


 本文介绍如何在Spring Boot项目中实现多数据源的动态切换,通过AOP技术实现读写分离,提高数据库访问效率。
前言:前面的一篇文章我们实现了mysql数据库的主从同步,那么这一篇开始我们用AOP来简单实现多数据源的动态切换;
要实现的功能:设置读数据库和写数据库,当查询数据的时候从读数据库读取,当插入数据的时候插入写数据库,读写数据库是主从关系,这样就可以实现读写分离了;
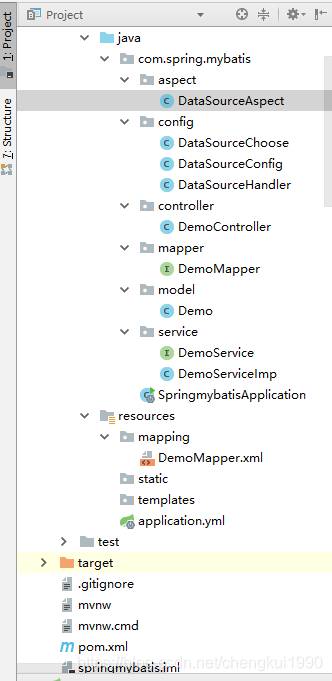
首先看一下我的项目目录结构,然后我们一步一步的实现:
1、配置读写数据源:既然是设置读写2个数据库,那么肯定是要配置2个数据库:
application.yml
server:
  port: 8080
spring:
  readdatasource:
    url: jdbc:mysql://localhost:3306/demo?useUnicode=true&characterEncoding=utf8
    username: root
    password: root
    driver-class-name: com.mysql.jdbc.Driver
    type: com.zaxxer.hikari.HikariDataSource #声明使用Hikari连接池
    hikari:
      minimum-idle: 5 #池中维护的最小空闲连接数
      maximum-pool-size: 15 #池中最大连接数
      auto-commit: true #自动提交从池中返回的连接
      idle-timeout:  50000 #连接允许在池中闲置的最长时间
      pool-name: DatebookHikariCP #线程池的名字
      max-lifetime: 1800000 #池中连接最长生命周期
      connection-timeout:  30000
  writedatasource:
    url: jdbc:mysql://192.168.xxx.129:3306/demo?useUnicode=true&characterEncoding=utf8
    username: root
    password: root
    driver-class-name: com.mysql.jdbc.Driver
    type: com.zaxxer.hikari.HikariDataSource #声明使用Hikari连接池
    hikari:
      minimum-idle: 5 #池中维护的最小空闲连接数
      maximum-pool-size: 15 #池中最大连接数
      auto-commit: true #自动提交从池中返回的连接
      idle-timeout:  50000 #连接允许在池中闲置的最长时间
      pool-name: DatebookHikariCP #线程池的名字
      max-lifetime: 1800000 #池中连接最长生命周期
      connection-timeout:  30000
mybatis:
  mapper-locations: classpath:mapping/*.xml  #等待来自池的连接的最大毫秒数
2、配置动态数据源DataSourceChoose:
package com.spring.mybatis.config;

import org.springframework.jdbc.datasource.lookup.AbstractRoutingDataSource;

/**
 *获取数据源,动态切换,我们要实现的是父类的determineCurrentLookupKey方法
 */
public class DataSourceChoose extends AbstractRoutingDataSource {

    /**
     * 动态获取数据源,返回的值等于targetDataSources map对象的key
     * @return
     */
    @Override
    protected Object determineCurrentLookupKey() {
        return DataSourceHandler.getDataSource();
    }
}
3、设置动态数据源的Configuration:
package com.spring.mybatis.config;

import com.zaxxer.hikari.HikariDataSource;
import org.springframework.beans.factory.annotation.Autowired;
import org.springframework.context.annotation.Bean;
import org.springframework.context.annotation.Configuration;
import org.springframework.context.annotation.Primary;
import org.springframework.core.env.Environment;

import javax.sql.DataSource;
import java.util.ArrayList;
import java.util.HashMap;
import java.util.List;
import java.util.Map;

@Configuration
public class DataSourceConfig {

    private final Environment environment;

    @Autowired
    public DataSourceConfig(Environment environment) {
        this.environment = environment;
    }

    @Bean("dynamicDataSource")
    @Primary
    public DataSource getDataSourceChoose() {
        DataSourceChoose dataSourceChoose = new DataSourceChoose();
        Map<Object, Object> map = new HashMap<Object, Object>();
        //读数据源
        HikariDataSource readDataSource = new HikariDataSource();
        readDataSource.setDriverClassName(environment.getProperty("spring.readdatasource.driver-class-name"));
        readDataSource.setJdbcUrl(environment.getProperty("spring.readdatasource.url"));
        readDataSource.setUsername(environment.getProperty("spring.readdatasource.username"));
        readDataSource.setPassword(environment.getProperty("spring.readdatasource.password"));
        readDataSource.setPoolName(environment.getProperty("spring.readdatasource.hikari.pool-name"));
        readDataSource.setAutoCommit(Boolean.getBoolean(environment.getProperty("spring.readdatasource.hikari.auto-commit")));
        readDataSource.setMaximumPoolSize(Integer.valueOf(environment.getProperty("spring.readdatasource.hikari.maximum-pool-size")));
        //写数据源
        HikariDataSource writeDataSource = new HikariDataSource();
        writeDataSource.setDriverClassName(environment.getProperty("spring.writedatasource.driver-class-name"));
        writeDataSource.setJdbcUrl(environment.getProperty("spring.writedatasource.url"));
        writeDataSource.setUsername(environment.getProperty("spring.writedatasource.username"));
        writeDataSource.setPassword(environment.getProperty("spring.writedatasource.password"));
        writeDataSource.setPoolName(environment.getProperty("spring.writedatasource.hikari.pool-name"));
        writeDataSource.setAutoCommit(Boolean.getBoolean(environment.getProperty("spring.writedatasource.hikari.auto-commit")));
        writeDataSource.setMaximumPoolSize(Integer.valueOf(environment.getProperty("spring.writedatasource.hikari.maximum-pool-size")));
        map.put("write", writeDataSource);
        map.put("read", readDataSource);
        //设置目标数据源
        dataSourceChoose.setTargetDataSources(map);
        //设置默认数据源
        dataSourceChoose.setDefaultTargetDataSource(readDataSource);
        return dataSourceChoose;
    }

    ;

}
4、配置数据原的Handler,ThreadLocal是线程私有的,所以可以存储数据源的key(关于ThreadLocal可以看我这篇文章:https://blog.csdn.net/chengkui1990/article/details/84822235)
package com.spring.mybatis.config;

/**
 * 数据源的handler类
 */
public class DataSourceHandler {

  private static final  ThreadLocal<String> threadLocal = new ThreadLocal();

    /**
     * 设置选取的数据源的key,这里key是write或者read
     * @param key
     */
    public static void setDataSource(String key){
        threadLocal.set(key);
    }

    public static String getDataSource(){
        return threadLocal.get();
    }
}
5、用AOP来实现数据源的动态选择,所以我们要配置一个Aspect来拦截DAO:
package com.spring.mybatis.aspect;

import com.spring.mybatis.config.DataSourceHandler;
import org.aspectj.lang.JoinPoint;
import org.aspectj.lang.annotation.Aspect;
import org.aspectj.lang.annotation.Before;
import org.aspectj.lang.annotation.Pointcut;
import org.springframework.context.annotation.EnableAspectJAutoProxy;
import org.springframework.stereotype.Component;

@EnableAspectJAutoProxy
@Aspect
@Component
public class DataSourceAspect {

    //切点
    @Pointcut("execution(* com.spring.mybatis.mapper.*.*(..))")
    private void pointCut() {
    }

    //前置通知
    @Before("pointCut()")
    public void before(JoinPoint point) {
        String methodName = point.getSignature().getName();
        //如果方法名以query开头,选择读数据库,如果方法名以insert开头,选择写数据库
        if (methodName.startsWith("query")) {
            DataSourceHandler.setDataSource("read");
        } else if (methodName.startsWith("insert")) {
            DataSourceHandler.setDataSource("write");
        } else {
            DataSourceHandler.setDataSource("read");
        }
    }


}
接下来就是Controller、Service、DAO等类了,直接粘代码不解释了!
DemoMapper.xml
<?xml version="1.0" encoding="UTF-8" ?>
<!DOCTYPE mapper PUBLIC "-//mybatis.org//DTD Mapper 3.0//EN" "http://mybatis.org/dtd/mybatis-3-mapper.dtd" >
<mapper namespace="com.spring.mybatis.mapper.DemoMapper">

    <sql id="select">
        id,content,create_datetime,is_delete
    </sql>

    <sql id="insert">
         (content,is_delete)
    </sql>

    <select id="queryUserById" parameterType="long" resultType="com.spring.mybatis.model.Demo">
        SELECT
          id,content as context,create_datetime as createTime,is_delete as isDelete
        FROM demo
        <where>
            <if test="id != null">
                id = #{id}
            </if>
        </where>
    </select>

    <insert id="insertUser">
        INSERT INTO demo
        <include refid="insert"/>
        VALUES (#{context},#{isDelete})
    </insert>
</mapper>
Service:
package com.spring.mybatis.service;

import com.spring.mybatis.model.Demo;
import org.apache.ibatis.annotations.Param;

public interface DemoService {

    Demo queryUserById(long id);

   String insertUser(String context, int isDelete);
}
Service实现:
package com.spring.mybatis.service;

import com.spring.mybatis.mapper.DemoMapper;
import com.spring.mybatis.model.Demo;
import org.springframework.beans.factory.annotation.Autowired;
import org.springframework.beans.factory.annotation.Qualifier;
import org.springframework.stereotype.Service;

import javax.sql.DataSource;

@Service
public class DemoServiceImp implements DemoService {

    @Autowired
    private DemoMapper demoMapper;

    @Override
    public Demo queryUserById(long id) {
        return demoMapper.queryUserById(id);
    }

    @Override
    public String insertUser(String context, int isDelete) {
        int result = demoMapper.insertUser(context,isDelete);
        if(result == 1){
            return "SUCCESS";
        }
        return "FAIL";
    }
}
实体Demo:
package com.spring.mybatis.model;


import java.util.Date;

public class Demo {

    private long id;

    private String context;

    private Date createTime;

    private int isDelete;

    public long getId() {
        return id;
    }

    public void setId(long id) {
        this.id = id;
    }

    public String getContext() {
        return context;
    }

    public void setContext(String context) {
        this.context = context;
    }

    public Date getCreateTime() {
        return createTime;
    }

    public void setCreateTime(Date createTime) {
        this.createTime = createTime;
    }

    public int getIsDelete() {
        return isDelete;
    }

    public void setIsDelete(int isDelete) {
        this.isDelete = isDelete;
    }
}
DAO:
package com.spring.mybatis.mapper;

import com.spring.mybatis.model.Demo;
import org.apache.ibatis.annotations.Param;
import org.springframework.stereotype.Repository;

@Repository
public interface DemoMapper {
    Demo queryUserById(@Param("id") long id);

    int insertUser(@Param("context")String context,@Param("isDelete") int isDelete);
}
Controller:
package com.spring.mybatis.controller;

import com.spring.mybatis.model.Demo;
import com.spring.mybatis.service.DemoService;
import org.springframework.beans.factory.annotation.Autowired;
import org.springframework.web.bind.annotation.GetMapping;
import org.springframework.web.bind.annotation.PathVariable;
import org.springframework.web.bind.annotation.RequestParam;
import org.springframework.web.bind.annotation.RestController;

@RestController
public class DemoController {

    @Autowired
    private DemoService demoService;

    /**
     * 查询数据,从读数据库
     * @param id
     * @return
     */
    @GetMapping(value = "/demo/queryUserById/{id}")
    private Demo queryUserById(@PathVariable(value = "id") long id){
        return demoService.queryUserById(id);
    }

    /**
     * 插入数据,从写数据库
     * @param context
     * @param isDelete
     * @return
     */
    @GetMapping(value = "/demo/insertuser")
    private String insertUser(@RequestParam("context") String context,@RequestParam("isDelete") int isDelete){
        return demoService.insertUser(context, isDelete);
    }
}
springBoot启动类:
package com.spring.mybatis;

import org.mybatis.spring.annotation.MapperScan;
import org.springframework.boot.SpringApplication;
import org.springframework.boot.autoconfigure.SpringBootApplication;

@SpringBootApplication(scanBasePackages = "com.spring.mybatis")
@MapperScan(basePackages = "com.spring.mybatis.mapper")
public class SpringmybatisApplication {

    public static void main(String[] args) {
        SpringApplication.run(SpringmybatisApplication.class, args);
    }

}
最后再贴一下pom.xml,有的依赖可以不要:
<?xml version="1.0" encoding="UTF-8"?>
<project xmlns="http://maven.apache.org/POM/4.0.0" xmlns:xsi="http://www.w3.org/2001/XMLSchema-instance"
	xsi:schemaLocation="http://maven.apache.org/POM/4.0.0 http://maven.apache.org/xsd/maven-4.0.0.xsd">
	<modelVersion>4.0.0</modelVersion>
	<parent>
		<groupId>org.springframework.boot</groupId>
		<artifactId>spring-boot-starter-parent</artifactId>
		<version>2.1.1.RELEASE</version>
		<relativePath/> <!-- lookup parent from repository -->
	</parent>
	<groupId>com.example</groupId>
	<artifactId>demo</artifactId>
	<version>0.0.1-SNAPSHOT</version>
	<packaging>jar</packaging>
	<name>springmybatis</name>
	<description>Demo project for Spring Boot</description>

	<properties>
		<java.version>1.8</java.version>
	</properties>

	<dependencies>
		<dependency>
			<groupId>org.springframework.boot</groupId>
			<artifactId>spring-boot-starter-jdbc</artifactId>
		</dependency>
		<dependency>
			<groupId>org.springframework.boot</groupId>
			<artifactId>spring-boot-starter-web</artifactId>
		</dependency>
		<dependency>
			<groupId>org.mybatis.spring.boot</groupId>
			<artifactId>mybatis-spring-boot-starter</artifactId>
			<version>1.3.2</version>
		</dependency>

		<dependency>
			<groupId>mysql</groupId>
			<artifactId>mysql-connector-java</artifactId>
			<version>5.1.35</version>
			<scope>runtime</scope>
		</dependency>
		<dependency>
			<groupId>org.springframework.boot</groupId>
			<artifactId>spring-boot-starter-test</artifactId>
			<scope>test</scope>
		</dependency>

        <!-- 配置tomcat数据源-->
		<dependency>
			<groupId>org.apache.tomcat</groupId>
			<artifactId>tomcat-jdbc</artifactId>
		</dependency>


		<!-- https://mvnrepository.com/artifact/org.springframework/spring-aop -->
		<dependency>
			<groupId>org.springframework</groupId>
			<artifactId>spring-aop</artifactId>
			<version>5.1.3.RELEASE</version>
		</dependency>

		<dependency>
			<groupId>org.springframework</groupId>
			<artifactId>spring-aspects</artifactId>
			<version>5.1.3.RELEASE</version>
		</dependency>
	</dependencies>

	<build>
		<plugins>
			<plugin>
				<groupId>org.springframework.boot</groupId>
				<artifactId>spring-boot-maven-plugin</artifactId>
			</plugin>
		</plugins>
	</build>
</project>
测试:
查询数据:

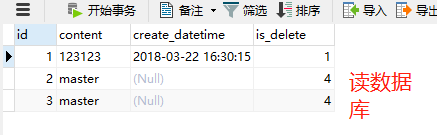
插入数据:


 1976
1976

 被折叠的 条评论
为什么被折叠?
被折叠的 条评论
为什么被折叠?
 到【灌水乐园】发言


