


14.1 NFS介绍
NFS是Network File System的缩写。
这个文件系统是基于网络层面的,需要借助网络实现数据同步。
NFS最早由Sun公司开发,分234三个版本,23由Sum起草开发,4.0开始由Netapp公司参与并主导开发,最新为4.1版本。
NFS数据传输基于RPC协议,RPC为Remote Procedure Call的简写。服务端和客户端不能直接通信,需要借助PRC协议。
NFS应用场景是:
- ABC三台机器上需要保证被访问到的文件是一样的,A共享数据出来,BC分别去挂载A共享的数据目录,从而BC访问到的数据和A上的能够保持一致。
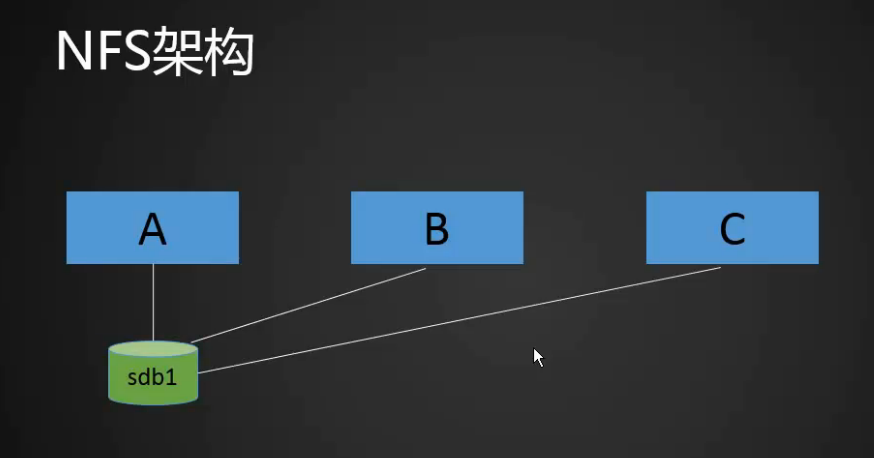
比如只有A提供服务可能会负载较高,我们可以用BC做负载均衡,为了获取到相同的数据并且实现同步,就可以使用NFS架构。
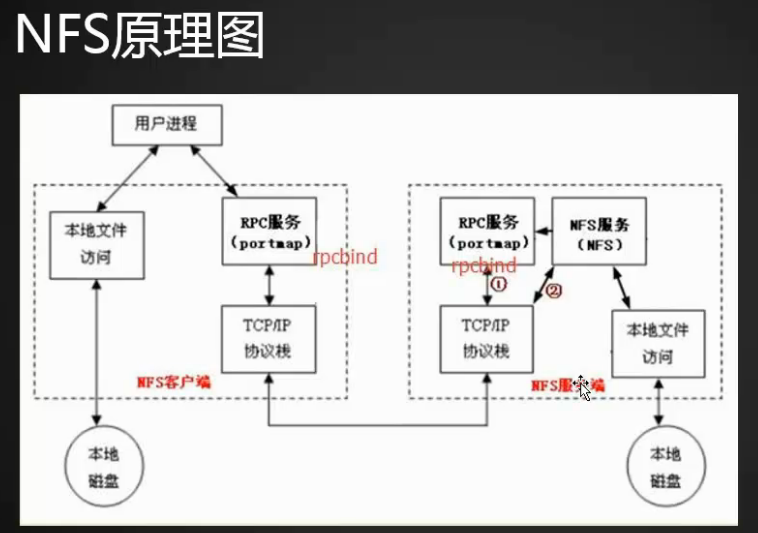
rpc协议由rpcbind这个服务实现的。centos5以及之前版本叫做portmap。这个服务会监听111端口,而rpc协议不会监听端口,通信使用的是TCP/IP协议栈,最终实现数据的传输。
总之,NFS服务要借助PRC协议通信。
14.2 NFS服务端安装配置
下面我们来安装配置一下rpcbind。
先准备两台虚拟机,模拟服务端(192.168.127.101)和客户端(192.168.127.102)。
首先在服务端上安装两个包nfs-utils和rpcbind,
[root@localhost: ~]# yum install -y nfs-utils rpcbind
在客户端上也需要安装nfs-utils这个包。
[root@localhost: ~]# yum install -y nfs-utils
rpcbind写不写都会被安装上,这个是nfs的依赖。
在服务端的/etc/exports文件中写入配置
[root@localhost: ~]# vim /etc/exports
[root@localhost: ~]# cat /etc/exports
/home/nfstestdir 192.168.127.0/24(rw,sync,all_squash,anonuid=1000,anongid=1000)
NFS挂载选项下一节再讲。
保存配置之后,创建目录,更改为777权限方便实验。
[root@localhost: ~]# mkdir /home/nfstestdir
[root@localhost: ~]# chmod 777 /home/nfstestdir/
启动服务
[root@localhost: ~]# netstat -lnpt
Active Internet connections (only servers)
Proto Recv-Q Send-Q Local Address           Foreign Address         State       PID/Program name
tcp        0      0 0.0.0.0:111             0.0.0.0:*               LISTEN      597/rpcbind
tcp        0      0 0.0.0.0:22              0.0.0.0:*               LISTEN      952/sshd
tcp        0      0 127.0.0.1:25            0.0.0.0:*               LISTEN      1305/master
tcp6       0      0 :::3306                 :::*                    LISTEN      1265/mysqld
tcp6       0      0 :::111                  :::*                    LISTEN      597/rpcbind
tcp6       0      0 :::22                   :::*                    LISTEN      952/sshd
tcp6       0      0 ::1:25                  :::*                    LISTEN      1305/master
rpcbind会自动给你启动,监听111端口,
启动nfs服务
[root@localhost: ~]# systemctl start nfs
[root@localhost: ~]# ps aux | grep nfs
root      5916  0.0  0.0      0     0 ?        S<   15:17   0:00 [nfsd4_callbacks]
root      5922  0.0  0.0      0     0 ?        S    15:17   0:00 [nfsd]
root      5923  0.0  0.0      0     0 ?        S    15:17   0:00 [nfsd]
root      5924  0.0  0.0      0     0 ?        S    15:17   0:00 [nfsd]
root      5925  0.0  0.0      0     0 ?        S    15:17   0:00 [nfsd]
root      5926  0.0  0.0      0     0 ?        S    15:17   0:00 [nfsd]
root      5927  0.0  0.0      0     0 ?        S    15:17   0:00 [nfsd]
root      5928  0.0  0.0      0     0 ?        S    15:17   0:00 [nfsd]
root      5929  0.0  0.0      0     0 ?        S    15:17   0:00 [nfsd]
root      5934  0.0  0.0 112712   976 pts/0    S+   15:17   0:00 grep --color=auto nfs
rpc的关联服务也会随之启动
[root@localhost: ~]# ps aux | grep rpc
rpc        597  0.0  0.0  69220  1428 ?        Ss   11:47   0:00 /sbin/rpcbind -w
rpcuser   5886  0.0  0.0  44504  1828 ?        Ss   15:17   0:00 /usr/sbin/rpc.statd
root      5887  0.0  0.0      0     0 ?        S<   15:17   0:00 [rpciod]
root      5893  0.0  0.0  19360   404 ?        Ss   15:17   0:00 /usr/sbin/rpc.idmapd
root      5904  0.0  0.0  42608   948 ?        Ss   15:17   0:00 /usr/sbin/rpc.mountd
root      5937  0.0  0.0 112712   976 pts/0    S+   15:18   0:00 grep --color=auto rpc
服务端设置开机启动
[root@localhost: ~]# systemctl enable nfs
Created symlink from /etc/systemd/system/multi-user.target.wants/nfs-server.service to /usr/lib/systemd/system/nfs-server.service.
14.3 NFS配置选项
- rw 读写
- ro 只读
- sync 同步模式,内存数据实时写入磁盘
- async 非同步模式,定时刷入道磁盘,断电可能会丢失数据
- no_root_squash 客户端挂载NFS共享目录后root用户不受约束,权限很大,相当于本地目录。
- root_squash 客户端上的root用户受到约束,被限定为一个普通用户
- all_squash 客户端上所有用户都在使用NFS共享目录时候被限定为一个普通用户
- anonuid/anongid和上面几个选项搭配使用,定义被限定用户的uid和gid
客户端向服务端请求列出所有可以提供nfs的目录
[root@localhost: ~]# showmount -e 192.168.127.101
Export list for 192.168.127.101:
/home/nfstestdir 192.168.127.0/24
如果请求被拒绝了,可以先把防火墙和selinux关掉,因为除了111端口,rpc服务还可能使用别的端口,用作其他用途。比如下列mountd服务使用的20048端口。
[root@localhost: ~]# netstat -lnpt
Active Internet connections (only servers)
Proto Recv-Q Send-Q Local Address           Foreign Address         State       PID/Program name
tcp        0      0 0.0.0.0:2049            0.0.0.0:*               LISTEN      -
tcp        0      0 0.0.0.0:111             0.0.0.0:*               LISTEN      646/rpcbind
tcp        0      0 0.0.0.0:20048           0.0.0.0:*               LISTEN      985/rpc.mountd
挂载命令依然是mount
[root@localhost: ~]# mount -t nfs 192.168.127.101:/home/nfstestdir /mnt
[root@localhost: ~]# df -h
Filesystem                        Size  Used Avail Use% Mounted on
/dev/sda3                          16G   11G  5.4G  67% /
devtmpfs                          1.9G     0  1.9G   0% /dev
tmpfs                             1.9G     0  1.9G   0% /dev/shm
tmpfs                             1.9G  8.7M  1.9G   1% /run
tmpfs                             1.9G     0  1.9G   0% /sys/fs/cgroup
/dev/sda1                         197M  157M   40M  80% /boot
tmpfs                             379M     0  379M   0% /run/user/0
192.168.127.101:/home/nfstestdir   16G   11G  5.4G  67% /mnt
创建一个文件,
服务端:

[root@localhost: ~]# ll /home/nfstestdir/
total 0
-rw-r--r-- 1 nfsnobody nfsnobody 0 Aug 28 22:21 test
-rw-r--r-- 1 nfsnobody nfsnobody 0 Aug 28 22:37 test1
-rw-r--r-- 1 lhy01     lhy01     0 Aug 28 22:38 test2


客户端:

[root@localhost: mnt]# ll
total 0
-rw-r--r-- 1 nfsnobody root 0 Aug 28 22:21 test
[root@localhost: mnt]# ls
test
[root@localhost: mnt]# touch test1
[root@localhost: mnt]# ll
total 0
-rw-r--r-- 1 nfsnobody nfsnobody 0 Aug 28 22:21 test
-rw-r--r-- 1 nfsnobody nfsnobody 0 Aug 28 22:37 test1
[root@localhost: mnt]# touch test2
[root@localhost: mnt]# ll
total 0
-rw-r--r-- 1 nfsnobody nfsnobody 0 Aug 28 22:21 test
-rw-r--r-- 1 nfsnobody nfsnobody 0 Aug 28 22:37 test1
-rw-r--r-- 1 lhy01     lhy01     0 Aug 28 22:38 test2
也就是说,你在客户端上挂载的nfs的目录,登入的是服务端上的某一个用户,由exports文件指定。


 811
811

 被折叠的 条评论
为什么被折叠?
被折叠的 条评论
为什么被折叠?
 到【灌水乐园】发言


