


前言
相信大家都见过一些购物app的折扣价会带有下划线,这个是怎么弄出来的呢?有的人可能会想到直接在上面加个宽度为1的view,但是这样做并不是一个好办法,你或许会添加N多这样的view,最好的方法就是自己自定义个带有下划线的UILable,这是一个简单的自定义控件,大神自行飘过,纯粹为了锻炼写作能力,不喜勿喷。谢谢!希望可以给读者一些自定义空间的启示, 此控件可以直接带走使用,水平有限,如果有什么错误,望指正。废话不说,直接写代码。
首先先自定义一个继承于UILable的类UnderlineLable.h,里面包含三个属性,分别可以设置下划线的一些属性
//
//  UnderlineLable.h
//  huya_zzyong
//
//  Created by zzyong on 16/3/3.
//  Copyright © 2016年 zzyong. All rights reserved.
//
#import <UIKit/UIKit.h>

typedef enum {
    UnderlineTypeLine,
    UnderlineTypeX
} UnderlineType;

@interface UnderlineLable : UILabel

//下划线颜色
@property (nonatomic ,strong) UIColor *underlineColour;
//下划线宽度
@property (nonatomic ,assign) CGFloat underlineWidth;
//下划线的样式
@property (nonatomic ,assign) UnderlineType underlineType;

@end
接着就在- (void)drawRect:(CGRect)rect 方法进行画线,记住一定要调用父类的drawRect方法
//
//  UnderlineLable.m
//  huya_zzyong
//
//  Created by zzyong on 16/3/3.
//  Copyright © 2016年 zzyong. All rights reserved.
//
#import "UnderlineLable.h"
@interface UnderlineLable (){
    CGContextRef _context;
}
@end
@implementation UnderlineLable
- (void)setUnderlineColour:(UIColor *)underlineColour{
    _underlineColour = underlineColour;
    [self setNeedsDisplay];
}
- (void)setUnderlineWidth:(CGFloat)underlineWidth{
    _underlineWidth = underlineWidth;
    [self setNeedsDisplay];
}
- (void)setAttributedText:(NSAttributedString *)attributedText{
    [super setAttributedText:attributedText];
    [self setNeedsDisplay];
}
- (void)setText:(NSString *)text{
    [super setText:text];
    [self setNeedsDisplay];
}
- (void)setUnderlineType:(UnderlineType)underlineType{
    _underlineType = underlineType;
    [self setNeedsDisplay];
}
- (void)drawRect:(CGRect)rect{
    //记住调用父类的此方法,不然无法将无法显示文字
    [super drawRect:rect];

    // 创建图形上下文
    _context = UIGraphicsGetCurrentContext();

    // 开启图形上下文
    CGContextBeginPath(_context);

    // 设置下划线颜色
    CGContextSetStrokeColorWithColor(_context, _underlineColour ? _underlineColour.CGColor : [UIColor blackColor].CGColor);

    // 设置下划线的宽度
    CGContextSetLineWidth(_context, _underlineWidth ? _underlineWidth : 1);

    // 设置下划线的线型
    CGContextSetLineCap(_context, kCGLineCapRound);

    //设置下划线样式
    if (_underlineType) {//x线
        [self drawLineWithBeginPoint:CGPointMake(0, 0) endPoint:CGPointMake(rect.size.width, rect.size.height)];
        [self drawLineWithBeginPoint:CGPointMake(0, rect.size.height) endPoint:CGPointMake(rect.size.width, 0)];
    }else{//横线
        [self drawLineWithBeginPoint:CGPointMake(0, rect.size.height * 0.5) endPoint:CGPointMake(rect.size.width, rect.size.height * 0.5)];
    }
}
- (void)drawLineWithBeginPoint:(CGPoint )start endPoint:(CGPoint )end{
    // 设置起点
    CGContextMoveToPoint(_context, start.x,start.y);
    // 设置下一个连接点
    CGContextAddLineToPoint(_context, end.x, end.y);
    // 画图
    CGContextStrokePath(_context);
}
@end
至此就完成了带下划线的lable,看看效果
    UnderlineLable *lableView = [[UnderlineLable alloc] init];
    lableView.textAlignment = NSTextAlignmentCenter;
    lableView.frame = CGRectMake(100, 100, 100, 50);
    lableView.text = @"$1000 zzyong";
    lableView.textColor = [UIColor grayColor];
    lableView.underlineWidth = 1;
    lableView.underlineType = UnderlineTypeLine;
    [lableView sizeToFit];
    [self.view addSubview:lableView];

    UnderlineLable *lableView2 = [[UnderlineLable alloc] init];
    lableView2.textAlignment = NSTextAlignmentCenter;
    lableView2.frame = CGRectMake(100, 200, 100, 50);
    lableView2.text = @"$1000 zzyong";
    lableView2.textColor = [UIColor grayColor];
    lableView2.underlineColour = [UIColor redColor];
    lableView2.underlineWidth = 1;
    lableView2.underlineType = UnderlineTypeLine;
    [lableView2 sizeToFit];
    [self.view addSubview:lableView2];

    UnderlineLable *lableView1 = [[UnderlineLable alloc] init];
    lableView1.textAlignment = NSTextAlignmentCenter;
    lableView1.frame = CGRectMake(100, 300, 100, 50);
    lableView1.text = @"$1000 zzyong";
    lableView1.textColor = [UIColor grayColor];
    lableView1.underlineWidth = 1;
    lableView1.underlineType = UnderlineTypeX;
    [lableView1 sizeToFit];
    [self.view addSubview:lableView1];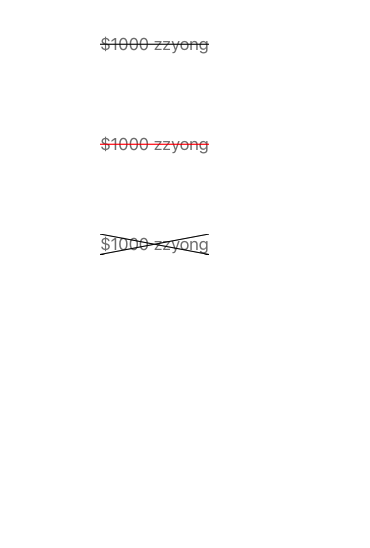


 455
455

 被折叠的 条评论
为什么被折叠?
被折叠的 条评论
为什么被折叠?
 到【灌水乐园】发言


