


放大镜功能
我们有时候需要实现这样一种效果:

当我的鼠标移动上去的时候,实现预览放大。鼠标移走之后,放大效果就消失了
我们今天就研究如何实现这样的功能
Vue.js
Vue是现在最流行的前端框架之一,如果看这篇博客的你还是仅仅只会JavaScript和jQuary的话,你可能要落伍了,因为你的武器不够先进。
Vue的简单程度,超乎你的想象,下面我就向大家演示如何使用Vue实现这个效果:
代码实现
首先我们先把代码给大家看一下,本代码是用Vue.js实现的。
<!DOCTYPE html>
<html>
	<head>
		<meta charset="utf-8">
		<title></title>
		<script src="https://cdn.jsdelivr.net/npm/vue@2.6.14/dist/vue.js"></script>
		<style>
			.imgBox {
				position: relative;
				width: 300px;
				height: 300px;
				background: url(img/detail_07.png) no-repeat;
				background-position: 0px 0px;
				background-size: 100%;
			}

			.imgBox .grey {
				position: absolute;
				width: 100px;
				height: 100px;
				background-color: rgba(200, 200, 200, 0.5);
			}
			.bigbox{
				position: absolute;
				top: 50%;
				left: 50%;
				width: 500px;
				height: 500px;
				background: url(img/detail_07.png) no-repeat;
				background-size: 300%;
				transform: translate(-50%,-50%);
			}
		</style>
	</head>
	<body>
		<div id="app">
			<div class="imgBox" @mouseenter="show()" @mouseleave="hide()" @mousemove="move($event)">
				<div class="grey" :style="'top:'+y+'px;'+'left:'+x+'px;'+'display:'+display"></div>
			</div>
			<div v-if="cansee" class="bigbox" :style="'background-position:'+'-'+tx+'px '+'-'+ty+'px'"></div>
		</div>
		<script>
			var app = new Vue({
				el: '#app',
				//初始化页面数据
				data() {
					return {
						x: 0,
						y: 0,
						tx:0,
						ty:0,
						cansee:false,
						display:'none'
					}
				},
				//触发函数
				methods: {
					move: function(e) {
						let {
							x,
							y
						} = e
						x = x - 50
						y = y - 50
						// 边界值判断
						if (x < 0) {
							x = 0
						}
						if (y < 0) {
							y = 0
						}
						if (x > 200) {
							x = 200
						}
						if (y > 200) {
							y = 200
						}
						this.x = x
						this.y = y
						this.tx=(3*x)*(500/300)
						this.ty=(3*y)*(500/300)
					},
					show: function() {
						this.display='block'
						this.cansee=true
					},
					hide: function() {
						this.display='none'
						this.cansee=false
					}
				}
			})
		</script>
	</body>
</html>
Vue的特点不是操作DOM层,它是实现数据层和视图层的双向绑定,换句话说就是你的数据层变化了,你不用管视图层,Vue会自动帮你渲染
好了推销了很长时间Vue接下来我们就来讲解一下我们的实现思路
我们的思路就是利用background-position属性进行图片部分显示,利用background-size进行放大。
不过对于放大,这个可需要一定的数学基础。因为放大前和放大后的东西是成比例的,而且我们要保证位置的精准对应。
代码解读
1.放大比例的计算
注意哈,我们的放大比例不是随便写的,这个放大比例取决于灰色悬浮色块和imgbox的宽度之比。
如果你写的的放大比例不等于这个,而是你自己想随便写的话,那么最后放大的区域和放大镜放置的区域是对应不上的

注意看这里我写css的细节:
.imgBox {
	position: relative;
	width: 300px;
	height: 300px;
	background: url(img/detail_07.png) no-repeat;
	background-position: 0px 0px;
	background-size: 100%;
}

.imgBox .grey {
	position: absolute;
	width: 100px;
	height: 100px;
	background-color: rgba(200, 200, 200, 0.5);
}
我灰色色块宽度是100px,而我们imgbox的大小是300px。那么我这么写的话,那我的放大倍数已经确定了,是多少呢,3倍!
请继续看我的css代码:
.bigbox{
	position: absolute;
	top: 50%;
	left: 50%;
	width: 500px;
	height: 500px;
	background: url(img/detail_07.png) no-repeat;
	background-size: 300%;
	transform: translate(-50%,-50%);
}
注意这一行:
background-size:300%
这里我放大了3倍,必须放大3倍,因为我的放大镜的宽度是100px,小图片盒子大小是300px,这个比例是3,已经固定了。
如果这里对应不上的话,就会出现显示区域和放大区域对应不上的怪现象
请看图:
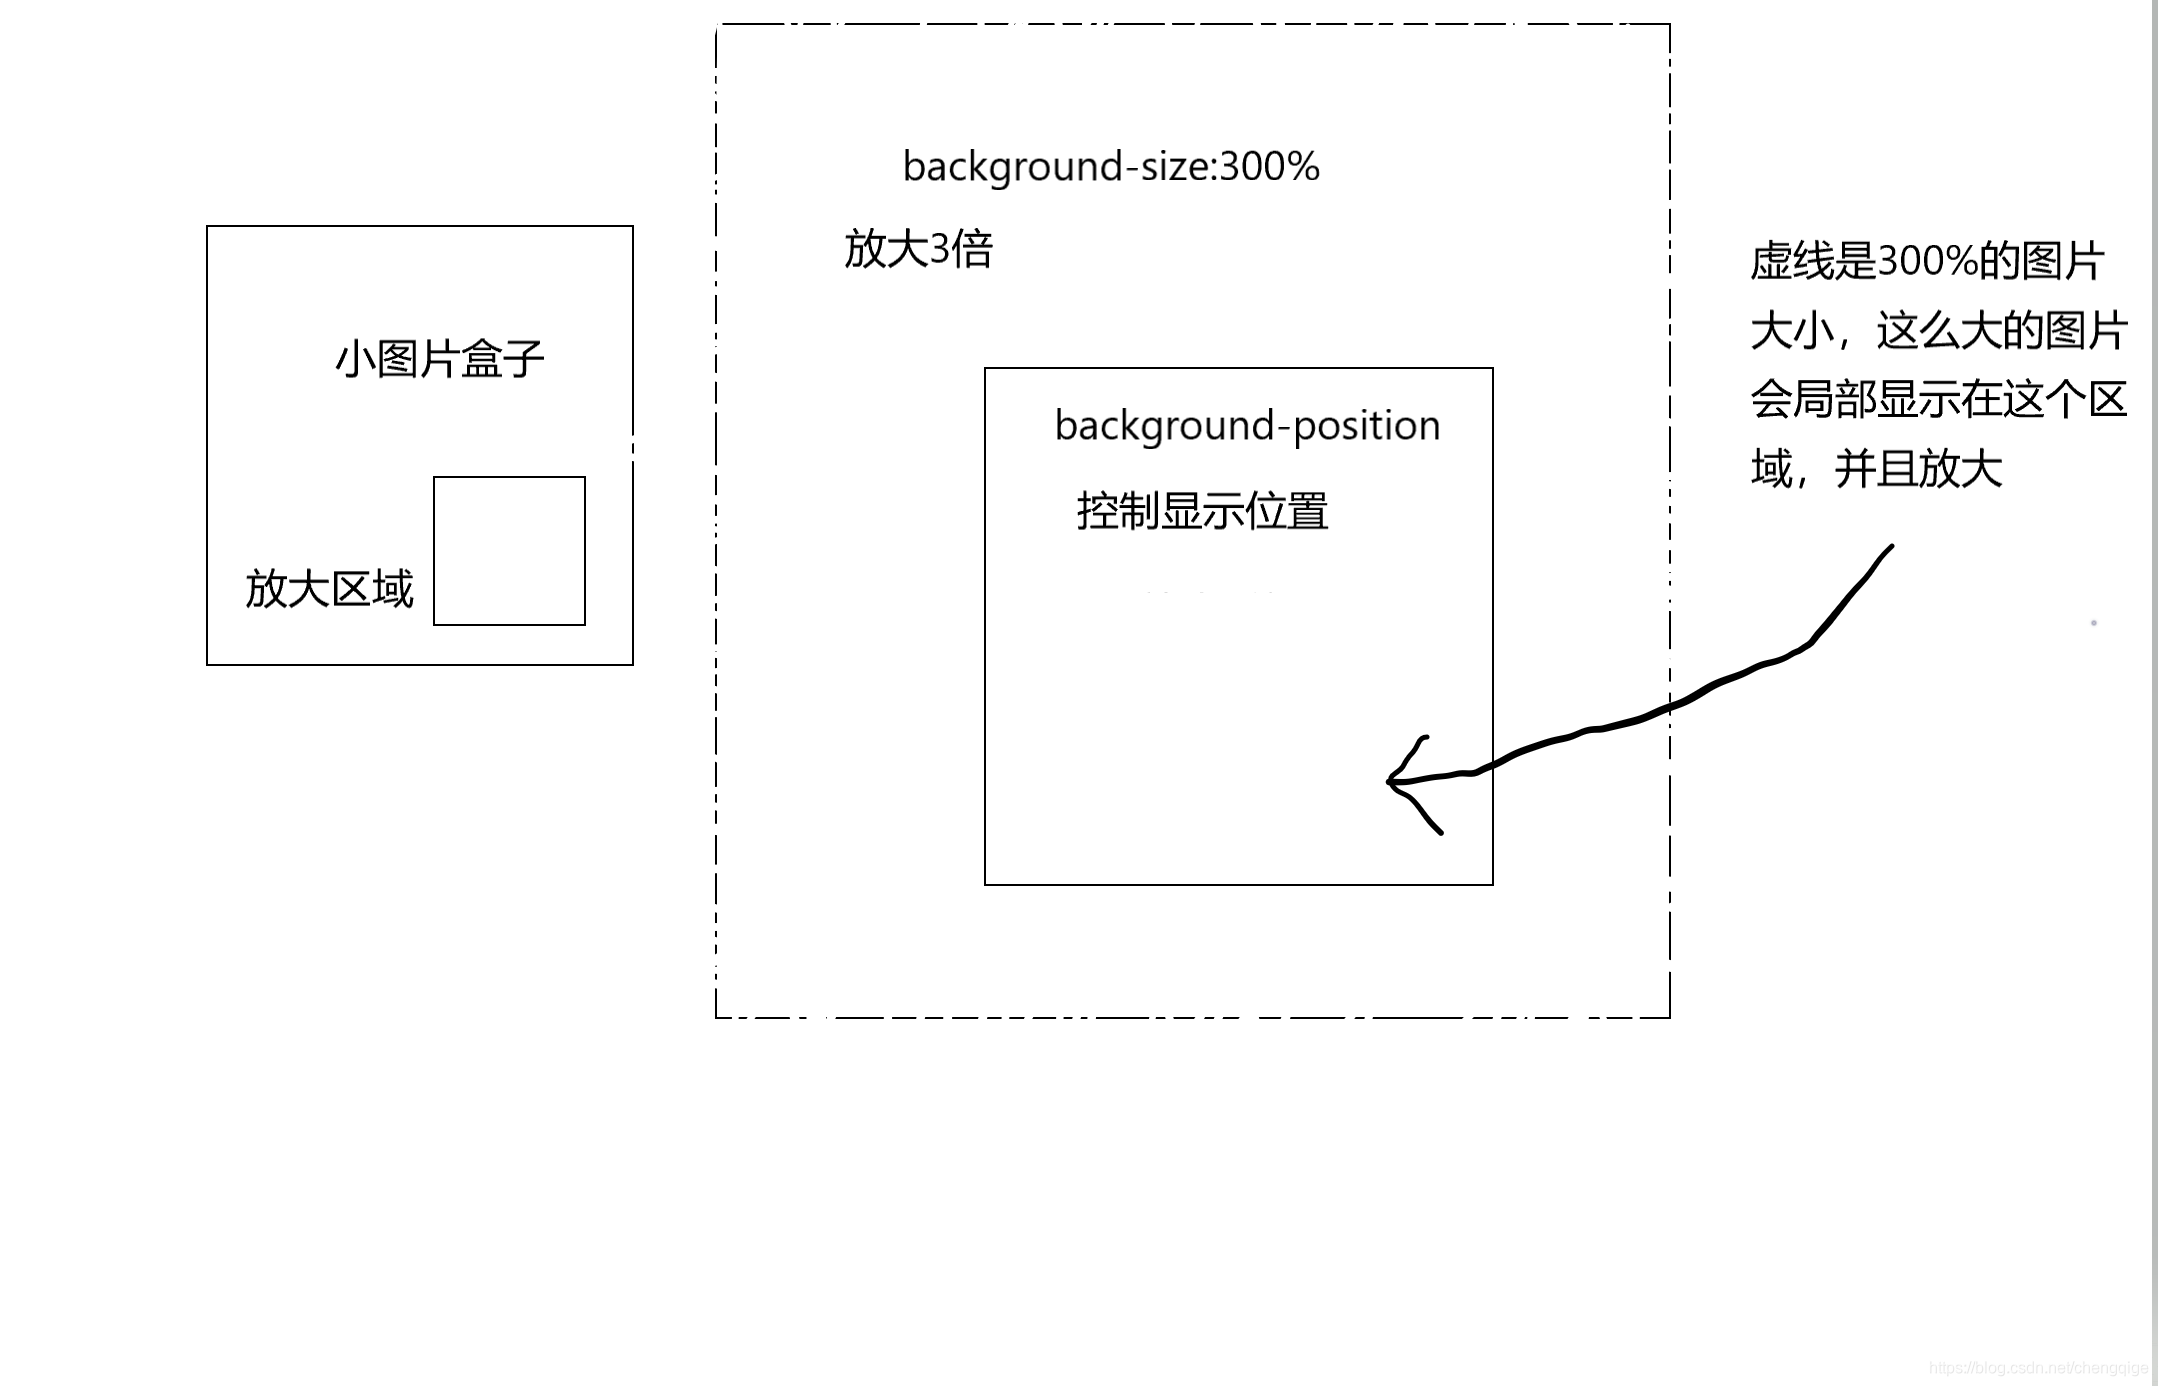
理解这里的话,你想想放大后的大正方形和显示区域的比例,必须和小的对应上才行,不然怎么可能完全对应呢?
2.图片显示位置参数
很多搞前端的小伙伴,我发现对background-position这个属性还不是很了解,其实这个属性很好用的。
这个属性是干什么用的呢?就是你设置背景图片的时候,默认呢图片是在容器的左上角,你不能改变显示背景图片的位置是吧。
那么background-position这个属性就很有用了,他主要是控制图片显示的位置的。放大镜的实现当然需要这个功能
这个属性取负值的话,就可以用margin取负数值理解
对应的代码片段:
<div v-if="cansee" class="bigbox" :style="'background-position:'+'-'+tx+'px '+'-'+ty+'px'"></div>
3.大图片位置截取
问一个问题,放大镜是什么?就是把原来图片的尺寸设置成300%(都可以),然后再截取对应位置区域的图就可以了。没错这就是放大镜
这个截取的位置涉及到数学计算,看看你数学学得怎么样吧
看图:

这里的x,和y,就是换算后的坐标,也就是说是放大后的相对坐标
对应的代码
//换算坐标
//由小图片的坐标,换算到大图坐标
move: function(e) {
	let {
		x,
		y
	} = e
	//为什么要减去50,因为我想让灰色宽(放大区域部分)显示在鼠标光标之间,所以向左移动半个灰色块长度
	x = x - 50
	//所以向上移动半个灰色快长度
	y = y - 50
	// 边界值判断
	if (x < 0) {
		x = 0
	}
	if (y < 0) {
		y = 0
	}
	if (x > 200) {
		x = 200
	}
	if (y > 200) {
		y = 200
	}
	this.x = x
	this.y = y
	this.tx=(3*x)*(500/300)
	this.ty=(3*y)*(500/300)
},
4.视图层渲染,数据双向绑定
大家可以看到,我的HTML代码里有很多变量
<div id="app">
	<div class="imgBox" @mouseenter="show()" @mouseleave="hide()" @mousemove="move($event)">
		<div class="grey" :style="'top:'+y+'px;'+'left:'+x+'px;'+'display:'+display"></div>
	</div>
	<div v-if="cansee" class="bigbox" :style="'background-position:'+'-'+tx+'px '+'-'+ty+'px'">
</div>
比如说x、y、display这些,记住这些我们只要在Vue中给他们赋值,视图层马上就变化了,非常方便,所以我们只需要考虑逻辑计算,视图渲染和同步交给我们的Vue.js
数据计算
var app = new Vue({
	el: '#app',
	//初始化页面数据
	data() {
		return {
			x: 0,
			y: 0,
			tx:0,
			ty:0,
			cansee:false,
			display:'none'
		}
	},
	//触发函数
	methods: {
		move: function(e) {
			let {
				x,
				y
			} = e
			x = x - 50
			y = y - 50
			// 边界值判断
			if (x < 0) {
				x = 0
			}
			if (y < 0) {
				y = 0
			}
			if (x > 200) {
				x = 200
			}
			if (y > 200) {
				y = 200
			}
			//直接赋值,触发视图层更新,Vue自动更新视图层
			this.x = x
			this.y = y
			this.tx=(3*x)*(500/300)
			this.ty=(3*y)*(500/300)
		},
		show: function() {
			this.display='block'
			this.cansee=true
		},
		hide: function() {
			this.display='none'
			this.cansee=false
		}
	}
})
代码全部讲解完毕了,如果你想学习Vue.js,我有我自己做的网盘,上面有我的Vue笔记


 3950
3950

 被折叠的 条评论
为什么被折叠?
被折叠的 条评论
为什么被折叠?
 到【灌水乐园】发言


