


Linux环境:Centos6.8 64-bit
RabbitMQ版本:v3.6.6
RabbitMQ机器:192.168.2.242、192.168.2.243、192.168.2.244
Haproxy版本:v1.6.4
Haproxy机器:192.168.2.241
一、RabbitMQ的安装
1、安装erlang
[root@localhost Downloads]# wget http://www.rabbitmq.com/releases/erlang/erlang-18.3.4.4-1.el6.x86_64.rpm

[root@localhost Downloads]# rpm -ivh erlang-18.3.4.4-1.el6.x86_64.rpm
2、安装rabbitmq
[root@localhost Downloads]# wget http://www.rabbitmq.com/releases/rabbitmq-server/v3.6.6/rabbitmq-server-3.6.6-1.el6.noarch.rpm

[root@localhost Downloads]# rpm -ivh rabbitmq-server-3.6.6-1.el6.noarch.rpm

出现如下错误:
warning: rabbitmq-server-3.6.6-1.el6.noarch.rpm: Header V4 RSA/SHA1 Signature, key ID 6026dfca: NOKEY
error: Failed dependencies:
	socat is needed by rabbitmq-server-3.6.6-1.el6.noarch

解决:
[root@localhost Downloads]# yum install socat

出现如下错误:
No package socat available.
Error: Nothing to do

解决:
[root@localhost Downloads]# wget --no-cache http://www.convirture.com/repos/definitions/rhel/6.x/convirt.repo -O /etc/yum.repos.d/convirt.repo
再执行 yum  install socat

再执行安装命令
[root@localhost Downloads]# rpm -ivh rabbitmq-server-3.6.6-1.el6.noarch.rpm
warning: rabbitmq-server-3.6.6-1.el6.noarch.rpm: Header V4 RSA/SHA1 Signature, key ID 6026dfca: NOKEY
Preparing...                ########################################### [100%]
   1:rabbitmq-server        ########################################### [100%]
3、启动rabbitmq
[root@localhost bin]# pwd
/usr/lib/rabbitmq/bin
[root@localhost bin]# rabbitmq-server start

              RabbitMQ 3.6.6. Copyright (C) 2007-2016 Pivotal Software, Inc.
  ##  ##      Licensed under the MPL.  See http://www.rabbitmq.com/
  ##  ##
  ##########  Logs: /var/log/rabbitmq/rabbit@localhost.log
  ######  ##        /var/log/rabbitmq/rabbit@localhost-sasl.log
  ##########
              Starting broker...
 completed with 6 plugins.

或者:
[root@localhost bin]# service rabbitmq-server start
4、启用web管理界面
[root@localhost init.d]# cd /usr/lib/rabbitmq/bin/
[root@localhost bin]# ./rabbitmq-plugins enable rabbitmq_management
5、访问管理界面
http://192.168.2.242:15672/ 能出现管理界面的时候就表示插件已经成功安装,但是,需要创建用户之后才能登录,接下来看看一些常用的命令。
6、常用命令
#添加虚拟主机
[root@localhost bin]# ./rabbitmqctl add_vhost {vhostname}

# 查看所有虚拟主机
[root@localhost bin]# ./rabbitmqctl list_vhosts

# 删除虚拟主机
[root@localhost bin]# ./rabbitmqctl delete_vhost {vhostname}

# 添加用户
[root@localhost bin]# ./rabbitmqctl add_user {username} {password}

# 查看用户列表
[root@localhost bin]# ./rabbitmqctl list_users

# 删除用户
[root@localhost bin]# ./rabbitmqctl delete_user {username}

# 修改用户密码
[root@localhost bin]# ./rabbimqctl change_password {username} {newpassword}

# 设定用户所属角色(1、administrator,2、monitoring, 3、management)
[root@localhost bin]# ./rabbitmqctl set_user_tags test monitoring

# 开启某个插件(重启服务器后生效)
[root@localhost bin]# ./rabbitmq-plugins enable pluginname

# 关闭某个插件(重启服务器后生效)
[root@localhost bin]# ./rabbitmq-plugins disable pluginname

# 权限管理(set_permissions [-pvhostpath] {user} {conf} {write} {read})
# conf:一个正则表达式match哪些配置资源能够被该用户访问。
# write:一个正则表达式match哪些配置资源能够被该用户写。
# read:一个正则表达式match哪些配置资源能够被该用户读。
[root@localhost bin]# ./rabbitmqctl set_permissions -p vhost_name username ".*" ".*" ".*"

# 查看服务器状态信息
[root@localhost bin]# ./rabbitmqctl status

# 查看队列列表
[root@localhost bin]# ./rabbitmqctl list_queues

# 关闭应用
[root@localhost bin]# ./rabbitmqctl stop_app

# 启动应用
[root@localhost bin]# ./rabbitmqctl start_app

# 清除所有队列
[root@localhost bin]# ./rabbitmqctl reset

# 查看某个vhost里的队列
[root@localhost bin]# ./rabbitmqctl list_queues -p vhost_name

# 清除用户权限
[root@localhost bin]# ./rabbitmqctl clear_permissions -p vhostname username

# 列出虚拟主机上的所有权限
[root@localhost bin]# ./rabbitmqctl list_permissions -p vhostpath

# 列出用户权限
[root@localhost bin]# ./rabbitmqctl list_user_permissions username
7、日志配置,创建配置文件目录
#必须是在/etc/rabbitmq目录下
[root@localhost ~]# cd /etc/rabbitmq
[root@localhost rabbitmq]#touch /etc/rabbitmq/rabbitmq-env.conf
RABBITMQ_LOG_BASE=/var/log/rabbitmq

[root@localhost rabbitmq]#touch /etc/rabbitmq/rabbitmq.config
8、一些问题
8.1、执行rabbitmqctc list_users出现如下错误
Error: unable to connect to node rabbit@localhost: nodedown
解决:服务没启动成功,具体的看看日志输出什么问题,再解决
8.2、执行 rabbitmq-server start 的时候出现如下错误
/usr/lib/rabbitmq/bin/rabbitmq-env: line 52: cd: /var/lib/rabbitmq/mnesia/rabbit@localhost-plugins-expand: Permission denied
BOOT FAILED
===========
Error description:
{error,
{cannot_delete_plugins_expand_dir,
["/var/lib/rabbitmq/mnesia/rabbit@localhost-plugins-expand",
{cannot_delete,
"/var/lib/rabbitmq/mnesia/rabbit@localhost-plugins-expand",
eacces}]}}
Log files (may contain more information):
/var/log/rabbitmq/rabbit@localhost.log
/var/log/rabbitmq/rabbit@localhost-sasl.log
Stack trace:
[{rabbit_plugins,setup,0,[{file,"src/rabbit_plugins.erl"},{line,71}]},
{rabbit,broker_start,0,[{file,"src/rabbit.erl"},{line,280}]},
{rabbit,start_it,1,[{file,"src/rabbit.erl"},{line,403}]},
{init,start_it,1,[]},
{init,start_em,1,[]}]
{"init terminating in do_boot",{error,{cannot_delete_plugins_expand_dir,["/var/lib/rabbitmq/mnesia/rabbit@localhost-plugins-expand",{cannot_delete,"/var/lib/rabbitmq/mnesia/rabbit@localhost-plugins-expand",eacces}]}}}
init terminating in do_boot ()
Crash dump is being written to: erl_crash.dump...done
解决:chown -R rabbitmq:rabbitmq /var/lib/rabbitmq/mnesia/
8.3、新建用户之后,登录的时候出现如下
=WARNING REPORT==== 8-Feb-2017::19:03:48 ===
HTTP access denied: user 'test' - invalid credentials
原因:没有给用户分配角色,解决办法如下:
# 设定用户所属角色(1、administrator,2、monitoring, 3、management)
[root@localhost bin]# ./rabbitmqctl set_user_tags test monitoring
二、集群的创建
1、创建之前的准备工作
1、修改/etc/sysconfig/network 更新主机名,重启系统;

2、修改2台机器的hosts,配置域名解析
[root@localhost ~]# vim /etc/hosts
127.0.0.1   localhost localhost.localdomain localhost4 localhost4.localdomain4
::1         localhost localhost.localdomain localhost6 localhost6.localdomain6
192.168.2.242 server242
192.168.2.243 server243
192.168.2.244 server244

3、随便复制某一台机器上的erlang.cokie到另一台,保证2台机器的 erlang.cookies文件里的值是一致的
(如果修改erlang cookie文件之前,erlang的进程和rabbitmq已经启动,把他们都stop或者kill掉。改完erlang cookie之后再重启)
[root@server244 rabbitmq]# cd /var/lib/rabbitmq/
[root@server244 rabbitmq]# cat .erlang.cookie
HZNVNRWDWVQJCNQCNSVI

把这个值复制到另一台机器上,注意,这个erlang.cookie的默认权限是400,可以通过如下命令修改权限
[root@server242 rabbitmq]# chmod 777 .erlang.cookie

再修改里面的值
[root@server242 rabbitmq]# vim .erlang.cookie

修改完成之后把权限改回400
[root@server242 rabbitmq]# chmod 400 .erlang.cookie

同样的要修改${HOME}/.erlang.cookie里的值
2、开始创建集群,以下命令步骤固定
[root@localhost bin]# ./rabbitmq-server -detached
[root@localhost bin]# ./rabbitmqctl stop_app
[root@localhost bin]# ./rabbitmqctl join_cluster rabbit@server114
[root@server242 bin]# ./rabbitmqctl start_app

查看集群加入状态
[root@server242 bin]# ./rabbitmqctl cluster_status
3、查看每台机器上的集群情况
[root@server242 bin]# ./rabbitmqctl cluster_status
Cluster status of node rabbit@server242 ...
[{nodes,[{disc,[rabbit@server242,rabbit@server243,rabbit@server244]}]},
 {running_nodes,[rabbit@server242,rabbit@server243,rabbit@server244]},
 {cluster_name,<<"rabbit@server242">>},
 {partitions,[]},
 {alarms,[{rabbit@server242,[]},{rabbit@server243,[]},{rabbit@server244,[]}]}]


如果要修改集群节点类型
[root@server242 bin]# ./rabbitmqctl stop_app
[root@server242 bin]# ./rabbitmqctl change_cluster_node_type ram
[root@server242 bin]# ./rabbitmqtl start_app
4、退出集群
退出集群:
./rabbitmqctl stop_app
./rabbitmqctl reset
./rabbitmqctl start_app
5、创建镜像队列
[root@server242 bin]# ./rabbitmqctl set_policy ha-all "^" '{"ha-mode":"all"}'ps:
如果整个集群重启,则先启动slave,再启动Master,到此,集群的搭建就完成了,但是要做到高可用,还得结合Haproxy,接下来咱们就开始部署Haproxy。
三、Haproxy的部署
1、下载并解压haproxy
[root@localhost ~]# wget http://fossies.org/linux/misc/haproxy-1.6.4.tar.gz
[root@localhost ~]# tar -xvf haproxy-1.6.4.tar.gz
2、查看系统内核,安装的时候需要根据这个内核选择模式
[root@localhost haproxy]# uname -r
2.6.32-642.15.1.el6.x86_64
3、执行安装命令
[root@localhost haproxy]# make TARGET=linux2628 ARCH=x86_64 PREFIX=/usr/local/haproxy

[root@localhost haproxy]# make install PREFIX=/usr/local/haproxy

 参数解释:
TARGET=linux2628 #内核版本,使用uname -r查看内核,如:2.6.18-371.el5,此时该参数就为linux26;kernel 大于2.6.28的用:TARGET=linux2628

ARCH=x86_64 #系统位数

PREFIX:安装路径
4、查看版本,测试是否安装成功
[root@localhost ~]# cd /usr/local/haproxy
[root@localhost haproxy]# haproxy -v
HA-Proxy version 1.6.4 2016/03/13
Copyright 2000-2016 Willy Tarreau <willy@haproxy.org>
有可能会遇到的问题:
[root@localhost sbin]# haproxy -v
-bash: /usr/sbin/haproxy: No such file or directory
解决:
[root@localhost sbin]# cp haproxy /usr/sbin/haproxy
5、新增haproxy.cfg配置文件
1.6版本安装完成之后,是没有haproxy.cfg配置文件的,需要自己建立这个配置文件, 复制下面的配置信息,修改MQ集群每个节点地址
global
   log 127.0.0.1 local0
   log 127.0.0.1 local1 notice
   daemon
   nbproc 8
   maxconn 4096
   user haproxy
   group haproxy
   chroot /usr/local/haproxy

defaults
    log global
    mode tcp
    option tcplog
    option dontlognull
    retries 3
    option httpclose
    option abortonclose
    maxconn 4096
    timeout connect 5000ms
    timeout client 10000ms
    timeout server 8000ms
    timeout check 3000
    option  httpclose
    balance roundrobin

listen stats
    bind 0.0.0.0:1080			#登录监控台的端口和地址
    mode http
    option httplog
    log 127.0.0.1 local0 err warning
    maxconn 10
    stats refresh 10s
    stats uri /stats				#监控台地址:http://haproxy_ip:1080/stats
    stats realm Haproxy Manager
    stats auth user1:password #登录监控台的账户和密码
    stats auth user2:password #登录监控台的账户和密码
    stats hide-version
    stats admin if TRUE

frontend Rabbitmq_frontend
    bind 0.0.0.0:5672
    mode tcp
    option    clitcpka
    timeout client  100m
    maxconn 10000
    default_backend  Rabbitmq_Backend

backend Rabbitmq_Backend
    mode tcp
    timeout queue   100m
    timeout server  300m
    option srvtcpka
    option redispatch
    fullconn 10000
    balance roundrobin
    option tcp-check
    server server242 192.168.2.242:5672 weight 3 maxconn 10000 check port 5672 inter 5000 rise 1 fall 2 backup
    server server243 192.168.2.243:5672 weight 3 maxconn 10000 check port 5672 inter 5000 rise 1 fall 2
    server server244 192.168.2.244:5672 weight 3 maxconn 10000 check port 5672 inter 5000 rise 1 fall 2

listen rabbitmq_admin
    bind 0.0.0.0:8004
    server node1 192.168.2.242:15672
    server node2 192.168.2.243:15672
    server node3 192.168.2.244:15672
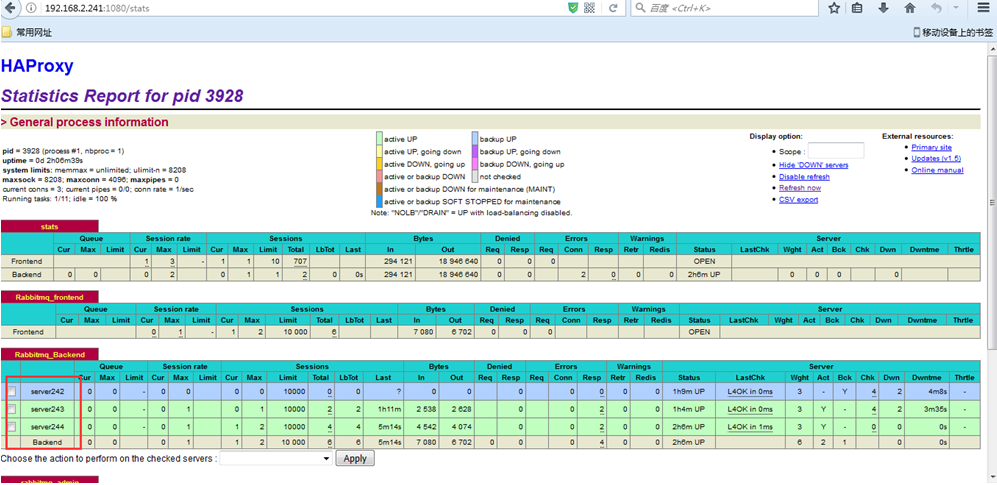
6、启动Haproxy并登录监控台
[root@localhost haproxy]# haproxy -f haproxy.cfg
有可能报错:
[ALERT] 071/223658 (16567) : parsing [../haproxy.cfg:7] : cannot find user id for 'haproxy' (0:Success)
[ALERT] 071/223658 (16567) : parsing [../haproxy.cfg:8] : cannot find group id for 'haproxy' (0:Success)
解决:
[root@localhost haproxy]# useradd haproxy -p /sbin/nologin访问:http://192.168.2.241:1080/stats 可以看到已经把3台MQ加入负载了
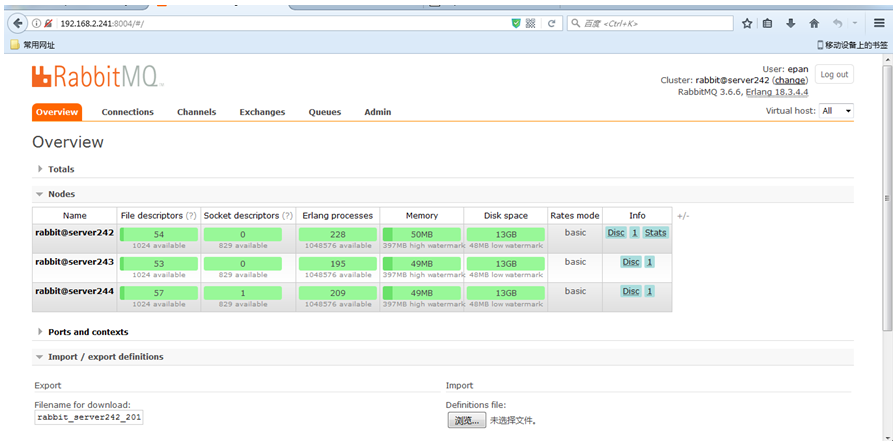
7、RabbitMQ监控界面,查看各节点运行情况
因为我们在haproxy配置文件里已经把RabbitMQ监控也加入进负载了,所以访问的时候也是访问haproxy的代理地址 http://192.168.2.241:8004
一点小问题,执行启动命令的时候有可能出现如下错误,可能是配置文件出错,所以启动前最好先用命令测试一下配置文件是否正确
[root@localhost haproxy]# /usr/local/haproxy/sbin/haproxy -f /usr/local/haproxy/haproxy.cfg

[ALERT] 060/220545 (3797) : sendmsg logger #1 failed: Connection refused (errno=111)

[ALERT] 060/220545 (3797) : sendmsg logger #2 failed: Connection refused (errno=111)

[ALERT] 060/220545 (3797) : sendmsg logger #1 failed: Connection refused (errno=111)

[ALERT] 060/220545 (3797) : sendmsg logger #2 failed: Connection refused (errno=111)

[ALERT] 060/220545 (3797) : sendmsg logger #1 failed: Connection refused (errno=111)

[ALERT] 060/220545 (3797) : sendmsg logger #2 failed: Connection refused (errno=111)

[ALERT] 060/220545 (3797) : sendmsg logger #1 failed: Connection refused (errno=111)

[ALERT] 060/220545 (3797) : sendmsg logger #2 failed: Connection refused (errno=111)
四、为HAProxy增加日志文件
1、修改/etc/sysconfig/rsyslog
内容如下
[root@localhost ~]#  vim /etc/sysconfig/rsyslog
#SYSLOGD_OPTIONS="-c 5"
SYSLOGD_OPTIONS="-c 2 -m 0 -r -x"
[root@localhost ~]#

#重启 /etc/init.d/rsyslog
[root@localhost ~]# /etc/init.d/rsyslog restart
2、为Haproxy1.6.4 新增默认端口
Haproxy1.6.4 默认没端口,可以修改rsyslog.conf 让其出现端口
#先查看 rsyslog.conf的内容
[root@localhost ~]# egrep 'UDPServerRun|ModLoad' /etc/rsyslog.conf
#去除注释
[root@localhost ~]# sed -i 's/#$UDPServerRun 514/$UDPServerRun 514/g' /etc/rsyslog.conf
[root@localhost ~]# sed -i 's/#$ModLoad imudp/$ModLoad imudp/g' /etc/rsyslog.conf
[root@localhost ~]# sed -n -e '/$ModLoad imudp/p' -e '/$UDPServerRun/p' /etc/rsyslog.conf

#重启 /etc/init.d/rsyslog
[root@localhost ~]# /etc/init.d/rsyslog restart
[root@localhost ~]# netstat -lntup | grep rsyslog

#看看是否已经有端口出现了
[root@localhost ~]#  netstat -lntup | grep rsyslog
udp        0      0 0.0.0.0:514                0.0.0.0:*                              5031/rsyslogd
udp        0      0 :::514                      :::*                                    5031/rsyslogd
[root@localhost ~]#
3、修改/etc/rsyslog.conf
#在local7.*下面新增一行
local7.*                                                /var/log/boot.log
local0.*                                                /var/log/haproxy/haproxy.log
4、新建haproxy.log日志文件
[root@localhost ~]# touch /var/log/haproxy/haproxy.log

#重启haproxy之后就可以看到如下日志了
[root@localhost ~]# tail -1000f /var/log/haproxy/haproxy.log
Mar  7 02:56:38 127.0.0.1 haproxy[5302]: stats stats/<STATS> 0/0/0/0/63 200 43794 - - LR-- 1/0/0/0/0 0/0 "GET /stats HTTP/1.1"
Mar  7 02:56:42 127.0.0.1 haproxy[5302]: rabbitmq_admin rabbitmq_admin/rb_node3 1/1/263233 283694 sD 0/0/0/0/0 0/0
Mar  7 02:56:47 127.0.0.1 haproxy[5301]: rabbitmq_admin rabbitmq_admin/rb_node1 1/0/8059 0 sD 3/2/2/0/0 0/0
Mar  7 02:56:48 127.0.0.1 haproxy[5302]: stats stats/<STATS> 2/0/0/0/58 200 43841 - - LR-- 1/0/0/0/0 0/0 "GET /stats HTTP/1.1"
Mar  7 02:56:52 127.0.0.1 haproxy[5301]: rabbitmq_admin rabbitmq_admin/rb_node3 1/1/8053 0 sD 3/2/2/0/0 0/0
五、集群测试
1、三种测试场景
1.1、干掉主Server,再向HAProxy发送消息,2个mq从节点可以正常收到和消费消息
1.2、干掉1个mq从节点,再向HAProxy发送消息,剩下主和从节点可以正常收到和消费消息
1.3、干掉2个mq从节点,再向HAProxy发送消息,剩下的主节点可以正常收到和消费消息
以上3个场景经测试都可以实现高可用,过程就不写在里面了。
到此,RabbitMQ+Haproxy部署高可用集群就可以了。。关于优化那些,根据你们自己的业务去做。


 11万+
11万+

 被折叠的 条评论
为什么被折叠?
被折叠的 条评论
为什么被折叠?
 到【灌水乐园】发言


