


Smart框架学习笔记
0.前言
一次偶然机会,接触到smart框架,看到轻量级java web框架,对一个菜鸟来说,只要入门简单,管它什么性能、安全之类的因素,太有诱惑力,入门容易就好,先用起来再说。本文是一个对web开发有兴趣、懂得点java基础的人、用过eclipse开发工具而不知道框架是什么、没用过maven、git的人,对smart框架使用过程一点体会的记录,希望对和我一样功底深厚的人有点帮助,减少摸索的时间。
1、框架使用
1.0 smart 框架是什么
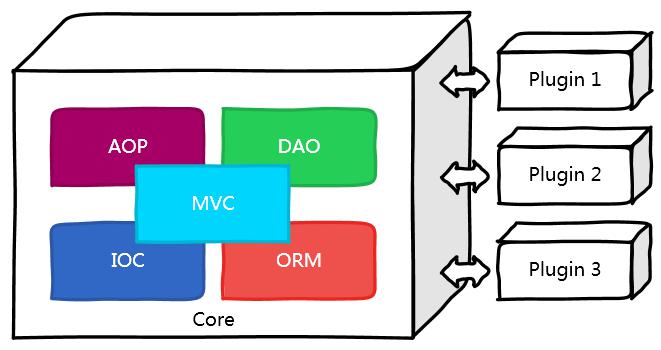
Smart Framework 是一款轻量级 Java Web 开发框架,基于“核心 + 插件”的体系架构。
1 基于 Servlet 3.0 规范,不依赖于 Spring、Hibernate 等开源框架。
2 提供 IOC、AOP、ORM 等轻量级解决方案,并具备良好的可扩展性。
3 前端直接使用 HTML + CSS + JS 开发模式,同时也兼容 JSP、JSTL、Tag 等技术。
4 后端提供 REST 服务接口(基于 JSON 格式)。
5 没有任何的 XML 配置文件,真正的零配置。
详细介绍:http://my.oschina.net/huangyong/blog/158380
1.1开发工具安装
看了一样框架介绍,傻眼了,里面术语几乎不懂,更看不懂架构图。好在框架的作者黄勇搞了个demo,其项目名称sample(http://git.oschina.net/huangyong/smart-sample),才让初学着面对框架这么一个高深的东西有一个学习的机会,所以从sample作为开始。
我使用maven管理项目(也是接触到smart才知道maven这么一个东东,汗!),smart项目合作人大漠真人给了一篇《Eclipse中使用Maven创建Servlet3.0 Web 项目的入门》文章,里面讲了2件事情,操作详细步骤请看原文(http://my.oschina.net/China2012/blog/191404)。
1) maven安装:步骤1软件下载,步骤2环境配置,就搞定了。
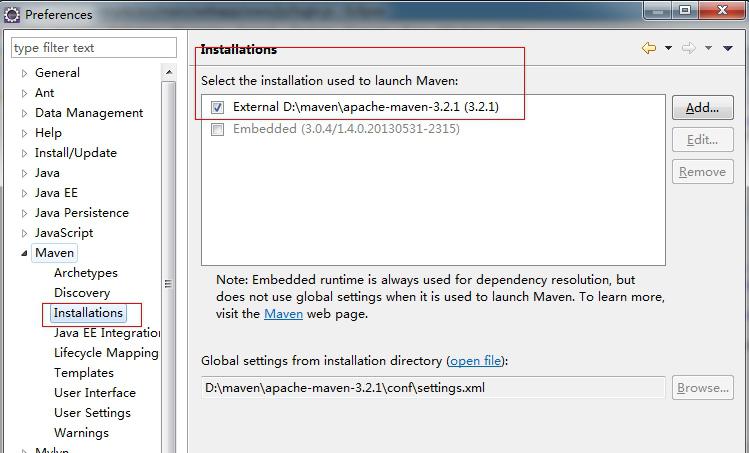
2) Eclipse安装m2e插件:下载Eclipse Kepler到喜欢的目录能正常打开就ok了,把插件maven配置成步骤1安装的,我猜直接用自带(Embedded)的也是可以的,用自己安装的。
下图就是我安装后的截图
1.2 sample源码导入
代码导入,你还要用到git,实在不想了解git是什么玩意或迫不及待想看到demo运行效果,可以直接到http://git.oschina.net/huangyong/smart-sample 下载,如果想要了解git,请查看《史上最浅显易懂的Git教程》,网址(http://www.liaoxuefeng.com/wiki/0013739516305929606dd18361248578c67b8067c8c017b0);想使用eclips插件egit,大漠真人又给我们写了一篇《Eclipse使用EGit管理git@OSC项目》入门文章(http://my.oschina.net/China2012/blog/174874)
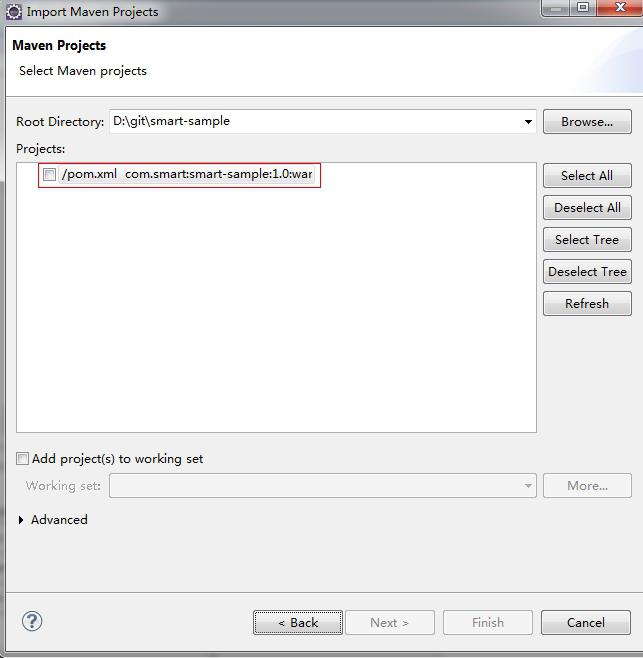
代码下载后解压到你的工作目录如(d:\workplace),然后用eclipse导入(file>import>exiting Maven Project)。
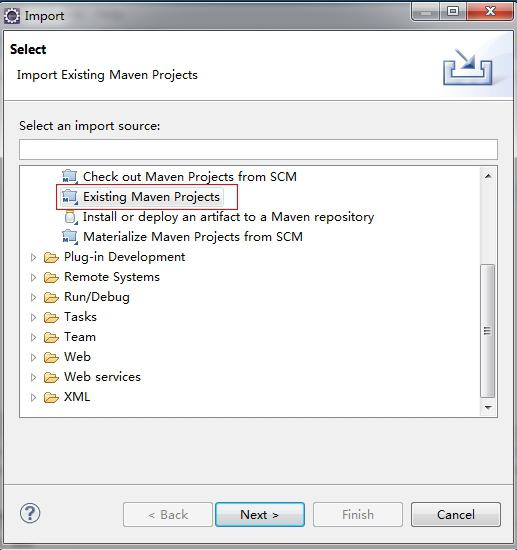
选择pom.xml,点击完成,之后就是一系列依赖jar的加载,都会保存到你配置的repository库(比如D:\maven\repository),第一次体会到maven好强大,以前少了个jar百度各种搜索,实在好吐血。
项目导入后的样子

说明一下,一个maven web完整的项目,需要包括pom.xml文件,目录(src/main/java、src/main/resources、src/test/java、src/test/resources)。
此外,想利用smart 框架自己手工创建web项目,参考大漠真人的Smart2.0开发指南——入门(http://my.oschina.net/China2012/blog/194943)
1.3、项目运行准备工作
1) 数据库安装,脚本运行。源码有脚本(doc/sample.sql),采用的mysql数据库,所以你得先安装数据库服务器。
2) 项目配置,sample包括框架基于servlet3.0开发规范,我也不知道servlet3.0有什么规范,就了解到可以不用配置web.xml,改用注释annotation(天,又是一种新接触的概念),项目所有相关配置全部在(src\main\resources)目录下,就三个配置文件包括框架配置smart.properties、日志配置log4.properties和安全控制shiro.properties配置。目前你只需查看samrt.properties文件里面jdbc开头的相应的配置参数是否跟你实际一样,如果你是傻瓜式安装mysql server估计是一模一样了。
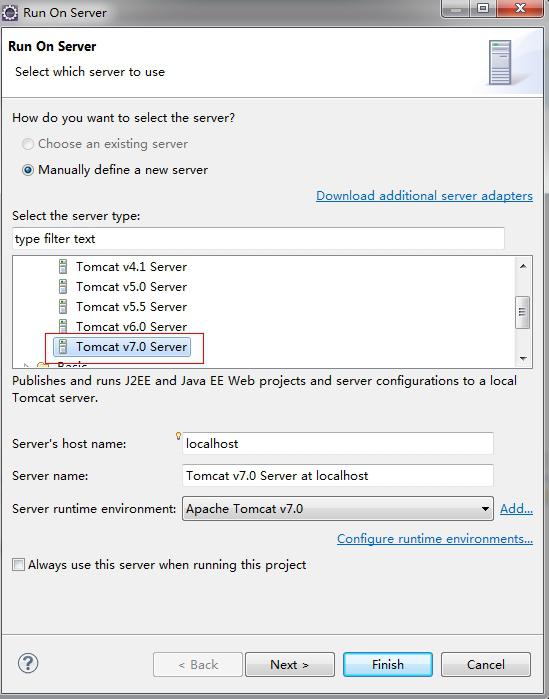
3) web服务器配置:经过上述2步,就可以运行sample了,右键该项目,选择run as ->run on server,选择tomcat v7.0 server,如下图。
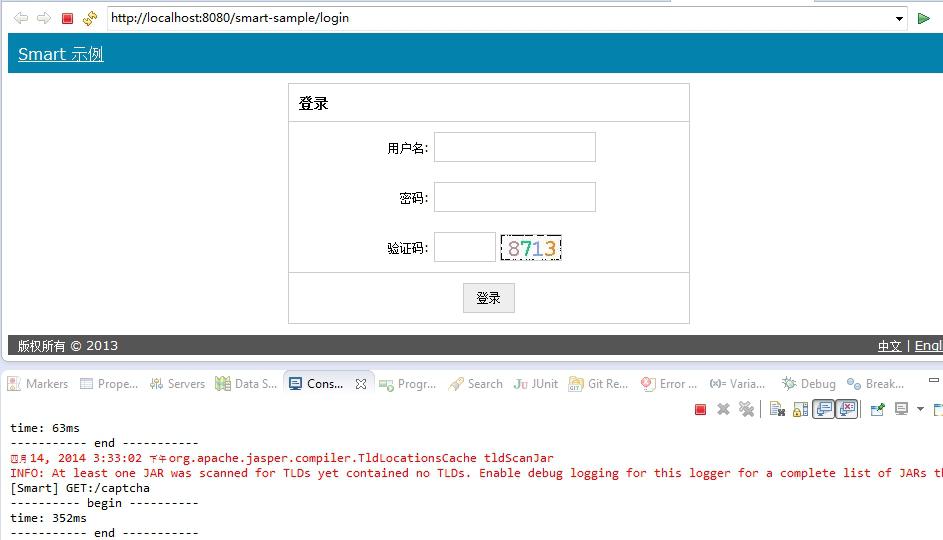
如果能看到下图,恭喜你成功了。事实上,由于对很多概念不了解特别是个人先天的资质问题,我是经过多番周折才看到下图的,这也就是写这篇文章的原因,希望对初学着有点帮助,减少摸索时间。坚信没有解决不了的问题,特别会有大牛们意想不到的热情帮助。
小结:了解smart框架,从使用demo开始,需要做的事情就是开发工具的安装、数据库安装、相应脚本导入、web服务器(tomcat)配置。
2、框架的学习
事实上,sample调试成功,那仅仅是开始,勇哥的《让你的开发变得如此 Smart》文章,(http://my.oschina.net/huangyong/blog/196408),更像一句响亮的口号,让人有种热血澎湃的感觉。如果你想利用框架做点和自己有关的工作,学习框架才是痛苦的开始,当然对技术有兴趣的话,痛苦就是种乐趣。
1) 请求与响应,说明了前后端交互,smart框架唯一一个DispatcherServlet,处理客户端的request请求与服务器的response响应。

。。。
3 插件的使用
3.0 smart-plugin-search(2014/4/25更新)
Smart提供了基于lucene实现了全文检索功能插件,插件提供了接口(org.smart4j.plugin.search.SearchEngine),在自己项目使用插件,需要如下步骤。
步骤1:pom.xml文件添加smart-plug-search依赖
 <dependency>
            <groupId>com.smart</groupId>
            <artifactId>smart-plugin-search</artifactId>
            <version>${smart.version}</version>
 </dependency>
步骤2:在项目配置文件smart.properties 配置索引目录
search.index_dir=D:\\temp\\index\\smart
步骤3:在自己项目实现SearchEngine接口
package com.smart.demo.search;
import com.smart.framework.DataSet;
import com.smart.framework.annotation.Bean;
import com.smart.framework.util.CollectionUtil;
import com.smart.plugin.search.IndexFieldName;
import com.smart.plugin.search.SearchEngine;
import com.smart.plugin.search.bean.IndexData;
import com.smart.plugin.search.bean.IndexDocument;
import com.smart.plugin.search.bean.IndexField;
import com.smart.plugin.search.bean.SearchResult;
import com.smart.demo.entity.Product;
import java.util.List;
import org.apache.lucene.document.Document;
@Bean
public class ProductSearchEngine  implements SearchEngine {
    @Override
    public IndexData createIndexData() {
        IndexData indexData = new IndexData();
        List<Product> productList = DataSet.selectList(Product.class, "", "");
        if (CollectionUtil.isNotEmpty(productList)) {
            for (Product product : productList) {
                IndexDocument indexDocument = new IndexDocument();
                indexDocument.addIndexField(new IndexField(IndexFieldName.title, product.getName()));
                indexDocument.addIndexField(new IndexField(IndexFieldName.content, product.getDescription()));
                indexData.addIndexDocument(indexDocument);
            }
        }
        return indexData;
    }
    @Override
    public SearchResult createSearchResult(Document document) {
        SearchResult searchResult = new SearchResult();
        searchResult.setTitle(document.get("title"));
        searchResult.setContent(document.get("content"));
        return searchResult;
    }
}
最后 在action里边,根据smart-plugin-search插件提供的SearchHelper类,进行查询操作,返回Pager<SearchResult>结果,最后返回给view,进行搜索内容展现。
@Request.Get("/product/search/{name}")
public View indexSearch(String name) {
        int pageNumber = 1;
        int pageSize = 5;
        Pager<SearchResult> searchResultPager =SearchHelper.search(name, pageNumber, pageSize);
        return new View("product_search.jsp")
            .data("searchResultPager", searchResultPager);
    }
备注:smart-plugin-search会在项目启动加载,定时自动进行内容索引。
3.1 smart-plugin-template (2014/4/28更新)
smart-plugin-template封装了开源模板引擎Velocity,插件就一个接口和相应实现类,比较简单,在实际项目中主要要注意模板路径。下面给插件调用模板的示例代码。
//创建模板引擎,根据自定义配置路径加载模板,入参为空,则class所在文件目录
VelocityTemplateEngine vt=new VelocityTemplateEngine(Constant.TEMPLATE_PATH);//加载vm模板文件,为绝对路径
Map<String, Object> templateDataMap =new HashMap<String,Object>();
templateDataMap.put("name", "dreamhead");
String result=vt.mergeTemplateFile("hello.vm", templateDataMap);//加载模板文件,相对路径
模板文件test.vm,内容为
<html>
<body>
<h2>Hello Smart !</h2>
  <h3> $name</h3>
    $hobby:
<table>
    #foreach($hobby in $hobbyArray)
    <tr>
        <td> ${hobby}</td>
    </tr>

    #end
</table>

</body>
</html>
说明一:装载vm模版时,需要设置Velocity.FILE_RESOURCE_LOADER_PATH属性,且要是绝对路径,VelocityTemplateEngine类默认为项目class所在文件目录,若要自定义,可在项目配置文件处理。
VelocityTemplateEngine还提供其他2个方法,具体看查看源码。
(2014/7/10更新)
根据黄勇建议:VelocityTemplateEngine 最好对用户透明。
vm 路径直接传递到 View 中,底层通过 vm 后缀来识别是否让 Velocity 做视图解析。
在项目实现框架ViewResolver接口,
1、resolveView部分
public class MyViewResolver implements ViewResolver {
    @Override
    public void resolveView(HttpServletRequest request, HttpServletResponse response, Object actionMethodResult) {
        if (actionMethodResult != null) {
            // Action 返回值可为 View 或 Result
            if (actionMethodResult instanceof View) {
                // 若为 View,则需考虑两种视图类型(重定向 或 转发)
                View view = (View) actionMethodResult;
                if (view.isRedirect()) {
                    // 获取路径
                    String path = view.getPath();
                    // 重定向请求
                    WebUtil.redirectRequest(path, request, response);
                } else {
                    // 初始化请求属性
                    Map<String, Object> data = view.getData();
                    String viewPath=view.getPath().toLowerCase();
                    if (viewPath.substring(viewPath.lastIndexOf(".")).equals(".vm")){
                        VelocityTemplateEngine vt=new VelocityTemplateEngine();
                        if (MapUtil.isNotEmpty(data)) {
                            String result = vt.mergeTemplateFile(viewPath,data);
                            WebUtil.write(response, result,FrameworkConstant.MIME_TEXT_HTML);
                        }
                    } else {
                        // 获取路径
                        String path = FrameworkConstant.JSP_PATH + view.getPath();
                        if (MapUtil.isNotEmpty(data)) {
                            for (Map.Entry<String, Object> entry : data.entrySet()) {
                                request.setAttribute(entry.getKey(), entry.getValue());
                            }
                        }
                        // 转发请求
                        WebUtil.forwardRequest(path, request, response);
                    }
                }
            }
            else {
                // 若为 Result,则需考虑两种请求类型(文件上传 或 普通请求)
                Result result = (Result) actionMethodResult;
                if (UploadHelper.isMultipart(request)) {
                    // 对于 multipart 类型,说明是文件上传,需要转换为 HTML 格式并写入响应中
                    WebUtil.write(response, JsonUtil.toJSON(result), FrameworkConstant.MIME_TEXT_HTML);
                } else {
                    // 对于其它类型,统一转换为 JSON 格式并写入响应中
                    WebUtil.write(response,JsonUtil.toJSON(result),FrameworkConstant.MIME_APPLICATION_JSON);
                }
            }
        }
    }}
2、action 部分
@Request.Get("/vm")
    public View vm(){
        String[] hobbyArray={"吃饭","喝水","洗澡"};
        return new View("vm/test.vm")
                .data("name", "张三")
                .data("hobby", "爱好")
                .data("hobbyArray", hobbyArray);
    }
详见:http://git.oschina.net/huangyong/smart-framework/issues/66
4、总结与期待
...


 441
441

 被折叠的 条评论
为什么被折叠?
被折叠的 条评论
为什么被折叠?
 到【灌水乐园】发言


