


文末有福利!!!!!!
前情回顾
在上一篇:安卓面试系列–OOM异常(一)中,已经讨论了安卓中OOM发生的原因和如何有效加载高清图片的。现在在此回顾一下:
安卓OOM发生的原因:图片分辨率过大,导致加载图片所需的内存超过系统给进程(app)分配的运行内存,内存爆掉,产生OOM
核心解决办法: 利用BitmapFactory.Options的inSimpleSize,计算出合适的图片采样率,减小图片分辨率。
引言
所以上一篇我们讲的是怎么解决图片的加载问题带来的OOM,这一篇我们来讲一讲图片的缓存,这里我会讲到一个图片加载框架,叫做Universal-Image-Loader,这是重点。
为什么图片需要缓存,你想想,你的程序中没有缓存的图片,所有的图片在加载的时候都要通过网络下载来获得,,现在的流量有多贵你们也不是不知道,用户在使用了你开发的app,一天把一个月的流量都用完了,那你的app能在用户的手机上活到明天吗?所以,缓存很重要。那到底怎么来缓存呢?就是我们刚才讲的Universal-Image-Loader。
Universal-Image-Loader
简介
这是一个开源框架,可以从gradle导入:
compile 'com.nostra13.universalimageloader:universal-image-loader:1.9.5'
该开源框架的特点如下:
- 多线程下载图片,图片可以来源于网络,文件系统,项目文件夹assets中以及drawable中等
- 支持随意的配置ImageLoader,例如线程池,图片下载器,内存缓存策略,硬盘缓存策略,图片显示选项以及其他的一些配置
- 支持图片的内存缓存,文件系统缓存或者SD卡缓存
- 支持图片下载过程的监听
- 根据控件(ImageView)的大小对Bitmap进行裁剪,减少Bitmap占用过多的内存
- 较好的控制图片的加载过程,例如暂停图片加载,重新开始加载图片,一般使用在ListView,GridView中,滑动过程中暂停加载图片,停止滑动的时候去加载图片
- 提供在较慢的网络下对图片进行加载
这是这个开源框架的介绍中说的,不用记,看看就好,反正记住这个框架可以从网上下载图片,也可以从资源文件中读取图片,并且可以进行缓存,还可以进行图片大小的控制。
简单使用
因为我们这个是面试系列,所以说我不会非常详细的去讲UIL的实现原理,重点还是给大家讲一下关于图片缓存以解决OOM问题,关于UIL的使用以及源码分析,我会在后面的博客中写出来。
首先,使用UIL需要进行参数配置,可以使用默认的配置,也可以自定义配置,主要还是需要自定义配置。配置参数的目的就是为了给图片添加各种缓存,以及压缩图片减少内存等等。
ImageLoaderConfiguration
先看下默认配置,一般是在MyApplication 文件中初始化:
public class MyApplication extends Application {
    @Override
    public void onCreate() {
        super.onCreate();
        //创建默认的ImageLoader配置参数
        ImageLoaderConfiguration configuration = ImageLoaderConfiguration.createDefault(this);
        //用配置参数初始化ImageLoader
        ImageLoader.getInstance().init(configuration);
    }
}
这个没什么好看的,我们一般也不会用,主要还是来看下自定义配置:
ImageLoaderConfiguration configuration = new ImageLoaderConfiguration.Builder(this)
        //max width,max height即保存每个缓存文件的最大长宽
        .memoryCacheExtraOptions(480,800)
        //设置硬盘缓存
        .diskCacheExtraOptions(480,800,null)
        //线程池内加载的数量
        .threadPoolSize(3)
        .threadPriority(Thread.NORM_PRIORITY - 2)
        .denyCacheImageMultipleSizesInMemory()
        .memoryCache(new UsingFreqLimitedMemoryCache(2*1024*1024))
        //设置内存缓存的大小
        .memoryCacheSize(2 * 1024 * 1024)
        //硬盘设置的最大缓存数
        .diskCacheSize(50 * 1024 * 1024)
        //将手机sd卡里面的缓存文件名称用MD5加密
        .diskCacheFileNameGenerator(new Md5FileNameGenerator())
        .tasksProcessingOrder(QueueProcessingType.LIFO)
        //缓存文件的数量
        .diskCacheFileCount(100)
        //缓存文件的路径
        .diskCache(new UnlimitedDiskCache(new File(Environment.getExternalStorageDirectory(),"Scroll")))
        //加载图片默认的配置信息
        .defaultDisplayImageOptions(DisplayImageOptions.createSimple())
        //图片加载时的配置,连接时间和加载超时的时间
        .imageDownloader(new BaseImageDownloader(this,5*1000,30*1000))
        //写入加载时的错误日志
        .writeDebugLogs()
        //构建完成
        .build();
ImageLoader.getInstance().init(configuration);
可以看到,这是使用的构建者模式来完成,我们给图片添加了硬盘缓存和内存缓存,这是下载图片之前我们所做的配置。这里我们需要关注的有以下几点:
 - diskCacheExtraOptions(480,800,null)//设置硬盘缓存
 - memoryCacheSize(2 * 1024 * 1024) //设置内存缓存
有了这两个东西,我们就可以把从网络上下载得到的图片加入我们的缓存之中,就可以在接下来的图片显示的方法中选择从缓存中加载图片了。
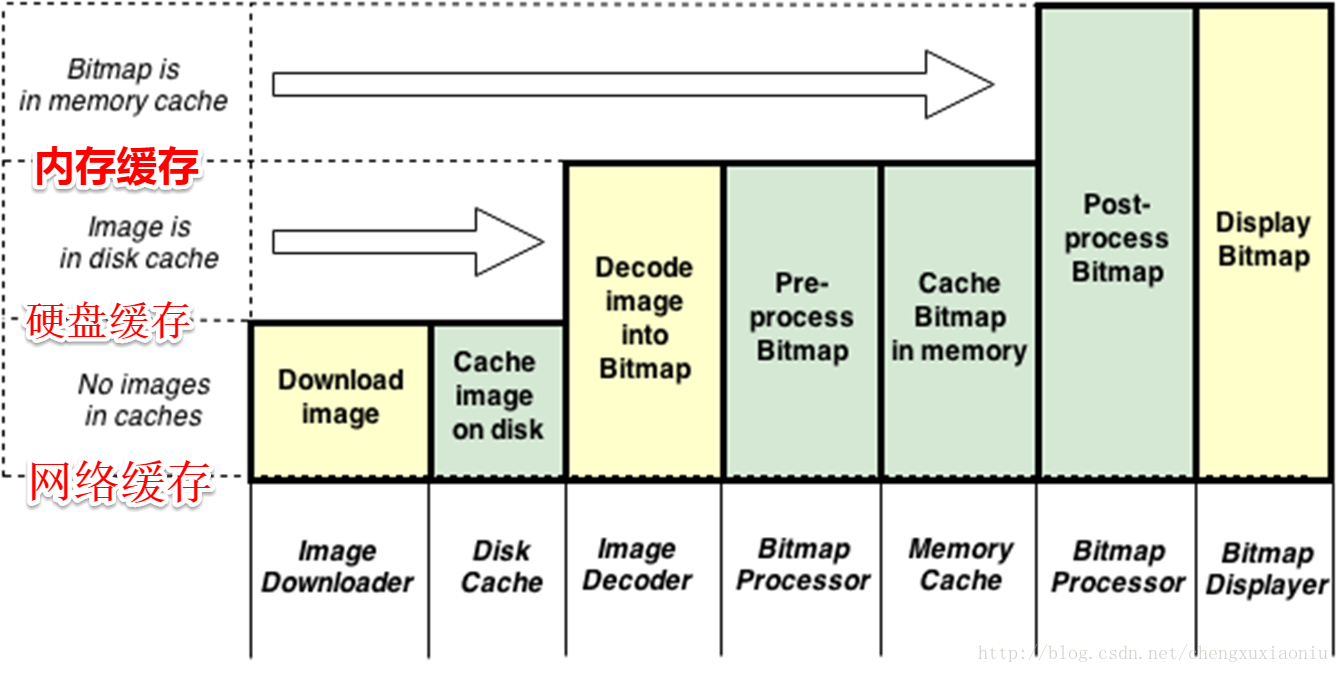
加载图片(三级缓存)–重中之重!!!
接下来我们讲一下图片显示的几个方法:
- loadImage()
- displayImage()
- loadImageSync(),此方法是同步的,android4.0有个特性,网络操作不能在主线程,所以loadImageSync()方法我们就不去使用;
这里一共有三个方法,我们不会全部讲解,这里我们就讲一下最常使用的displayImage()这个方法,它重载的方法有很多,但是不管怎么样调用,最后都是调用下面这个方法。
public void displayImage(String uri, ImageAware imageAware, DisplayImageOptions options,
      ImageSize targetSize, ImageLoadingListener listener, ImageLoadingProgressListener progressListener) {
   checkConfiguration();
   if (imageAware == null) {
      throw new IllegalArgumentException(ERROR_WRONG_ARGUMENTS);
   }
   if (listener == null) {
      listener = defaultListener;
   }
   if (options == null) {
      options = configuration.defaultDisplayImageOptions;
   }

   if (TextUtils.isEmpty(uri)) {
      engine.cancelDisplayTaskFor(imageAware);
      listener.onLoadingStarted(uri, imageAware.getWrappedView());
      if (options.shouldShowImageForEmptyUri()) {
         imageAware.setImageDrawable(options.getImageForEmptyUri(configuration.resources));
      } else {
         imageAware.setImageDrawable(null);
      }
      listener.onLoadingComplete(uri, imageAware.getWrappedView(), null);
      return;
   }

   if (targetSize == null) {
      targetSize = ImageSizeUtils.defineTargetSizeForView(imageAware, configuration.getMaxImageSize());
   }
   String memoryCacheKey = MemoryCacheUtils.generateKey(uri, targetSize);
   engine.prepareDisplayTaskFor(imageAware, memoryCacheKey);
       // 回调监听接口
   listener.onLoadingStarted(uri, imageAware.getWrappedView());
       // 优先从内存中加载
   Bitmap bmp = configuration.memoryCache.get(memoryCacheKey);
   if (bmp != null && !bmp.isRecycled()) {
      L.d(LOG_LOAD_IMAGE_FROM_MEMORY_CACHE, memoryCacheKey);
           // 是否需要处理加载进度
      if (options.shouldPostProcess()) {
         ImageLoadingInfo imageLoadingInfo = new ImageLoadingInfo(uri, imageAware, targetSize, memoryCacheKey,
               options, listener, progressListener, engine.getLockForUri(uri));
         ProcessAndDisplayImageTask displayTask = new ProcessAndDisplayImageTask(engine, bmp, imageLoadingInfo,
               defineHandler(options));
         if (options.isSyncLoading()) {
            displayTask.run();
         } else {
            engine.submit(displayTask);
         }
      } else {
               // 直接显示
         options.getDisplayer().display(bmp, imageAware, LoadedFrom.MEMORY_CACHE);
               // 回调监听接口
         listener.onLoadingComplete(uri, imageAware.getWrappedView(), bmp);
      }
   } else {
      if (options.shouldShowImageOnLoading()) {
         imageAware.setImageDrawable(options.getImageOnLoading(configuration.resources));
      } else if (options.isResetViewBeforeLoading()) {
         imageAware.setImageDrawable(null);
      }

      ImageLoadingInfo imageLoadingInfo = new ImageLoadingInfo(uri, imageAware, targetSize, memoryCacheKey,
            options, listener, progressListener, engine.getLockForUri(uri));
      LoadAndDisplayImageTask displayTask = new LoadAndDisplayImageTask(engine, imageLoadingInfo,
            defineHandler(options));
           // 默认异步加载
      if (options.isSyncLoading()) { // 是否同步加载
         displayTask.run();
      } else {
         engine.submit(displayTask); // 异步加载
      }
   }
}
上面加了部分注释可以看下。
通过调用上面的方法,我们可以定制图片加载的许多DisplayImageOptions参数,如:图片的占位图,加载失败时显示的图片,是否缓存到手机文件中,显示的样式,图片显示动画等等。使用ImageSize还可以设置获取到的图片大小,在显示大图片时由为重要!
当然还有两个监听:ImageLoadingListener下载监听和ImageLoadingProgressListener进度监听。
从displayImage();源码可以看到,优先判断memoryCache内存缓存中是否有缓存该图片?有则直接拿bitmap进行显示,否则再进行处理。
从上面的代码看,并没有发现使用diskCache,所以它肯定是将diskCache和网络加载放在一块了。
而默认的,使用的是异步加载:
if (options.isSyncLoading()) { // 是否同步加载
   displayTask.run();
} else {
   engine.submit(displayTask); // 异步加载
}
而真正去加载文件缓存的是LoadAndDisplayImageTask类,这是一个Runnable的实现,所以主要看它的run方法的实现:
@Override
public void run() {
   if (waitIfPaused()) return;
   if (delayIfNeed()) return;

   ReentrantLock loadFromUriLock = imageLoadingInfo.loadFromUriLock;
   L.d(LOG_START_DISPLAY_IMAGE_TASK, memoryCacheKey);
   if (loadFromUriLock.isLocked()) {
      L.d(LOG_WAITING_FOR_IMAGE_LOADED, memoryCacheKey);
   }

   loadFromUriLock.lock();
   Bitmap bmp;
   try {
      checkTaskNotActual();

      bmp = configuration.memoryCache.get(memoryCacheKey);
      if (bmp == null || bmp.isRecycled()) {
         bmp = tryLoadBitmap();
         if (bmp == null) return; // listener callback already was fired

         checkTaskNotActual();
         checkTaskInterrupted();

         if (options.shouldPreProcess()) {
            L.d(LOG_PREPROCESS_IMAGE, memoryCacheKey);
            bmp = options.getPreProcessor().process(bmp);
            if (bmp == null) {
               L.e(ERROR_PRE_PROCESSOR_NULL, memoryCacheKey);
            }
         }

         if (bmp != null && options.isCacheInMemory()) {
            L.d(LOG_CACHE_IMAGE_IN_MEMORY, memoryCacheKey);
            configuration.memoryCache.put(memoryCacheKey, bmp);
         }
      } else {
         loadedFrom = LoadedFrom.MEMORY_CACHE;
         L.d(LOG_GET_IMAGE_FROM_MEMORY_CACHE_AFTER_WAITING, memoryCacheKey);
      }

      if (bmp != null && options.shouldPostProcess()) {
         L.d(LOG_POSTPROCESS_IMAGE, memoryCacheKey);
         bmp = options.getPostProcessor().process(bmp);
         if (bmp == null) {
            L.e(ERROR_POST_PROCESSOR_NULL, memoryCacheKey);
         }
      }
      checkTaskNotActual();
      checkTaskInterrupted();
   } catch (TaskCancelledException e) {
      fireCancelEvent();
      return;
   } finally {
      loadFromUriLock.unlock();
   }

   DisplayBitmapTask displayBitmapTask = new DisplayBitmapTask(bmp, imageLoadingInfo, engine, loadedFrom);
   runTask(displayBitmapTask, syncLoading, handler, engine);
}
代码有点长,不过最重要的就是tryLoadBitmap();方法和DisplayBitmapTask加载图片类方法。
tryLoadBitmap()主要代码:
Bitmap bitmap = null;
File imageFile = configuration.diskCache.get(uri);
if (imageFile != null && imageFile.exists() && imageFile.length() > 0) {
   L.d(LOG_LOAD_IMAGE_FROM_DISK_CACHE, memoryCacheKey);
   loadedFrom = LoadedFrom.DISC_CACHE;

   checkTaskNotActual();
   bitmap = decodeImage(Scheme.FILE.wrap(imageFile.getAbsolutePath()));
}
if (bitmap == null || bitmap.getWidth() <= 0 || bitmap.getHeight() <= 0) {
   L.d(LOG_LOAD_IMAGE_FROM_NETWORK, memoryCacheKey);
   loadedFrom = LoadedFrom.NETWORK;

   String imageUriForDecoding = uri;
   if (options.isCacheOnDisk() && tryCacheImageOnDisk()) {
      imageFile = configuration.diskCache.get(uri);
      if (imageFile != null) {
         imageUriForDecoding = Scheme.FILE.wrap(imageFile.getAbsolutePath());
      }
   }

   checkTaskNotActual();
   bitmap = decodeImage(imageUriForDecoding);

   if (bitmap == null || bitmap.getWidth() <= 0 || bitmap.getHeight() <= 0) {
      fireFailEvent(FailType.DECODING_ERROR, null);
   }
}
在这个方法中,我们终于看到了diskCache:
File imageFile = configuration.diskCache.get(uri);如果缓存中有我们需要的图片,我们就通过它的绝对路径来拿到图片。
bitmap = decodeImage(Scheme.FILE.wrap(imageFile.getAbsolutePath()));如果没有,就使用图片的uri远程路径:
String imageUriForDecoding = uri;
if (options.isCacheOnDisk() && tryCacheImageOnDisk()) {
   imageFile = configuration.diskCache.get(uri);
   if (imageFile != null) {
      imageUriForDecoding = Scheme.FILE.wrap(imageFile.getAbsolutePath());
   }
}
bitmap = decodeImage(imageUriForDecoding);
注意,我们发现,decodeImage();方法有可能被两次调用!第一次是当然是文件缓存中获取,获取失败后,第二次又调用了decodeImage();方法,而这次,就是我们的网络获取了!
我们的最终目的是要拿到bitmap,但是是需要调用decodeImage();方法来拿的。
private Bitmap decodeImage(String imageUri) throws IOException {
   ViewScaleType viewScaleType = imageAware.getScaleType();
   ImageDecodingInfo decodingInfo = new ImageDecodingInfo(memoryCacheKey, imageUri, uri, targetSize, viewScaleType,
         getDownloader(), options);
   return decoder.decode(decodingInfo);
}
而这个方法的主要是通过decoder.decode();方法来生成bitmap。所以我们需要看下这个ImageDecoder类的方法了。
通过查看源码发现ImageDecoder是一个接口,那我们使用的是哪个实现类呢?
找啊找啊找,发现在初始化ImageLoadConfiguration时,配置了默认的编码类,当然也可以自定义。
if (decoder == null) {
   decoder = DefaultConfigurationFactory.createImageDecoder(writeLogs);
}
/** Creates default implementation of {@link ImageDecoder} - {@link BaseImageDecoder} */
public static ImageDecoder createImageDecoder(boolean loggingEnabled) {
return new BaseImageDecoder(loggingEnabled);
}看到了,是这个BaseImageDecoder类,看它的关键代码:
@Override
public Bitmap decode(ImageDecodingInfo decodingInfo) throws IOException {
   Bitmap decodedBitmap;
   ImageFileInfo imageInfo;

   InputStream imageStream = getImageStream(decodingInfo);
   if (imageStream == null) {
      L.e(ERROR_NO_IMAGE_STREAM, decodingInfo.getImageKey());
      return null;
   }
   try {
      imageInfo = defineImageSizeAndRotation(imageStream, decodingInfo);
      imageStream = resetStream(imageStream, decodingInfo);
      Options decodingOptions = prepareDecodingOptions(imageInfo.imageSize, decodingInfo);
      decodedBitmap = BitmapFactory.decodeStream(imageStream, null, decodingOptions);
   } finally {
      IoUtils.closeSilently(imageStream);
   }

   if (decodedBitmap == null) {
      L.e(ERROR_CANT_DECODE_IMAGE, decodingInfo.getImageKey());
   } else {
      decodedBitmap = considerExactScaleAndOrientatiton(decodedBitmap, decodingInfo, imageInfo.exif.rotation,
            imageInfo.exif.flipHorizontal);
   }
   return decodedBitmap;
}
我们看到它会调用getImageStream();来获取InputStream流,如果为空后就直接返回了null了,那我们拿什么来显示呢?其实,这个地方只有在获取文件缓存的时候才会为null,因为我们后面又调用了个从网络请求图片,走的也是这个方法!
然后通过调用BitmapFactory.decodeStream();方法来生成bitmap,这个方法我们就很常见了吧?当然获取到的bitmap就是我们真正需要的了,当然也有可能为null,这个时候就真没办法了。而最后面几行代码则是对生成的bitmap进行必要的缩放和旋转处理。
所以还有一点没说的是这个getImageStream();
protected InputStream getImageStream(ImageDecodingInfo decodingInfo) throws IOException {
   return decodingInfo.getDownloader().getStream(decodingInfo.getImageUri(), decodingInfo.getExtraForDownloader());
}
if (downloader == null) {
downloader = DefaultConfigurationFactory.createImageDownloader(context);
}/** Creates default implementation of {@link ImageDownloader} - {@link BaseImageDownloader} */
public static ImageDownloader createImageDownloader(Context context) {
return new BaseImageDownloader(context);
}@Override
public InputStream getStream(String imageUri, Object extra) throws IOException {
switch (Scheme.ofUri(imageUri)) {
case HTTP:
case HTTPS:
return getStreamFromNetwork(imageUri, extra);
case FILE:
return getStreamFromFile(imageUri, extra);
case CONTENT:
return getStreamFromContent(imageUri, extra);
case ASSETS:
return getStreamFromAssets(imageUri, extra);
case DRAWABLE:
return getStreamFromDrawable(imageUri, extra);
case UNKNOWN:
default:
return getStreamFromOtherSource(imageUri, extra);
}
}这下都清楚了吧!所有的流来源都是来自这里。具体的每种类型的处理方式就不多说了,大家看下都能懂,其中多了一个判断该uri是否是视频video。
三级缓存总结
首先我们会先判断内存缓存中是否存在,如果存在则直接拿到bitmap显示,否则就进行后续的操作,这个时候我们会提交一个displayTask,分同步和异步,一般都是异步的,这个任务会被提交到LoadAndDisplayImage这个类的run()方法中去执行,在这个run()方法中,我们会通过tryLoadImage()方法和DisplayBitmapTask()方法去加载图片。我们的硬盘缓存判断,主要就是在tryLoadImage()方法中的,它会先判断我们的硬盘缓存中是否有我们需要的图片,如果有,就拿到图片的绝对路径,并通过decodeImage()方法把它加载出来,如果没有就是用图片的远程路径,也是通过decodeImage()方法,但是这一次我们就是从网络中获取了。最终我们会通过一个图片下载类BaseImageDownloader类中的getStream()方法中获取图片,在getStream()这个方法中,我们可以看到看到这个框架给我们提供了各种获取图片的路径,比如Http、Https、File、assets、drawable、content等等。这样我们的图片显示就算完成了。
DisplayImageOptions
我们可以看一下displayImage()这个方法中有个参数叫做options,关于这个参数,它是我们图片显示的时候所需要的参数,我们是需要自己定制的。
DisplayImageOptions options = new DisplayImageOptions.Builder()
        .cacheInMemory(true)
        .cacheOnDisk(true)
        .bitmapConfig(Bitmap.Config.RGB_565)
        .build();
这就是options最简单的配置,可以看到,我们设置了内存缓存为true,硬盘缓存为true,这样加载图片的时候就可以从内存和硬盘中读取文件了。还有一个是Bitmap.Config.RGB_565,这个参数在上一篇博客中应该已经详细说了,UIL默认的是Bitmap.Config.RGB_8888,一个像素点占四个字节,而使用Bitmap.Config.RGB_565,一个像素点占用两个字节,内存消耗少一半。
好了,说到这里,关于Universal-Image-Loader 中对于图片缓存的策略就讲完了,国际惯例,我们来总计一下。
总结
使用UIL首先需要从gradle导入,然后需要对UIL配置图片下载前的参数ImageLoaderConfiguration对其进行初始化,让UIL可以进行内存缓存和硬盘缓存,然后我们可以使用displayImage()方法进行图片的加载,首先会从内存缓存中获取,如果没有,再去硬盘缓存中获取,如果都没有,就提交一个下载任务类,从网络上下载图片。然后在显示图片的时候我们可以调整像素点为RGB_565,让其一个像素占两个字节,这样也可以节省内存。
关于Universal-Image-Loader的详细讲解,我会在后续的博客中新开一篇写出来。
福利
这里给大家一个已经封装好的工具类,大家在项目中可以直接使用,一行代码就可以调用。本来想上传到资源中心,然后大家可以用一个积分来下载,想想还是算了,程序猿何苦为难程序猿,说多了都是泪~~希望大家可以给个顶,给我一点动力来更新。。。
/**
* @function: 初始化UniversalImageLoader, 并用来加载网络图片
*/
public class ImageLoaderUtil {
    /**
     * 默认的参数值
     */
    private static final int THREAD_COUNT = 4;  //UIL中的最大线程数
    private static final int PRIORITY = 2;  //图片加载的优先级
    private static final int MEMORY_CACHE_SIZE = 2 * 1024 * 1024;  //可以缓存图片的大小(内存)
    private static final int DISK_CACHE_SIZE = 50 * 1024 * 1024;  //可以缓存图片的大小(硬盘)
    private static final int CONNECTION_TIME_OUT = 5 * 1000;  //连接超时
    private static final int READ_TIME_OUT = 30 * 1000;  //读取超时
    /**
     * 使用单例模式
     */
    private static ImageLoaderUtil mInstance = null;
    private static ImageLoader mLoader = null;
    public static ImageLoaderUtil getInstance(Context context) {
        if (mInstance == null) {
            synchronized (ImageLoaderUtil.class) {
                if (mInstance == null) {
                    mInstance = new ImageLoaderUtil(context);
                }
            }
        }
        return mInstance;
    }
    /**
     * 单例模式的私有构造方法完成初始化工作
     */
    private ImageLoaderUtil(Context context) {
        //图片下载前的配置
        ImageLoaderConfiguration config = new ImageLoaderConfiguration
                .Builder(context)
                .threadPoolSize(THREAD_COUNT)  //配置图片下载线程的最大数量
                .threadPriority(Thread.NORM_PRIORITY - PRIORITY)  //设置优先级
                .denyCacheImageMultipleSizesInMemory()  //禁止缓存多套不同尺寸的图片到内存中
                //.memoryCache(new UsingFreqLimitedMemoryCache(MEMORY_CACHE_SIZE))
                .memoryCache(new WeakMemoryCache())  //使用弱引用
                .diskCacheSize(DISK_CACHE_SIZE)  //分配硬盘缓存大小
                .diskCacheFileNameGenerator(new Md5FileNameGenerator())//将保存的时候的URI名称用MD5 加密
                .tasksProcessingOrder(QueueProcessingType.LIFO)  //图片下载顺序:后进先出
                .defaultDisplayImageOptions(getDefaultOptions())  //默认的图片显示options
                .imageDownloader(new BaseImageDownloader(context, CONNECTION_TIME_OUT, READ_TIME_OUT))  //设置图片下载器
                .writeDebugLogs()  //debug环境下会输出日志
                .build();
        ImageLoader.getInstance().init(config);
        mLoader = ImageLoader.getInstance();
    }
    /**
     * 加载图片API(四参)
     */
    public void displayImage(ImageView imageView, String url,
                             ImageLoadingListener listener, DisplayImageOptions options) {
        if (mLoader != null) {
            mLoader.displayImage(url, imageView, options, listener);
        }
    }
    //三参
    public void displayImage(ImageView imageView, String url, ImageLoadingListener listener) {
        displayImage(imageView, url, listener, null);
    }
    //二参
    public void displayImage(ImageView imageView, String url) {
        displayImage(imageView, url, null);
    }
    /**
     * 带缓存式图片显示配置
     */
    private DisplayImageOptions getDefaultOptions() {
        DisplayImageOptions options = new
                DisplayImageOptions.Builder()
                .showImageForEmptyUri(R.drawable.xadsdk_img_error)  //图片地址为空时显示的图片(必选)
                .showImageOnFail(R.drawable.xadsdk_img_error)  //图片下载失败时显示的图片(必选)
                .cacheInMemory(true)  //设置下载的图片是否缓存在内存中, 重要,否则图片不会缓存到内存中(必选)
                .cacheOnDisk(true)  //设置下载的图片是否缓存在SD卡中, 重要,否则图片不会缓存到硬盘中(必选)
                .considerExifParams(true)  //是否考虑JPEG图像EXIF参数(旋转,翻转)
                .imageScaleType(ImageScaleType.IN_SAMPLE_INT)//设置图片以如何的编码方式显示
                .bitmapConfig(Bitmap.Config.RGB_565)  //设置图片的解码类型(必选)
                .decodingOptions(new BitmapFactory.Options())  //设置图片的解码配置,系统自带(必选)
                .resetViewBeforeLoading(true)//设置图片在下载前是否重置,复位
                .build();
        return options;
    }
    /**
     * 不带缓存式图片显示配置
     * @return
     */
    public DisplayImageOptions getOptionsWithNoCache() {
        DisplayImageOptions options = new
                DisplayImageOptions.Builder()
                //.cacheInMemory(true)//设置下载的图片是否缓存在内存中, 重要,否则图片不会缓存到内存中
                //.cacheOnDisk(true)//设置下载的图片是否缓存在SD卡中, 重要,否则图片不会缓存到硬盘中
                .considerExifParams(true)  //是否考虑JPEG图像EXIF参数(旋转,翻转)
                .imageScaleType(ImageScaleType.IN_SAMPLE_INT)//设置图片以如何的编码方式显示
                .bitmapConfig(Bitmap.Config.RGB_565)//设置图片的解码类型//
                .decodingOptions(new BitmapFactory.Options())//设置图片的解码配置
                .resetViewBeforeLoading(true)//设置图片在下载前是否重置,复位
                .displayer(new FadeInBitmapDisplayer(400))
                .build();
        return options;
    }
}


 8816
8816


 被折叠的 条评论
为什么被折叠?
被折叠的 条评论
为什么被折叠?
 到【灌水乐园】发言


