


目录
消息中间件的概述
1.1 消息队列简介
消息队列(message queue)简称MQ
是一种先进先出的数据结构为基础的消息服务器
消息:在两个系统要传递的数据
作用:实现消息的传递
原始的数据传递方式:

上述的数据传输方式为同步传输【作为调用方必须等待被调用方执行完毕以后,才可以继续传递消息】,同步传输存在的弊端:传输效率较低。
基于MQ实现消息的传输,如下图所示:

上述的数据的传输方式属于异步传输【作为调用方法不用等待被调用方执行完毕就可以接续传递消息】,数据传输的消息较高。
1.2消息队列应用的场景
消息队列主要的作用及场景
系统解耦
流量削峰
数据分发
1.2.1 系统解耦
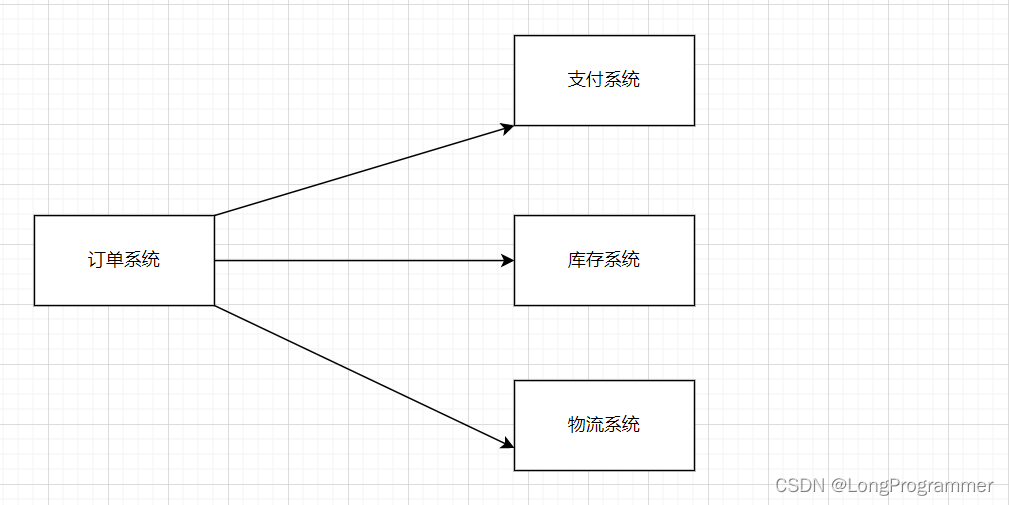
系统的耦合性越高,容错性【是指系统在部分组件(一个或多个)发生故障时仍能正常运作的能力】就越低。以电商应用为例,用户创建订单后,如果耦合调用库存
系统、物流系统、支付系统,任何一个子系统出了故障或者因为升级等原因暂时不可用,都会造成下单操作异常,影响用户使用体验。
如图
使用消息队列以后如图:
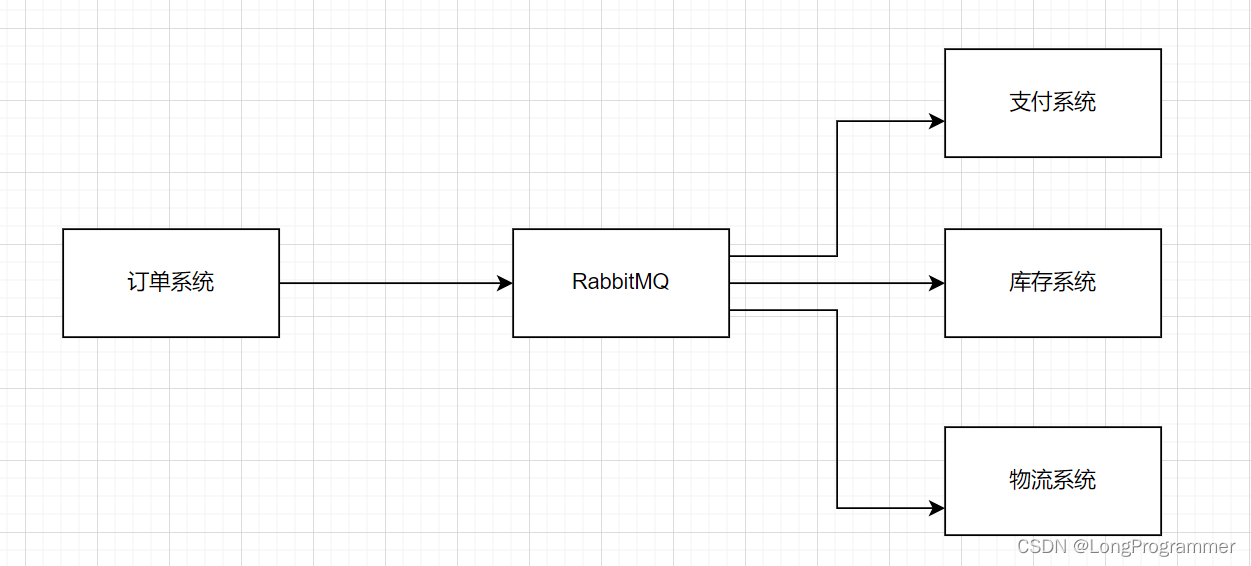
使用消息队列解耦合,系统的耦合性就会降低了,容错性就提高了。比如物流系统发生故障,需要几分钟才能来修复,在这段时间内,物流系统要处理的数据被缓存
到消息队列中,用户的下单操作正常完成。当物流系统回复后,补充处理存在消息队列中的订单消息即可,终端系统感知不到物流系统发生过几分钟故障。
1.2.2流量削峰
流量削峰:消除系统中的高峰值流量 流量可以理解为请求
现有一个电商系统下单初始架构
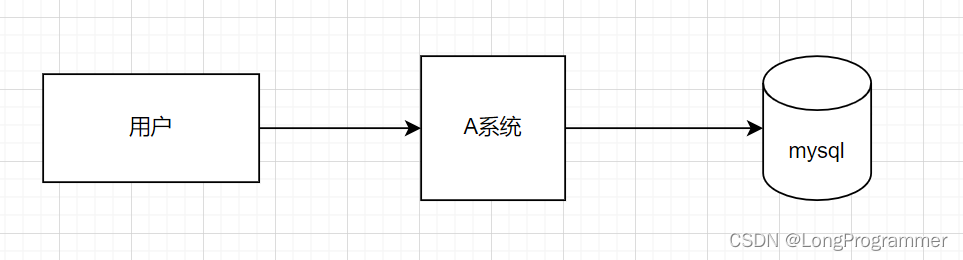
假设用户每秒需要发送5w个请求,而我们的A系统每秒只能处理2w个请求,这样就会导致大量的下单请求失败。而且由于实际请求的数量远远超过系统的处理能力,此时也有可能导致系统宕机。

用户每秒发送5k个请求,我们可以先将下单请求数据存储到MQ中,此时在MQ中就缓存了很多的下单请求数据,而A系统根据自己的处理能力从MQ中获取数据进行
下单操作,有了MQ的缓存层以后,就可以保证每一个用户的下单请求可以得到正常的处理,并且这样可以大大提到系统的稳定性和用户体验。
1.2.3 数据分发
假设1系统进行了某一个业务操作以后,需要将这个业务操作结果通知给其他的系统,原始的架构如下所示:
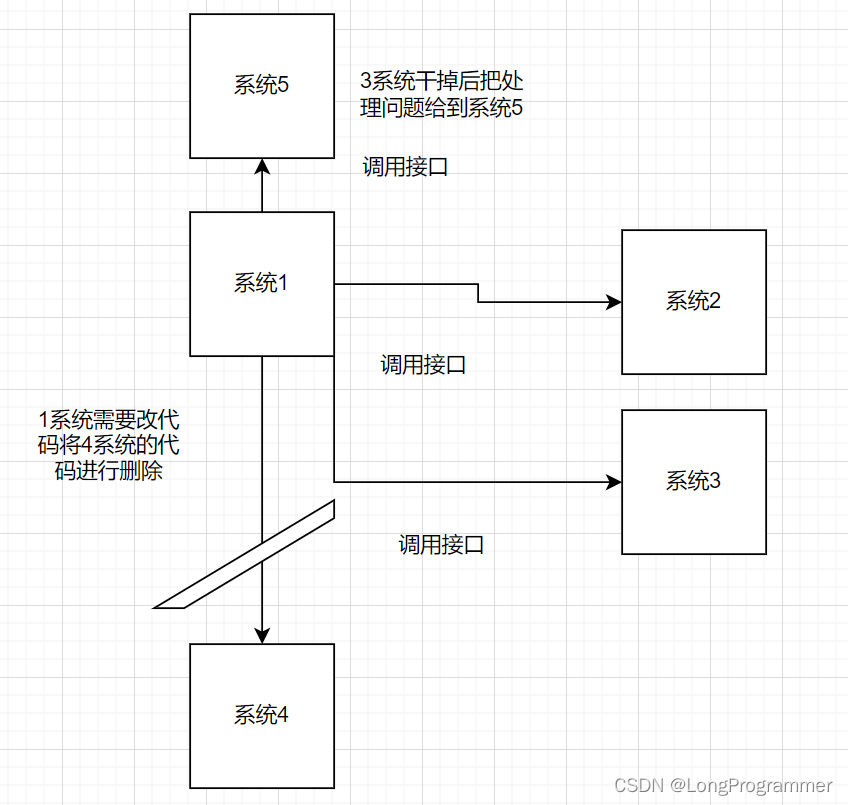
此时2系统、3系统、4系统就需要提供对应的接口,然后让1系统进行调用。如果此时不需要通知4系统了,那么就需要更改A系统的代码,将调用4系统的代码删除
掉。并且如此时项目中添加了一个新的系统5,1系统也需要将处理结构通知给5系统,那么同时也需要更改1系统的代码。这样就不利于后期的维护。
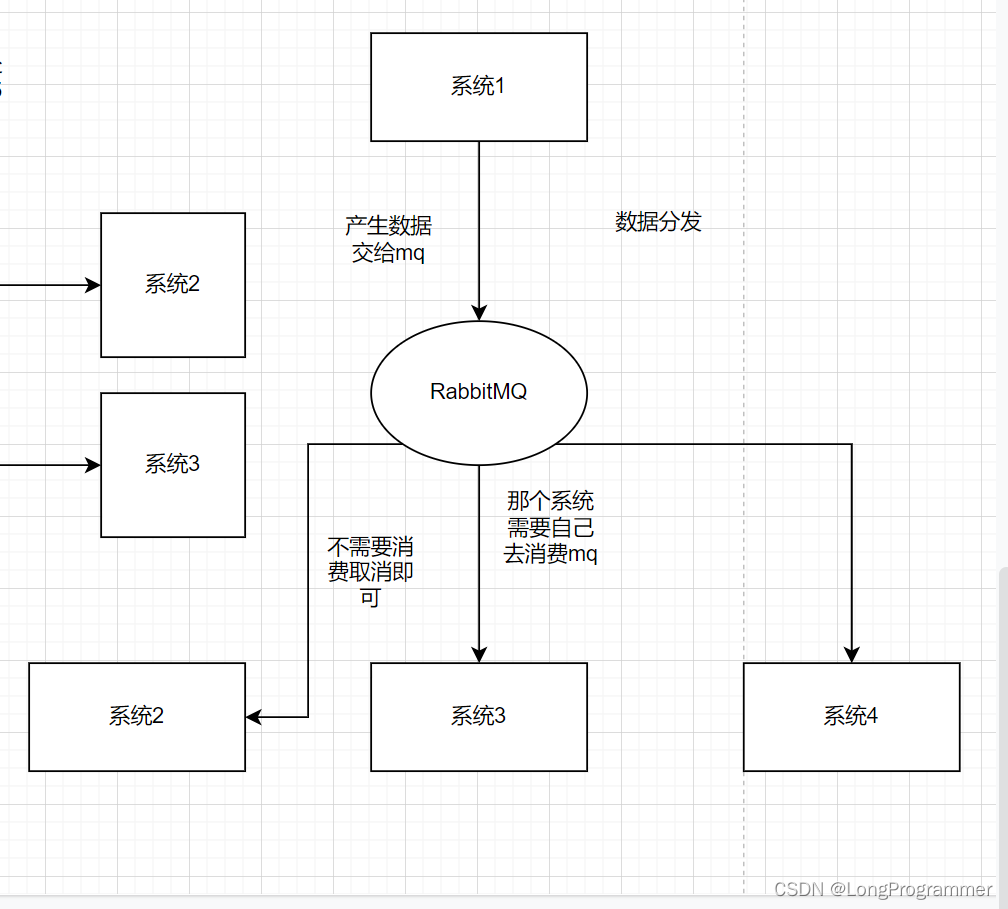
1系统需要将业务操作结果通知给其他的系统时,1系统只需要将结构发送到MQ中。其他的系统只需要从MQ中获取结果即可,如果不需要结果了,此时只需要取消
从MQ中获取结果的操作即可。并且如果新增了一个系统需要获取结果,只需要从MQ中获取结果数据就可以了,1系统的代码不需要进行改动。这样就大大的提高了
系统的维护性。
1.2.4MQ的优缺点
1.系统解耦提高了容错性
2.流量削峰提高了并发能力
4.数据分发提高了后期维护性
5.异步通讯提高了响应速度
缺点:
1、系统可用性降低:系统引入的外部依赖越多,系统稳定性越差。一旦MQ宕机,就会对业务造成影响。
2、系统复杂度提高:MQ的加入大大增加了系统的复杂度。
1.4 Rabbitmq简介
RabbitMQ是由erlang【二郎神】语言开发,基于AMQP(Advanced Message Queue 高级消息队列协议)协议实现的消息队列,它是一种应用程序之间的通信方
法,消息队列在分布式系统开发中应用非常广泛。
RabbitMQ官方地址:RabbitMQ: One broker to queue them all | RabbitMQ
RabbitMQ常见的消息模型:RabbitMQ Tutorials | RabbitMQ
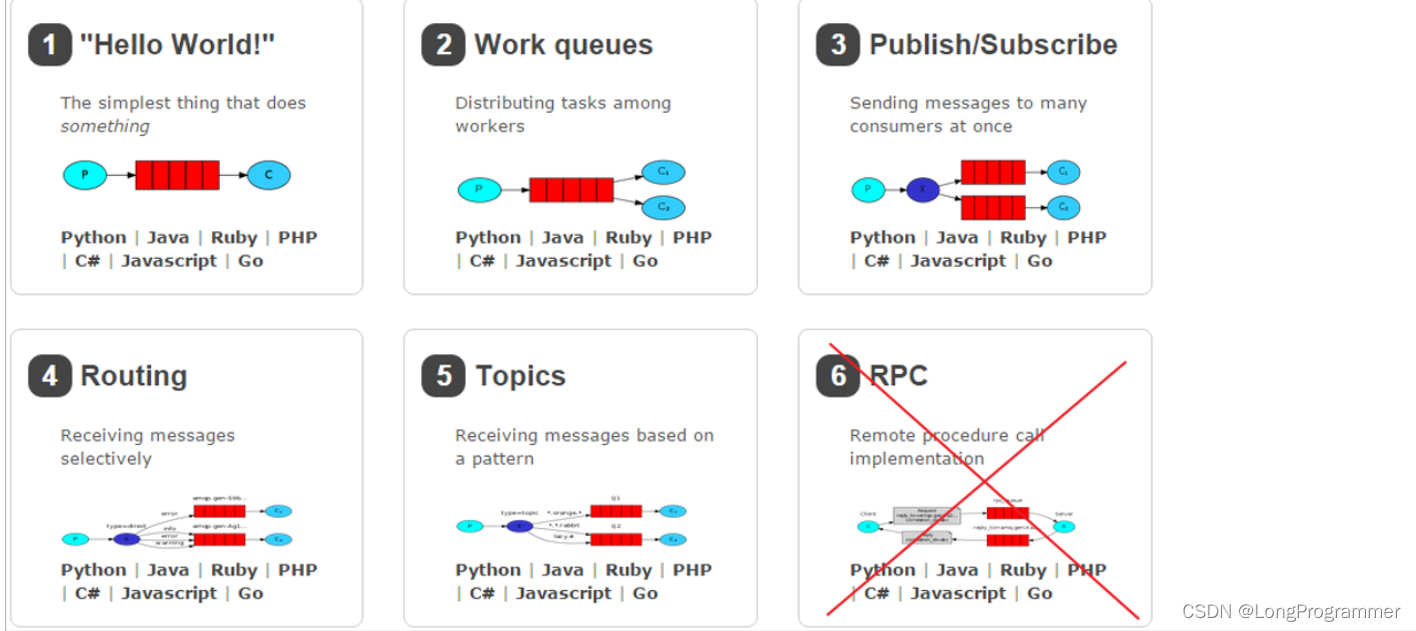
RabbitMQ提供了7种模式:简单模式,work模式 ,Publish/Subscribe发布与订阅模式,Routing路由模式,Topics主题模式,RPC远程调用模式(远程调用),生产者
确认。
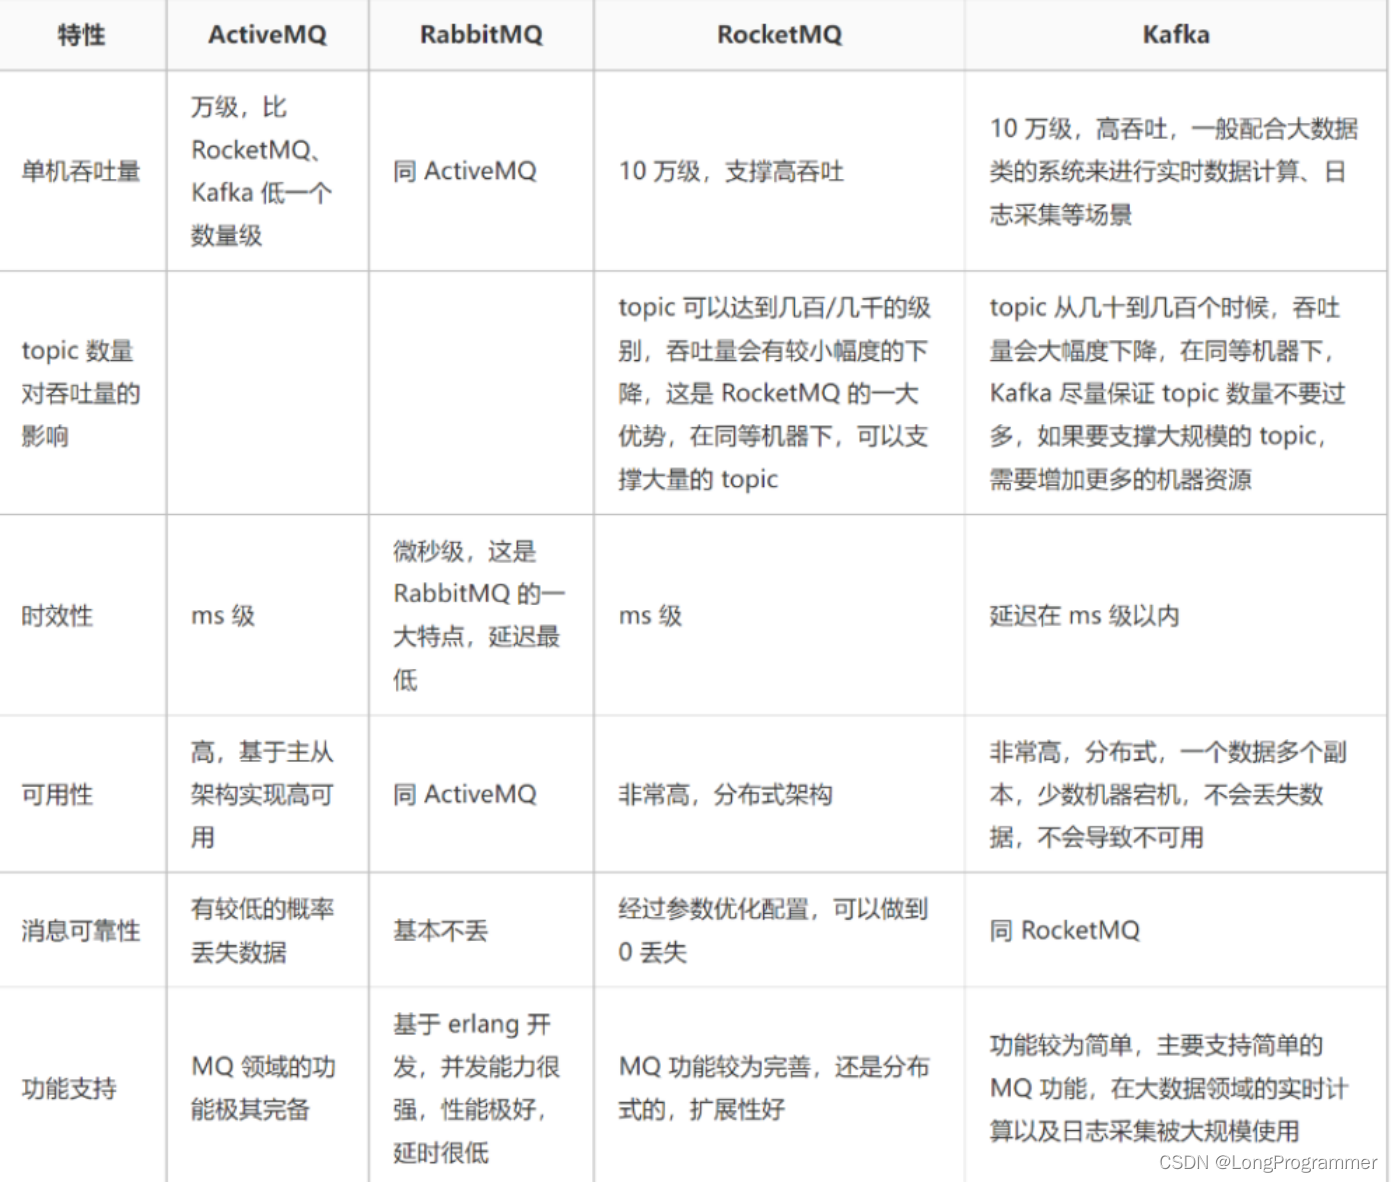
1.5 常见的消息队列产品
市场上常见的消息队列有如下:
1、ActiveMQ
2、Rabbitmq
3、RocketMQ
4、Kafka
常见特性比对:
2 Rabbitmq环境搭建
2.1 部署Rabbitmq
docker pull rabbitmq:management

 docker run -d --name myrabbitmq1 -p 5672:5672 -p 15672:15672 -p 25672:25672 -v myrabbitmq1_data:/var/lib/rabbitmq  --restart=always  rabbitmq:management
2.2控制台使用
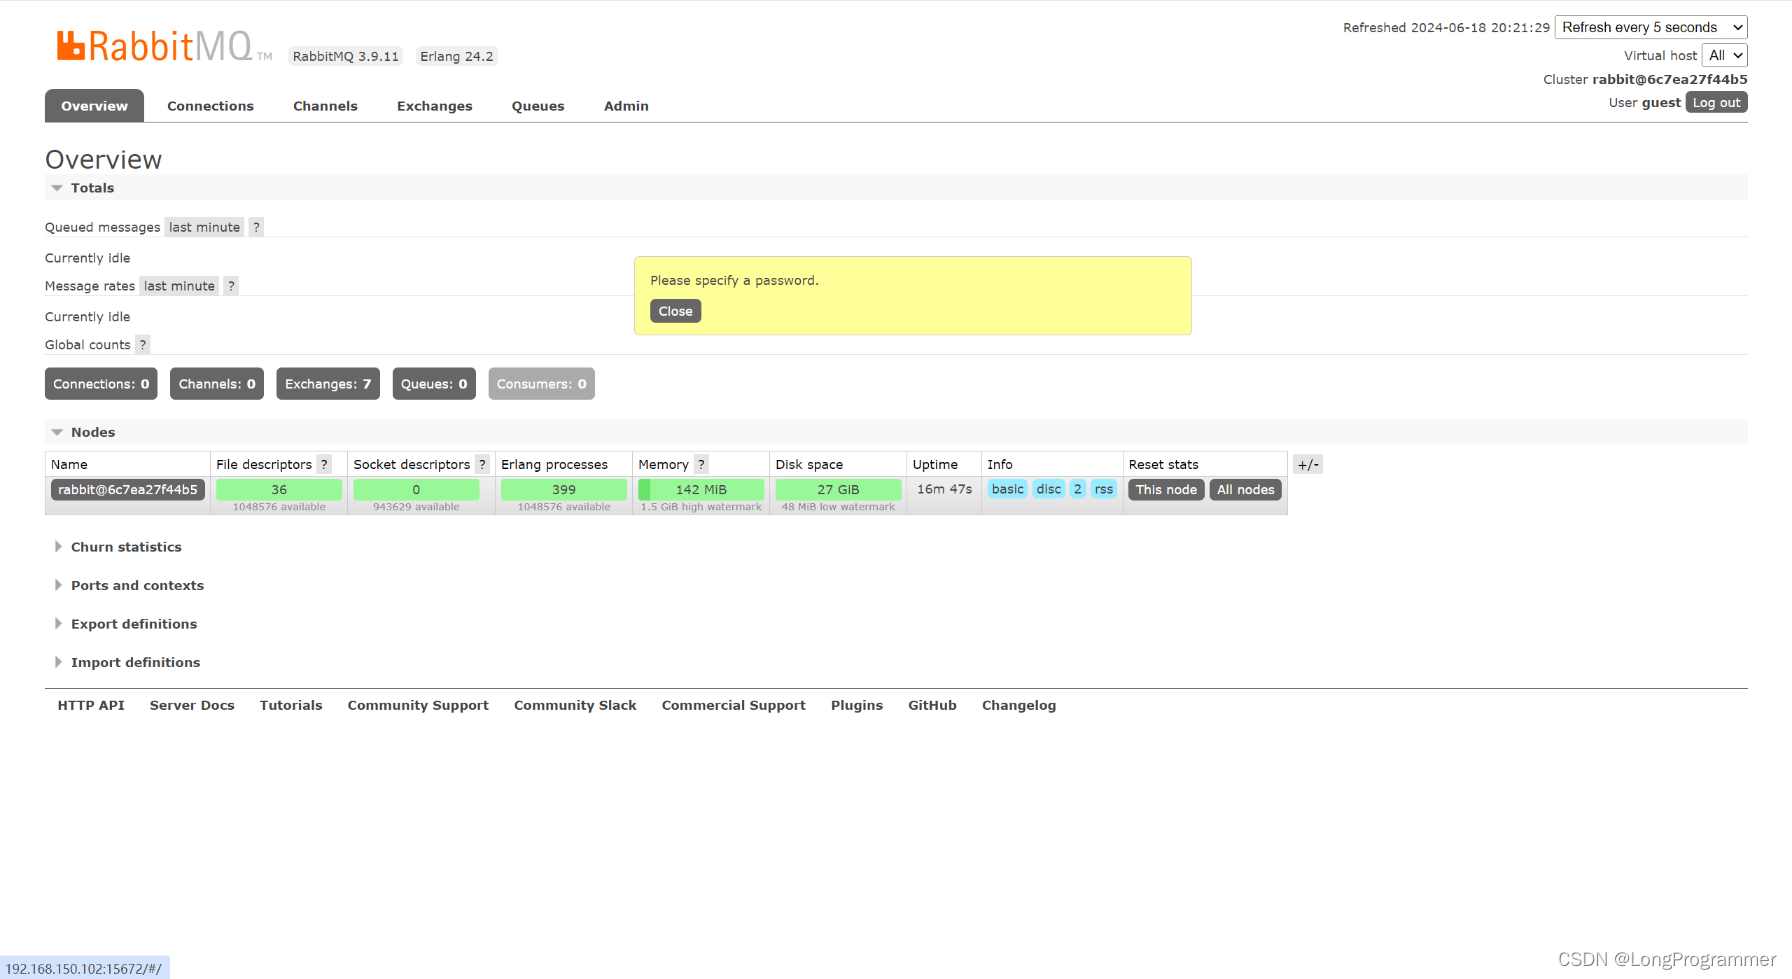
http://192.168.150.102:15672/#/访问地址

2.3rabbitmq架构
rabbitmq的核心组件
1、vh: 虚拟主机
		用来隔离不用的数据
2、user:mq用户
	每个用户可以授权操作不同的vh
3、connection:连接
	客户端和mq建立的连接
4、chennel:通道
	建立连接后准备对mq进行操作时建立的通道

5、exchange: 交换机
	vh中通过交换机分发消息给不同的队列
6、queue: 队列
	vh中最终存放消息的数据结构
	exchange分发消息就是发送到队列中
	只有队列可以存储消息
	交换机不存,如果分发时没有队列 交换机会丢弃消息
7、binding :绑定
	队列按照配置绑定到指定的交换机上
	以后交换机可以将消息分发给绑定的队列
8、message:消息
	发送数据的内容
9、routing:路由
	交换机分发消息到队列的操作
	由binding决定如何分发消息
10、consumer: 消费者  读取消息使用的端
11、producer: 生产者  发送消息到队列的端
2.4 管理界面使用
2.4.1 管理界面选项卡介绍
Rabbitmq管理系统的界面如下所示:
各个选项卡的说明:
1、overview:概览
2、connections:无论生产者还是消费者,都需要与RabbitMQ建立连接后才可以完成消息的生产和消费,在这里可以查看连接情况
3、channels:通道,建立连接后,会形成通道,消息的投递获取依赖通道。
4、Exchanges:交换机,用来实现消息的路由
5、Queues:队列,即消息队列,消息存放在队列中,等待消费,消费后被移除队列
Rabbitmq常见端口号:
5672:RabbitMQ的编程语言客户端连接端口
15672:RabbitMQ管理界面端口
2.4.2 用户管理
在创建容器的时候指定了一个使用Rabbitmq的用户admin,也可以创建新的用户,如下所示:

常见的角色说明:
1、 超级管理员(administrator):可登录管理控制台,可查看所有的信息,并且可以对用户,策略(policy)进行操作。
2、 监控者(monitoring):可登录管理控制台,同时可以查看rabbitmq节点的相关信息(进程数,内存使用情况,磁盘使用情况等)
3、 策略制定者(policymaker):可登录管理控制台, 同时可以对policy进行管理。但无法查看节点的相关信息。
4、 普通管理者(management):仅可登录管理控制台,无法看到节点信息,也无法对策略进行管理。
5、 其他:无法登录管理控制台,通常就是普通的生产者和消费者。
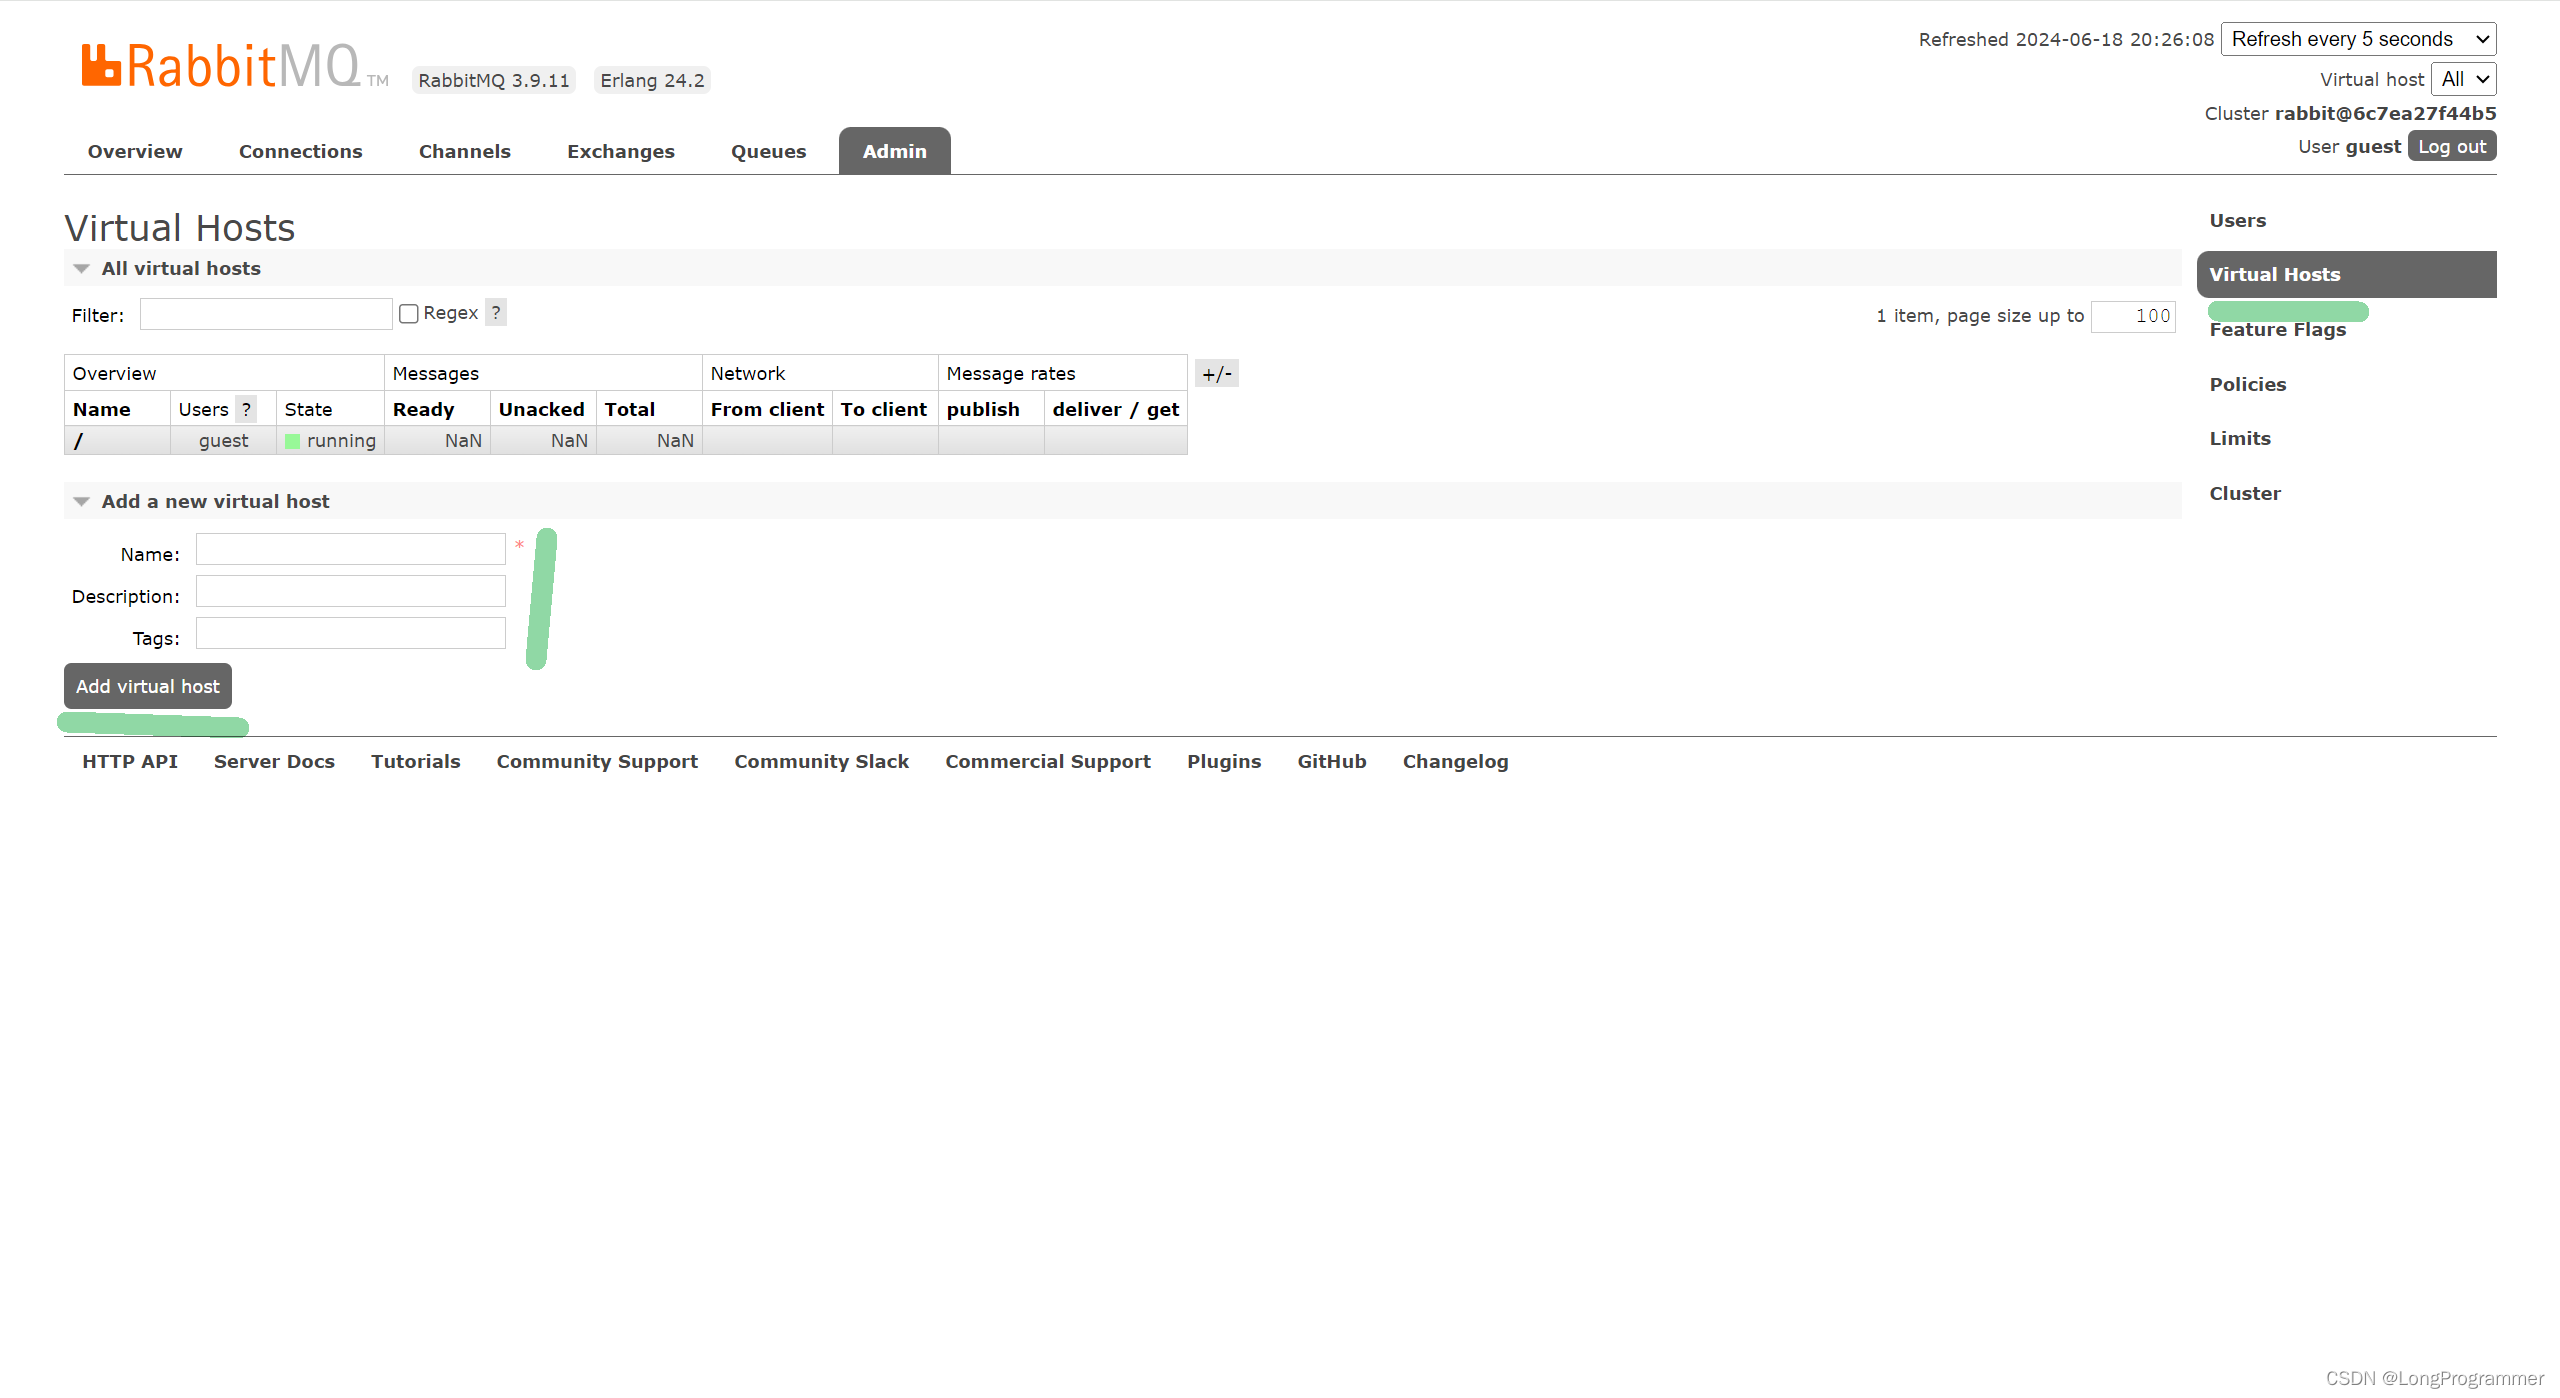
2.4.2 虚拟主机管理
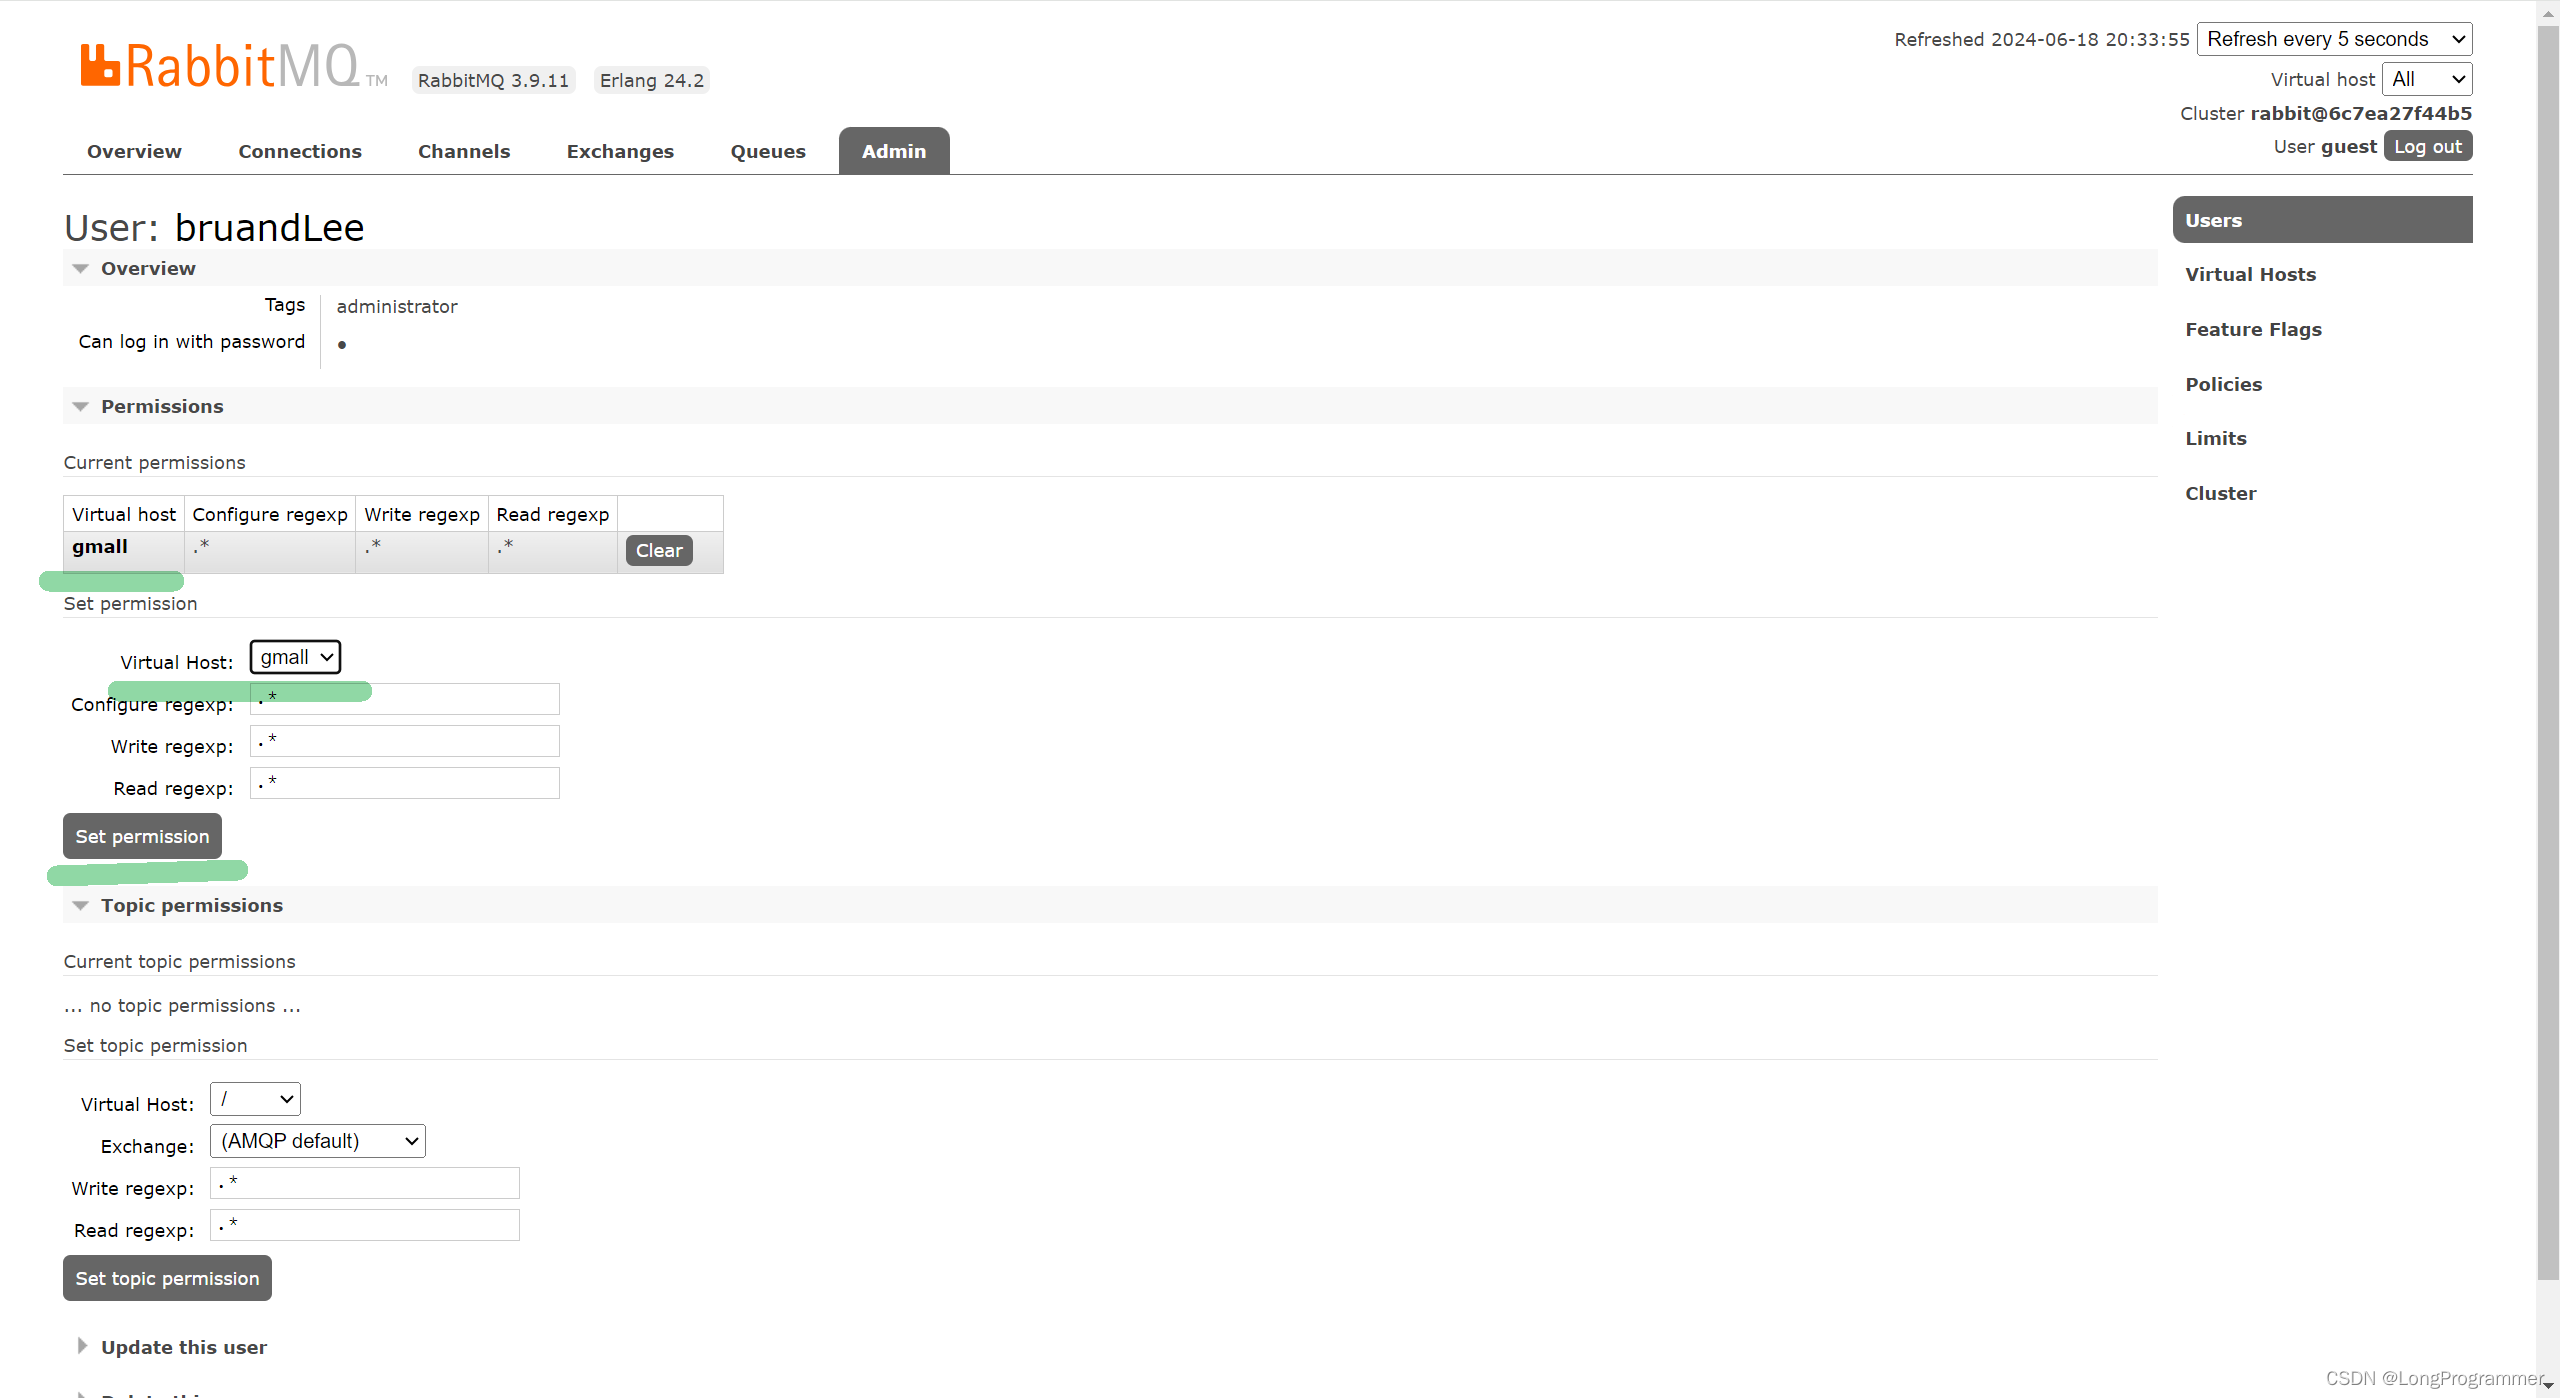
2.4.3 设置访问权限
虚拟创建好了以后,就可以给用户设置访问该虚拟机的权限,如下所示:
3.创建springboot项目实战rabbitMq

配置文件
spring:
  rabbitmq:
    host: 192.168.150.102
    port: 5672
    username: shunfeng
    password: root123
    virtual-host: /shunfeng
4、发送消息到mq
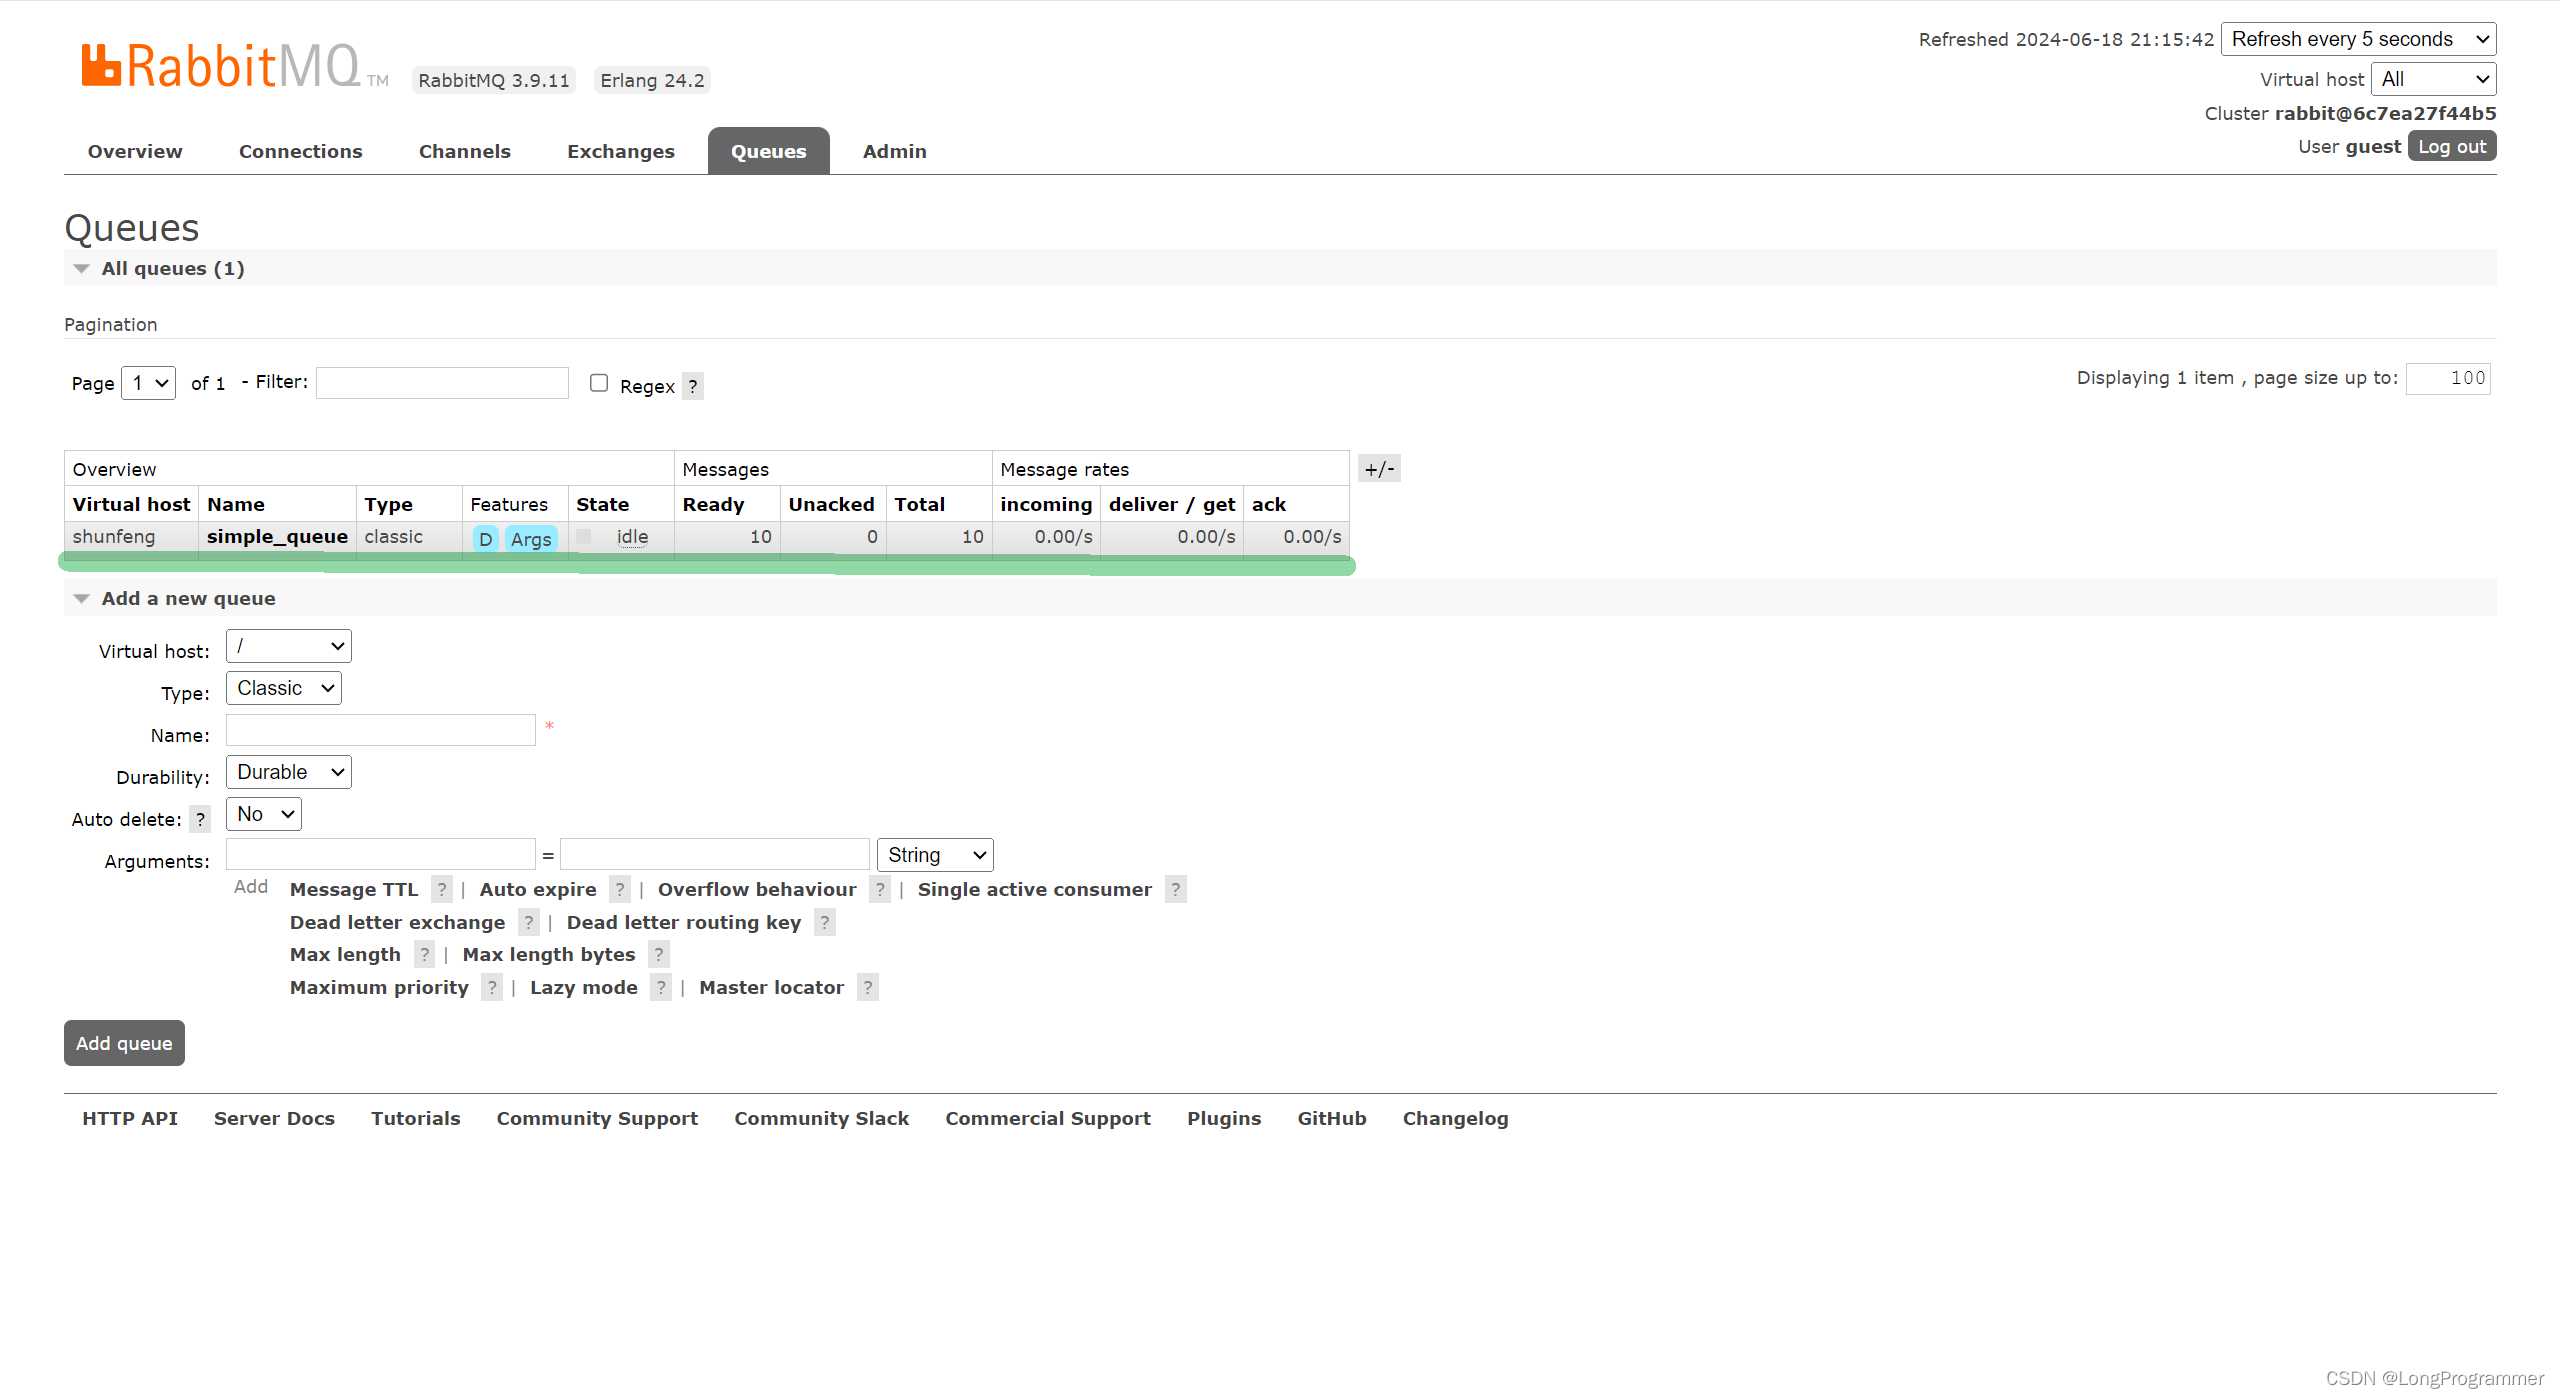
在rabbitmq控制台先创建simple_queue队列
@Resource
RabbitTemplate rabbitTemplate;
//    @Resource
//    AmqpTemplate amqpTemplate;
@Test
void contextLoads() {
    for (int i = 0; i < 10; i++) {
        rabbitTemplate.convertAndSend("simple_queue","hello,mq!!_"+i);
    }
}
在rabbitmq控制台查看simple_queue中的消息

3.2 消费者服务
搭建项目 参考上面生产者服务(创建、引入依赖、配置文件)
3.2 消费者服务
搭建项目 参考上面生产者服务(创建、引入依赖、配置文件)
获取mq中的消息使用
@Component
public class MqListeners {
//    @RabbitListener  在组件类中 通过该注解标注的方法就是一个消费者方法
    @RabbitListener(queues = {"simple_queue"}) //queues用来指定要监听的队列
    public void simpleQueueListener(Message message){
//        message.getMessageProperties() 获取消息其他的信息
        String msg = new String(message.getBody()); //获取消息内容转为字符串
        System.out.println("simpleQueueListener 接受到消息:"+msg);
    }
}
启动消费者服务:
可以观察控制台消费消息的情况
4、五大消息模型
4.1 简单消息模型simple
一个消费者
一个生产者
一个队列

可以保证消息有序消费
4.2 work消息模型
simple消息模型只有一个消费者,会导致消息积压问题解决:可以使用多个消费者消费
多个消费者
一个生产者
一个队列
一个队列中的每个消息只能被消费一次
特点: 默认轮询将消息交给多个消费者消费
1、生产者服务
配置类初始化队列
package com.shunfeng;

import org.junit.jupiter.api.Test;
import org.springframework.amqp.rabbit.core.RabbitTemplate;
import org.springframework.beans.factory.annotation.Autowired;
import org.springframework.boot.test.context.SpringBootTest;

@SpringBootTest
class RabbitmqProducerApplicationTests {

    @Autowired
    private RabbitTemplate rabbitTemplate;

    @Test
    void contextLoads() {
        for(int x = 0 ;  x < 10 ; x++) {
            rabbitTemplate.convertAndSend("work_queue" , "hello rabbitmq..." + x);
        }
    }

}
消费者代码
编写两个消费者监听器,如下所示:
package com.shunfeng.config;

import org.springframework.amqp.core.Message;
import org.springframework.amqp.rabbit.annotation.RabbitListener;
import org.springframework.stereotype.Component;

@Component
public class Consumer01Listener {


    @RabbitListener(queues = "work_queue")
    public void consumer01(Message message) {
        byte[] body = message.getBody();
        String msg = new String(body);
        System.out.println("consumer01Listener ...msg ----> " + msg);


    }
}
package com.shunfeng.config;


import org.springframework.amqp.core.Message;
import org.springframework.amqp.rabbit.annotation.RabbitListener;
import org.springframework.stereotype.Component;

@Component
public class Consumer02Listener {

    @RabbitListener(queues = "work_queue")
    public void consumer01(Message message) {
        byte[] body = message.getBody();
        String msg = new String(body);
        System.out.println("consumer02Listener....msg ----> " + msg);
    }

}
消费者服务
1、自定义交换机、队列、队列绑定交换机
spring_test_fanout  :交换机
	spring_test_fanout_queue1 : 队列1
    spring_test_fanout_queue2: 队列2
自定义交换机后,必须使用它的队列来绑定它
生产者
package com.shunfeng.config;

import org.springframework.amqp.core.*;
import org.springframework.context.annotation.Bean;
import org.springframework.context.annotation.Configuration;

@Configuration
public class MqConsumerConfig {

    //1.1、fanout交换机
    @Bean
    public Exchange springTestFanoutExchange(){
        return ExchangeBuilder
            .fanoutExchange("spring_test_fanout") //fanoutExchange表示创建fanout类型的交换机,"spring_test_fanout"表示交换机名
            .durable(true)
            .build();
    }
    //1.2、创建存储消息的队列
    // 为每个需要单独消费一次消息的消费者创建一个对应的队列
    @Bean
    public Queue springTestFanoutQueue1(){
        return QueueBuilder.durable("spring_test_fanout_queue1").build();
    }
    @Bean
    public Queue springTestFanoutQueue2(){
        return QueueBuilder.durable("spring_test_fanout_queue2").build();
    }
    //1.3、绑定交换机和队列: 交换机以后才可以将消息分发给队列
    @Bean
    public Binding springTestFanoutQueue1Bind(Exchange springTestFanoutExchange, Queue springTestFanoutQueue1){
        return BindingBuilder.bind(springTestFanoutQueue1)//要绑定的队列
            .to(springTestFanoutExchange)
            .with("") //交换机
            .noargs(); //不需要其他参数 进行构建

    }
    @Bean
    public Binding springTestFanoutQueue2Bind(Exchange springTestFanoutExchange,Queue springTestFanoutQueue2){
        return BindingBuilder.bind(springTestFanoutQueue2)//要绑定的队列
            .to(springTestFanoutExchange)
            .with("") //交换机
            .noargs(); //不需要其他参数 进行构建

    }
}
消费者
package com.shunfeng.config;

import org.springframework.amqp.core.Message;
import org.springframework.amqp.rabbit.annotation.RabbitListener;
import org.springframework.context.annotation.Configuration;

@Configuration
public class MqLisener2 {

    @RabbitListener(queues = "spring_test_fanout_queue1")
    public void springTestFanoutQueueListener1(Message message){
        System.out.println("sspringTestFanoutQueueListener1获取到消息:"+new String(message.getBody()));
    }

    @RabbitListener(queues = {"spring_test_fanout_queue1"})
    public void springTestFanoutQueueListener2(Message message){
        System.out.println("springTestFanoutQueueListener2获取到消息:"+new String(message.getBody()));
    }

    @RabbitListener(queues = {"spring_test_fanout_queue2"})
    public void springTestFanoutQueueListener3(Message message) throws InterruptedException {
        System.out.println("springTestFanoutQueueListener3获取到消息:"+new String(message.getBody()));
        //触发业务代码执行  消费消息
        Thread.sleep(6000);

    }
}
    @Test
    void test2(){
        for (int i = 1; i <= 20; i++) {
            //参数1:交换机,参数2:路由key
            rabbitTemplate.convertAndSend("spring_test_fanout","","hello,rabbitmq!!_"+i);
        }
    }
.4 direct定向消息模型
fanout交换机会将消息路由给每一个绑定到自己上面的队列
direct消息模型在发送消息时可以为消息指定一个路由key(routing key)
队列绑定交换机时需要指定一个路由key
当发送消息到交换机时 ,交换机判断如果消息的路由key和队列的路由key一致分发消息
1、自定义交换机、队列、队列绑定交换机指定路由key
//2.1、direct交换机
@Bean
public Exchange springTestDirectExchange(){
return ExchangeBuilder
.directExchange("spring_test_direct") //directExchange表示创建direct类型的交换机,"spring_test_direct"表示交换机名
.durable(true)
.build();
}
//2.2、direct交换机的队列
@Bean
public Queue springTestDirectQueue1(){
return QueueBuilder.durable("spring_test_direct_queue1").build();
}
@Bean
public Queue springTestDirectQueue2(){
return QueueBuilder.durable("spring_test_direct_queue2").build();
}
//2.3、direct交换机队列绑定 配置路由key
@Bean
public Binding springTestDirectQueue1Bind(Queue springTestDirectQueue1,Exchange springTestDirectExchange){
return BindingBuilder.bind(springTestDirectQueue1)
.to(springTestDirectExchange)
//当前队列接受的消息路由key必须为order.insert
.with("order.insert") //指定绑定的路由key
.noargs();
}
@Bean
public Binding springTestDirectQueue2Bind1(Queue springTestDirectQueue2,Exchange springTestDirectExchange){
return BindingBuilder.bind(springTestDirectQueue2)
.to(springTestDirectExchange)
//当前队列接受的消息路由key必须为order.delete
.with("order.delete") //指定绑定的路由key
.noargs();
}
@Bean
public Binding springTestDirectQueue2Bind2(Queue springTestDirectQueue2,Exchange springTestDirectExchange){
return BindingBuilder.bind(springTestDirectQueue2)
.to(springTestDirectExchange)
//当前队列接受的消息路由key必须为order.delete
.with("order.insert") //指定绑定的路由key
.noargs();
}2、创建消费者消费消息
@Component
public class MqListener3 {
@RabbitListener(queues = {"spring_test_direct_queue1"})
public void springTestDirectQueue1Listener(Message message){
System.out.println("1-DirectQueueListener 获取到消息:"+new String(message.getBody()));
}
@RabbitListener(queues = {"spring_test_direct_queue2"})
public void springTestDirectQueue2Listener(Message message){
System.out.println("2-DirectQueueListener 获取到消息:"+new String(message.getBody()));
}
}3、生产消息
 @Test
    void test3(){
        for (int i = 1; i <= 20; i++) {
            //参数1:交换机,参数2:路由key
            rabbitTemplate.convertAndSend("spring_test_direct",i%2==0?"order.insert":"order.delete",
                    i%2==0?"新增order":"删除order");
        }
    }
4.5 topic通配消息模型
direct消息模型 一个队列绑定交换机时如果指定多个路由key 需要绑定多次
topic消息模型支持路由key使用通配符: #任意多字符任意多级, *一级任意多字符
1、自定义交换机、队列、队列绑定交换机指定路由key
//3.1、topic交换机
@Bean
public Exchange springTestTopicExchange(){
    return ExchangeBuilder
        .topicExchange("spring_test_topic") //topicExchange表示创建topic类型的交换机,"spring_test_topic"表示交换机名
        .durable(true)
        .build();
}
//3.2、topic交换机的队列
@Bean
public Queue springTestTopicQueue1(){
    return QueueBuilder.durable("spring_test_topic_queue1").build();
}
@Bean
public Queue springTestTopicQueue2(){
    return QueueBuilder.durable("spring_test_topic_queue2").build();
}

//3.3、topic交换机队列绑定 配置路由key
@Bean
public Binding springTestTopicQueue1Bind(Queue springTestTopicQueue1,Exchange springTestTopicExchange){
    return BindingBuilder.bind(springTestTopicQueue1)
        .to(springTestTopicExchange)
        //当前队列接受的消息路由key必须为order.insert
        //必须接受order开始,下一级不是空的 消息
        .with("order.*") //指定绑定的路由key  支持使用通配符
        .noargs();
}
@Bean
public Binding springTestTopicQueue2Bind(Queue springTestTopicQueue2,Exchange springTestTopicExchange){
    return BindingBuilder.bind(springTestTopicQueue2)
        .to(springTestTopicExchange)
        //当前队列接受的消息路由key必须为order.insert
        .with("order.#") //指定绑定的路由key  支持使用通配符
        .noargs();
}
2、创建消费者消费消息
@Component
public class MqListener4 {
@RabbitListener(queues = {"spring_test_topic_queue1"})
public void springTestTopicQueue1Listener(Message message){
System.out.println("1-TopicQueueListener 获取到消息:"+new String(message.getBody())+"路由key: "
+message.getMessageProperties().getReceivedRoutingKey());
}
@RabbitListener(queues = {"spring_test_topic_queue2"})
public void springTestTopicQueue2Listener(Message message){
System.out.println("2-TopicQueueListener 获取到消息:"+new String(message.getBody())+"路由key: "
+message.getMessageProperties().getReceivedRoutingKey());
}
}3、生产消息
@Test
void test4(){
rabbitTemplate.convertAndSend("spring_test_topic","order.insert",
"新增order1");
rabbitTemplate.convertAndSend("spring_test_topic","order",
"新增order2");
rabbitTemplate.convertAndSend("spring_test_topic","order.select.item",
"查询order3");
rabbitTemplate.convertAndSend("spring_test_topic","select.order.all",
"查询所有order4");
}5、@RabbitListener注解
消费者服务
@RabbitListener可以使用已存在的队列
也可以新创建交换机队列绑定
@Component
public class MqListener5 {
//queues:队列已存在时使用 , 当队列已经在配置文件中创建好了 并且绑定了交换机时 使用
@RabbitListener(
//创建一个绑定,将队列绑定到指定交换机 并配置路由key
bindings = {
//使用队列绑定到交换机,路由key为*.log.#
@QueueBinding(
value = @Queue(name = "spring_test_topic2_queue1"
,durable = "true"
),
exchange = @Exchange(type = "topic" ,name = "spring_test_topic2"),
key = "*.log.#"
)
}
)
public void consumer(Message message){
System.out.println("接受到消息:"+new String(message.getBody())+
" routing key: "+ message.getMessageProperties().getReceivedRoutingKey());
}
}发送消息
@Test
void test5(){
rabbitTemplate.convertAndSend("spring_test_topic2","order.log.insert",
"新增order1");
rabbitTemplate.convertAndSend("spring_test_topic2","user.log.error",
"新增order2");
rabbitTemplate.convertAndSend("spring_test_topic2","user.select.item",
"查询order3");
rabbitTemplate.convertAndSend("spring_test_topic2","select.order.all",
"查询所有order4");
}


 335
335


 被折叠的 条评论
为什么被折叠?
被折叠的 条评论
为什么被折叠?
 到【灌水乐园】发言


