1 概念
为什么要用mybatis
JDBC:
SQL夹在Java代码块里,耦合度高导致硬编码内伤,维护不易且实际开发需求中sql是有变化,频繁修改的情况多见。
Hibernate和JPA:
长难复杂SQL,对于Hibernate而言处理也不容易
内部自动生产的SQL,不容易做特殊优化。
对开发人员而言,核心sql还是需要自己优化+掌握在自己手上,简单来说,就是一句话,
* sql和java编码分开,功能边界清晰,一个专注业务、一个专注数据,可以使用简单的XML或注解
用于配置和原始映射,将接口和Java的POJO映射成数据库中的记录,完成业务代码+底层数据库的媒介
2 mybatis--helloworld
1) 导包
mybatis的jar包 : mybatis-3.2.8.jar
数据库驱动 : mysql-connector-java-5.1.37-bin.jar
mybatis在工作的时候,为了方便观察sql。导入日志包: log4j.jar
log4j必须有一个配置文件才能工作。
2) 编写mybatis的全局配置文件。指导mybatis如何工作的。引入约束文件(为了有提示)
<?xml version="1.0" encoding="UTF-8" ?>
<!DOCTYPE configuration
  PUBLIC "-//mybatis.org//DTD Config 3.0//EN"
  "http://mybatis.org/dtd/mybatis-3-config.dtd">
 <!-- mybatis的全局配置文件。 -->
<configuration>
	<!--配置所有的mybatis运行时信息 -->
	<!--http://mybatis.org/dtd/mybatis-3-config.dtd 这是约束文件,作用就是约束标签该怎么写。
	 -->
	 <!--1、配置mybatis'的数据库环境,default="development"指定默认使用哪个环境 -->
	<environments default="development">
		<!--配置一个具体的环境   id="development"指定环境的唯一标识-->
		<environment id="development">
			<!--配置事务管理器  -->
			<transactionManager type="JDBC"></transactionManager>
			<!--配置数据源。使用连接池技术.mybatis内置了数据库连接池  -->
			<dataSource type="POOLED">
				<!-- 配置连接池信息 -->
				<property name="driver" value="com.mysql.jdbc.Driver"/>
				<property name="url" value="jdbc:mysql://localhost:3306/mybatis_0829"/>
				<property name="username" value="root"/>
				<property name="password" value="123456"/>
			</dataSource>
		</environment>
		<!-- <environment id="test"></environment>
		<environment id="product"></environment> -->
	</environments>

	<!--注册接口的映射文件。否则接口是找不到的。  -->
	<mappers>
		<mapper resource="com/atguigu/dao/PersonDao.xml"/>
	</mappers>
</configuration>
3) log4j.xml的三种配置方式
① 第一种
<?xml version="1.0" encoding="UTF-8" ?>
<!DOCTYPE log4j:configuration SYSTEM "log4j.dtd">

<log4j:configuration xmlns:log4j="http://jakarta.apache.org/log4j/">

 <appender name="STDOUT" class="org.apache.log4j.ConsoleAppender">
   <param name="Encoding" value="UTF-8" />
   <layout class="org.apache.log4j.PatternLayout">
    <param name="ConversionPattern" value="%-5p %d{MM-dd HH:mm:ss,SSS} %m  (%F:%L) \n" />
   </layout>
 </appender>
 <logger name="java.sql">
   <level value="debug" />
 </logger>
 <logger name="org.apache.ibatis">
   <level value="debug" />
 </logger>
 <root>
   <level value="debug" />
   <appender-ref ref="STDOUT" />
 </root>
</log4j:configuration>
②第二种简洁版
<?xml version="1.0" encoding="UTF-8" ?>
<!DOCTYPE log4j:configuration SYSTEM "log4j.dtd">


<log4j:configuration xmlns:log4j="http://jakarta.apache.org/log4j/">

 <appender name="log.console" class="org.apache.log4j.ConsoleAppender">
   <layout class="org.apache.log4j.PatternLayout">
    <param name="ConversionPattern" value="%d{yyyy-MM-dd HH:mm:ss,SSS} %5p (%C{1}:%M) - %m%n" />
   </layout>
 </appender>
 <!-- -->
 <logger name="org.apache.ibatis">
   <level value="info" />
   <appender-ref ref="log.console" />
 </logger>

 <logger name="com.atguigu">
   <level value="debug" />
   <appender-ref ref="log.console" />
 </logger>

</log4j:configuration>
③ 第三种 .properties文件
# For JBoss: Avoid to setup Log4J outside $JBOSS_HOME/server/default/deploy/log4j.xml!
# For all other servers: Comment out the Log4J listener in web.xml to activate Log4J.
#log4j.rootLogger=INFO, stdout, logfile
log4j.rootLogger=DEBUG, stdout

log4j.appender.stdout=org.apache.log4j.ConsoleAppender
log4j.appender.stdout.layout=org.apache.log4j.PatternLayout
log4j.appender.stdout.layout.ConversionPattern=%d %p [%c] - %m%n

#log4j.appender.logfile=org.apache.log4j.RollingFileAppender
#log4j.appender.logfile.File=system.log
#log4j.appender.logfile.MaxFileSize=512KB
# Keep three backup files.
#log4j.appender.logfile.MaxBackupIndex=3
# Pattern to output: date priority [category] - message
#log4j.appender.logfile.layout=org.apache.log4j.PatternLayout
#log4j.appender.logfile.layout.ConversionPattern=%d %p [%c] - %m%n
4) 建对应的entity持久化实体
5)建Mapper接口并定义好方法
6) 编写这个接口对应的xml文件。这个xml文件就是指导这个接口的每一个方法是如何工作。不用编 写接口的实现类。
<?xml version="1.0" encoding="UTF-8"?>
<!DOCTYPE mapper
  PUBLIC "-//mybatis.org//DTD Mapper 3.0//EN"
  "http://mybatis.org/dtd/mybatis-3-mapper.dtd">
<!-- namespace:指定接口的全类名
mapper文件:作用:指导dao接口里面的每一个方法如何工作
-->
<mapper namespace="com.atguigu.dao.PersonDao">
	<!-- public void add(Person person); -->
	<!-- 1、指定一个插入操作。id是方法名
	parameterType:指定参数类型。
	 -->
	<insert id="add" parameterType="com.atguigu.entities.Person">
		<!--#{属性名}:取出参数里面这个属性的值  -->
		INSERT INTO tbl_person(NAME,age,birth,registerTime,salary)
		VALUES(#{name},#{age},#{birth},#{registerTime},#{salary});
	</insert>

</mapper>
7)在全局注册这个【配置文件】(添加到mybatis的全局配置文件里边)
<mappers>
   <mapper resource="com/atguigu/mybatis/mapper/PersonMapper.xml"/>
 </mappers>
8)编写Junit单元测试类,执行CRUD操作
package com.atguigu.test;

import static org.junit.Assert.*;

import java.io.IOException;
import java.io.InputStream;
import java.util.Date;

import org.apache.ibatis.io.Resources;
import org.apache.ibatis.session.SqlSession;
import org.apache.ibatis.session.SqlSessionFactory;
import org.apache.ibatis.session.SqlSessionFactoryBuilder;
import org.junit.Test;

import com.atguigu.dao.PersonDao;
import com.atguigu.entities.Person;

public class MyBatisTest {

	@Test
	public void test() throws IOException {
		InputStream inputStream = Resources.getResourceAsStream("mybatis-config.xml");
		//1、根据配置文件创建出sqlSessionFactory
		SqlSessionFactory sqlSessionFactory = new SqlSessionFactoryBuilder().build(inputStream);
		//2、获取一个称为SqlSession的对象,用来执行数据的增删改查
		SqlSession openSession = null;
		try {
			openSession = sqlSessionFactory.openSession();
			//4、获取到接口
			PersonDao mapper = openSession.getMapper(PersonDao.class);
			//5、调用方法
			mapper.add(new Person(null, "张三", 18, new Date(), new Date(), 9998.98));
			//6、提交数据
			openSession.commit();
		} catch (Exception e) {
			// TODO Auto-generated catch block
			e.printStackTrace();
		}finally{
			//7、关闭资源
			openSession.close();
		}
	}
}
第一个case总结:
XXXMapper.xml文件中,namespace必须是接口全路径
XXXMapper.xml中的id必须是接口里面的方法名 ,两者一致
XXXMapper.xml中的parameterType类型必须和对应方法的形参一致
XXXMapper.xml中的resultType类型必须和对应方法的返回值类型一致
每个线程都应该有它自己的SqlSession实例。SqlSession的实例不能共享使用,
它也是线程不安全的,定义为局部变量
mapper接口实现动态代理对象:
定义:只需要编写mapper接口的(等价于传统的dao接口),
Impl实现类,也即动态代理+面向接口
XXXdao接口-------->XXXMapper.java
XXXdao接口Impl实现类-------->XXXMapper.xml
3 Mapper+Annotation入门增强
3.1 传统的dao : Dao接口 DaoImpl
3. 2 Mybatis也是支持注解:
① 重写接口
② 在接口方法上新增加注解
public interface PersonMapperAnnotation
{
 @Insert("insert into tbl_person(name,age,birth,registerTime,salary) "
    + "values(#{name},#{age},#{birth},#{registerTime},#{salary})")
 public void add(Person person);

 @Delete("delete from tbl_person where id=#{id}")
 public void delete(Integer id);

 @Update("update tbl_person set name=#{name},age=#{age},birth=#{birth},registerTime=#{registerTime},salary=#{salary} where id=#{id}")
 public void update(Person person);

 @Select("select * from tbl_person where id=#{id}")
 public Person getPersonById(Integer id);

 @Select("select * from tbl_person")
 public List<Person> getAllPerson();
}
③到mybatis的配置文件里面注册该接口类(含注解)
<!-- 配置注解接口的类 -->
   <mapper class="com.atguigu.mybatis.mapper.PersonMapperAnnotation"/>
如果没有注册进配置文件,报如下异常信息:

org.apache.ibatis.binding.BindingException: Type interface com.atguigu.mybatis.mapper.PersonMapperAnnotation is not known to the MapperRegistry.
④测试,通过getMapper重新获得注解接口版的XXXMapper.class
@Test
 public void test_Add()
 {
   SqlSession sqlSession = null;
   try
   {
    sqlSession = sqlSessionFactory.openSession();
    PersonMapperAnnotation personMapper = sqlSession.getMapper(PersonMapperAnnotation.class);

    Person person = new Person();
    person.setAge(42);
    person.setBirth(new Date());
    person.setName("左冷禅");
    person.setRegisterTime(new Date());
    person.setSalary(4500.05);

    personMapper.add(person);

    sqlSession.commit();
   } catch (Exception e){
    e.printStackTrace();
   }finally{
    if(sqlSession != null) sqlSession.close();
   }
 }
3 Mybatis的全局配置文件 mybatis-config.xml 细节
MyBatis的XML配置文件包含了影响MyBatis行为甚深的设置和属性信息
3.1 configuration
3.1.1 properties 属性
JDBC--->C3P0,添加外部数据库链接演示
<!--1、引入外部配置文件作为属性
	1)properties标签体中的key=value优先解析
	2)外部配置文件的值,如果有同名,会覆盖properties标签体中

	resource;引用类路径下的资源
	url:引用网络下的资源  http://www.atguigu.com/dbconfig.properties
	 -->
	<properties resource="dbconfig.properties" >
		<property name="username" value="admin"/>
	</properties>
①src文件夹下面新建db.properties
jdbc.user=root
jdbc.password=123456
jdbc.driverClass=com.mysql.jdbc.Driver
jdbc.jdbcUrl=jdbc:mysql://127.0.0.1:3306/mybatis0607?useUnicode=true&characterEncoding=UTF8
②修改mybatis-config.xml
<!-- 引入外部资源文件,将数据库配置设为外部链接 -->
 <properties resource="db.properties"></properties>

    <environment id="development">
    <!-- 使用jdbc事务管理-->
    <transactionManager type="JDBC" />
    <!-- 数据库连接池-->
    <dataSource type="POOLED">
      <property name="driver"    value="${jdbc.driverClass}" />
      <property name="url"        value="${jdbc.jdbcUrl}" />
      <property name="username"   value="${jdbc.user}" />
      <property name="password"   value="${jdbc.password}" />
    </dataSource>
   </environment>
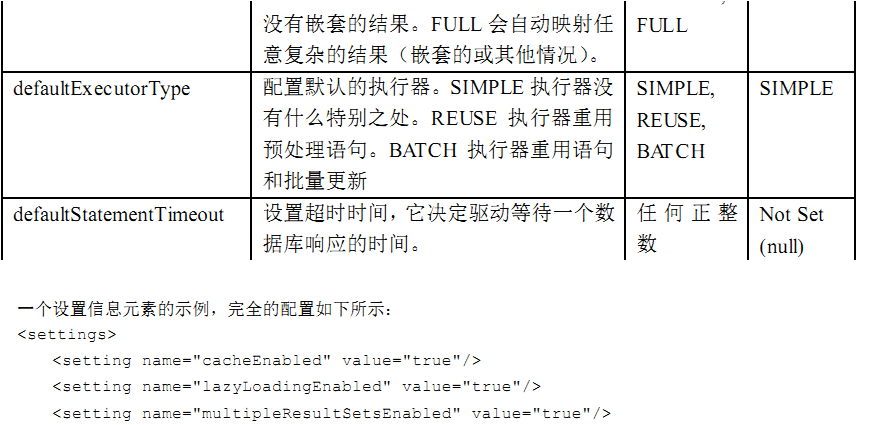
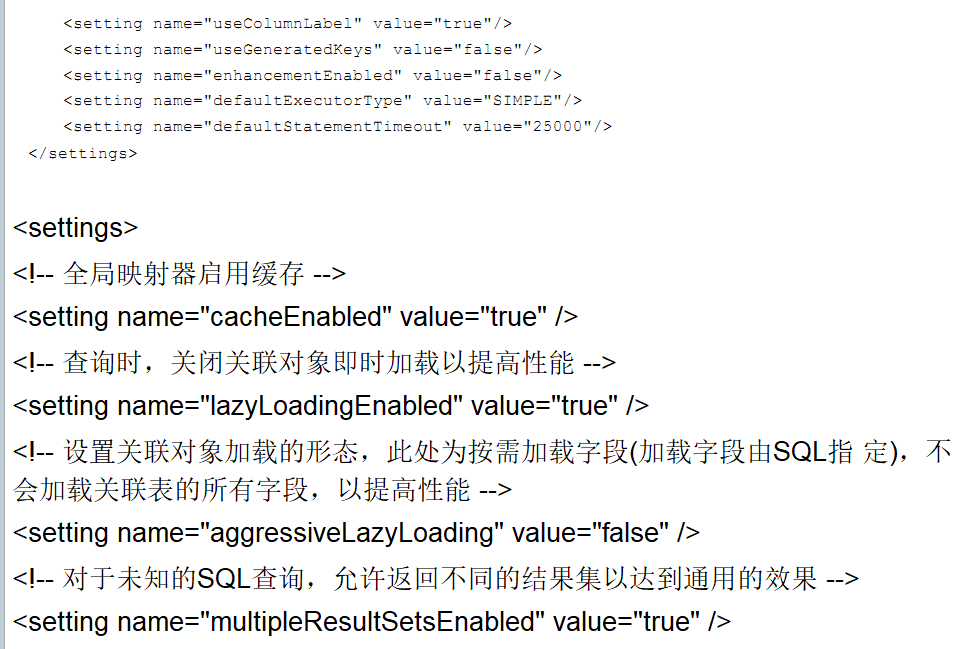
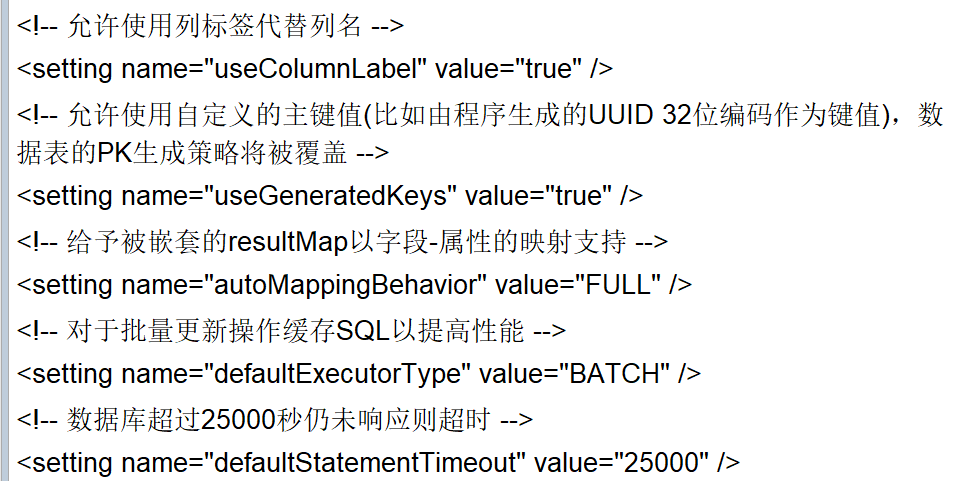
3.1.2 settings 全局参数定义
<!--2、配置某些全局属性,比如是否开启缓存等  -->
	<!-- <settings>
		<setting name="cacheEnabled" value="true"/>
	</settings> -->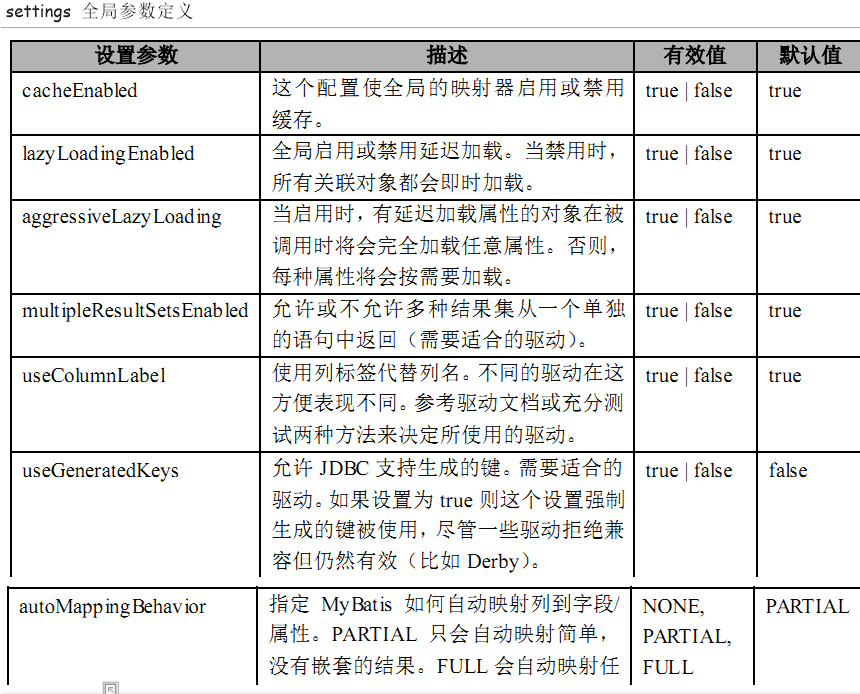
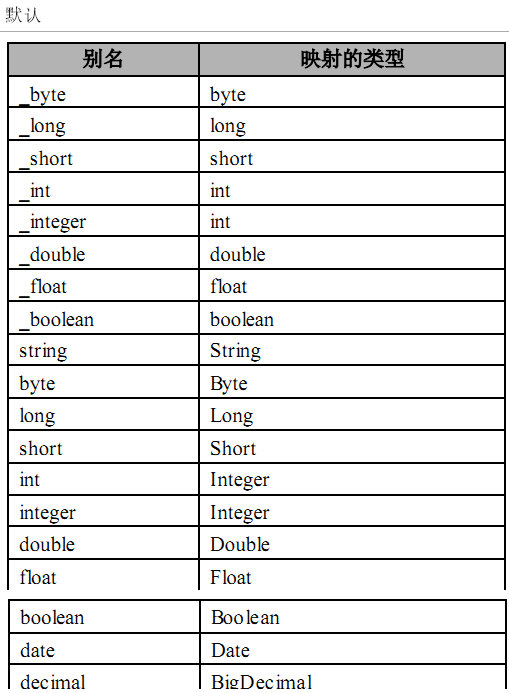
3.1.3 typeAliases 别名处理器
别名是为 Java类型命名一个短的名字。它只和 XML 配置有关,只用来减少类名重复的部分。
配置了mybatis-config.xml会影响XXXMapper.xml的使用
<!--3、别名处理器  -->
	<typeAliases>
		<!--为某个全类名起别名
		type:全类名
		alias:别名
		 -->
		<!-- <typeAlias type="com.atguigu.entities.Person" alias="Person"/> -->
		<!--批量别名,name:指定的是包名。这个包下的所有类,都会有别名,别名默认就是类名  -->
		<package name="com.atguigu.entities"/>
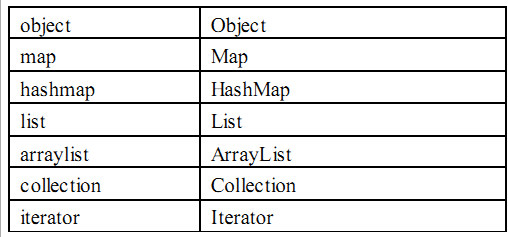
		<!--mybatis为java常用类型已经起好别名了。直接用,不区分大小写。  -->
	</typeAliases>
默认:
自定义
①单个
 <typeAliases>
   <!-- 单独为Perosn进行别名设置 -->
   <typeAlias type="com.atguigu.mybatis.entities.Person" alias="Person"/>
 </typeAliases>

 <insert id="add" parameterType="Person">  红色部分,前面的包名已经没有了。
  insert into tbl_person(name,salary,birth,registerTime)
      values(#{name},#{salary},#{birth},#{registerTime});
 </insert>
②多个
 <typeAliases>
   <!-- 单独为Perosn进行别名设置
   <typeAlias type="com.atguigu.mybatis.entities.Person" alias="Person"/>-->

   <!--批处理别名,扫描整个包下的类 -->
   <package name="com.atguigu.mybatis.entities"/>
 </typeAliases>

<insert id="add" parameterType="Person"> 红色部分,前面的包名已经没有了。
 insert into tbl_person(name,salary,birth,registerTime)
     values(#{name},#{salary},#{birth},#{registerTime});
 </insert>
3.1.4 typeHandlers 类型处理器
<!--
	4、mybatis将数据库字段映射成javaBean中某个属性的时候,默认使用对应的类型处理器在工作。
	1)、我们也可以自定义类型处理器
	2)、定义好以后注册这个类型处理
	3)、我们一般都不需要再去写这些类型处理器了
	<typeHandlers>
		<typeHandler handler=""/>
	</typeHandlers> -->
①用于java类型和jdbc类型映射
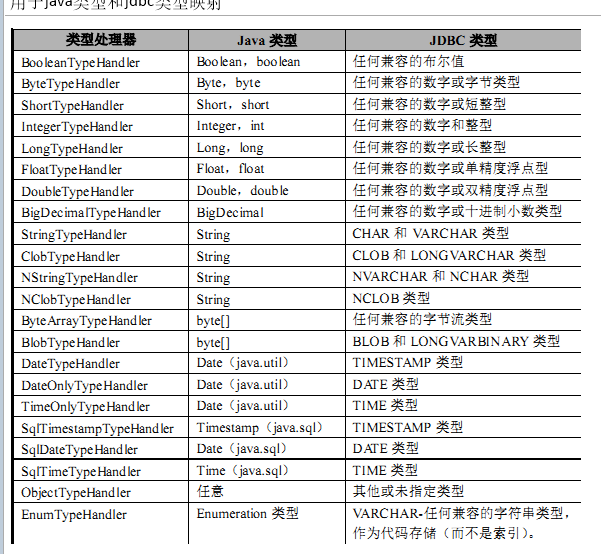
②Mybatis的映射基本已经满足,不太需要重新定义
3.1.5 environments 环境
①environment 环境变量
②transactionManager 事务管理器
③dataSource 数据源
<!--5)、mybatis运行的数据库等环境的配置。  -->
	<!-- default="default":指定使用哪个环境作为默认环境 -->
	<environments default="default">
		<!--每个 environment表示一个具体的环境 -->
		<environment id="default">
			<!-- 事务管理器:
			type="JDBC":这个配置就是直接使用了 JDBC 的提交和回滚设置,它依赖于从数据源得到的连接来管理事务范围。
			type="MANAGED ":这个配置几乎没做什么。它从来不提交或回滚一个连接,
					而是让容器来管理事务的整个生命周期(比如 JEE 应用服务器的上下文)。 默认情况下它会关闭连接,然而一些容器并不希望这样,因此需要将 closeConnection 属性设置为 false 来阻止它默认的关闭行为。
			type="自己的事务管理的全类名",如果自己写必须实现TransactionFactory接口
			 -->
			<transactionManager type="JDBC"></transactionManager>

			<!-- 数据源的配置
			type="UNPOOLED":不使用连接池技术。
			type="POOLED":使用连接池技术。mybatis自带的连接池
			type="JNDI":Java Named Directory Interface(java命名目录接口,ejb)
			type="指定自己的连接池的全类名":必须实现DataSourceFactory接口,返回第三方数据源即可
			 -->
			<dataSource type="POOLED">
				<!-- ${driver}取出properties配置的值 -->
				<property name="driver" value="${driver}"/>
				<property name="username" value="${username}"/>
				<property name="password" value="${password}"/>
				<property name="url" value="${url}"/>
			</dataSource>
		</environment>
	</environments>
3.1.6 mappers 映射器
1) resource:XXXMapper.xml文件
<mapper resource="com/atguigu/mybatis/mapper/PersonMapper.xml"/>
2) class:接口注解实现
<mapper class="com.atguigu.mybatis.mapper.PersonMapper"/>
3)url:外部路径
①<mapper url="file:///D:\43\mybatis_01\config\sqlmap\Person.xml" />
②不建议使用
4) package
 <mappers>
   <!-- XML配置文件 -->
   <mapper resource="com/atguigu/mybatis/mapper/PersonMapper.xml"/>

   <!-- Annotation -->
   <mapper class="com.atguigu.mybatis.mapper.PersonMapper"/>

   <!-- 注册mapper包下的所有mapper接口,此种方法要求mapper接口名称和mapper映射文件名称遵守mabatis规范,且放在同一个目录中 -->
   <package name="com.atguigu.mybatis.mapper"/>

 </mappers>
<!-- 6)、注册mapper配置文件 -->
	<mappers>
		<!--resource:指定xml文件位置  -->
		<mapper resource="mybatis/mapper/PersonMapper.xml"/>
		<!--class:指定注解版的java文件位置  -->
		<mapper class="com.atguigu.dao.PersonMapperAnnotation"/>
		<mapper resource="mybatis/mapper/CatMapper.xml"/>
		<mapper resource="mybatis/mapper/DogMapper.xml"/>
		<!-- 批量注册。特别注意;必须满足一下条件
		1)、mapper文件和mapper接口在同包下
		2)、两个同名
		-->
		<!-- <package name="com.atguigu.dao"/> -->
	</mappers>
	<!--注意点:标签是有顺序的;顺序必须正确:
	properties?,settings?,typeAliases?,typeHandlers?,objectFactory?,
objectWrapperFactory?,plugins?,environments?,databaseIdProvider?,mappers?
	  -->
4 SQL映射的XML文件XXXMapper.xml
4.1 insert、delete、update、select
1)主键的生成方式 (Person插入数据后想获得主键)
①有自增Mysql
<insert id="add" parameterType="Person" useGeneratedKeys="true" keyProperty="id">
   insert into tbl_person(name,salary,birth,registerTime)
       values(#{name},#{salary},#{birth},#{registerTime});
 </insert>

useGeneratedKeys="true" keyProperty="id"
② 无自增Oracle
 <insert id="add" parameterType="Person">
   <selectKey order="BEFORE" keyProperty="id" resultType="_int">
      select crm_seq.nextval from dual
  </selectKey>
  insert into tbl_person(name,salary,birth,registerTime)
      values(#{name},#{salary},#{birth},#{registerTime});
 </insert>
2)如果需要额外功能请自行文档
4.2 parameterType(输入参数类型)
1) 传入简单类型,比如按照id查Person(前面已讲过)
2) 传入POJO类型,前台选了多个条件
package com.atguigu.mybatis.mapper;


import java.util.List;
import java.util.Map;

import org.apache.ibatis.annotations.Param;

import com.atguigu.mybatis.entities.Customer;

public interface CustomerMapper {

	void saveCustomer(Customer customer);

	Customer getCustomerById(Integer custId);

	/**
	 * 将custName和custAge对应的查询条件封装到Customer对象中
	 * @param customer
	 * @return
	 */
	List<Customer> getCustomerByCondition01(Customer customer);

	/**
	 * 查询条件已经无法使用一个实体类对象来封装,所以使用Map来保存
	 * @param map
	 * @return
	 */
	List<Customer> getCustomerByCondition02(Map<String, Object> map);

	/**
	 * 传入多个参数
	 * @param minAge
	 * @param maxAge
	 * @return
	 */
	List<Customer> getCustomerByCondition03(
			@Param("minAgeParam") int minAge,
			@Param("maxAgeParam") int maxAge);

	/**
	 * 使用Map类型封装查询结果
	 * @param orderId
	 * @return
	 */
	Map<String, Object> getDataMap(Integer orderId);

	/**
	 * 将每一条查询结果的Map封装到List中返回
	 * @param orderAmount
	 * @return
	 */
	List<Map<String,Object>> getDataListMap(Integer orderAmount);

	/**
	 * 通过resultMap的方式建立字段名和属性名之间的映射关系
	 * @param custId
	 * @return
	 */
	Customer getCustomerByResultMap(Integer custId);

	void createTable(@Param("tableName") String tableName);
}
<?xml version="1.0" encoding="UTF-8"?>
<!DOCTYPE
	mapper
	PUBLIC "-//mybatis.org//DTD Mapper 3.0//EN"
	"http://mybatis.org/dtd/mybatis-3-mapper.dtd">
<!-- namespace属性:接口全类名 -->
<mapper namespace="com.atguigu.mybatis.mapper.CustomerMapper">

	<!-- 配置保存Customer对象的insert语句 -->
	<!-- id属性:void saveCustomer(Customer customer)方法的方法名 -->
	<!-- #{参数名}格式:如果传入参数是一个实体类对象时,参数名可以使用对象的属性名 -->
	<!-- #{}最终会被替换为?占位符,所以#{}和${}有本质区别,${}只是拼字符串不会转换成?占位符,所以有SQL注入的风险 -->
	<insert id="saveCustomer" parameterType="Customer">
		insert into tbl_cust(cust_name,cust_age) values(#{custName},#{custAge})
	</insert>

	<!-- 以字段别名的方式解决字段名和对象属性名不一致问题 -->
	<select id="getCustomerById" resultType="Customer">
		SELECT cust_id custId,cust_name custName,cust_age custAge
		FROM tbl_cust
		WHERE cust_id=#{custId}
	</select>

	<select id="getCustomerByCondition01" resultType="Customer">
		SELECT cust_id custId,cust_name custName,cust_age custAge
		FROM tbl_cust
		WHERE cust_name like #{custName} and cust_age>#{custAge}
	</select>

	<!-- #{key},根据key从map中获取对应的值作为SQL语句的参数 -->
	<select id="getCustomerByCondition02" resultType="Customer" parameterType="map">
		SELECT DISTINCT c.cust_id custId,cust_name custName,cust_age custAge
		FROM tbl_cust c LEFT JOIN tbl_order o ON c.`cust_id`=o.`cust_id`
		WHERE cust_name LIKE #{custNameKey} AND order_amount>#{orderAmountKey}
	</select>

	<select id="getCustomerByCondition03" resultType="Customer">
		SELECT cust_id custId,cust_name custName,cust_age custAge
		FROM tbl_cust
		<![CDATA[WHERE cust_age > #{minAgeParam} and cust_age < #{maxAgeParam}]]>
	</select>

	<select id="getDataMap" resultType="map">
		SELECT DISTINCT cust_name custName,order_name orderName
		FROM tbl_cust c LEFT JOIN tbl_order o ON c.`cust_id`=o.`cust_id`
		WHERE order_id=#{orderId}
	</select>

	<select id="getDataListMap" resultType="map">
		SELECT DISTINCT cust_name custName,order_name orderName
		FROM tbl_cust c LEFT JOIN tbl_order o ON c.`cust_id`=o.`cust_id`
		WHERE order_amount>#{orderAmount}
	</select>

	<!-- type属性:指定实体类类型 -->
	<resultMap type="Customer" id="customerResultMap">
		<!-- column属性:指定字段名 -->
		<!-- property属性:指定属性名 -->
		<id column="cust_id" property="custId"/>
		<result column="cust_name" property="custName"/>
		<result column="cust_age" property="custAge"/>
	</resultMap>

	<select id="getCustomerByResultMap" resultMap="customerResultMap">
		SELECT cust_id,cust_name,cust_age
		FROM tbl_cust
		WHERE cust_id=#{custId}
	</select>

	<update id="createTable">
		CREATE TABLE ${tableName}(
			app_id INT AUTO_INCREMENT PRIMARY KEY,
			app_name CHAR(100)
		)
	</update>

</mapper>
①新建表tbl_cat
CREATE TABLE `tbl_cat` (
  `id` int(10) NOT NULL AUTO_INCREMENT,
  `catName` varchar(20) DEFAULT NULL,
  `age` int(11) DEFAULT NULL,
  `birth` date DEFAULT NULL,
  PRIMARY KEY (`id`)
);

INSERT INTO tbl_cat(catName,age,birth) VALUES('whiteCat',7,CURRENT_DATE());
INSERT INTO tbl_cat(catName,age,birth) VALUES('blackCat',5,CURRENT_DATE());
INSERT INTO tbl_cat(catName,age,birth) VALUES('yellowCat',3,CURRENT_DATE());
② 新建Cat.java
package com.atguigu.mybatis.entities;
import java.util.Date;
public class Cat
{
 private Integer id;
 private String  catName;
 private int     age;
 private Date    birth;

 public Cat() {}

 public Integer getId()
 {
   return id;
 }

 public void setId(Integer id)
 {
   this.id = id;
 }

 public String getCatName()
 {
   return catName;
 }

 public void setCatName(String catName)
 {
   this.catName = catName;
 }

 public int getAge()
 {
   return age;
 }

 public void setAge(int age)
 {
   this.age = age;
 }

 public Date getBirth()
 {
   return birth;
 }

 public void setBirth(Date birth)
 {
   this.birth = birth;
 }
 @Override
 public String toString()
 {
   return "Cat [id=" + id + ", catName=" + catName + ", age=" + age
      + ", birth=" + birth + "]";
 }
}
③新建CatMapper接口+方法public Cat getCatByConditions(Cat cat)
package com.atguigu.mybatis.mapper;

import java.util.Date;

import com.atguigu.mybatis.entities.Cat;

public interface CatMapper
{
 public Cat getCatByConditions(Cat cat);

}
④新建CatMapper.xml
<?xml version="1.0" encoding="UTF-8"?>
<!DOCTYPE mapper PUBLIC "-//mybatis.org//DTD Mapper 3.0//EN" "http://mybatis.org/dtd/mybatis-3-mapper.dtd">


<mapper namespace="com.atguigu.mybatis.mapper.CatMapper">

 <select id="getCatByConditions" parameterType="Cat" resultType="Cat">
   select * from tbl_cat where id=#{id} and age=#{age} and birth=#{birth}
 </select>

</mapper>

<!-- 配置保存Customer对象的insert语句 -->
	<!-- id属性:void saveCustomer(Customer customer)方法的方法名 -->
	<!-- #{参数名}格式:如果传入参数是一个实体类对象时,参数名可以使用对象的属性名 -->
	<!-- #{}最终会被替换为?占位符,所以#{}和${}有本质区别,${}只是拼字符串不会转换成?占位符,所以有SQL注入的风险 -->
⑤通配注册或单独注册进mybatis配置文件,否则报:is not known to the MapperRegistry
⑥新建单元测试类
⑦ 演示下like并讲解
- 接口新建方法getCatByCatName
- #{ }
接口定义
public List<Cat> getCatByCatName(String catName);

Mapper.xml定义
<select id="getCatByCatName" parameterType="Cat" resultType="Cat">
 SELECT * FROM tbl_cat WHERE catName LIKE #{catName}
</select>

如果使用#{},方法里加入%
List<Cat> result = catMapper.getCatByCatName("%cat%");

推荐用它,比较安全
- ${ }
- 建议+结论
 Mybatis3 防止SQL注入
#{xxx},使用的是PreparedStatement,会有类型转换,所以比较安全;推荐使用#

${xxx},使用字符串拼接,可以SQL注入;

like查询不小心会有漏动,正确写法如下:

Mysql: select * from t_user where name like concat('%', #{name}, '%')

Oracle: select * from t_user where name like '%' || #{name} || '%'

SQLServer: select * from t_user where name like '%' + #{name} + '%'
3) 传入HashMap
①接口新增方法
public List<Cat> getCatByMap(Map<String,Object> map);
②映射文件
<select id="getCatByMap" parameterType="hashmap" resultType="Cat">
   SELECT * FROM tbl_cat WHERE catName LIKE #{catName} and id=#{id}
 </select>
③ 测试类
@Test
 public void test_GetCatByMap()
 {
   SqlSession sqlSession = null;

   try
   {
    sqlSession = sqlSessionFactory.openSession();

    CatMapper catMapper = sqlSession.getMapper(CatMapper.class);

    Map<String,Object> map = new HashMap<String,Object>();
    map.put("catName","%cat%");
    map.put("id","3");

    List<Cat> list = catMapper.getCatByMap(map);

    System.out.println(list.size());

    sqlSession.close();
   }catch (Exception e){
    e.printStackTrace();
   }finally{
    if(sqlSession != null) sqlSession.close();
   }
 }
4)口袋POJO,混合型传入参数,进公司看团队技术流风格
4.3 resultType(输出参数类型)
1) 输出单个POJO对象,(前面已讲过)
2)输出多个List<POJO>,(前面已讲过)
3)输出hashmap
①说明:select的各个字段名称作为map的key,值写入value
② 接口 :
public Map<String,Object> getCatByMap2(int id);
③映射文件
<select id="getCatByMap2" parameterType="int" resultType="hashmap">
   SELECT id,catName,age,birth FROM tbl_cat WHERE id=#{id}
 </select>
④测试类
@Test
 public void test_GetCatByMap2()
 {
   SqlSession sqlSession = null;
   try
   {
    sqlSession = sqlSessionFactory.openSession();
    CatMapper catMapper = sqlSession.getMapper(CatMapper.class);

    Map<String,Object> map = catMapper.getCatByMap2(1);
    Iterator<Map.Entry<String,Object>> it = map.entrySet().iterator();
    while(it.hasNext())
    {
      Map.Entry<String,Object> entry = it.next();
      System.out.println(entry.getKey()+"\t"+entry.getValue());
    }
    sqlSession.close();
   }catch (Exception e){
    e.printStackTrace();
   }finally{
    if(sqlSession != null) sqlSession.close();
   }
 }
4.4 resultMap(结果集映射)
POJO里面的field和数据库表里面column一一对应的话,resultType可以指定pojo将查询结 果映射为pojo
1)假如不一致那?新建Dog演示
①新建tbl_dog
CREATE TABLE `tbl_dog` (
 `id` int(10) NOT NULL AUTO_INCREMENT,
 `dog_Name` varchar(20) DEFAULT NULL,
 `dog_Weight` int(10) DEFAULT NULL,
 PRIMARY KEY (`id`)
);

INSERT INTO tbl_dog(dog_Name,dog_Weight) VALUES('ww1',10);
INSERT INTO tbl_dog(dog_Name,dog_Weight) VALUES('ww2',15);

SELECT * FROM tbl_dog;
②新建Dog.java
package com.atguigu.mybatis.entities;

public class Dog
{
 private Integer id;
 private String  dogName;
 private int    dogWeight;

 public Dog() {}

 public Integer getId()
 {
   return id;
 }

 public void setId(Integer id)
 {
   this.id = id;
 }

 public String getDogName()
 {
   return dogName;
 }

 public void setDogName(String dogName)
 {
   this.dogName = dogName;
 }

 public int getDogWeight()
 {
   return dogWeight;
 }

 public void setDogWeight(int dogWeight)
 {
   this.dogWeight = dogWeight;
 }

 @Override
 public String toString()
 {
   return "Dog [id=" + id + ", dogName=" + dogName + ", dogWeight="
      + dogWeight + "]";
 }

}
③新建DogMapper接口,getDogByName
public interface DogMapper
{
 public List<Dog> getDogByDogName(String dogName);
}
④新建DogMapper.xml
 <select id="getDogByDogName" parameterType="String" resultType="Dog">
   SELECT id,dog_Name,dog_Weight FROM tbl_dog WHERE dog_Name LIKE #{dogName}
 </select>
⑤通配注册或者新注册到Mybatis配置文件
⑥test
DogMapper.xml
<select id="getDogByDogName" parameterType="String" resultType="Dog">
   SELECT *
   FROM tbl_dog WHERE dog_Name LIKE #{dogName}
 </select>
test code
public class DogMapperTest
{

 private SqlSessionFactory sqlSessionFactory = null;

 @Before
 public void createSqlSessionFactory() throws IOException
 {
   String resource = "mybatis-config.xml";
   InputStream inputStream = Resources.getResourceAsStream(resource);
   sqlSessionFactory = new SqlSessionFactoryBuilder().build(inputStream);
 }


 @Test
 public void test()
 {
   SqlSession sqlSession = sqlSessionFactory.openSession();

   DogMapper dogMapper = sqlSession.getMapper(DogMapper.class);
   List<Dog> list = dogMapper.getDogByDogName("%dog%");
   for (Dog dog : list)
   {
    System.out.println(dog.toString());
   }

   sqlSession.close();
 }

}
2) 别名查询
<select id="getDogByDogName" parameterType="String" resultType="Dog">
   SELECT id as id, dog_Name as dogName, dog_Weight as dogWeight
   FROM tbl_dog WHERE dog_Name LIKE #{dogName}
 </select>
3)结果映射
 <!-- 靠resultMap来解决,类名和字段名不一致的情况 -->
 <!--  id:查询结果集的唯一标识
    column:数据库字段
    property:POJO类的属性字段
    result:映射结果,表示将数据库的值对应映射给POJO的类属性上
  -->
 <resultMap id="dogResultMap" type="Dog" >
   <id column="id" property="id"/>
   <result column="dog_Name" property="dogName"/>
   <result column="dog_Weight" property="dogWeight"/>
 </resultMap>
 <select id="getDogByDogName2" parameterType="String" resultMap="dogResultMap">
   SELECT id,dog_Name,dog_Weight  FROM tbl_dog WHERE dog_Name LIKE #{dogName}
 </select>
4.5 sql(定义重用的sql)
sql
这个元素可以被用来定义可重用的 SQL 代码段,可以包含在其他语句中。它可以被静态地(在加载参数) 参数化. 不同的属性值通过包含的实例变化. 比如:
<sql id="userColumns"> ${alias}.id,${alias}.username,${alias}.password </sql>
这个 SQL 片段可以被包含在其他语句中,例如:
<select id="selectUsers" resultType="map">
  select
    <include refid="userColumns"><property name="alias" value="t1"/></include>,
    <include refid="userColumns"><property name="alias" value="t2"/></include>
  from some_table t1
    cross join some_table t2
</select>
属性值可以用于包含的refid属性或者包含的字句里面的属性值,例如:
<sql id="sometable">
  ${prefix}Table
</sql>

<sql id="someinclude">
  from
    <include refid="${include_target}"/>
</sql>

<select id="select" resultType="map">
  select
    field1, field2, field3
  <include refid="someinclude">
    <property name="prefix" value="Some"/>
    <property name="include_target" value="sometable"/>
  </include>
</select>
5 动态sql
5.1 概述
5.2 新建Student演示
5.3 if
1) 接口方法
public List<Student> getStudent_If(int age);
2)传入单参数age返回List<Student>,有就拼接没有就不参与,按照年龄查学生
3)重点难点:单参数时,mybatis找不到参数错误现象和处理
单独传入一个值,在开发中经常看到如下错误:
org.apache.ibatis.exceptions.PersistenceException:

### Error querying database. Cause: org.apache.ibatis.reflection.ReflectionException: There is no getter for property named 'age' in 'class java.lang.Integer'
### Cause: org.apache.ibatis.reflection.ReflectionException: There is no getter for property named 'age' in 'class java.lang.Integer'


三种方法处理:

1 接口方法中添加注解@Param
 之前:public List<Student> getStudentByIf(int age);
 之后:public List<Student> getStudentByIf(@Param("age") int age);

2 XXXMapper.xml配置文件里面写_parameter
 <select id="getStudentByIf" parameterType="int" resultType="Student">
 select * from tbl_student where 1 = 1
   <if test="_parameter > 0">
 and age = #{age}
   </if>
 </select>

3 直接传递对象
5.4 where
1) 接口方法
public interface StudentMapper
{
public List<Student> getStudent_If(int age);
 public List<Student> getStudent_Where(Student student);

}
2)Mapper文件
<mapper namespace="com.atguigu.mybatis.mapper.StudentMapper">
<select id="getStudentById" parameterType="int" resultType="Student">
select * from tbl_student where id=#{id}
</select>
<!-- where/if -->
<select id="getStudentByCondition" parameterType="Student" resultType="Student">
select * from tbl_student
<where>
<if test=" score !=null && score != '' ">
score > #{score}
</if>
<!--使用name !=null and name != ''也可以-->
<if test=" name !=null && name != '' ">
and name like #{name}
</if>
</where>
</select>
</mapper>
3)where子句以and 或者or开头,它会自动删除第一个and或者or
4)一般建议Where和if结合起来用
5.5 choose/when/otherwise
1)接口方法
public List<Student> getStudent_choosewhenotherwise(Map<String,Object> map);
2)Mapper文件
<select id="getStudentByOption" parameterType="hashmap" resultType="Student">
select * from tbl_student
<choose>
<when test=" id != null && id !='' ">
where id >= #{id}
</when>
<when test=" birth != null && birth !='' ">
where birth > #{birth}
</when>
<otherwise>
where 1 = 1
</otherwise>
</choose>
</select>
5.6 foreach
1) SQL里面的IN查询
2) if+where+foreach
①接口
public List<Student> getStudent_foreach(Map<String,Object> map);
② 映射文件
<select id="getStudentByForEach" parameterType="Map" resultType="Student">
select * from tbl_student
<if test="ages != null && ages !='' ">
<where>
age in
<foreach item="ages" collection="ages" open="(" separator="," close=")">
#{ages}
</foreach>
</where>
</if>
</select>
③test
@Test
 public void test_ForEach()
 {
   SqlSession sqlSession = null;
   Map<String,Object> map = new HashMap<String,Object>();
   try
   {
    sqlSession = sqlSessionFactory.openSession();
    StudentMapper studentMapper = sqlSession.getMapper(StudentMapper.class);

    List<Integer> ages = new ArrayList<Integer>();
    ages.add(33);
    ages.add(64);
    ages.add(0);

    map.put("ages",ages);

    List<Student> list = studentMapper.getStudentByForEach(map);
    for (Student element : list)
    {
      System.out.println(element.toString());
    }
   } catch (Exception e){
    e.printStackTrace();
   }finally{
    if(sqlSession != null)sqlSession.close();
   }
 }
5.7 trim
1) 接口
public List<Student> getStudentByTrim(Student student);
或者
public List<Student> getStudentByTrim(Map<String,Object> map);
2)映射文件
<select id="getStudentByTrim" parameterType="Student" resultType="Student">
   select * from tbl_student
   <trim prefix="where" prefixOverrides="and|or">
    <if test="age > 0">
      and age = #{age}
    </if>
    <if test="name !=null and name !='' ">
      and name like #{name}
    </if>
   </trim>
 </select>
3)trim+if,能替代where
4)前后缀动态覆盖拼装insert
public void insertByTrim(Map<String,Object> map);

<insert id="insertByTrim" parameterType="map">
   insert into tbl_student
   <trim prefix="(" suffix=")" suffixOverrides=",">
    <if test="name != null">
      name,
    </if>
    <if test="score != null">
      score,
    </if>
    <if test="birth != null">
      birth,
    </if>
    <if test="age != null">
      age,
    </if>
   </trim>
   <trim prefix=" values (" suffix=")" suffixOverrides=",">
    <if test="name != null">
      #{name},
    </if>
    <if test="score != null">
      #{score},
    </if>
    <if test="birth != null">
      #{birth},
    </if>
    <if test="age != null">
      #{age},
    </if>
   </trim>
 </insert>
5.8 set
1)动态包含需要更新的列set+if
①会动态前置set关键字
②自动删除最后一个英文逗号
2)自动删除最后一个英文逗号
①接口
public void updateStudent(Student student);
②映射文件
<update id="updateStudent" parameterType="Student">
   <!--
   update tbl_student
   set name=#{name},score=#{score},birth=#{birth},age=#{age}
   where id=#{id}
   -->
   update tbl_student
   <set>
    <if test="name !=null and name !=''">name=#{name},</if>
    <if test="score >0 ">score=#{score},</if>
    <if test="birth !=null and birth !=''">birth=#{birth},</if>
    <if test="age !=null and age !=''">age=#{age},</if>
   </set>
   where id=#{id}
 </update>
6 关联查询
6.1 通用步骤
1)新建数据表+新增内容数据
2)建entity
3)Mapper接口
4)对应接口的Mapper.xml
5)通配注册或在mybatis-config.xml里面新增映射配置
6)测试类
6.2 一对一
1) 配置版
①新建数据表+新增数据表内容
CREATE TABLE `tbl_key` (
  `id` INT(10) NOT NULL AUTO_INCREMENT,
  `keyName` VARCHAR(20) DEFAULT NULL,
  PRIMARY KEY (`id`)
);

CREATE TABLE `tbl_lock` (
  `id` INT(10) NOT NULL AUTO_INCREMENT,
  `lockName` VARCHAR(20) DEFAULT NULL,
  `key_id` INT(11) DEFAULT NULL,
  PRIMARY KEY (`id`),
  KEY `fk_tblKey_id` (`key_id`),
  CONSTRAINT `fk_tblKey_id` FOREIGN KEY (`key_id`) REFERENCES `tbl_key` (`id`)
)

SELECT * FROM tbl_key,tbl_lock WHERE tbl_key.id = tbl_lock.key_id AND tbl_lock.id=1


SELECT * FROM tbl_key LEFT OUTER JOIN tbl_lock ON tbl_key.id = tbl_lock.key_id WHERE tbl_lock.id=1
②建entity
public class Key
{
 private Integer id;
 private String  keyName;

}

public class Lock
{
 private Integer id;
 private String  lockName;
 private Key     key;
}
③ Mapper定义接口
KeyMapper.java
public interface KeyMapper
{
 public Key getKeyById(Integer id);
}
LockMapper.java
public interface LockMapper
{
 public Lock getLockById(Integer id);
}
④KeyMapper.xml定义
<?xml version="1.0" encoding="UTF-8" ?>
<!DOCTYPE mapper PUBLIC "-//mybatis.org//DTD Mapper 3.0//EN" "http://mybatis.org/dtd/mybatis-3-mapper.dtd">

<mapper namespace="com.atguigu.mybatis.mapper.KeyMapper">

 <select id="getKeyById" parameterType="Integer" resultType="Key">
   select * from tbl_key where id=#{id}
 </select>

</mapper>
⑤LockMapper.xml实现,第一种(ResultMap+连接查询)
<?xml version="1.0" encoding="UTF-8" ?>
<!DOCTYPE mapper PUBLIC "-//mybatis.org//DTD Mapper 3.0//EN" "http://mybatis.org/dtd/mybatis-3-mapper.dtd">
<!--
  association:用于1:1关联查询
  javaType:对象属性的完整类型,建议包名+类名
  property:entity对象的属性名称
  column:对应数据库表的字段
 -->
<mapper namespace="com.atguigu.mybatis.mapper.LockMapper">
 <resultMap id="LockResultMap" type="Lock">
   <id property="id" column="id"/>
   <result property="lockName" column="lockName"/>
 <association property="key" javaType="com.atguigu.mybatis.entities.Key">
  <id property="id" column="id"/>
  <result property="keyName" column="keyName"/>
 </association>
 </resultMap>
 <select id="getLockById" parameterType="Integer" resultMap="LockResultMap" >
 SELECT * FROM tbl_lock ,tbl_key
 WHERE tbl_lock.key_id = tbl_key.id
 AND tbl_lock.id = #{id}
 </select>
</mapper>
⑥LockMapper.xml实现,第二种(ResultMap+select分段查询)
<?xml version="1.0" encoding="UTF-8" ?>
<!DOCTYPE mapper PUBLIC "-//mybatis.org//DTD Mapper 3.0//EN" "http://mybatis.org/dtd/mybatis-3-mapper.dtd">

<mapper namespace="com.atguigu.mybatis.mapper.LockMapper">

<resultMap type="Lock" id="LockResultMap">
   <id property="id" column="id"/>
   <result property="lockName" column="lockName"/>
   <association property="key" column="key_id"  select="com.atguigu.mybatis.mapper.KeyMapper.getKeyById"/>
 </resultMap>

 <select id="getLockById" parameterType="Integer" resultMap="LockResultMap" >
  SELECT * FROM tbl_lock where id=#{id}
 </select>
</mapper>

lock外键是key表的主键
<association property="key" column="key_id"  select="com.atguigu.mybatis.mapper.KeyMapper.getKeyById"/>
⑦延时加载介绍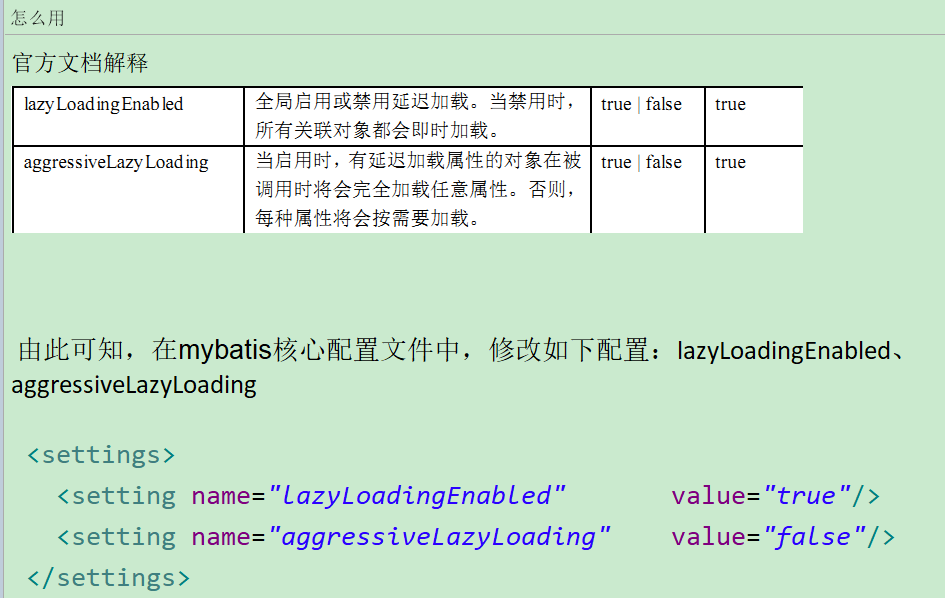
2)注解版
①KeyMapperAnnotation
public interface KeyMapperAnnotation
{
 @Select("select * from tbl_key where id=#{id}")
 public Key getKeyById(Integer id);
}
②LockMapperAnnotaion
public interface LockMapperAnnotaion
{
 @Select("select * from tbl_lock where id=#{id}")
 @Results({
   @Result(id=true,property="id",column="id"),
   @Result(property="lockName",column="lockName"),
   @Result(property="key",column="key_id",
one=@One(select="com.atguigu.mybatis.mapper.KeyMapperAnnotation.getKeyById"))
 })
 public Lock getLockById(Integer id);
}
6.3 一对多
配置版
1)先是单向1:N,一个部门下有多个员工
①建entity
Dept.java
import java.util.List;

public class Dept
{
 private Integer id;
 private String  deptName;
 private String  locAdd;
 private List<Emp> emps;


 public Dept() {}


 public Integer getId() {
   return id;
 }


 public void setId(Integer id) {
   this.id = id;
 }


 public String getDeptName() {
   return deptName;
 }


 public void setDeptName(String deptName) {
   this.deptName = deptName;
 }


 public String getLocAdd() {
   return locAdd;
 }


 public void setLocAdd(String locAdd) {
   this.locAdd = locAdd;
 }


 public List<Emp> getEmps() {
   return emps;
 }


 public void setEmps(List<Emp> emps) {
   this.emps = emps;
 }


 @Override
 public String toString()
 {
   return "Dept [id=" + id + ", deptName=" + deptName + ", locAdd="
      + locAdd + ", emps=" + emps + "]";
 }


}
Emp.java
public class Emp
{
 private Integer id;
 private String  name;
 //private Dept    dept;//后续双向关系的时候记得添加

 public Emp() {}

 public Integer getId() {
   return id;
 }
 public void setId(Integer id) {
   this.id = id;
 }
 public String getName() {
   return name;
 }
 public void setName(String name) {
   this.name = name;
 }
 public Dept getDept() {
   return dept;
 }
 public void setDept(Dept dept) {
   this.dept = dept;
 }

 @Override
 public String toString() {
   return "Emp [id=" + id + ", name=" + name + ", dept=" + dept + "]";
 }


}
②新建DeptMapper接口和方法,按照id查询部门
import com.atguigu.mybatis.entities.Dept;

public interface DeptMapper
{
 public Dept getDeptById(Integer id);
}
③新建DeptMapper.xml
<mapper namespace="com.atguigu.mybatis.mapper.DeptMapper">
 <resultMap id="DeptResultMap" type="Dept">
   <id property="id" column="id"/>
   <result property="deptName" column="deptName"/>
   <result property="locAdd" column="locAdd"/>
   <!-- private List<Emp> emps; column="id"写被集合对象主键,select按照外键键查询,通过deptid查出emp给dept-->
   <collection property="emps" column="id" ofType="Emp" select="com.atguigu.mybatis.mapper.EmpMapper.getEmpByDeptId"/>
 </resultMap>
 <select id="getDeptById" parameterType="Integer" resultMap="DeptResultMap">
        select * from tbl_dept where id=#{id}
 </select>
</mapper>
=====================================================================================
解释如下:
collection :一对多关联查询
ofType:集合中元素对象的类型
④新建EmpMapper接口和方法
public interface EmpMapper
{
 public List<Emp> getEmpByDeptId(Integer deptId);
}
⑤新建EmpMapper.xml
<mapper namespace="com.atguigu.mybatis.mapper.EmpMapper">

 <resultMap  id="EmpResultMap" type="Emp">
   <id property="id" column="id"/>
   <result property="name" column="name"/>
 </resultMap>
 <select id="getEmpByDeptId" parameterType="Integer" resultMap="EmpResultMap">
   select * from tbl_emp where deptId=#{deptId}
 </select>
</mapper>
⑥测试junit,查出一个部门下所有员工
public class TestOne2Many
{
 private static Logger logger = Logger.getLogger(TestOne2Many.class);
 private SqlSessionFactory sqlSessionFactory = null;

 @Before
 public void init() throws IOException
 {
   String resource = "mybatis-config.xml";
   InputStream inputStream = Resources.getResourceAsStream(resource);
   sqlSessionFactory = new SqlSessionFactoryBuilder().build(inputStream);
 }


 @Test
 public void test_GetDeptById()
 {
   SqlSession sqlSession = null;

   try
   {
    sqlSession = sqlSessionFactory.openSession();

    DeptMapper deptMapper = sqlSession.getMapper(DeptMapper.class);
    Dept dept = deptMapper.getDeptById(1);

    System.out.println("############"+dept.getDeptName());
    List<Emp> list = dept.getEmps();
    for (Emp emp : list)
    {
      System.out.println(emp.toString());
    }

   } catch (Exception e){
    e.printStackTrace();
   }finally{
    if(null != sqlSession) sqlSession.close();
   }
 }

}
2)再来双向1:N,每一个员工都属于一个部门
①Emp类里新增定义 private Dept dept;
②接口EmpMapper新增方法getEmpById
public interface EmpMapper
{
 //为部门查询服务,从一的一端查询,协助按照deptId查询并获得所有员工
 public List<Emp> getEmpByDeptId(Integer deptId);
 //为员工查询服务,查出该员工信息+属于哪个部门
 public Emp getEmpById(Integer id);
}
③修改EmpMapper.xml
<mapper namespace="com.atguigu.mybatis.mapper.EmpMapper">

 <resultMap  id="EmpResultMap" type="Emp">
   <id property="id" column="id"/>
   <result property="name" column="name"/>
   <association property="dept" column="deptId" select="com.atguigu.mybatis.mapper.DeptMapper.getDeptById"/>   <!--双向映射,员工里面有部门 -->
 </resultMap>
 <!-- 为部门查询服务,从一的一端查询,协助按照部门id查询并获得所有员工 -->
 <select id="getEmpByDeptId" parameterType="Integer" resultMap="EmpResultMap">
 select * from tbl_emp where deptId=#{deptId}
 </select>
 <!-- 为员工查询服务,查出该员工自身信息+属于哪个部门 -->
 <select id="getEmpById" parameterType="Integer" resultMap="EmpResultMap">
 select * from tbl_emp where id=#{id}
 </select>

</mapper>
④测试junit,查出某员工属于哪个部门
@Test
 public void test_GetEmpById()
 {
   SqlSession sqlSession = null;

   try
   {
    sqlSession = sqlSessionFactory.openSession();

    EmpMapper empMapper = sqlSession.getMapper(EmpMapper.class);
    Emp emp = empMapper.getEmpById(1);

    System.out.println(emp.toString());

   } catch (Exception e){
    e.printStackTrace();
   }finally{
    if(null != sqlSession) sqlSession.close();
   }
 }
注解版
3)先是单向1:N,一个部门下有多个员工
①新建接口DeptMapperAnnotation+添加注解
public interface DeptMapperAnnotation
{
 @Select("select * from tbl_dept where id=#{id}")
 @Results({
   @Result(id=true,property="id",column="id"),
   @Result(property="deptName",column="deptName"),
   @Result(property="locAdd",column="locAdd"),
   @Result(property="emps",column="id",
many=@Many(select="com.atguigu.mybatis.mapper.EmpMapperAnnotation.getEmpByDeptId"))
 })
 public Dept getDeptById(Integer id);
}
②新建接口EmpMapperAnnotation+添加注解
public interface EmpMapperAnnotation
{
 @Select("select * from tbl_emp where deptId=#{deptId}")
 @Results({
   @Result(id=true,property="id",column="id"),
   @Result(property="name",column="name")
 })
 public List<Emp> getEmpByDeptId(Integer deptId);
}
③通配注册或新增注册进mybatis配置文件
④测试1:N
4)再来双向1:N,每一个员工都属于一个部门
①修改EmpMapperAnnotation接口
 @Select("select * from tbl_emp where id=#{id}")
 @Results({
   @Result(id=true,property="id",column="id"),
   @Result(property="name",column="name"),
   @Result(property="dept",column="deptId",
one=@One(select="com.atguigu.mybatis.mapper.DeptMapperAnnotation.getDeptById"))
 })
 public Emp getEmpById(Integer id);
②测试
@Test
 public void test_GetEmpByIdAnnotation()
 {
   SqlSession sqlSession = null;

   try
   {
    sqlSession = sqlSessionFactory.openSession();

    EmpMapperAnnotation empMapperAnnotation = sqlSession.getMapper(EmpMapperAnnotation.class);
    Emp emp = empMapperAnnotation.getEmpById(1);

    System.out.println(emp.toString());

   } catch (Exception e){
    e.printStackTrace();
   }finally{
    if(null != sqlSession) sqlSession.close();
   }
 }
=============================================================
1.搭建环境
①导入jar包
[1]MyBatis本身的核心jar包:mybatis-3.2.8.jar
[2]MySQL数据库驱动:mysql-connector-java-5.1.37-bin.jar
[3]数据库连接池(可选):c3p0-0.9.1.2.jar
[4]日志抓取:log4j-1.2.17.jar
②提供连接数据库的基本信息:jdbc.properties
jdbc.user=root
jdbc.password=root
jdbc.driverClass=com.mysql.jdbc.Driver
jdbc.jdbcUrl=jdbc:mysql://localhost:3306/mybatis160829
③创建MyBatis自身的配置文件:mybatis-config.xml
④创建log4j专用的配置文件:log4j.properties
log4j.rootLogger=DEBUG,myConsole

log4j.appender.myConsole=org.apache.log4j.ConsoleAppender

log4j.appender.myConsole.Target=System.out

log4j.appender.myConsole.layout=org.apache.log4j.PatternLayout

log4j.appender.myConsole.layout.ConversionPattern=[%-5p] %d(%r) --> [%t] %l: %m %x %n
Tips:所有我们自定义的东西,如果想要让框架找到,只有两个办法
-
- 以某种方式明确告诉框架文件的路径和文件名:mybatis-config.xml
- 遵守框架默认的约定:log4j.properties
2.给SQL语句传入参数的方式
①单一值:Integer、String、……
| 传入方式:Customer getCustomerById(Integer custId); |
| 在XML中引用的方式:#{随意} |
②实体类对象:Customer等
| 传入方式:List<Customer> getCustomerByCondition01(Customer customer) |
| 在XML中引用的方式:#{实体类对象的属性名} |
③Map
| 传入方式:List<Customer> getCustomerByCondition02(Map<String, Object> map) |
| 在XML中引用的方式:#{map的key} |
④@Param注解
| 传入方式:List<Customer> getCustomerByCondition03( @Param("minAgeParam") int @Param("maxAgeParam") int maxAge); |
| 在XML中引用的方式:#{注解中指定的名称} |
3.获取SQL语句执行结果数据
①封装到实体类对象中
| 必要的配置:resultType="Customer" |
| SQL语句中可以使用别名的方式解决字段名和属性名不一致问题 SELECT cust_id custId,cust_name custName,cust_age custAge ... |
| 接口方法返回值类型:实体类类型 Customer getCustomerById(Integer custId); |
②封装到实体类对象的集合中
| 必要的配置:resultType="Customer" 对于集合类型的数据,不必考虑集合类型,只需要指定实体类类即可 |
| SQL语句中可以使用别名的方式解决字段名和属性名不一致问题 SELECT cust_id custId,cust_name custName,cust_age custAge ... |
| 接口方法返回值类型:实体类类型的集合 List<Customer> getCustomerByCondition01(Customer customer) |
③将每一条记录封装到Map中
| 必要的配置:resultType="map" |
| SQL语句中对是否指定别名没有要求 |
| 返回值类型:Map<String,Object> |
④如果查询结果有多条记录,则返回Map的List
| 必要的配置:resultType="map" |
| SQL语句中对是否指定别名没有要求 |
| 返回值类型:List<Map<String,Object>> |
⑤使用resultMap建立字段名和属性名之间的映射关系
| <!-- type属性:指定实体类类型 --> <resultMap type="Customer" id="customerResultMap"> <!-- column属性:指定字段名 --> <!-- property属性:指定属性名 --> <id column="cust_id" property="custId"/> <result column="cust_name" property="custName"/> <result column="cust_age" property="custAge"/> </resultMap> <select id="getCustomerByResultMap" resultMap="customerResultMap"> SELECT cust_id,cust_name,cust_age FROM tbl_cust WHERE cust_id=#{custId} </select> |
⑥单一值
| resultType="int/double/String/..." |
4.${}和#{}的区别
${}仅仅是拼字符串
使用的场合:一般是在无法使用#{}或者说不能用?占位符的地方使用,例如:创建数据库表时表名
#{}是读取数据后作为?占位符的参数数据
使用的场合:给SQL语句传入具体数值时
5.关联关系
①生活中,数据之间的关联关系
[1]多对一:Order和OrderItem;Customer和Order
[2]一对一:Husband和Wife;Key和Lock
[3]多对多:Teacher和Student
②MyBatis对关联关系的支持
[1]对多:获取多的一端
order.getOrderItemSet();
teacher.getStudentSet();
不必关心是从多还是一的一端出发,总之目标是获取一个集合对象
[2]对一:获取一的一端
orderItem.getOrder();
wife.getHusband();
不必关心是从多还是一的一端出发,总之目标是获取一个单个对象
③MyBatis中建立关联关系的配置方式
[1]对一
一次性全部加载:
简洁版:在resultMap标签内通过级联属性将数据注入
经典版:association标签配合javaType属性
分两条SQL语句加载:association标签配合select属性
[2]对多
一次性全部加载:collection标签配合ofType属性
分两条SQL语句加载:collection标签配合select属性
④测试关联关系的实验
[1]根据orderId查询Order对象,同时将关联的Customer对象也查询出来:使用resultMap
[2]根据orderId查询Order对象,同时将关联的Customer对象也查询出来:association配合javaType
[3]根据orderId查询Order对象,使用另外一条SQL语句查询Customer对象:association配合select
[4]根据custId查询Customer对象,同时将关联的Order对象的集合也查询出来
collection标签配合ofType属性
[5]根据custId查询Customer对象,使用另外一条SQL语句查询关联的Order对象的集合
collection标签配合select属性
⑤为什么要使用resultMap?
因为SQL语句不支持级联形式的别名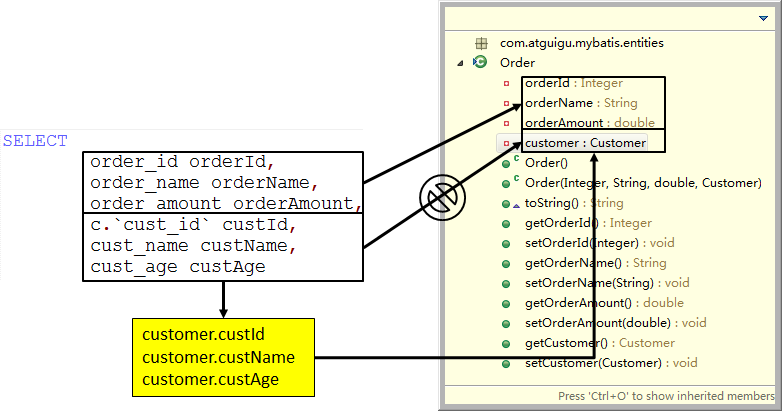
| c.`cust_id` customer.custId, cust_name customer.custName, cust_age customer.custAge |
| 这样写不符合SQL语法 |
⑥为什么分两条语句加载?
如果通过左外连接的方式用一条SQL语句进行查询,那么无法实现“延迟加载”效果。如果想要实现延迟加载效果,前提就是用一条SQL语句查询Order,另一条SQL语句查询Customer。
⑦小结
[1]对一
一次性加载:association+javaType
分两条SQL语句加载:association+select
[2]对多
一次性加载:collection+ofType
分两条SQL语句加载:collection+select
6.延迟加载/懒加载
①概念:对于一个实体类对象(Order)关联的其他对象(Customer),在查询Order时并没有马上把关联的Customer也查询出来,而是等到真正用到Customer属性时才发送SQL语句进行查询。
②影响系统性能的两个方面
[1]访问数据库的次数:越少越好
[2]内存空间:空余空间越大越好
③三种查询方式比较
[1]立即加载:一定会发送两条SQL语句
确定Customer需要用到,但是无法通过左外连接等技术手段一次性查询得到
[2]延迟加载:可能发送两条SQL语句,也可能只发送一条
查询Order之后,Customer可能不会被用到,甚至我们确定Customer根本就不会被用到
[3]左外连接:发送一条SQL语句
查询Order的同时,确定Customer一定会被使用,或有很大的可能性要使用
④MyBatis环境下使用延迟加载需要在mybatis-config.xml配置文件中加入如下配置
| <settings> <!-- 开启延迟加载功能 --> <setting name="lazyLoadingEnabled" value="true"/>
<!-- 关闭立即加载功能 --> <setting name="aggressiveLazyLoading" value="false"/>
</settings> |
注意:还需要额外导入两个jar包
asm-3.3.1.jar
cglib-2.2.2.jar
7._parameter
当动态SQL标签的属性中需要引用外部传入的单一值时,单一值没有通过@Param注解明确指定名称,则使用_parameter来引用
8.缓存
①存在的意义:提升项目运行的性能。
如果查询、获取某个数据的操作是比较消耗资源的,那么我们应该在获取之后将数据在缓存中保存起来,这样下一次再使用就不必重新执行“昂贵”操作了。
②MyBatis缓存体系
[1]一级缓存:线程级别,由SqlSession对象负责维护的
[2]二级缓存:进程级别,由SqlSessionFactory对象负责维护的
内置
第三方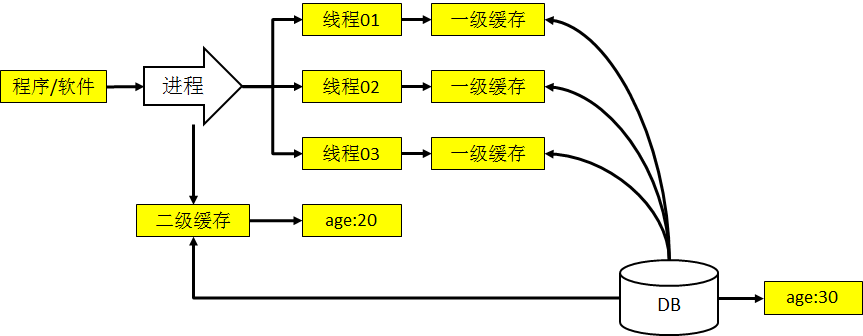
③进程和线程的关系
[1]空间的角度
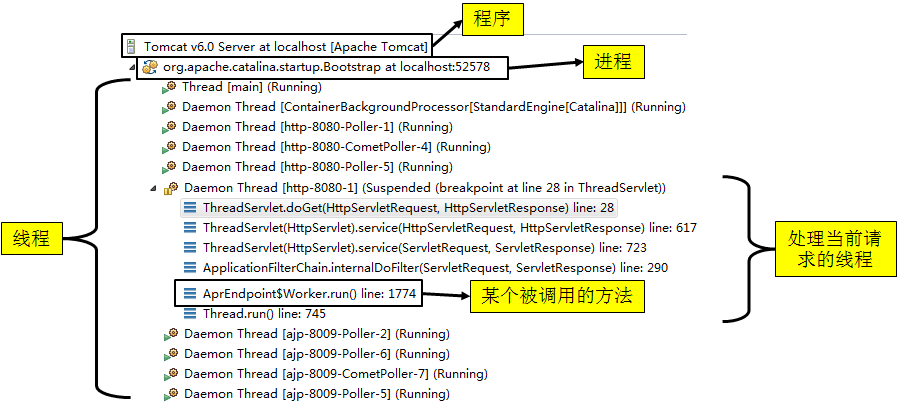
[2]时间的角度
衡量进程(服务器进程)执行时间的单位:月/年
衡量线程(处理请求的线程)执行时间的单位:毫秒/秒
④★二级缓存中适合和不适合保存的数据
[1]适合
-
-
- 经常被查询,而且很少被修改的数据
- 不是特别重要,允许偶尔的并发问题
- 不会被其他应用程序修改
-
[2]不适合
-
-
- 经常被修改的数据
- 特别重要,不允许任何的并发问题,例如:财务数据
- 有可能被其他应用程序修改的数据
-
⑤二级缓存的缓存命中率:成功从缓存中获取到数据的次数/查询总次数
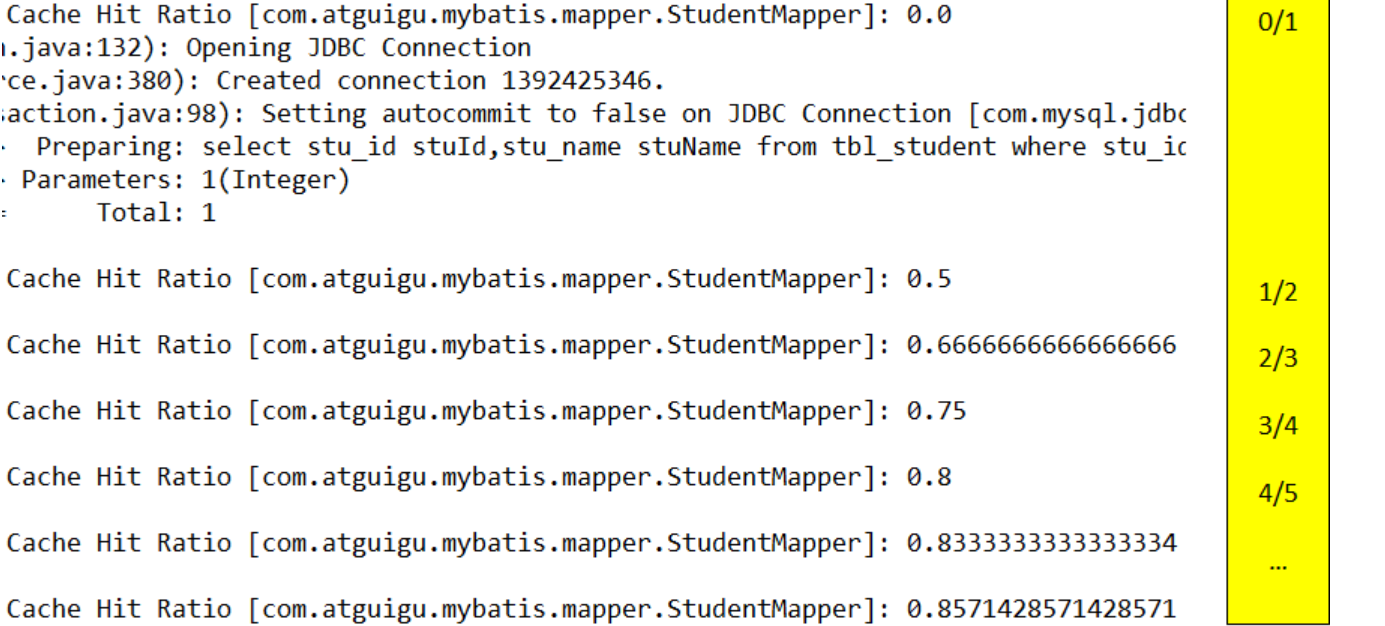
⑥EHCache配置文件说明
| <ehcache> <!-- 指定一个硬盘上的目录,用于在内存中的缓存区域溢出时保存对象 --> <diskStore path="D:\\MyCache"/> <!-- defaultCache:默认缓存区域的设置 --> <defaultCache <!-- 缓存区域中最多保存多少个元素 --> maxElementsInMemory="10000" <!-- 是否永不过期,如果设置为true,那么会忽略timeToIdleSeconds和timeToLiveSeconds 属性的设置--> eternal="false" <!-- 控制数据在缓存中,闲置的最长时间 --> timeToIdleSeconds="120" <!-- 控制数据在缓存中,存活的总时间 --> timeToLiveSeconds="120" <!-- 内存中的缓存空间满了以后是否要保存到硬盘上 --> overflowToDisk="true" /> </ehcache> |
⑦缓存的本质:Map
| //1.从Map形式的缓存区域中获取key对应的value Object value = map.get(key); //2.检查value是否为空 if(value == null){ //3.当前需要的数据并没有事先存入缓存,所以需要真正查询数据库得到 value = mapper.getById(5); /4.将value存入缓存区域 map.put(key,value); } //5.将value返回 return value; |
9.MyBatis和Spring整合开发
①整合的思路
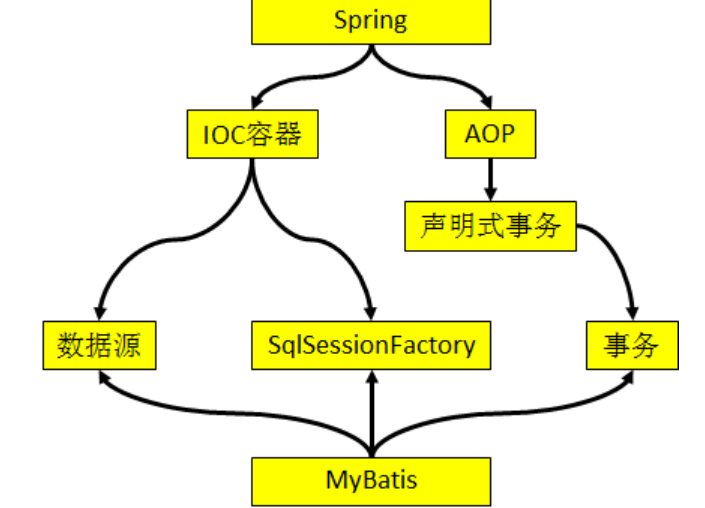
②整合的任务
[1]引入外部属性文件:jdbc.properties
[2]配置数据源的bean
[3]配置SqlSessionFactory的bean
-
-
- 装配数据源的bean
- 指定MyBatis自身配置文件的位置
- 配置typeAliasPackage
-
[4]配置事务管理器bean:装配数据源
[5]开启基于注解的声明式事务的功能:装配事务管理器
[6]配置XxxMapper的扫描器
③需要额外导入的jar包:mybatis-spring-1.2.2.jar
④Spring需要的jar包
[1]SpringIOC容器需要的jar包
[2]Spring声明式事务需要的jar包
=====================================================================
7 查询缓存
7.1 介绍
1 默认情况下,mybatis是启用一级缓存的,它是SqlSession级别的,也即同一个SqlSession接口对象调用了相同的select语句,
就会从缓存里面拿到,而不是再去查询一次数据库,给学生演示下看看。
默认情况下,select使用缓存,增删改不使用。当 Session flush 或 close 之后,该Session中的所有 Cache 就将清空。
2 二级缓存
3 外部缓存
4 作用域
正如大多数持久层框架一样,MyBatis 同样提供了一级缓存和二级缓存的支持;
一级缓存基于 PerpetualCache 的 HashMap 本地缓存,其存储作用域为 Session,当 Session flush 或 close 之后,该Session中的所有 Cache 就将清空。
二级缓存与一级缓存其机制相同,默认也是采用 PerpetualCache,HashMap存储,不同在于其存储作用域为 Mapper(Namespace),并且可自定义存储源,如 Ehcache、Hazelcast等。
7.2 一级缓存
1) 案例步骤
①建表tbl_user
CREATE TABLE tbl_user(
  id INT PRIMARY KEY AUTO_INCREMENT,
  NAME VARCHAR(20),
  age INT
);
INSERT INTO tbl_user(NAME, age) VALUES('苏武', 22);
INSERT INTO tbl_user(NAME, age) VALUES('李青', 31);
②建entity
public class User
{
 private Integer id;
 private String  name;
 private int     age;

 public User(){}


 public User(Integer id, String name, int age)
 {
   super();
   this.id = id;
   this.name = name;
   this.age = age;
 }


 public Integer getId()
 {
   return id;
 }

 public void setId(Integer id)
 {
   this.id = id;
 }

 public String getName()
 {
   return name;
 }

 public void setName(String name)
 {
   this.name = name;
 }

 public int getAge()
 {
   return age;
 }

 public void setAge(int age)
 {
   this.age = age;
 }

 @Override
 public String toString()
 {
   return "User [id=" + id + ", name=" + name + ", age=" + age + "]";
 }


}
③UserMapper接口和方法
public interface UserMapper
{
 public User getUserById(Integer id);

 public void updateUser(User user);
}
④UserMapper.xml实现
<mapper namespace="com.atguigu.mybatis.mapper.UserMapper">

 <select id="getUserById" parameterType="Integer" resultType="User">
   select * from tbl_user where id=#{id}
 </select>

 <update id="updateUser" parameterType="User">
   update tbl_user set name=#{name},age=#{age} where id=#{id}
 </update>

</mapper>
⑤通配注册或新增注册到配置文件
⑥演示缓存失效情况
@Test
 public void test_OneLevelCache()
 {
   SqlSession sqlSession = null;
   try
   {
    sqlSession = sqlSessionFactory.openSession();

    UserMapper userMapper = sqlSession.getMapper(UserMapper.class);

    User user = userMapper.getUserById(1);
    System.out.println(user.toString());

    /**
    * 一级缓存默认会被使用,执行下面的结果可以看到,User user2,但是sql还是一条*/
    User user2 = userMapper.getUserById(1);
    System.out.println(user2.toString());

    /**
    * 1必须是同样的查询条件
    User user2 = userMapper.getUserById(2);
    System.out.println(user2.toString()); */

    /**
    * 2必须是同一个sqlSession,如果关闭过一次,那就另外算了。
    sqlSession.close();
    sqlSession = sqlSessionFactory.openSession();
    userMapper = sqlSession.getMapper(UserMapper.class);
    User user2 = userMapper.getUserById(1);
    System.out.println(user2.toString());*/

    /**
    * 3没有执行过sqlSession.clearCache();
    sqlSession.clearCache();
    User user2 = userMapper.getUserById(1);
    System.out.println(user2.toString());*/

    /**
     *
     * 4没有执行过增删改
    userMapper.updateUser(new User(1,"lisi",363));
    sqlSession.commit();
    user = userMapper.getUserById(1);
    System.out.println(user.toString());*/


   } catch (Exception e){
    e.printStackTrace();
   }finally{
    if(null != sqlSession) sqlSession.close();
   }
 }
2) 原理结论
Mybatis内部缓存是使用了一个HashMap,map数据结构需要key/value
key:hashCode+查询的SqlId+编写的sql查询语句
value:执行上面的查询所获得java对象
一级缓存作用域是SqlSession,每次查询先找缓存,找到使用,
找不到再从数据库查询。查询到数据将数据写入缓存。
缓存启效前提条件:
1查询条件一样
2必须是同一个sqlSession,如果关闭过一次,那就另外算了。
3没有执行过sqlSession.clearCache();
4没有执行过增删改,sqlSession执行insert、update、delete等操作, commit提交后会清空缓存区域。
7.3 二级缓存
1)案例步骤
①mybatis-config.xml配置中开启显示的定义二级缓存

②提醒,用二级缓存时entity类必须实现序列化接口
③添加一个<cache>在userMapper.xml
<cache eviction="FIFO" flushInterval="60000" size="512" readOnly="true"/>
④测试+效果
package com.atguigu.mybatis.test;

import java.io.IOException;
import java.io.InputStream;

import org.apache.ibatis.io.Resources;
import org.apache.ibatis.session.SqlSession;
import org.apache.ibatis.session.SqlSessionFactory;
import org.apache.ibatis.session.SqlSessionFactoryBuilder;
import org.apache.log4j.Logger;
import org.junit.Before;
import org.junit.Test;

import com.atguigu.mybatis.entities.User;
import com.atguigu.mybatis.mapper.UserMapper;

public class TestTwoLvLCache
{
 private static Logger logger = Logger.getLogger(TestTwoLvLCache.class);
 private SqlSessionFactory sqlSessionFactory = null;

 @Before
 public void init() throws IOException
 {
 String resource = "mybatis-config.xml";
 InputStream inputStream = Resources.getResourceAsStream(resource);
 sqlSessionFactory = new SqlSessionFactoryBuilder().build(inputStream);
 }

 @Test
 public void test_GetUserById()
 {
//当前会话没关的时候,数据不会放在二级缓存中,会话关闭的时候会将之前所有查询过的数据放在二级缓存中,所以关闭要有顺序才能测验出缓存。会话没关,数据都是在一级缓存中放着,只有关闭了会话,才会将一级缓存中保存的数据清理到二级缓存中去
 SqlSession sqlSession1 = sqlSessionFactory.openSession();
 UserMapper userMapper1 = sqlSession1.getMapper(UserMapper.class);
 User user1 = userMapper1.getUserById(1);
 System.out.println(user1.toString());
 sqlSession1.close();

 SqlSession sqlSession2 = sqlSessionFactory.openSession();
 UserMapper userMapper2 = sqlSession2.getMapper(UserMapper.class);
 User user2 = userMapper2.getUserById(1);
 System.out.println(user2.toString());
 sqlSession2.close();

 }

}
2) 原理结论
1 Mybatis二级缓存是多个SqlSession共享的,其作用域是mapper的同一个namespace,
不同的sqlSession两次执行相同namespace下的sql语句且向sql中传递参数也相同即最终执行相同的sql语句。
2 Mybatis显示定义开启二级缓存,需要在setting全局参数中配置
①Cache参数解释
<cache eviction="FIFO" flushInterval="60000" size="512" readOnly="true"/>
上面的配置意思如下:
创建了FIFO的策略,每个1分钟刷新一次,存512个对象而且返回的对象被认为是只读的。
eviction:缓存的回收策略
flushInterval:时间间隔,单位是毫秒,
size:引用数目,内存大就多配置点,要记住你缓存的对象数目和你运行环境的可用内存资源数目。默认值是1024
readOnly:true,只读
四大策略:
1.LRU – 最近最少使用的:移除最长时间不被使用的对象,它是默认
2.FIFO – 先进先出:按对象进入缓存的顺序来移除它们。
3.SOFT – 软引用:移除基于垃圾回收器状态和软引用规则的对象。
4.WEAK – 弱引用:更积极地移除基于垃圾收集器状态和弱引用规则的对象。
②禁用二级缓存
<select id="getUserById" parameterType="Integer" resultType="User" useCache="true">
select * from tbl_user where id=#{id}
</select>
设置useCache=false可以禁用当前select语句的二级缓存,即每次查询都会发出sql去查询,
默认情况是true,即该sql使用二级缓存。
③刷新(清空)二级缓存
 <update id="updateUser" parameterType="User" flushCache="true">
 UPDATE tbl_user SET NAME=#{name},age=#{age} WHERE id=#{id}
 </update>

 insert、update、delete操作数据后需要刷新缓存,如果不执行刷新缓存会出现脏读,所以默认为true,
默认情况下为true即刷新缓存,一般不用修改,知道即可。
④ 一级缓存和二级缓存的使用顺序
如果你的 MyBatis 使用了二级缓存,并且你的 Mapper 和 select 语句也配置使用了二级缓存,那么在执行 select 查询的时候, MyBatis 会先从二级缓存中取输入,其次才是一级缓存,即 MyBatis 查询数据的顺序是:
二级缓存 -----> 一级缓存 -----> 数据库
⑤要想使某条 Select查询支持二级缓存的前提条件
1. MyBatis支持二级缓存的总开关:全局配置变量参数 cacheEnabled=true
 <settings>
   <setting name="cacheEnabled" value="true"/>
 </settings>

2. 该select语句所在的Mapper,配置了<cache> 节点且有效

3. 该select语句的参数 useCache=true
7.4mybatis整合Ehcache
1)EhCache 是一个纯Java的进程内缓存框架,具有快速、精干等特点,
是Hibernate中默认的CacheProvider。
2)怎么用
①添jar包
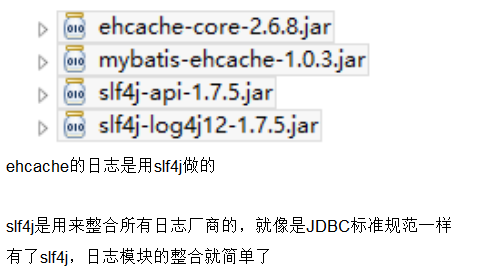
②ehcache.xml配置,用自定义的
<ehcache xmlns:xsi="http://www.w3.org/2001/XMLSchema-instance"
 xsi:noNamespaceSchemaLocation="../config/ehcache.xsd">

 <diskStore path="D:\44\ehcache" />

 <defaultCache
   maxElementsInMemory="1000"
   maxElementsOnDisk="10000000"
   eternal="false"
   overflowToDisk="false"
   timeToIdleSeconds="120"
   timeToLiveSeconds="120"
   diskExpiryThreadIntervalSeconds="120"
   memoryStoreEvictionPolicy="LRU">
 </defaultCache>
</ehcache>

<!--
属性说明:
l diskStore:指定数据在磁盘中的存储位置。
l defaultCache:当借助CacheManager.add("demoCache")创建Cache时,EhCache便会采用<defalutCache/>指定的的管理策略

以下属性是必须的:
l maxElementsInMemory - 在内存中缓存的element的最大数目
l maxElementsOnDisk - 在磁盘上缓存的element的最大数目,若是0表示无穷大
l eternal - 设定缓存的elements是否永远不过期。如果为true,则缓存的数据始终有效,如果为false那么还要根据timeToIdleSeconds,timeToLiveSeconds判断
l overflowToDisk - 设定当内存缓存溢出的时候是否将过期的element缓存到磁盘上

以下属性是可选的:
l timeToIdleSeconds - 当缓存在EhCache中的数据前后两次访问的时间超过timeToIdleSeconds的属性取值时,这些数据便会删除,默认值是0,也就是可闲置时间无穷大
l timeToLiveSeconds - 缓存element的有效生命期,默认是0.,也就是element存活时间无穷大
 diskSpoolBufferSizeMB 这个参数设置DiskStore(磁盘缓存)的缓存区大小.默认是30MB.每个Cache都应该有自己的一个缓冲区.
l diskPersistent - 在VM重启的时候是否启用磁盘保存EhCache中的数据,默认是false。
l diskExpiryThreadIntervalSeconds - 磁盘缓存的清理线程运行间隔,默认是120秒。每个120s,相应的线程会进行一次EhCache中数据的清理工作
l memoryStoreEvictionPolicy - 当内存缓存达到最大,有新的element加入的时候, 移除缓存中element的策略。默认是LRU(最近最少使用),可选的有LFU(最不常使用)和FIFO(先进先出)


 -->
③开启ehcache缓存
修改mapper.xml文件,在cache中指定EhcacheCache

<!-- mybatis和ehcache结合-->
 <cache type="org.mybatis.caches.ehcache.EhcacheCache"></cache>
④测试
import java.io.IOException;
import java.io.InputStream;

import org.apache.ibatis.io.Resources;
import org.apache.ibatis.session.SqlSession;
import org.apache.ibatis.session.SqlSessionFactory;
import org.apache.ibatis.session.SqlSessionFactoryBuilder;
import org.apache.log4j.Logger;
import org.junit.Before;
import org.junit.Test;

import com.atguigu.mybatis.entities.User;
import com.atguigu.mybatis.mapper.UserMapper;

public class TestTwoLvLCache
{
  private static Logger logger = Logger.getLogger(TestTwoLvLCache.class);
  private SqlSessionFactory sqlSessionFactory = null;

  @Before
  public void init() throws IOException
  {
     String resource = "mybatis-config.xml";
     InputStream inputStream = Resources.getResourceAsStream(resource);
     sqlSessionFactory = new SqlSessionFactoryBuilder().build(inputStream);
  }

  @Test
  public void test_GetUserById()
  {
     SqlSession sqlSession1 = sqlSessionFactory.openSession();
     UserMapper userMapper1 = sqlSession1.getMapper(UserMapper.class);
     User user1 = userMapper1.getUserById(1);
     System.out.println(user1.toString());
     sqlSession1.close();

     SqlSession sqlSession2 = sqlSessionFactory.openSession();
     UserMapper userMapper2 = sqlSession2.getMapper(UserMapper.class);
     User user2 = userMapper2.getUserById(1);
     System.out.println(user2.toString());
     sqlSession2.close();

     SqlSession sqlSession3 = sqlSessionFactory.openSession();
     UserMapper userMapper3 = sqlSession3.getMapper(UserMapper.class);
     User user3 = userMapper3.getUserById(1);
     System.out.println(user3.toString());
     sqlSession3.close();

     SqlSession sqlSession4 = sqlSessionFactory.openSession();
     UserMapper userMapper4 = sqlSession4.getMapper(UserMapper.class);
     User user4 = userMapper4.getUserById(1);
     System.out.println(user4.toString());
     sqlSession4.close();

     SqlSession sqlSession5 = sqlSessionFactory.openSession();
     UserMapper userMapper5 = sqlSession5.getMapper(UserMapper.class);
     User user5 = userMapper5.getUserById(1);
     System.out.println(user5.toString());
     sqlSession5.close();
  }

}
8 Spring+Mybatis整合
1)spring3.0以下不支持mybatis
2)添jar包
3)db.properties
jdbc.user=root
jdbc.password=123456
jdbc.driverClass=com.mysql.jdbc.Driver
jdbc.jdbcUrl=jdbc:mysql://127.0.0.1:3306/mybatis0607?useUnicode=true&characterEncoding=UTF8
4)applicationContext.xml
<?xml version="1.0" encoding="UTF-8"?>
<beans xmlns="http://www.springframework.org/schema/beans"
 xmlns:xsi="http://www.w3.org/2001/XMLSchema-instance"
 xmlns:aop="http://www.springframework.org/schema/aop"
 xmlns:context="http://www.springframework.org/schema/context"
 xmlns:tx="http://www.springframework.org/schema/tx"
 xsi:schemaLocation="http://www.springframework.org/schema/beans http://www.springframework.org/schema/beans/spring-beans.xsd
   http://www.springframework.org/schema/aop http://www.springframework.org/schema/aop/spring-aop-4.0.xsd
   http://www.springframework.org/schema/context http://www.springframework.org/schema/context/spring-context-4.0.xsd
   http://www.springframework.org/schema/tx http://www.springframework.org/schema/tx/spring-tx-4.0.xsd">

 <context:component-scan base-package="com.atguigu.mybatis"></context:component-scan>

 <context:property-placeholder location="classpath:db.properties"/>
 <bean id="dataSource" class="com.mchange.v2.c3p0.ComboPooledDataSource">
   <property name="user"     value="${jdbc.user}"/>
   <property name="password"    value="${jdbc.password}"/>
   <property name="jdbcUrl"   value="${jdbc.jdbcUrl}" />
   <property name="driverClass"  value="${jdbc.driverClass}" />
 </bean>

 <!-- 配置mybatis的sqlSessionFactory -->
 <bean id="sqlSessionFactory" class="org.mybatis.spring.SqlSessionFactoryBean">
   <property name="dataSource" ref="dataSource"></property>
   <property name="typeAliasesPackage" value="com.atguigu.mybatis"></property>
   <property name="configLocation" value="classpath:mybatis-config.xml"/>
 </bean>

 <!-- 配置事务管理 -->
 <bean id="transactionManager" class="org.springframework.jdbc.datasource.DataSourceTransactionManager">
   <property name="dataSource" ref="dataSource"></property>
 </bean>
 <tx:annotation-driven transaction-manager="transactionManager"/>


</beans>
5)新建mybatis配置文件mybatis-config.xml
<?xml version="1.0" encoding="UTF-8" ?>
<!DOCTYPE configuration
PUBLIC "-//mybatis.org//DTD Config 3.0//EN"
"http://mybatis.org/dtd/mybatis-3-config.dtd">

<configuration>


</configuration>
6)新建entity+Mapper接口/XML配置+Service
7) 测试调用
public interface UserMapper
{
 public void add(User user);

 public User getUserById(Integer id);
}


<mapper namespace="com.atguigu.mybatis.mapper.UserMapper">

 <insert id="add" parameterType="User">
   insert into tbl_user(name,age) values(#{name},#{age})
 </insert>

 <select id="getUserById" parameterType="Integer" resultType="User">
   select * from tbl_user where id=#{id}
 </select>

</mapper>
9 Mybatis逆向工程
9.1 是什么
Mybatis官方提供的逆向工程,可以将单表生生成
常用的Mapper、entity等配置
9.2 能干嘛
从数据库表反向生成mapper.java/mapper.xml/entity/辅助查询类
9.3 怎么用
1)有数据库表提供给MyBatisGenerator反向生产素材
2)打开mybatis-generator-core-1.3.2-bundle\mybatis-generator-core-1.3.2\docs里面的文档照着官网配置
3)官方文档generatorConfig.xml
4)拷贝出entity/mapper/mapper.xml
5)测试
@Test
 public void testselectByExample()
 {
   DogExample example = new DogExample();
   DogExample.Criteria criteria = example.createCriteria();
   criteria.andDogNameEqualTo("哈士奇");

   List<Dog> list = dogService.selectByExample(example);
   System.out.println(list.get(0).toString());
 }
9.4 注意事项
1 覆盖和追加问题
1.1 工具自动化会生产3个东东,entity+Mapper接口+Mapper接口对应的xml
1.2 假如xxxMapper.xml文件已经存在了,再次生成则mapper.xml文件内容不被覆盖而是进行内容追加,有时候会导致mybatis解析失败。所以,建议为了确保它的正确性和完整性,建议删除重建。
1.3 entity和接口是因为是直接覆盖,没有上述问题。


 2万+
2万+

 被折叠的 条评论
为什么被折叠?


