


1.Profile 功能
为了方便多环境适配,SpringBoot 简化了 profile 功能。
1.1 application-profile 功能
- 默认配置文件 application.yml 任何时候都会加载。
- 指定环境配置文件 application-{env}.yml,env 通常替代为 test
- 激活指定环境
- 配置文件激活 : 在默认配置文件中配置 spring.profiles.active=test
- 命令行激活 : java -jar xxx.jar --spring.profiles.active=test (命令行与配置项相同,命令行优先)
- 默认配置与环境配置同时生效
- 同名配置项,profile 配置优先
application.properties
persion.name=张三1

#指定激活的环境。默认配置文件和指定环境的配置文件都会生效。
spring.profiles.active=test
application-prod.yml
person:
  name: prod-张三
application-test.yml
person:
  name: test-张三
controller
@RestController
public class HelloController {
    @Value("${person.name:李四}")
    private String name;

    @GetMapping("/")
    public String hello() {
        return "hello "+name;
    }
}
当application.properties 指定【spring.profiles.active】为 test 时,输出【hello test-张三】;指定【spring.profiles.active】为 prod 时,输出【hello prod-张三】。
1.2 @Profile 条件装配功能
指定组件在哪个环境下才能被注册到容器中,不指定,任何环境下都能注册这个组件.
- 加了环境标识的bean,只有这个环境被激活的时候才能注册到容器中,默认是default环境
- 卸载配置类上,只有是指定的环境的时候,整个配置类里面的所有的配置才会生效,有点类似@Conditional
- 没有标注环境标识的bean在任何环境下都是加载的
例1
如下三个entity
public class Human {
}

@Profile("prod")
@Data
@Component
public class Boss extends Human {
}

@Profile("test")
@Data
@Component
public class Worker extends Human {
}
controller
@RestController
public class HelloController {
    @Autowired
    Human human;

    @GetMapping("/human")
    public String human() {
        return human.getClass().toString();
    }
}
application.properties 指定【spring.profiles.active】为 test 时,输出【class com.cj.study.annoPro.Worker】
application.properties 指定【spring.profiles.active】为 prod 时,输出【class com.cj.study.annoPro.Boss】。
例2
@Configuration
public class MyConfig {
    @Profile("prod") //当激活 prod 时,Spring 容器中注入id为red的Color组件
    @Bean
    public Color red(){
        return new Color();
    }

    @Profile("test") //当激活 prod 时,Spring 容器中注入id为green的Color组件
    @Bean
    public Color green(){
        return new Color();
    }
}
1.3 profile 分组
application-prod-extra.yml
person:
  age: 21
application-prod.yml
person:
  name: prod-张三
application-test.yml
person:
  name: test-张三
application.properties
#当使用 profile 组时,激活内容为组名
spring.profiles.active=myProd

spring.profiles.group.myProd[0]=prod
spring.profiles.group.myProd[1]=prod-extra

spring.profiles.group.myTest[0]=test
Java 类
@Data
@Component
@ConfigurationProperties("person")
public class Person {
    private String name;
    private Integer age;
}


@RestController
public class HelloController {
    @Autowired
    Person person;

    @GetMapping("/")
    public Person hello() {
        return person;
    }
}
输出结果:
application.properties 指定【spring.profiles.active】为 myProd 时,输出【{"name":"prod-张三","age":21}】
application.properties 指定【spring.profiles.active】为 myTest 时,输出【{"name":"test-张三","age":8}】。
2.外部化配置
- Default properties (specified by setting SpringApplication.setDefaultProperties).
- @PropertySource annotations on your @Configuration classes. Please note that such property sources are not added to the Environment until the application context is being refreshed. This is too late to configure certain properties such as logging.* and spring.main.* which are read before refresh begins.
- Config data (such as application.properties files)
- A RandomValuePropertySource that has properties only in random.*.
- OS environment variables.
- Java System properties (System.getProperties()).
- JNDI attributes from java:comp/env.
- ServletContext init parameters.
- ServletConfig init parameters.
- Properties from SPRING_APPLICATION_JSON (inline JSON embedded in an environment variable or system property).
- Command line arguments.
- properties attribute on your tests. Available on @SpringBootTest and the test annotations for testing a particular slice of your application.
- @TestPropertySource annotations on your tests.
- Devtools global settings properties in the $HOME/.config/spring-boot directory when devtools is active.
优先级 1-14,低级别优先级的同名配置项会被高级别的覆盖。
外部配置源有如下几种:
- Java 属性文件
- yml 文件
- 系统环境变量
@SpringBootApplication
public class Boot09ProfileApplication {
    //启动类可以获取系统的环境变量和系统的属性,这些值可以使用 @Value("{}") 来获取
    public static void main(String[] args) {
        ConfigurableApplicationContext run = SpringApplication.run(Boot09ProfileApplication.class, args);
        ConfigurableEnvironment environment = run.getEnvironment();
        Map<String,Object> sysEnvironment = environment.getSystemEnvironment(); //获取系统的环境变量
        Map<String,Object> propertiesEnvironment = environment.getSystemProperties(); //获取系统的属性

        System.out.println("------------系统的环境变量------------");
        for (Map.Entry<String,Object> entry : sysEnvironment.entrySet()) {
            System.out.println(entry.getKey() + "=" + entry.getValue());
        }
        System.out.println("------------系统的属性------------");
        for (Map.Entry<String,Object> entry : propertiesEnvironment.entrySet()) {
            System.out.println(entry.getKey() + "=" + entry.getValue());
        }
    }

}- 命令行参数 java -jar xxx.jar --spring.name=xxx
SpringBoot 查找配置文件的位置(优先级高的覆盖优先级低的同名配置):
- classpath 根路径
- classpath 根路径下 config 目录
- jar 包当前目录(应用打包好的jar包)
- jar 当前目录的 config 目录(应用打包好的jar包)
- /config 子目录的直接子目录(/config 下的一级目录) (windows 下测试:5不会覆盖4的同名配置项)
配置文件的加载顺序
- 当前 jar 包内部的 application.properties 和 application.yml
- 当前 jar 包内部的 application-{profile}.properties 和 application-{profile}.yml
- 引用的外部 jar包的 application.properties 和 application.yml
- 引用的外部 jar包的 application-{profile}.properties 和 application-{profile}.yml
总结:指定环境优先,外部优先,后面的可以覆盖前面的同名配置项
3.自定义 starter
3.1 starter 启动原理
1、starter 的pom 文件需引入 autoconfigure 的依赖

2、autoconfigure 包中配置 META/spring.factories 中 EnableAutoConfiguration,使得项目启动加载指定的自动配置类。
3、编写自动配置类 xxxxAutoConfiguration --> xxxProperties
@Configuration
@ConditionalOnMissingBean(Xxx.class)
@EnableConfigurationProperties(XxxProperties.class)//默认HelloProperties放在容器中
public class XxxAutoConfiguration {

    @Bean
    public Xxx xxx(){
        return new Xxx ();
    }

}
4、引入 starter -- xxxxAutoConfiguration -- 容器中放入组件 -- 绑定 xxxProperties -- 配置项
3.2 自定义 starter
项目 :boot-09-custom-starter
创建一个 empty project,命名为【boot-09-custom-starter】
项目 :hello-spring-boot-starter
在 【boot-09-custom-starter】 添加模块 【hello-spring-boot-starter】,【hello-spring-boot-starter】为普通 maven 工程。

在 pom 文件引入 hello-spring-boot-starter-autoconfigure 依赖(即我们自定义的 autoconfiguration)。
    <dependencies>
        <dependency>
            <groupId>org.cj.hello</groupId>
            <artifactId>hello-spring-boot-starter-autoconfigure</artifactId>
            <version>1.0-SNAPSHOT</version>
        </dependency>
    </dependencies>
项目 :hello-spring-boot-starter-autoconfigure
在 【boot-09-custom-starter】 添加模块 【hello-spring-boot-starter-autoconfigure】,【hello-spring-boot-starter-autoconfigure】为 SpringBoot 工程。(也可以创建普通 maven 工程,再手动添加 SpringBoot 的依赖项)。

在 pom 文件引入 spring-boot-starter 依赖(即我们自定义的 autoconfiguration)。
    <dependencies>
        <dependency>
            <groupId>org.springframework.boot</groupId>
            <artifactId>spring-boot-starter</artifactId>
        </dependency>

        <dependency>
            <groupId>org.projectlombok</groupId>
            <artifactId>lombok</artifactId>
            <optional>true</optional>
        </dependency>
    </dependencies>
绑定的属性类
@Data
@ConfigurationProperties("hello")
public class HelloProperties {
    private String prefix;
    private String suffix;
}
HelloService 类
/**
 * 默认不要放到容器中,通过自动导入
 */
public class HelloService {
    @Autowired
    HelloProperties helloProperties;

    public String sayHello(String name) {
        return helloProperties.getPrefix() + " say: hello - " + helloProperties.getSuffix();
    }
}
HelloService 的自动配置类
@Configuration
@ConditionalOnMissingBean(HelloService.class)
@EnableConfigurationProperties(HelloProperties.class) //默认 HelloProperties 放在容器中
public class HelloServiceAutoConfiguration {
    @Bean
    public HelloService helloService() {
        return new HelloService();
    }
}
resources/META-INF/spring.factories
# Auto Configure
org.springframework.boot.autoconfigure.EnableAutoConfiguration=\
org.cj.hello.auto.HelloServiceAutoConfiguration
测试
创建一个 SpringBoot 项目,并引入 web 场景
引入自定义 starter
        <!-- 引入`hello-spring-boot-starter`依赖 -->
        <dependency>
            <groupId>org.cj.hello</groupId>
            <artifactId>hello-spring-boot-starter</artifactId>
            <version>1.0-SNAPSHOT</version>
        </dependency>
定义 hello 场景的相关配置文件
hello.prefix = cj
hello.suffix = !!
编写测试 controller
@RestController
public class HelloController {
@Autowired
HelloService helloService;
@GetMapping("/")
public String hello() {
return helloService.sayHello("home");
}
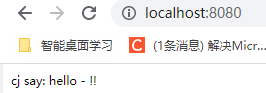
}最终页面输出为


 543
543


 被折叠的 条评论
为什么被折叠?
被折叠的 条评论
为什么被折叠?
 到【灌水乐园】发言


