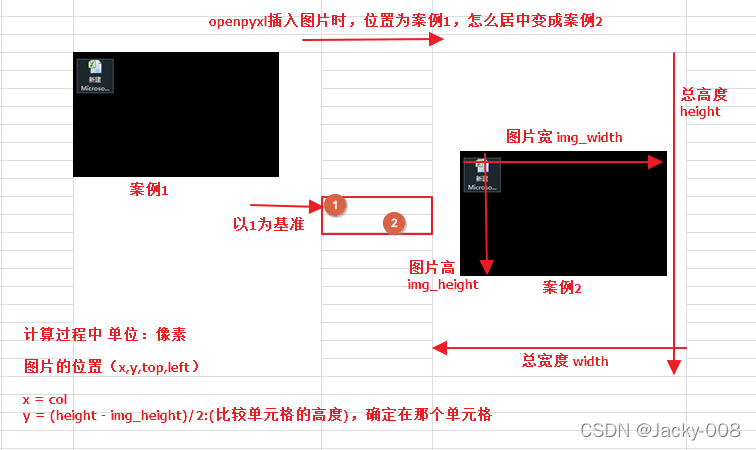
1、计算方法
2、代码实现
import openpyxl
from openpyxl.styles import Alignment, Font, PatternFill, Border
import logging
from openpyxl.cell.cell import get_column_letter
from openpyxl.drawing.image import Image
from openpyxl.drawing.xdr import XDRPoint2D, XDRPositiveSize2D
from openpyxl.drawing.spreadsheet_drawing import AnchorMarker, OneCellAnchor
from openpyxl.utils.units import pixels_to_EMU
logger = logging.getLogger('error')
def insert_image(worksheet, start_row, start_col, height, image_url, image_size=None):
"""
# 计算图片大小 img_size[0]=180; img_size[1]=80
:param worksheet: openpyxl.Worksheet对象
:param start_row: # 哪一行开始
:param start_col: # 那一列
:param height: # 合并了多少行
:param image_url: # 图片路径
:param image_size: # 在excel中图片显示的最大宽高
:return: # None
"""
try:
p2e = pixels_to_EMU
img = Image(image_url)
per = img.width / img.height
shr_image_width = image_size[1] * per
img_size = shr_image_width, image_size[1]
if shr_image_width > image_size[0]:
shr_image_height = image_size[0] / per
img_size = image_size[0], shr_image_height
img.height, img.width = img_size
size = XDRPositiveSize2D(p2e(img.height), p2e(img.width))
col_letter = get_column_letter(start_col)
width = worksheet.column_dimensions[col_letter].width
_col = int((width * 8 - img.height) / 2)
h2_lst = []
acc_height = 0
for row in range(start_row, start_row + height):
h = worksheet.row_dimensions[row].height
if not h:
worksheet.row_dimensions[row].height = 15
acc_height += 15
h2_lst.append(int(acc_height * 20 / 15))
else:
acc_height += h
h2_lst.append(int(acc_height * 20 / 15))
h2_lst.insert(0, 0)
top = int((h2_lst[-1] - img.width) / 2)
pos = []
for nid, ele in enumerate(h2_lst):
if top < ele:
pos.append((nid, top))
row = start_row + pos[0][0] - 1
index = pos[0][0]
_row = pos[0][1] - h2_lst[index]
marker = AnchorMarker(col=start_col - 1, colOff=p2e(_col), row=row, rowOff=p2e(_row))
img.anchor = OneCellAnchor(_from=marker, ext=size)
worksheet.add_image(img)
except Exception as e:
logger.error(e)
pass
if __name__ == '__main__':
wb = openpyxl.Workbook()
ws = wb.active
ws.merge_cells(start_row=5, end_row=14, start_column=5, end_column=5)
col_letter = get_column_letter(5)
ws.column_dimensions[col_letter].width = 25
insert_image(ws, 5, 5, 9, '111.jpg', (160, 80))
wb.save('xxx.xlsx')


 这篇博客介绍了如何利用openpyxl库在Excel中插入图片,并保持图片居中且不发生变形。文章详细阐述了计算图片大小、位置和居中对齐的算法,并提供了完整的Python代码实现。该方法适用于需要在Excel工作表中插入和调整图片的场景。


 1503
1503

 被折叠的 条评论
为什么被折叠?
被折叠的 条评论
为什么被折叠?
 到【灌水乐园】发言


