


上一次我们介绍了如何用Ribbon实现负载均衡的用法,不清楚的可以查看上一期博客,链接为https://blog.csdn.net/chenpeixing361/article/details/95359537。这一期我们介绍如何用Fegin实现负载均衡的效果。
首先简单介绍一下什么是Fegin,Feign 是一个声明式的伪 Http 客户端,它使得写 Http 客户端变得更简单。使用 Feign,只需要创建一个接口并注解。它具有可插拔的注解特性,可使用 Feign 注解和 JAX-RS 注解。Feign 支持可插拔的编码器和解码器。Feign 默认集成了 Ribbon,并和 Eureka 结合,默认实现了负载均衡的效果。
我们在之前项目的基础上继续新建一个Directory,命名为hello-spring-cloud-web-admin-fegin,然后新建pom.xml文件,其代码如下:
<?xml version="1.0" encoding="UTF-8"?>
<project xmlns="http://maven.apache.org/POM/4.0.0" xmlns:xsi="http://www.w3.org/2001/XMLSchema-instance"
         xsi:schemaLocation="http://maven.apache.org/POM/4.0.0 http://maven.apache.org/xsd/maven-4.0.0.xsd">
    <modelVersion>4.0.0</modelVersion>

    <parent>
        <groupId>com.chen</groupId>
        <artifactId>hello-spring-cloud-dependencies</artifactId>
        <version>1.0.0-SNAPSHOT</version>
        <relativePath>../hello-spring-cloud-dependencies/pom.xml</relativePath>
    </parent>

    <artifactId>hello-spring-cloud-web-admin-feign</artifactId>
    <packaging>jar</packaging>

    <name>hello-spring-cloud-web-admin-feign</name>
    <inceptionYear>2019-Now</inceptionYear>

    <dependencies>
        <!-- Spring Boot Begin -->
        <dependency>
            <groupId>org.springframework.boot</groupId>
            <artifactId>spring-boot-starter-web</artifactId>
        </dependency>
        <dependency>
            <groupId>org.springframework.boot</groupId>
            <artifactId>spring-boot-starter-tomcat</artifactId>
        </dependency>
        <dependency>
            <groupId>org.springframework.boot</groupId>
            <artifactId>spring-boot-starter-thymeleaf</artifactId>
        </dependency>
        <dependency>
            <groupId>org.springframework.boot</groupId>
            <artifactId>spring-boot-starter-actuator</artifactId>
        </dependency>
        <dependency>
            <groupId>org.springframework.boot</groupId>
            <artifactId>spring-boot-starter-test</artifactId>
            <scope>test</scope>
        </dependency>
        <!-- Spring Boot End -->

        <!-- Spring Cloud Begin -->
        <dependency>
            <groupId>org.springframework.cloud</groupId>
            <artifactId>spring-cloud-starter-netflix-eureka-server</artifactId>
        </dependency>
        <dependency>
            <groupId>org.springframework.cloud</groupId>
            <artifactId>spring-cloud-starter-openfeign</artifactId>
        </dependency>
        <!-- Spring Cloud End -->

        <!-- 解决 thymeleaf模板引擎一定要执行严格的html5格式校验问题 -->
        <dependency>
            <groupId>net.sourceforge.nekohtml</groupId>
            <artifactId>nekohtml</artifactId>
        </dependency>
    </dependencies>

    <build>
        <plugins>
            <plugin>
                <groupId>org.springframework.boot</groupId>
                <artifactId>spring-boot-maven-plugin</artifactId>
                <configuration>
                    <mainClass>com.chen.hello.spring.cloud.web.admin.feign.WebAdminFeignApplication</mainClass>
                </configuration>
            </plugin>
        </plugins>
    </build>
</project>与之前不同的是,我们在上述pom文件中添加了openfegin的依赖,用于配置Fegin。然后我们在resources目录下新建application.yml文件,用于端口信息配置以及默认网关配置,这里端口我们设置为8765,代码如下:
spring:
  application:
    name: hello-spring-cloud-web-admin-feign
  thymeleaf:
    cache: false
    mode: LEGACYHTML5
    encoding: UTF-8
    servlet:
      content-type: text/html

server:
  port: 8765

eureka:
  client:
    service-url:
      default-zone: http://localhost:8761/eureka/
然后我们在 src/main/java目录下新建包com.chen.hello.spring.cloud.web.admin.fegin,并新建WebAdminFeginApplication,其代码如下:
package com.chen.hello.spring.cloud.web.admin.fegin;
import org.springframework.boot.SpringApplication;
import org.springframework.boot.autoconfigure.SpringBootApplication;
import org.springframework.cloud.client.discovery.EnableDiscoveryClient;
import org.springframework.cloud.openfeign.EnableFeignClients;

@SpringBootApplication
@EnableFeignClients
@EnableDiscoveryClient
public class WebAdminFeginApplication {
    public static void main(String[] args) {
        SpringApplication.run(WebAdminFeginApplication.class,args);
    }
}
我们在上述代码中添加了@EnableFeginClients注解,表明开启了Fegin服务,当然@EnableDiscoveryClient注解表明Eureka服务发现,这里仍然要加上。
接下来我们新建service包,并创建接口AdminService,其代码如下:
package com.chen.hello.spring.cloud.web.admin.fegin.service;

import org.springframework.cloud.openfeign.FeignClient;
import org.springframework.web.bind.annotation.GetMapping;
import org.springframework.web.bind.annotation.RequestParam;

@FeignClient(value = "hello-spring-cloud-service-admin")
public interface AdminService {

    @GetMapping(value = "/hi")
    public String sayHi(@RequestParam("message") String message);

}
我们在上述代码中对接口进行注解,添加了Eureka服务的提供者名称,并对传递的message参数进行绑定,这里必须要进行绑定,否则后面调试会显示接受不到该方法。然后我们创建controller包,并新建AdminController类进行测试,其代码如下:
package com.chen.hello.spring.cloud.web.admin.fegin.controller;

import com.chen.hello.spring.cloud.web.admin.fegin.service.AdminService;
import org.springframework.beans.factory.annotation.Autowired;
import org.springframework.web.bind.annotation.GetMapping;
import org.springframework.web.bind.annotation.RequestParam;
import org.springframework.web.bind.annotation.RestController;

import javax.annotation.Resource;

@RestController
public class AdminController {

    @Resource
    private AdminService adminService;

    @GetMapping(value = "/hi")
    public String sayHi(@RequestParam String message) {
        return adminService.sayHi(message);
    }
}
上述代码没有什么特殊之处,这里就不做讲解了。
好了,我们开启之前的四个端口服务,即8761-8764端口,然后再开启8765端口,这里不必多说,前面的服务端口肯定要先开启的,毕竟Fegin是作为服务的消费者运行的。运行截图如下:

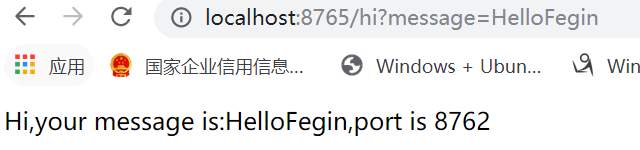
当点击刷新按钮时,端口在9872和8763之间循环变动,这也就验证了Fegin是基于Ribbon实现负载均衡的。
好了,本期博客就到这里了,我们下期再见!


 643
643


 被折叠的 条评论
为什么被折叠?
被折叠的 条评论
为什么被折叠?
 到【灌水乐园】发言


