


Apache Sqoop系列文章
1、Apache Sqoop介绍及部署
2、sqoop导入(RMDB-mysql、sybase到HDFS-hive)
3、Sqoop导出(HDFS到RMDB-mysql)
4、Sqoop job作业
文章目录
本文是在前一篇的基础上介绍sqoop的使用,具体的部署环境请参考前一篇。
本文的前提是hadoop、mysql、hive环境都是好用的。
本文分为2个部分,即sqoop导入的简单介绍以及6种使用示例,包含sybase导入到hdfs。
一、Sqoop导入介绍
“导入工具”导入单个表从RDBMS到HDFS。表中的每一行被视为HDFS的记录。
所有记录都存储为文本文件的文本数据
1、语法结构
下面的语法用于将数据导入HDFS。
$ sqoop import (generic-args) (import-args)
2、简单验证
----验证sqoop连接mysql 是否成功--列出该链接下的所有库
sqoop list-databases --connect jdbc:mysql://192.168.10.44:3306/test --username root --password 88888
二、使用示例
1、全量导入mysql表数据到HDFS
前提是对应的环境都是可用的,且是有测试数据的。
1)、导入
# 从MySQL数据库服务器中的person表导入HDFS
sqoop import --connect jdbc:mysql://192.168.10.44:3306/test --username root --password 888888 \
--delete-target-dir \
--target-dir /test \
--table person \
--m 1

# 其中
# --target-dir可以用来指定导出数据存放至HDFS的目录;
# --delete-target-dir   删除target-dir目录,然后再重建

[root@server7 lib]# sqoop import --connect jdbc:mysql://192.168.10.44:3306/test --username root --password 888888 \
> --delete-target-dir \
> --target-dir /test \
> --table person \
> --m 1
Warning: /opt/cloudera/parcels/CDH-6.2.1-1.cdh6.2.1.p0.1425774/bin/../lib/sqoop/../accumulo does not exist! Accumulo imports will fail.
Please set $ACCUMULO_HOME to the root of your Accumulo installation.
SLF4J: Class path contains multiple SLF4J bindings.
SLF4J: Found binding in [jar:file:/opt/cloudera/parcels/CDH-6.2.1-1.cdh6.2.1.p0.1425774/jars/slf4j-log4j12-1.7.25.jar!/org/slf4j/impl/StaticLoggerBinder.class]
SLF4J: Found binding in [jar:file:/opt/cloudera/parcels/CDH-6.2.1-1.cdh6.2.1.p0.1425774/jars/log4j-slf4j-impl-2.8.2.jar!/org/slf4j/impl/StaticLoggerBinder.class]
SLF4J: See http://www.slf4j.org/codes.html#multiple_bindings for an explanation.
SLF4J: Actual binding is of type [org.slf4j.impl.Log4jLoggerFactory]
22/11/08 15:12:19 INFO sqoop.Sqoop: Running Sqoop version: 1.4.7-cdh6.2.1
22/11/08 15:12:19 WARN tool.BaseSqoopTool: Setting your password on the command-line is insecure. Consider using -P instead.
22/11/08 15:12:19 INFO manager.MySQLManager: Preparing to use a MySQL streaming resultset.
22/11/08 15:12:19 INFO tool.CodeGenTool: Beginning code generation
Tue Nov 08 15:12:19 CST 2022 WARN: Establishing SSL connection without server's identity verification is not recommended. According to MySQL 5.5.45+, 5.6.26+ and 5.7.6+ requirements SSL connection must be established by default if explicit option isn't set. For compliance with existing applications not using SSL the verifyServerCertificate property is set to 'false'. You need either to explicitly disable SSL by setting useSSL=false, or set useSSL=true and provide truststore for server certificate verification.
22/11/08 15:12:19 INFO manager.SqlManager: Executing SQL statement: SELECT t.* FROM `person` AS t LIMIT 1
22/11/08 15:12:19 INFO manager.SqlManager: Executing SQL statement: SELECT t.* FROM `person` AS t LIMIT 1
22/11/08 15:12:19 INFO orm.CompilationManager: HADOOP_MAPRED_HOME is /opt/cloudera/parcels/CDH/lib/hadoop-mapreduce
22/11/08 15:12:22 ERROR orm.CompilationManager: Could not rename /tmp/sqoop-root/compile/4f96760f8620e1c038672078f7a2ed66/person.java to /opt/cloudera/parcels/CDH-6.2.1-1.cdh6.2.1.p0.1425774/lib/sqoop/lib/./person.java. Error: Destination '/opt/cloudera/parcels/CDH-6.2.1-1.cdh6.2.1.p0.1425774/lib/sqoop/lib/./person.java' already exists
22/11/08 15:12:22 INFO orm.CompilationManager: Writing jar file: /tmp/sqoop-root/compile/4f96760f8620e1c038672078f7a2ed66/person.jar
22/11/08 15:12:23 INFO tool.ImportTool: Destination directory /test deleted.
22/11/08 15:12:23 WARN manager.MySQLManager: It looks like you are importing from mysql.
22/11/08 15:12:23 WARN manager.MySQLManager: This transfer can be faster! Use the --direct
22/11/08 15:12:23 WARN manager.MySQLManager: option to exercise a MySQL-specific fast path.
22/11/08 15:12:23 INFO manager.MySQLManager: Setting zero DATETIME behavior to convertToNull (mysql)
22/11/08 15:12:23 INFO mapreduce.ImportJobBase: Beginning import of person
22/11/08 15:12:23 INFO Configuration.deprecation: mapred.jar is deprecated. Instead, use mapreduce.job.jar
22/11/08 15:12:23 INFO Configuration.deprecation: mapred.map.tasks is deprecated. Instead, use mapreduce.job.maps
22/11/08 15:12:23 INFO client.ConfiguredRMFailoverProxyProvider: Failing over to rm46
22/11/08 15:12:23 INFO mapreduce.JobResourceUploader: Disabling Erasure Coding for path: /user/root/.staging/job_1667806921128_0009
Tue Nov 08 15:12:31 CST 2022 WARN: Establishing SSL connection without server's identity verification is not recommended. According to MySQL 5.5.45+, 5.6.26+ and 5.7.6+ requirements SSL connection must be established by default if explicit option isn't set. For compliance with existing applications not using SSL the verifyServerCertificate property is set to 'false'. You need either to explicitly disable SSL by setting useSSL=false, or set useSSL=true and provide truststore for server certificate verification.
22/11/08 15:12:31 INFO db.DBInputFormat: Using read commited transaction isolation
22/11/08 15:12:31 INFO mapreduce.JobSubmitter: number of splits:1
22/11/08 15:12:31 INFO Configuration.deprecation: yarn.resourcemanager.zk-address is deprecated. Instead, use hadoop.zk.address
22/11/08 15:12:31 INFO Configuration.deprecation: yarn.resourcemanager.system-metrics-publisher.enabled is deprecated. Instead, use yarn.system-metrics-publisher.enabled
22/11/08 15:12:31 INFO mapreduce.JobSubmitter: Submitting tokens for job: job_1667806921128_0009
22/11/08 15:12:31 INFO mapreduce.JobSubmitter: Executing with tokens: []
22/11/08 15:12:32 INFO conf.Configuration: resource-types.xml not found
22/11/08 15:12:32 INFO resource.ResourceUtils: Unable to find 'resource-types.xml'.
22/11/08 15:12:32 INFO impl.YarnClientImpl: Submitted application application_1667806921128_0009
22/11/08 15:12:32 INFO mapreduce.Job: The url to track the job: http://server8:8088/proxy/application_1667806921128_0009/
22/11/08 15:12:32 INFO mapreduce.Job: Running job: job_1667806921128_0009
22/11/08 15:12:39 INFO mapreduce.Job: Job job_1667806921128_0009 running in uber mode : false
22/11/08 15:12:39 INFO mapreduce.Job:  map 0% reduce 0%
22/11/08 15:12:46 INFO mapreduce.Job:  map 100% reduce 0%
22/11/08 15:12:46 INFO mapreduce.Job: Job job_1667806921128_0009 completed successfully
22/11/08 15:12:47 INFO mapreduce.Job: Counters: 33
        File System Counters
                FILE: Number of bytes read=0
                FILE: Number of bytes written=248904
                FILE: Number of read operations=0
                FILE: Number of large read operations=0
                FILE: Number of write operations=0
                HDFS: Number of bytes read=85
                HDFS: Number of bytes written=248
                HDFS: Number of read operations=6
                HDFS: Number of large read operations=0
                HDFS: Number of write operations=2
                HDFS: Number of bytes read erasure-coded=0
        Job Counters
                Launched map tasks=1
                Other local map tasks=1
                Total time spent by all maps in occupied slots (ms)=5208
                Total time spent by all reduces in occupied slots (ms)=0
                Total time spent by all map tasks (ms)=5208
                Total vcore-milliseconds taken by all map tasks=5208
                Total megabyte-milliseconds taken by all map tasks=5332992
        Map-Reduce Framework
                Map input records=13
                Map output records=13
                Input split bytes=85
                Spilled Records=0
                Failed Shuffles=0
                Merged Map outputs=0
                GC time elapsed (ms)=60
                CPU time spent (ms)=1740
                Physical memory (bytes) snapshot=240119808
                Virtual memory (bytes) snapshot=2613522432
                Total committed heap usage (bytes)=232259584
                Peak Map Physical memory (bytes)=240119808
                Peak Map Virtual memory (bytes)=2613522432
        File Input Format Counters
                Bytes Read=0
        File Output Format Counters
                Bytes Written=248
22/11/08 15:12:47 INFO mapreduce.ImportJobBase: Transferred 248 bytes in 23.6754 seconds (10.475 bytes/sec)
22/11/08 15:12:47 INFO mapreduce.ImportJobBase: Retrieved 13 records.
2)、验证方式一

3)、验证方式二
为了验证在HDFS导入的数据,使用以下命令查看导入的数据:
hdfs dfs -cat /test/part-m-00000

[root@server7 lib]# hdfs dfs -cat /test/part-m-00000
11,测试修改go语言,30
13,NameUpdate,22
14,updatejson,23
189,再试一试,12
191,test-full-update,3333
889,zhangsanswagger2,88
892,update,189
1001,testupdate,19
1002,测试go语言,23
1013,slene,0
1014,testing,0
1015,testing,18
1016,astaxie,19

# 可以看出它会在HDFS上默认用逗号,分隔person表的数据和字段。可以通过--fields-terminated-by '\t'来指定分隔符。
2、全量导入mysql表数据到HIVE
1)、方式一先复制表结构到hive中再导入数据
1、将关系型数据的表结构复制到hive中
sqoop create-hive-table
sqoop create-hive-table --connect jdbc:mysql://192.168.10.44:3306/test --username root --password 888888 \
--table person \
--hive-table test.person
# 其中:
#  --table person为mysql中的数据库test中的表
#  --hive-table person 为hive中新建的表名称
2、从关系数据库导入文件到hive中
sqoop import
sqoop import --connect jdbc:mysql://192.168.10.44:3306/test --username root --password 888888 \
--table person \
--hive-table test.person \
--hive-import \
--m 1

执行完后查询
0: jdbc:hive2://server8:10000> select * from person;
INFO  : Compiling command(queryId=hive_20221108152707_7553742f-d1a1-42ad-9072-9aa76ae845cb): select * from person
INFO  : Semantic Analysis Completed
INFO  : Returning Hive schema: Schema(fieldSchemas:[FieldSchema(name:person.id, type:int, comment:null), FieldSchema(name:person.name, type:string, comment:null), FieldSchema(name:person.age, type:int, comment:null)], properties:null)
INFO  : Completed compiling command(queryId=hive_20221108152707_7553742f-d1a1-42ad-9072-9aa76ae845cb); Time taken: 0.069 seconds
INFO  : Executing command(queryId=hive_20221108152707_7553742f-d1a1-42ad-9072-9aa76ae845cb): select * from person
INFO  : Completed executing command(queryId=hive_20221108152707_7553742f-d1a1-42ad-9072-9aa76ae845cb); Time taken: 0.001 seconds
INFO  : OK
+------------+-------------------+-------------+
| person.id  |    person.name    | person.age  |
+------------+-------------------+-------------+
| 11         | 测试修改go语言          | 30          |
| 13         | NameUpdate        | 22          |
| 14         | updatejson        | 23          |
| 189        | 再试一试              | 12          |
| 191        | test-full-update  | 3333        |
| 889        | zhangsanswagger2  | 88          |
| 892        | update            | 189         |
| 1001       | testupdate        | 19          |
| 1002       | 测试go语言            | 23          |
| 1013       | slene             | 0           |
| 1014       | testing           | 0           |
| 1015       | testing           | 18          |
| 1016       | astaxie           | 19          |
+------------+-------------------+-------------+
13 rows selected (0.112 seconds)
2)、方式二直接复制表结构、数据到hive中
sqoop import --connect jdbc:mysql://192.168.10.44:3306/test --username root --password 888888 \
--table author \
--hive-import \
--m 1 \
--hive-database test;

0: jdbc:hive2://server8:10000> select * from author;
INFO  : Compiling command(queryId=hive_20221108152953_cd41f8ed-31d5-43a6-a10a-ad8a3c725617): select * from author
INFO  : Semantic Analysis Completed
INFO  : Returning Hive schema: Schema(fieldSchemas:[FieldSchema(name:author.id, type:bigint, comment:null), FieldSchema(name:author.created_time, type:string, comment:null), FieldSchema(name:author.updated_time, type:string, comment:null), FieldSchema(name:author.first_name, type:string, comment:null), FieldSchema(name:author.last_name, type:string, comment:null)], properties:null)
INFO  : Completed compiling command(queryId=hive_20221108152953_cd41f8ed-31d5-43a6-a10a-ad8a3c725617); Time taken: 0.071 seconds
INFO  : Executing command(queryId=hive_20221108152953_cd41f8ed-31d5-43a6-a10a-ad8a3c725617): select * from author
INFO  : Completed executing command(queryId=hive_20221108152953_cd41f8ed-31d5-43a6-a10a-ad8a3c725617); Time taken: 0.001 seconds
INFO  : OK
+------------+------------------------+------------------------+--------------------+-------------------+
| author.id  |  author.created_time   |  author.updated_time   | author.first_name  | author.last_name  |
+------------+------------------------+------------------------+--------------------+-------------------+
| 1          | 2020-08-21 09:02:27.0  | 2020-08-21 09:02:27.0  | alan               | chan              |
| 2          | 2020-08-21 09:03:08.0  | 2020-08-21 09:03:08.0  | alan2              | chan              |
| 3          | 2020-08-21 09:03:14.0  | 2020-08-21 09:03:14.0  | alan3              | chan              |
| 4          | 2020-08-21 09:03:18.0  | 2020-08-21 09:03:18.0  | alan4              | chan              |
+------------+------------------------+------------------------+--------------------+-------------------+
4 rows selected (0.109 seconds)
3、导入表数据子集(where过滤)
–where可以指定从关系数据库导入数据时的查询条件。它执行在数据库服务器相应的SQL查询,并将结果存储在HDFS的目标目录。
sqoop import --connect jdbc:mysql://192.168.10.44:3306/test --username root --password 888888 \
--table person \
--where "id >= 1000" \
--target-dir /test/wherequery \
--m 1

[root@server7 lib]# hadoop fs -cat /test/wherequery/part-m-00000
1001,testupdate,19
1002,测试go语言,23
1013,slene,0
1014,testing,0
1015,testing,18
1016,astaxie,19
4、导入表数据子集(query查询)
- 使用query sql语句来进行查找不能加参数–table
- 并且必须要添加where条件
- 并且where条件后面必须带一个$CONDITIONS 这个字符串
- 并且这个sql语句必须用单引号,不能用双引号
sqoop import --connect jdbc:mysql://192.168.10.44:3306/test --username root --password 888888 \
--query 'select * from person WHERE  id > 1000 and $CONDITIONS' \
--split-by id \
--m 2 \
--target-dir /test/wherequery2 \
--fields-terminated-by '\t'

sqoop命令中,--split-by id通常配合-m 10参数使用。用于指定根据哪个字段进行划分并启动多少个maptask。

[root@server7 lib]# hadoop fs -cat /test/wherequery2/part-m-00000
1001    testupdate      19
1002    测试go语言      23
[root@server7 lib]# hadoop fs -cat /test/wherequery2/part-m-00001
1013    slene   0
1014    testing 0
1015    testing 18
1016    astaxie 19
5、增量导入
很多时候都是只需要导入增量数据即可,并不需要将表中的数据每次都全部导入到hive或者hdfs当中去。因此一般都是选用一些字段进行增量的导入, sqoop支持增量的导入数据。
增量导入是仅导入新添加的表中的行的技术。
- –check-column (col)
用来指定一些列,这些列在增量导入时用来检查这些数据是否作为增量数据进行导入,和关系型数据库中的自增字段及时间戳类似。
注意:这些被指定的列的类型不能使任意字符类型,如char、varchar等类型都是不可以的,同时-- check-column可以去指定多个列。 - –incremental (mode)
append:追加,比如对大于last-value指定的值之后的记录进行追加导入。lastmodified:最后的修改时间,追加last-value指定的日期之后的记录 - –last-value (value)
指定自从上次导入后列的最大值(大于该指定的值),也可以自己设定某一值
1)、Append模式增量导入
1、执行以下指令先将我们之前的数据导入
sqoop import --connect jdbc:mysql://192.168.10.44:3306/test --username root --password 888888 \
--target-dir /test/appendresult \
--table person \
--m 1
# 使用hadoop fs -cat查看生成的数据文件,发现数据已经导入到hdfs中。
hadoop fs -cat /test/appendresult/part-m-00000

[root@server7 lib]# hadoop fs -cat /test/appendresult/part-m-00000
11,测试修改go语言,30
13,NameUpdate,22
14,updatejson,23
189,再试一试,12
191,test-full-update,3333
889,zhangsanswagger2,88
892,update,189
1001,testupdate,19
1002,测试go语言,23
1013,slene,0
1014,testing,0
1015,testing,18
1016,astaxie,19
2、在mysql的emp中插入2条增量数据
insert into `person` (`id`, `name`, `age`) values ('1017', 'alan', '18');
insert into `person` (`id`, `name`, `age`) values ('1018', 'chan', '19');
3、执行如下的指令,实现增量的导入
sqoop import --connect jdbc:mysql://192.168.10.44:3306/test --username root --password 888888 \
--table person \
--m 1 \
--incremental append \
--check-column id \
--last-value  1016 \
--target-dir /test/appendresult
4、最后验证
导入数据目录可以发现多了一个文件里面就是增量数据

2)、Lastmodified模式增量导入
1、第一次导入
首先再mysql中创建一个customer表,指定一个时间戳字段:
create table customertest
(
     id int,
     name varchar(20),
     last_mod timestamp default current_timestamp on update current_timestamp
);
此处的时间戳设置为在数据的产生和更新时都会发生改变.
分别插入如下记录:
insert into customertest(id,name) values(1,'neil');
insert into customertest(id,name) values(2,'jack');
insert into customertest(id,name) values(3,'martin');
insert into customertest(id,name) values(4,'tony');
insert into customertest(id,name) values(5,'eric');
执行sqoop指令将数据全部导入hdfs:
sqoop import --connect jdbc:mysql://192.168.10.44:3306/test --username root --password rootroot \
--table customertest \
--m 1 \
--target-dir /test/lastmodifiedresult


查看此时导出的结果数据:
hadoop fs -cat /test/lastmodifiedresult/part-m-00000

[root@server7 lib]# hadoop fs -cat /test/lastmodifiedresult/part-m-00000
1,neil,2022-11-08 08:32:41.0
2,jack,2022-11-08 08:32:41.0
3,martin,2022-11-08 08:32:41.0
4,tony,2022-11-08 08:32:41.0
5,eric,2022-11-08 08:32:41.0
2、再次插入一条数据进入customertest表
insert into customertest(id,name) values(6,'james')
3、使用incremental的方式进行增量的导入
sqoop import --connect jdbc:mysql://192.168.10.44:3306/test --username root --password 8888888 \
--table customertest \
--append \
--check-column last_mod \
--incremental lastmodified \
--last-value "2022-11-08 08:32:41" \
--m 1 \
--target-dir /test/lastmodifiedresult

hadoop fs -cat /test/lastmodifiedresult/part-m-00001
[root@server7 lib]# hadoop fs -cat /test/lastmodifiedresult/part-m-00001
1,neil,2022-11-08 08:32:41.0
2,jack,2022-11-08 08:32:41.0
3,martin,2022-11-08 08:32:41.0
4,tony,2022-11-08 08:32:41.0
5,eric,2022-11-08 08:32:41.0
6,james,2022-11-08 08:35:18.0
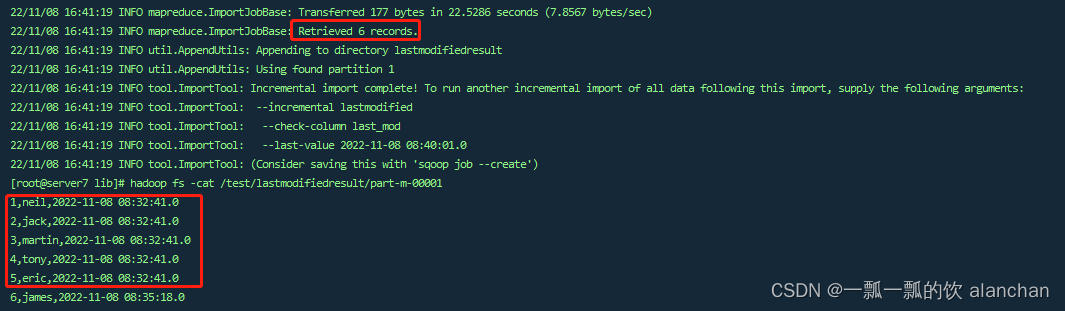
此处已经会导入我们最后插入的一条记录,但是我们却发现此处插入了6条数据,这是因为采用lastmodified模式去处理增量时,会将大于等于last-value值的数据当做增量插入。
选择好同步的条件很重要。
3)、Lastmodified模式:append、merge-key
使用lastmodified模式进行增量处理要指定增量数据是以append模式(附加)还是merge-key(合并)模式添加
下面演示使用merge-by的模式进行增量更新,我们去更新 id为1的name字段。
update customertest set name = 'Neil' where id = 1;

# 更新之后,这条数据的时间戳会更新为更新数据时的系统时间.
# 执行如下指令,把id字段作为merge-key:
sqoop import --connect jdbc:mysql://192.168.10.44:3306/test --username root --password rootroot \
--table customertest \
--check-column last_mod \
--incremental lastmodified \
--last-value "2022-11-08 08:35:18" \
--m 1 \
--merge-key id \
--target-dir /test/lastmodifiedresult

hadoop fs -cat /test/lastmodifiedresult/part-m-00000

[root@server7 lib]# hadoop fs -cat /test/lastmodifiedresult/part-m-00000
1,Neil,2022-11-08 08:43:56.0
6,james,2022-11-08 08:35:18.0


sqoop import --connect jdbc:mysql://192.168.10.44:3306/test --username root --password rootroot \
--table customertest \
--target-dir /test/lastmodifiedresult \
--check-column last_mod \
--incremental lastmodified \
--last-value "2022-11-08 08:35:18" \
--m 1 \
--merge-key id
验证结果与下文描述不一致,仅仅也是map过程
由于merge-key模式是进行了一次完整的mapreduce操作,因此最终我们在lastmodifiedresult文件夹下可以看到生成的为part-r-00000这样的文件,会发现id=1的name已经得到修改,同时新增了id=6的数据。

6、sybase导入到hdfs
sqoop import \
  --connect 'jdbc:sybase:Tds:192.168.×××.102:4100/DATABASE=CZ' \
  --driver 'com.sybase.jdbc3.jdbc.SybDriver' \
  --username "etl_Bigdata" --password "888888" \
  --query "select * from dbo.t_his where \$CONDITIONS" \
  --target-dir "/user/hive/warehouse/test.db/t_his" --split-by 1 --verbose ;

  #带top的查询
  --query "select top 100 * from dbo.t_his where \$CONDITIONS" \
以上完成了sqoop导入到hdfs的几种示例,基本上满足日常的应用。另外,本处演示的仅仅是一次性作业,如果是定时的任务的话,可使用很多中方式来实现,比如oozie、azkaban等等有界面的管理工具。


 778
778

 被折叠的 条评论
为什么被折叠?
被折叠的 条评论
为什么被折叠?
 到【灌水乐园】发言


