


 本文详细介绍了如何使用NSSM在Windows环境下将Gogs安装为系统服务的过程,包括配置路径、日志输出、错误处理及环境变量设置,确保Gogs能够作为自托管Git服务稳定运行。
Use NSSM
Get the nssm.exe needed for your machine (32 or 64 bit; they’re packaged together in Iain’s zip file), and place it in a directory that is in (or will be added to) your %PATH% environment variable.
Open a command line as administrator and do following command to configure Gogs as a service:
C:\>nssm install gogs
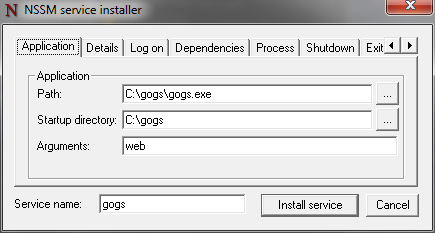
“NSSM service installer” will appear. Configure it as follows:
Application tab:
- Path:
C:\gogs\gogs.exe 为gogs的exe文件所在位置 - Startup directory:
C:\gogs - Arguments:
web
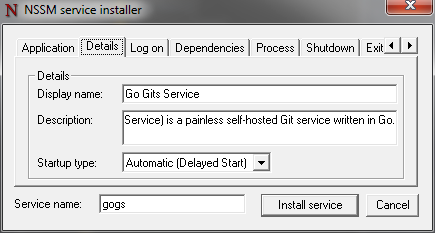
Details tab:
- Display name:
Gogs - Description:
A painless self-hosted Git service. - Startup type:
Automatic (Delayed Start)
Note that we’ve chosen delayed start, so that the service will not impact the early boot time. Gogs will start two minutes after the non-delayed services.
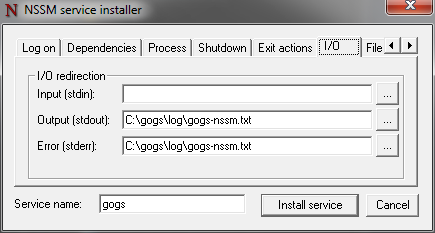
I/O tab:
- Output (stdout):
C:\gogs\log\gogs-nssm.txt - Error (stderr):
C:\gogs\log\gogs-nssm.txt
That will capture all text output that you would normally receive from Gogs on the command line console, and log it to that file instead.
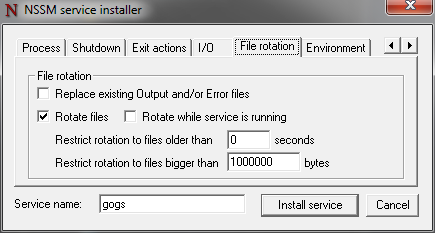
File rotation tab:
- Check:
Rotate files - Restrict rotation to files bigger than:
1000000 bytes
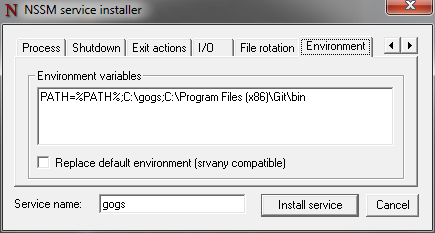
Environment tab:
- Environment variables:
PATH=%PATH%;C:\gogs;C:\Program Files (x86)\Git\bin
That is a guarantee that both gogs.exe and git.exe will be on the Gogs service’s path variable during runtime.
Click “Install service”, and you should be confirmed that it succeeded.
If it failed, refer back to the command line console you started, for the error message. When it succeeds, go to command line and do:
nssm start gogs
You should see:
gogs: START: The operation completed successfully.
Check that this is true by opening C:\gogs\log\gogs-nssm.txt. You should see Gogs’ start up procedures, ending with:
timestamp [I] Run Mode: Production
timestamp [I] Listen: http://127.0.1.1:80
Now point your web browser at http://gogs/ and log in.
Gogs is running as a service, and will not need to be run manually, unless something goes wrong. NSSM will attempt to restart the service for you, if the Gogs server crashes.
When you need to restart it after app.ini changes, go to an administrator command line after the changes, and do:
nssm restart gogs
See the configuration cheat sheet for reference of the custom\conf\app.ini settings.
An example of the logging and error handling in action:
[log]
ROOT_PATH = C:\gogs\log
At the time of writing this line, it will cause the following to print in C:\gogs\log\gogs-nssm.txt:
timestamp [T] Custom path: C:/gogs/custom
timestamp [T] Log path: C:\gogs\log
timestamp [I] Gogs x.y.z
timestamp [log.go:294 Error()] [E] Fail to set logger(file): invalid character 'g' in string escape code
This is what was expected in C:\custom\conf\app.ini:
ROOT_PATH = C:/gogs/log
And this was the nssm interaction while solving it:
C:\>nssm restart gogs
gogs: STOP: The operation completed successfully.
gogs: Unexpected status SERVICE_PAUSED in response to START control.

C:\>nssm start gogs
gogs: START: An instance of the service is already running.

C:\>nssm stop gogs
gogs: STOP: The operation completed successfully.

C:\>nssm start gogs
gogs: Unexpected status SERVICE_PAUSED in response to START control.

C:\>nssm restart gogs
gogs: STOP: The operation completed successfully.
gogs: START: The operation completed successfully.


 3327
3327

 被折叠的 条评论
为什么被折叠?
被折叠的 条评论
为什么被折叠?
 到【灌水乐园】发言


