


文章目录
Thymeleaf
一种类似于JSP的
动态网页技术
1. Thymeleaf的概述
- JSP必须依赖Tomcat才能运行,不能直接运行在浏览器中
- HTML可以运行在浏览器中,但是不能介绍控制器传递的数据
- Thymeleaf是一种既
保留了HTML后缀,能够直接运行在浏览器,又实现了JSP显示动态数据的功能- 动静分离
- 开箱即用
2. 创建Thymeleaf项目
SpringBoot应用对Thymeleaf提供了良好的支持。
对于构建一个完整程序,创建第一个Thymeleaf程序需要以下几个步骤:
- 创建项目,添加依赖
- 创建Thymeleaf页面
- 创建Controller
- 访问页面
2.1 创建项目、添加依赖
-
打开IDEA创建新项目,选择Spring Initializr方式创建Springboot项目
-
填写项目信息

- 添加依赖(或者直接在项目的pom文件中直接添加依赖)
项目创建时添加依赖

或者在pom文件添加以下依赖
<dependency>
	<groupId>org.springframework.boot</groupId>
	<artifactId>spring-boot-starter-thymeleaf</artifactId>
</dependency>
<dependency>
	<groupId>org.springframework.boot</groupId>
	<artifactId>spring-boot-starter-web</artifactId>
</dependency>
<dependency>
    <groupId>org.projectlombok</groupId>
    <artifactId>lombok</artifactId>
    <optional>true</optional>
</dependency>
2.2 创建thymeleaf模板
thymeleaf模板就是HTML文件
SpringBoot应用中,resources/templates就是用来存放thymeleaf模板的,在templates目录创建HTML页面模板
重要说明:
static目录下的资源被定义为静态资源,SpringBoot应用默认放行,如果将HTML创建在static目录是可以直接访问的templates目录下的文件被定义为动态网页模板,SpringBoot应用会拦截templates中定义的资源,如果将HTML文件创建在templates目录, 则必须通过控制器跳转访问
-index.html
<!DOCTYPE html>
<html lang="en">
<head>
    <meta charset="UTF-8">
    <title>Title</title>
</head>
<body>
    <h1>index</h1>
</body>
</html>
2.3 创建Controller
创建PageController,用于转发“允许直接”访问的页面请求
- @controller 注解的意思就是声明这个java文件为一个controller控制器。
- @RequestMapping(“/index”) 控制器张index方法的请求路径
- return “index” 这个index就是在templates目录下对应模板(本次为Thymeleaf模板)的名称(与页面关联默认规则为:templates目录下返回字符串.html)。
- PageController
@Controller
public class pageController {
    @RequestMapping("/index")
    public String index(){
        return "index";
    }
}
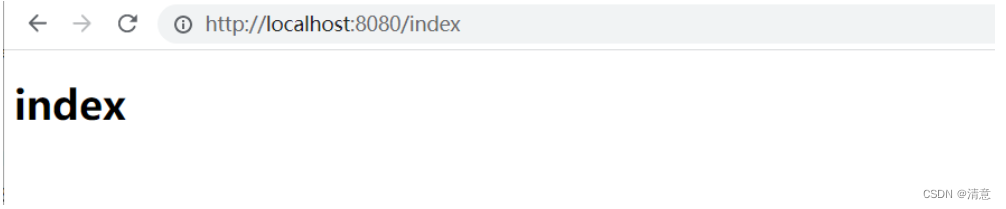
2.4 访问
开启项目后,浏览器访问http://localhost:8080/index
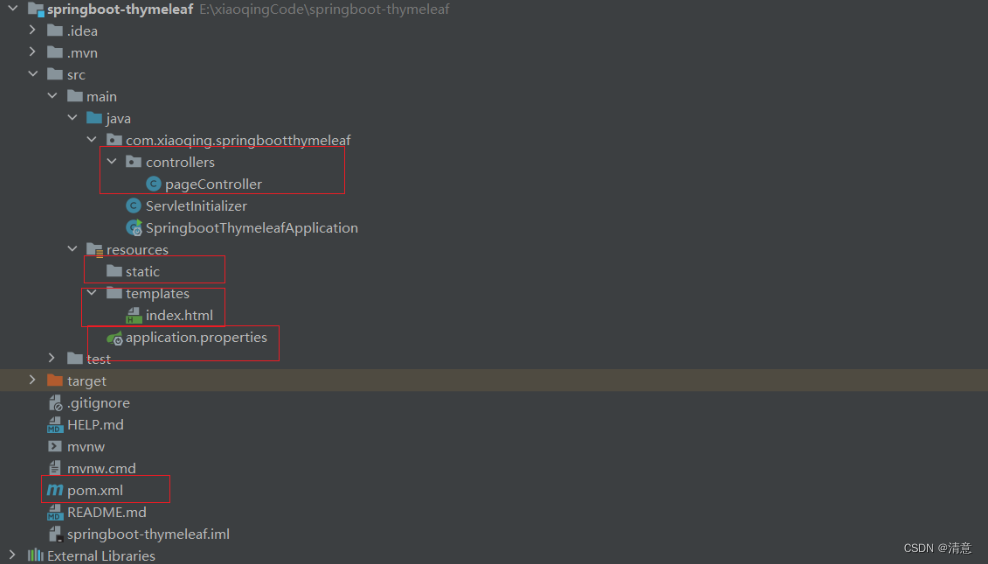
2.5 项目结构说明
- pom.xml:是项目中的Maven依赖,因为Springboot使用Maven来管理外部jar包依赖,我们只需填写依赖名称配置即可引入该依赖,在本系统中引入Spring web模块(Springmvc)和Thymeleaf的依赖.我们不需要自己去招相关jar包。
- application.properties: 编写Springboot与各框架整合的一些配置内容。
- controller:用来编写控制器,主要负责处理请求以及和视图(Thymeleaf)绑定。
- static:用于存放静态资源,例如html、JavaScript、css以及图片等。
- templates:用来存放模板引擎Thymeleaf(本质依然是.html文件)
项目基于Springboot框架,且选了Spring web(Springmvc)作为mvc框架,其中Thymeleaf就是v(view)视图层,我们需要在controller中指定Thymeleaf页面的url,然后再Model中绑定数据。
3. thymeleaf的配置
Springboot官方对Thymeleaf做了很多默认配置,但咱们引入Thymeleaf的jar包依赖后很可能根据自己特定需求进行更细化的配置,例如页面缓存、字体格式设置等等
# THYMELEAF (ThymeleafAutoConfiguration)
spring.thymeleaf.cache=true # Whether to enable template caching.
spring.thymeleaf.check-template=true # Whether to check that the template exists before rendering it.
spring.thymeleaf.check-template-location=true # Whether to check that the templates location exists.
spring.thymeleaf.enabled=true # Whether to enable Thymeleaf view resolution for Web frameworks.
spring.thymeleaf.enable-spring-el-compiler=false # Enable the SpringEL compiler in SpringEL expressions.
spring.thymeleaf.encoding=UTF-8 # Template files encoding.
spring.thymeleaf.excluded-view-names= # Comma-separated list of view names (patterns allowed) that should be excluded from resolution.
spring.thymeleaf.mode=HTML # Template mode to be applied to templates. See also Thymeleaf's TemplateMode enum.
spring.thymeleaf.prefix=classpath:/templates/ # Prefix that gets prepended to view names when building a URL.
spring.thymeleaf.reactive.chunked-mode-view-names= # Comma-separated list of view names (patterns allowed) that should be the only ones executed in CHUNKED mode when a max chunk size is set.
spring.thymeleaf.reactive.full-mode-view-names= # Comma-separated list of view names (patterns allowed) that should be executed in FULL mode even if a max chunk size is set.
spring.thymeleaf.reactive.max-chunk-size=0 # Maximum size of data buffers used for writing to the response, in bytes.
spring.thymeleaf.reactive.media-types= # Media types supported by the view technology.
spring.thymeleaf.servlet.content-type=text/html # Content-Type value written to HTTP responses.
spring.thymeleaf.suffix=.html # Suffix that gets appended to view names when building a URL.
spring.thymeleaf.template-resolver-order= # Order of the template resolver in the chain.
spring.thymeleaf.view-names= # Comma-separated list of view names (patterns allowed) that can be resolved.
spring.thymeleaf.cache=false是否允许页面缓存的配置,我们在开发时候要确保页面是最新的所以需要禁用缓存- 使用
spring.thymeleaf.encoding=UTF-8来确定页面的编码,但如果你的项目是GBK编码就需要将它改成GBK spring.thymeleaf.prefix=classpath:/templates/,Springboot默认模板引擎文件是放在templates目录,如果你有需求将模板引擎也可修改配置,将templates改为自己需要的目录
4. thymeleaf的语法
如果要在thymeleaf模板中
获取从控制器传递的数据,需要使用th标签
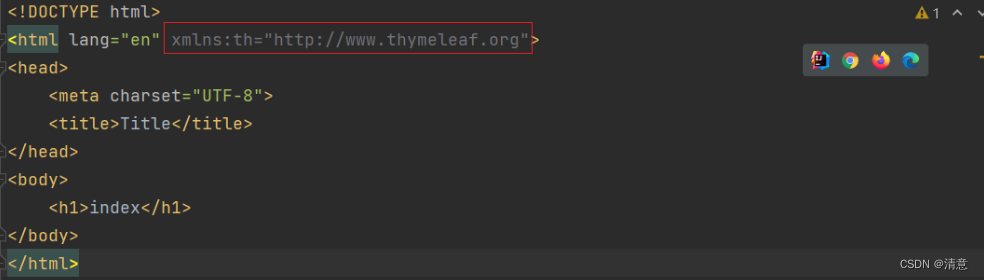
4.1 在thymeleaf模板引入th标签的命名空间
xmlns:th="http://www.thymeleaf.org"
4.2 常用的标签
Thymeleaf通过特殊的标签来寻找属于Thymeleaf的部分,并渲染该部分内容;Thymeleaf也主要通过标签来识别替换对应位置内容

4.3 变量表达式${…}
在Thymeleaf中可以通过
${…}进行取值
- 创建一个Book实体类
@Data
@NoArgsConstructor
@AllArgsConstructor
public class Book {
    private int bookId;
    private String bookName;
    private String bookAuthor;
    private double bookPrice;
}
- 向控制器的Model参数添加各种类型的数据
@Controller
@RequestMapping("/book")
public class BookController {
    @RequestMapping("/message")
    public String bookMessage(Model model){

        Book book = new Book(1,"Java","tom",66.6);
        ArrayList<Book> books = new ArrayList<>();
        books.add( new Book(1,"Java","tom",66.6));
        books.add( new Book(2,"Python","rose",77.7));
        books.add( new Book(3,"C","jack",88.8));
        books.add( new Book(4,"C#","marry",99.9));

        //添加数据到model中
        model.addAttribute("number",6.66);//添加简单类型数据
        model.addAttribute("str","Thymeleaf学习之路");//添加字符串类型数据
        model.addAttribute("book",book);//添加对象类型数据
        model.addAttribute("books",books);//添加集合类型数据

        return "index";
    }
}
4.3.1 取简单类似数据
如果在controller中的Model直接存储某简单类型数据,我们可以直接在
th:text标签使用${对象名}进行取值
<h2>简单类型</h2>
<p th:text="'价格是:' + ${number}"></p>

4.3.2 取字符串类型数据
如果在controller中的Model直接存储某字符串,我们可以直接在
th:text标签使用${对象名}进行取值
<h2>字符串类型</h2>
<p th:text="'字符串是:' + ${str}"></p>

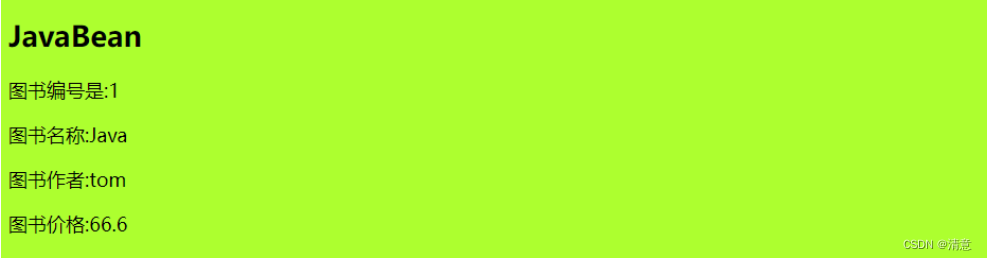
4.3.3 取JavaBean对象
th:text标签
- 使用${对象名.对象属性}取值
- 使用${对象名[‘对象属性’]}取值
- get方法取值,例如${对象.get方法名}
th:object 和 *
- th:text
<h2>JavaBean</h2>
<p th:text="'图书编号是:' + ${book.bookId}"></p>
<p th:text="'图书名称:' + ${book.bookName}"></p>
<p th:text="'图书作者:' + ${book.bookAuthor}"></p>
<p th:text="'图书价格:' + ${book.bookPrice}"></p>

- th:object
<h2>JavaBean</h2>
<div th:object="${book}">
    <p th:text="'图书编号:' + *{bookId}"></p>
    <p th:text="'图书名称:' + *{bookName}"></p>
    <p th:text="'图书作者:' + *{bookAuthor}"></p>
    <p th:text="'图书价格:' + *{bookPrice}"></p>
</div>
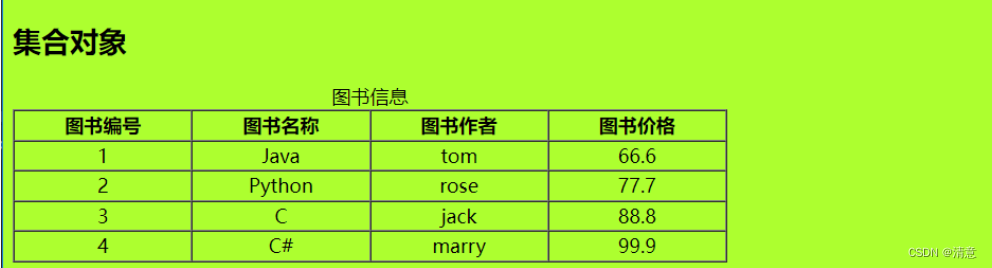
4.3.4 取集合对象
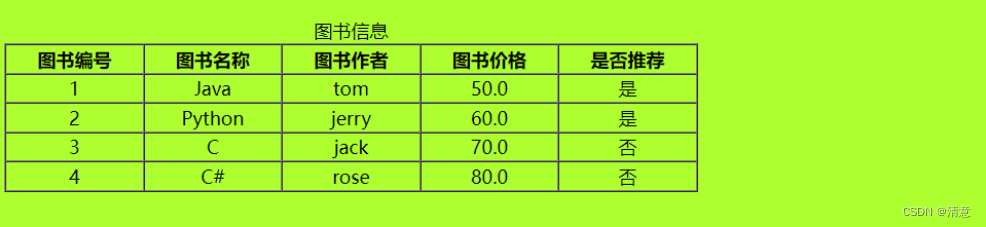
因为List集合是个有序列表,里面内容可能不止一个,你需要遍历List对其中对象取值,而遍历需要用到标签:th:each,具体使用为,其中b就相当于遍历每一次的对象名,在下面的作用域可以直接使用,而books就是你在Model中储存的List的名称
<h2>集合对象</h2>
<table style="width: 600px; text-align: center;" cellspacing="0" border="1">
    <caption>图书信息</caption>
    <thead>
    <tr>
        <th>图书编号</th>
        <th>图书名称</th>
        <th>图书作者</th>
        <th>图书价格</th>
    </tr>
    </thead>
    <tbody>
    <tr th:each="b:${books}">
        <td th:text="${b.bookId}"></td>
        <td th:text="${b.bookName}"></td>
        <td th:text="${b.bookAuthor}"></td>
        <td th:text="${b.bookPrice}"></td>
    </tr>
    </tbody>
</table>
4.4 选择变量表达式: *{…}
变量表达式不仅可以写成${…},而且还可以写成*{…}。
但是,有一个重要的区别:星号语法对选定对象而不是整个上下文评估表达式。也就是说,只要没有选定的对象,美元(
${…})和星号(*{...})的语法就完全一样。
什么是选定对象?使用th:object属性的表达式的结果。就可以选定对象
<h2>JavaBean</h2>
<div th:object="${book}">
    <p th:text="'图书编号:' + *{bookId}"></p>
    <p th:text="'图书名称:' + *{bookName}"></p>
    <p th:text="'图书作者:' + *{bookAuthor}"></p>
    <p th:text="'图书价格:' + *{bookPrice}"></p>
</div>
4.5 链接表达式: @{…}
在Thymeleaf 中,如果想引入链接比如link,href,src,需要使用
@{资源地址}引入资源。其中资源地址可以static目录下的静态资源,也可以是互联网中的绝对资源。
4.5.1 引入css
<link rel="stylesheet" th:href="@{index.css}">
4.5.2 引入js
<script type="text/javascript" th:src="@{index.js}"></script>
4.5.3 超链接
<a th:href="@{/test}">超链接</a>
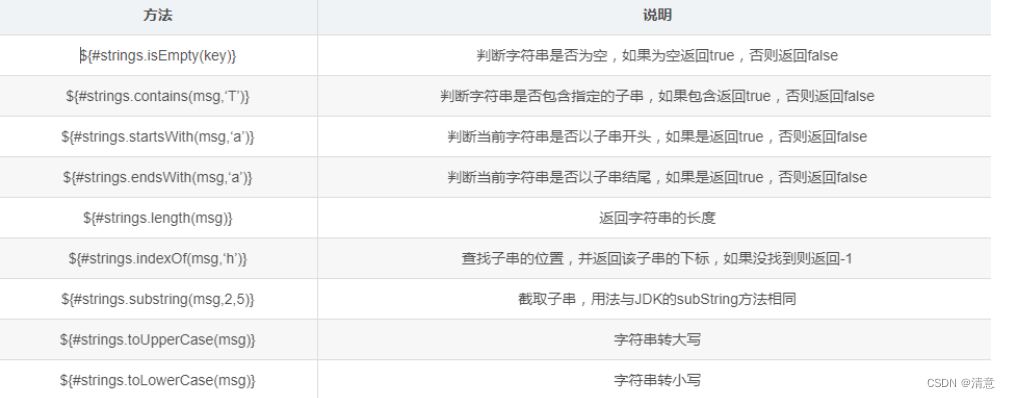
5. thymeleaf的字符串操作
Thymeleaf提供了一些内置对象可以操作数据,内置对象可直接在模板中使用,这些对象是以#引用的,操作字符串的内置对象为strings。
6. thymelaeaf的流程控制
6.1 循环
6.1.1 th:each
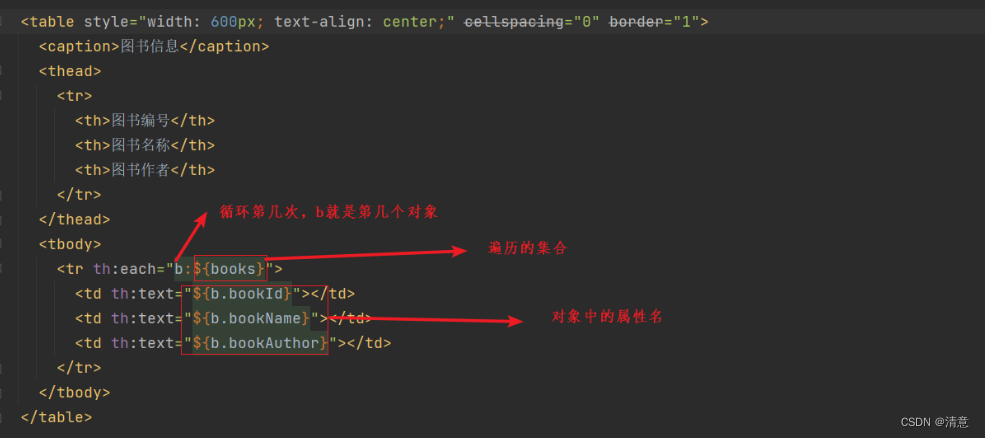
<table style="width: 600px; text-align: center;" cellspacing="0" border="1">
  <caption>图书信息</caption>
  <thead>
    <tr>
      <th>图书编号</th>
      <th>图书名称</th>
      <th>图书作者</th>
    </tr>
  </thead>
  <tbody>
    <tr th:each="b:${books}">
      <td th:text="${b.bookId}"></td>
      <td th:text="${b.bookName}"></td>
      <td th:text="${b.bookAuthor}"></td>
    </tr>
  </tbody>
</table>

6.2 分支
6.2.1 th:if
如果条件不成立,则不显示此标签
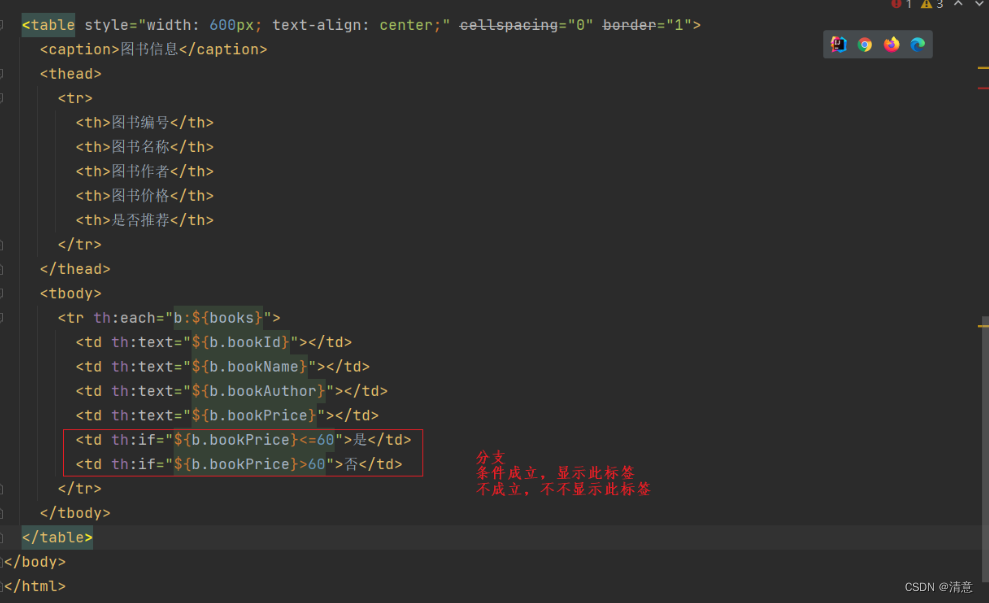
<tbody>
  <tr th:each="b:${books}">
    <td th:text="${b.bookId}"></td>
    <td th:text="${b.bookName}"></td>
    <td th:text="${b.bookAuthor}"></td>
    <td th:text="${b.bookPrice}"></td>
    <td th:if="${b.bookPrice}<=60">是</td>
    <td th:if="${b.bookPrice}>60">否</td>
  </tr>
</tbody>
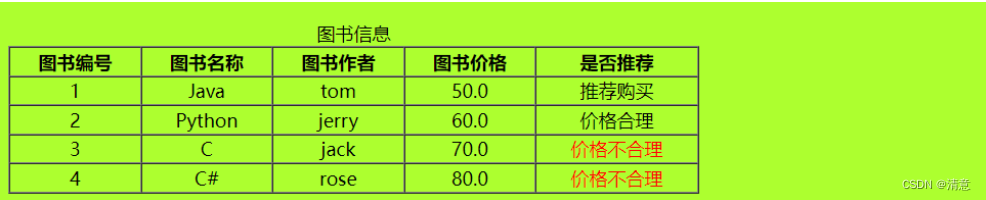
6.2.2 th:switch 和 th:case
    <tbody>
      <tr th:each="b:${books}">
        <td th:text="${b.bookId}"></td>
        <td th:text="${b.bookName}"></td>
        <td th:text="${b.bookAuthor}"></td>
        <td th:text="${b.bookPrice}"></td>
        <td th:switch="${b.bookPrice}">
          <label th:case="50" >推荐购买</label>
          <label th:case="60">价格合理</label>
          <label th:case="*" style="color: red">价格不合理</label>
        </td>
      </tr>
    </tbody>
7. 碎片的概念
碎片:HTML片段,我们可以将多个页面中使用的
相同的HTML标签部分单独定义,然后通过th:include可以在HTML网页引入定义的碎片
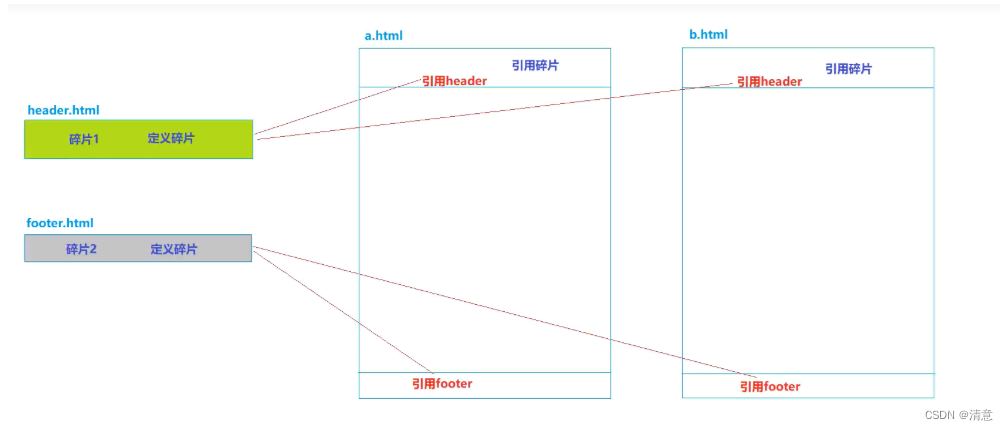
7.1 相关标签
-
th:fragment 定义碎片
-
th:include 引用碎片(引用碎片的文本)
-
th:replace 引用碎片(引用碎片的文本和样式)
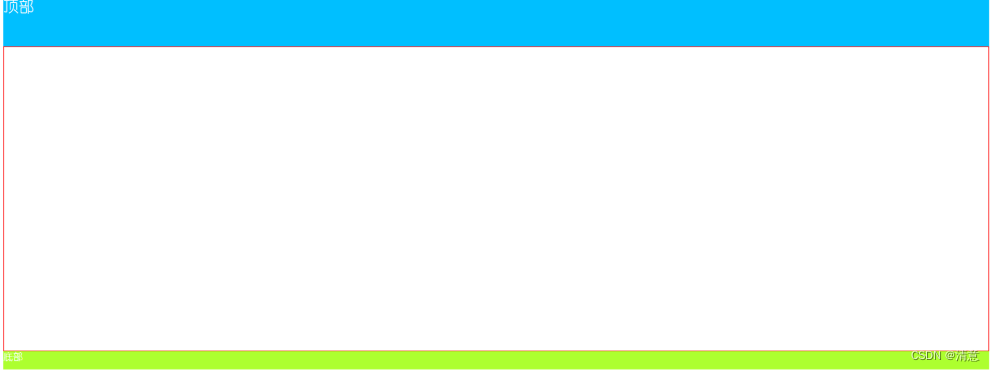
7.2 案例
定义两个碎片,顶部碎片和底部碎片,在第三个thymeleaf模板中引用碎片
7.2.1定义顶部碎片
- header.html
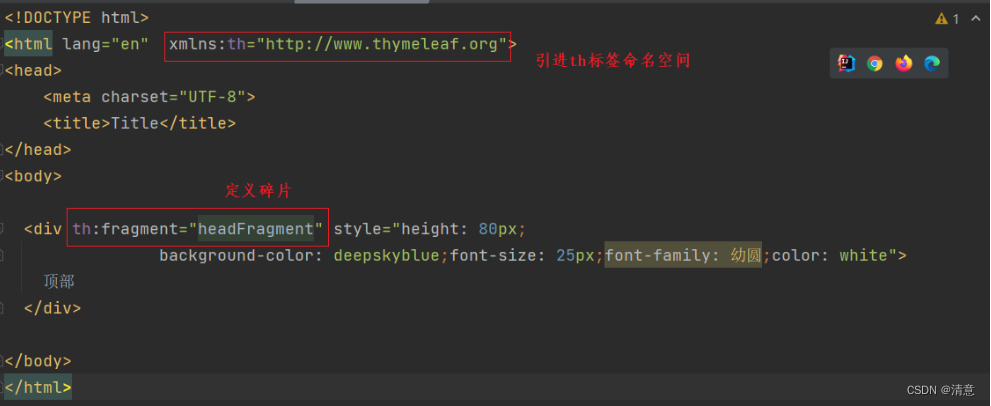
<!DOCTYPE html>
<html lang="en"  xmlns:th="http://www.thymeleaf.org">
<head>
    <meta charset="UTF-8">
    <title>Title</title>
</head>
<body>

  <div th:fragment="headFragment" style="height: 80px;
                background-color: deepskyblue;font-size: 25px;font-family: 幼圆;color: white">
    顶部
  </div>

</body>
</html>
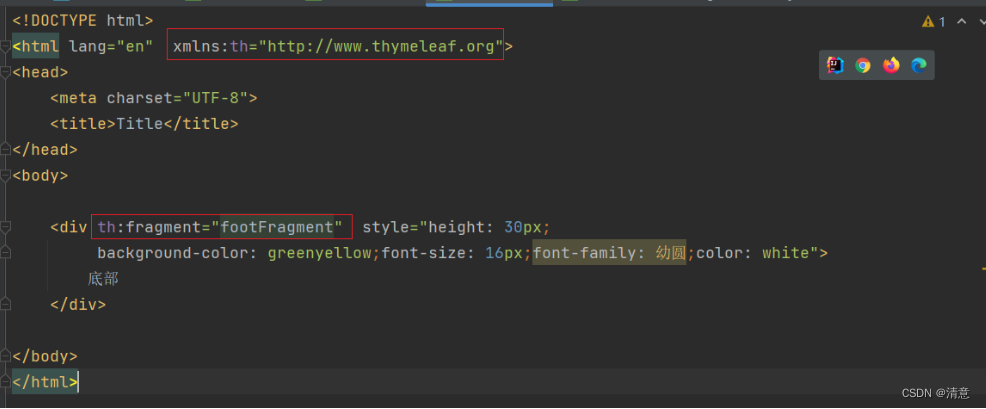
7.2.2 定义底部碎片
- footer.html
<!DOCTYPE html>
<html lang="en"  xmlns:th="http://www.thymeleaf.org">
<head>
    <meta charset="UTF-8">
    <title>Title</title>
</head>
<body>

    <div th:fragment="footFragment"  style="height: 30px;
         background-color: greenyellow;font-size: 16px;font-family: 幼圆;color: white">
        底部
    </div>

</body>
</html>
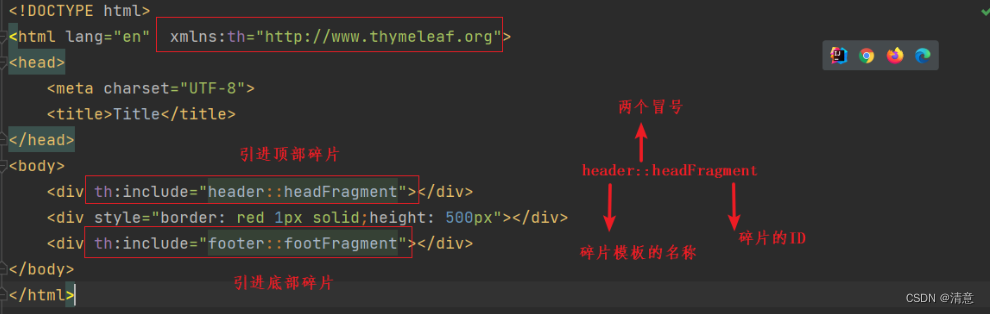
7.2.3 创建测试模板
- test.html
<!DOCTYPE html>
<html lang="en"  xmlns:th="http://www.thymeleaf.org">
<head>
    <meta charset="UTF-8">
    <title>Title</title>
</head>
<body>
    <div th:replace="header::headFragment"></div>
    <div style="border: red 1px solid;height: 500px"></div>
    <div th:replace="footer::footFragment"></div>
</body>
</html>
7.2.4 通过控制器跳转
- PageController
@Controller
public class PageController {

    @RequestMapping("/test")
    public String test(){
        return "test";
    }
}
7.2.5 测试th:include标签
- test.html
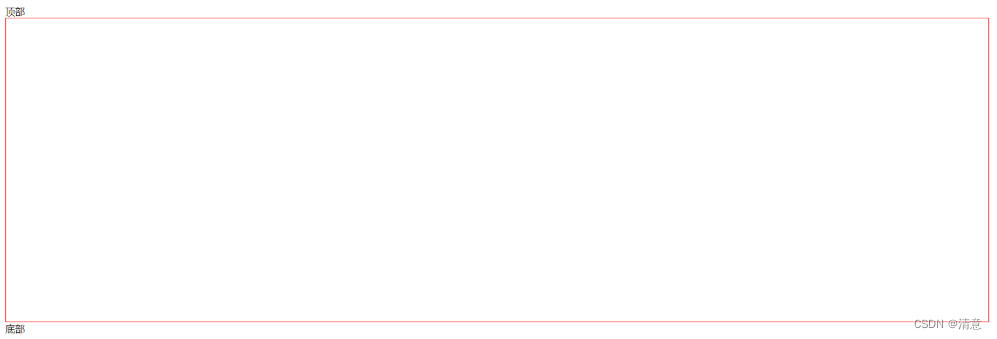
访问http://localhost:8080/test,只引进了碎片的文本内容
7.2.6 测试th:replace标签
- test.html
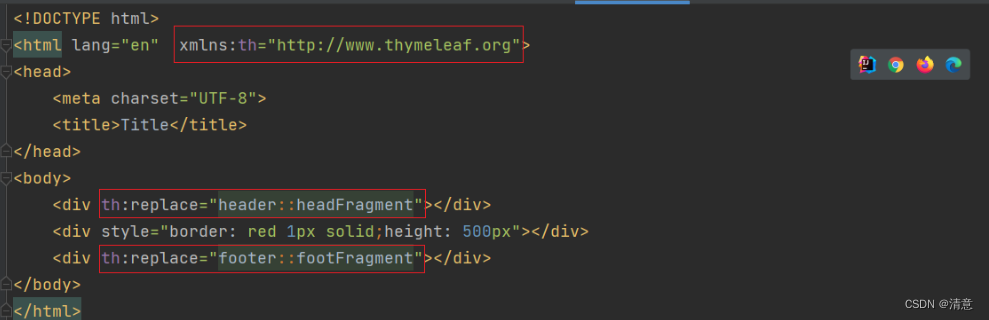
访问http://localhost:8080/test,引进了碎片的文本内容和样式


 3820
3820

 被折叠的 条评论
为什么被折叠?
被折叠的 条评论
为什么被折叠?
 到【灌水乐园】发言


