


分发系统介绍
expect脚本远程登录
expect脚本远程执行命令
expect脚本传递参数
expect脚本同步文件
expect脚本指定host和要同步的文件
构建文件分发系统
批量远程执行命令
分发系统介绍
因为一些程序要更改,或者有些bug要修改,快速更新代码等,如果仅是几台server的话,很简单,把已经改好的程序拷过去,或者rsync远程推送,再或者网上NFS共享一下就可以了;但如果有几十台几百台,那样的方法会太繁琐,此时就可以用expect来批量实现分发任务。
-
expect:一个实现自动交互功能的软件套件,基于Tcl的一种脚本语言,具有简单的语法;
-
功 能 :实现自动登录远程机器,并自动执行命令;和shell脚本结合,可以实现完全自动化;
expect脚本远程登录
安装except
yum install -y expect
自动远程登录
进入/usr/local/sbin/,创建一个expect脚本;
[root@jerrylinux01 ~]# cd /usr/local/sbin/
[root@jerrylinux01 sbin]# vim 1.expect
#! /usr/bin/expect

set host "192.168.78.129" //设置连接主机

set passwd "freeme123" //设置密码

spawn ssh root@$host //执行命令

expect {

"yes/no" { send "yes\\r"; exp_continue} //假如第一次登陆,需要yse,然后回车,继续执行

"password:" { send "$passwd\\r" } //输入密码

}

interact //结束执行
代码解释: #! /usr/bin/expect 这一行告诉操作系统脚本里的代码使用那一个shell来执行。
-
在expect下 定义变量,用 set,比如 定义变量a为1 :set a 1
-
expect 使用expect语句进行交互
-
\r表示回车
-
exp_continue 表示继续 \r 表示换行 interact 继续停留在这台机器,不退出。
-
interact表示继续交互
授予1.expect 可执行权限,就可以连接ying02机器
[root@jerrylinux01 sbin]# ./ 1.expect
-bash: ./: 是一个目录
[root@jerrylinux01 sbin]# ./1.expect
-bash: ./1.expect: 权限不够
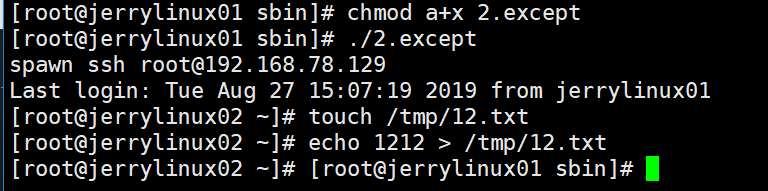
[root@jerrylinux01 sbin]# chmod a+x 1.expect
[root@jerrylinux01 sbin]# ./1.expect

expect脚本远程执行命令
自动远程登录后,执行命令并退出
[root@jerrylinux01 sbin]# vim 2.expect
#!/usr/bin/expectset user "root" //设置用户为 root

set passwd "freeme123" //设置密码

spawn ssh $user@192.168.78.129 //连接远程机器jerrylinux02

expect { //expect脚本内容

"yes/no" { send "yes\\r"; exp_continue}

"password:" { send "$passwd\\r" }

}

expect "\]*" //遇到右侧方括号执行下面命令

send "touch /tmp/12.txt\\r" //在/tmp下创建12.txt;回车

expect "\]*" //上一语句执行完,遇到右侧方括号,执行下面

send "echo 1212 > /tmp/12.txt\\r" //把1212写入12.txt,回车

expect "\]*"

send "exit\\r" //输入exit,退出,回到jerrylinux01机器

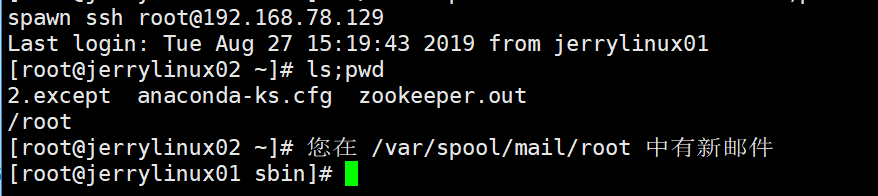
expect脚本传递参数
expect脚本可以接受从bash传递过来的参数.可以使用[lindex $argv n]获得,n从0开始,分别表示第一个,第二个,第三个….参数
[root@jerrylinux01 sbin]# vim 3.expect
#!/usr/bin/expectset user \[lindex $argv 0\] //第一个参数

set host \[lindex $argv 1\] //第二个参数

set passwd "freem123"

set cm \[lindex $argv 2\] //第三参数

spawn ssh $user@$host

expect {

"yes/no" { send "yes\\r"}

"password:" { send "$passwd\\r" }

}

expect "\]*"

send "$cm\\r"

expect "\]*"

send "exit\\r"
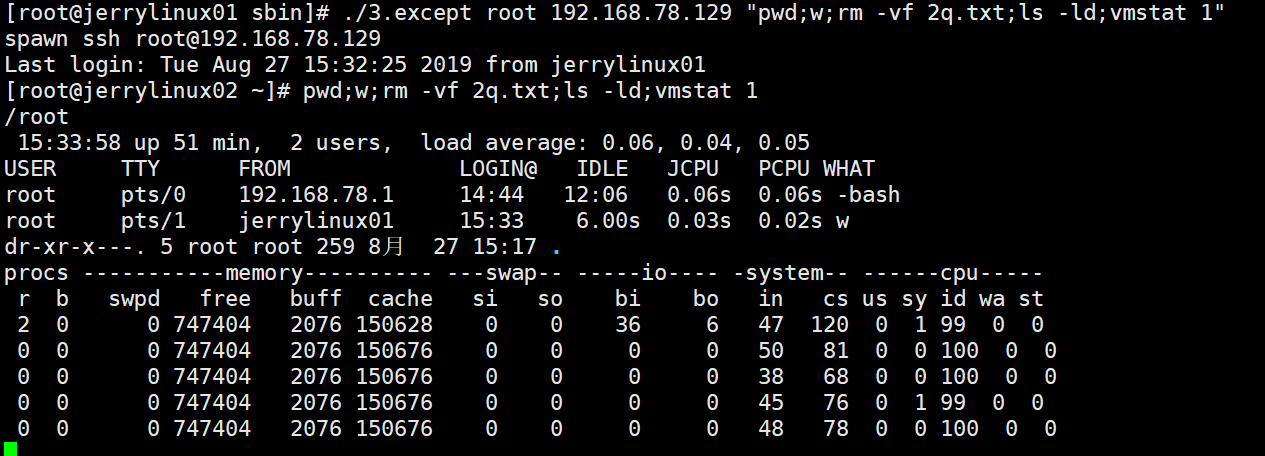
给予可执行权限,并定义参数后执行脚本;
[root@jerrylinux01 sbin]# chmod a+x 3.expect
[root@jerrylinux01 sbin]# ./3.expect root 192.168.78.129 "ls;pwd" //带参数执行;cm为定义变量,可以是任何命令,两命令之间应分号隔开
参数中可以定义多个命令:如执行pwd、w、rm、ls -ld、vmstat 1等,命令之间用分号隔开
[root@jerrylinux01 sbin]# ./3.expect root 192.168.78.129 "pwd;w;rm -vf 2q.txt;ls -ld;vmstat 1"
expect脚本同步文件
自动同步文件
#!/usr/bin/expect

set passwd "freeme123"

spawn rsync -av root@192.168.78.129:/tmp/12.txt /tmp/

expect {

"yes/no" { send "yes\\r"}

"password:" { send "$passwd\\r" }

}

expect eof

expect eof 语句解释:
-
spawn执行的命令结果,会被expect捕捉到。因为spawn会启动一个进程,只有这个进程的相关信息才会被捕捉到,主要包括:标准输入的提示信息,eof和timeout。
-
在这里eof是必须去匹配的,在spawn进程结束后会向expect发送eof,如果expect没有匹配,那么会立即退出远程登录,即操作失败。
expect脚本指定host和要同步的文件
#!/usr/bin/expect

set passwd "Freeme123"

set host \[lindex $argv 0\]

set file \[lindex $argv 1\]

spawn rsync -av $file root@$host:$file

expect {

"yes/no" { send "yes\\r"}

"password:" { send "$passwd\\r" }

}

expect eof
注意:
1、这里要同步的文件,必要要写绝对路径;
2、备份的时候,注意时间限制;可以设定 set timeout 定义超时时间(单位为 秒) -1 为永远不超时。
构建文件分发系统
-
需求背景对于大公司而言,肯定时不时会有网站或者配置文件更新,而且使用的机器肯定也是好多台,少则几台,多则几十甚至上百台。所以,自动同步文件是至关重要的。
-
实现思路首先要有一台模板机器,把要分发的文件准备好,然后只要使用expect脚本批量把需要同步的文件分发到目标机器即可。
-
核心命令rsync -av --files-from=list.txt / root@host:/
vim rsync.expect
#!/usr/bin/expect

set passwd "Freeme123"

set host \[lindex $argv 0\]

set file \[lindex $argv 1\]

spawn rsync -avR --files-from=$file / root@$host:/

\# 上传文件的列表是$file,我们需要在list当中去定义; --file-from指定文件列表路径 -R表示同步时目标会级联创建目录

expect {

"yes/no" { send "yes\\r"}

"password:" { send "$passwd\\r" }

}

expect eof
vim /tmp/ip.list
127.0.0.1
192.168.78.129
vim /tmp/file.list
/tmp/12.txt
/root/shell/1.sh
/root/111/222/111.txt
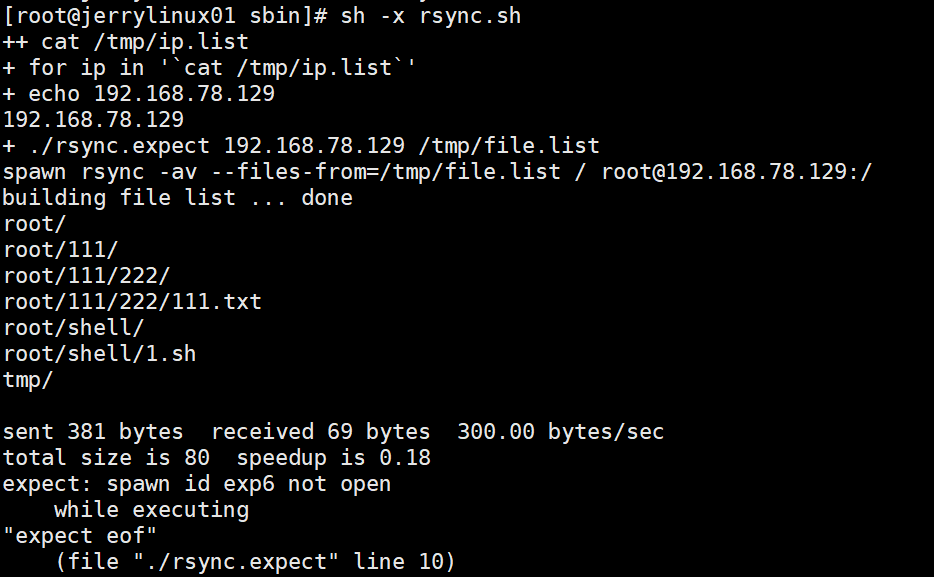
创建一个rsync的shell脚本,脚本的目的:遍历所有的server和list中的文件可以同步到每台服务器
vim rsync.sh
#!/bin/bash

for ip in \`cat /tmp/ip.list\`

do

echo $ip

./rsync.expect $ip /tmp/file.list

done
分发系统还有一个重要的关键是,确保同步的机器的密码一
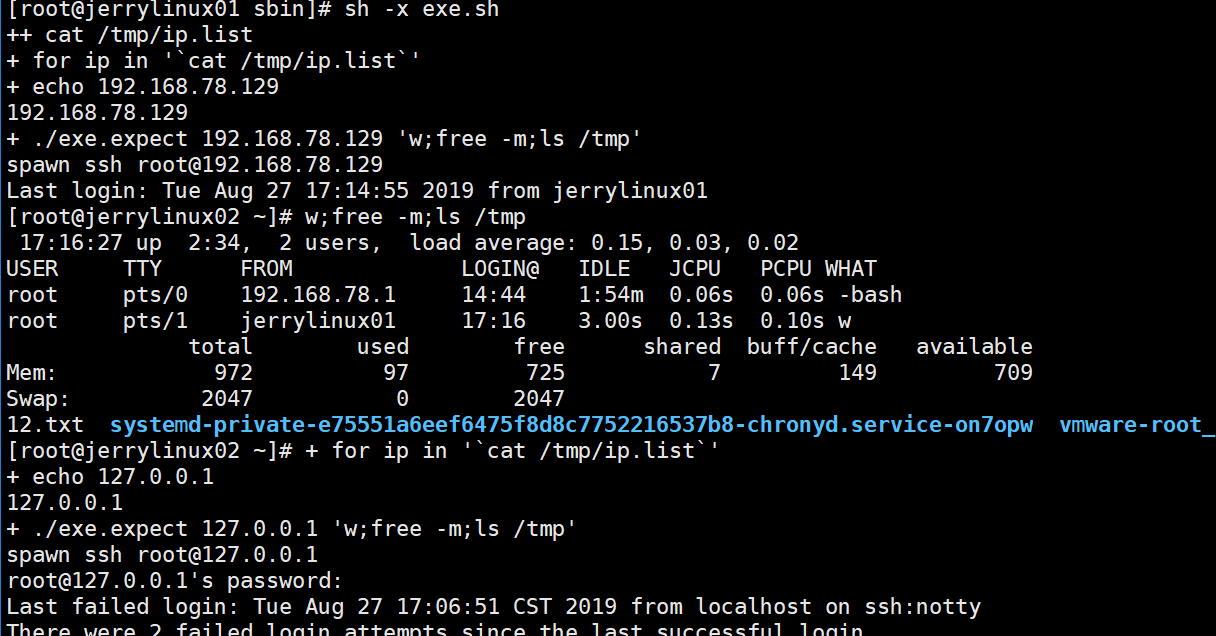
批量远程执行命令
当同步完代码后有可能需要批量地重启服务,因此还需要批量远程执行命令,类似于自动化。 这里是用expect编写执行命令的脚本并用shell脚本来批量调用它。
vim exe.expect
#!/usr/bin/expect

set host \[lindex $argv 0\]

set passwd "Freeme123"

set cm \[lindex $argv 1\]

spawn ssh root@$host

expect {

"yes/no" { send "yes\\r"}

"password:" { send "$passwd\\r" }

}

expect "\]*"

send "$cm\\r"

expect "\]*"

send "exit\\r"
再新建exe.sh的shell脚本,用来调用exe.expect脚本
vim exe.sh
#!/bin/bash

for ip in \`cat /tmp/ip.list\` //循环执行ip.list,注意ip清单是上个试验的;

do

echo $ip

./exe.expect $ip "w;free -m;ls /tmp" //调用exe的expect脚本,并传递参数;

done


 28万+
28万+

 被折叠的 条评论
为什么被折叠?
被折叠的 条评论
为什么被折叠?
 到【灌水乐园】发言


