eclipse集成Scala,运行Spark项目

为了学习Spark,在window上使用eclipse创建包含Scala的maven工程,并打包至于服务器运行。

1.1 hadoop安装

安装hadoop2.6.0,参考博客

1.2 spark下载

下载spark-1.6.0-bin-hadoop2.6.tgz,在官网下载,在 choose a download type中建议选择 select apache mirror。 
下载完成之后放在自己的相应目录, 
运行spark命令: 
./sbin/start-master.sh #启动/停止主机 
./sbin/stop-master.sh #启动/停止主机 
./bin/spark-class org.apache.spark.deploy.worker.Worker spark://DevindeMac-mini.local:7077 #加子嗣 
完成之后可以在 http://localhost:8080/ 查看运行详情。

1.3 scala下载

安装包下载地址,进入官网:http://www.scala-lang.org/,选择相应的版本,我选择的scala-2.10.4, 这里可能在机器上不能正常运行的原因是jdk版本过低。 
下载完成之后,放在指定目录,在 ~/.bash_profile配置环境变量 
export PATH=$PATH:/usr/local/Cellar/scala-2.10.4/bin 
成功之后可以使用 在终端运行 scala -version 、scala 查看是否成功。

1.4 安装scala IDE

网上都是直接下载 http://scala-ide.org/download/sdk.html,这里的镜像或者在线安装:eclipse在安装插件的方式安装。(eclipse 尤其注意版本) 
(1) 在Eclipse中选择Help->Install new Software 
http://download.scala-ide.org/sdk/helium/e38/scala210/stable/site

这里写图片描述

ps: 这里需要翻墙,且时间比较长 
(2)加插件下载链接安装后,会提示重新启动Eclipse 
(3)测试 
新建Scala Project工程Test

object Testd {
  def main(args: Array[String]): Unit = {
     val array = Array("devin","shuai")
     array.foreach(println)
  }
}
 
 
  • 1
  • 2
  • 3
  • 4
  • 5
  • 6
  • 1
  • 2
  • 3
  • 4
  • 5
  • 6

(4)建立基于spark的scala程序 
在eclipse中,依次选择“File” –>“New” –> “Other…” –> “Scala Wizard” –> “Scala Project”,创建一个Scala工程,并命名为“SparkScala”。 
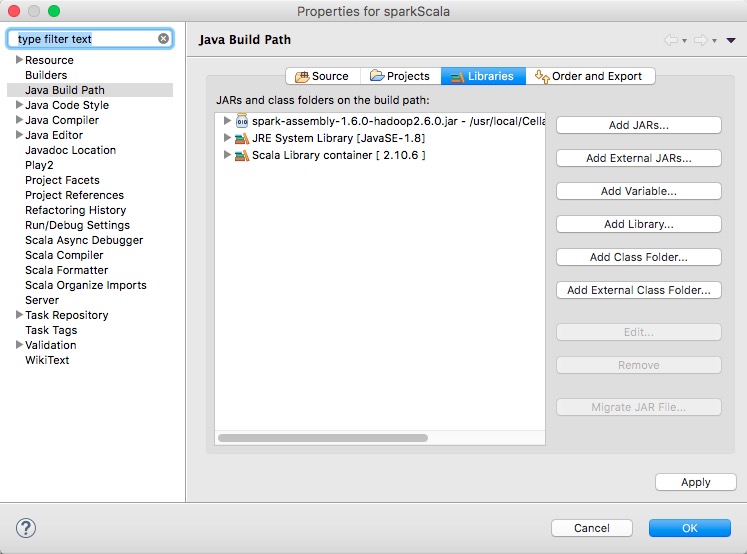
右击“SaprkScala”工程,选择“Properties”,在弹出的框中,按照下图所示,依次选择“Java Build Path” –>“Libraties” –>“Add External JARs…”,导入spark-assembly-1.6.0-hadoop2.6.0.jar在spark-1.6.0-bin-hadoop2.6的lib目录下。如下图 
这里写图片描述

package com.devin.spark.demo

import org.apache.spark.SparkConf
import org.apache.spark.SparkContext

object WordCount {

  def main(args: Array[String]) {      
   if (args.length < 0) {
       System.err.println("Usage: <file>")
       System.exit(1)
    }  
   println( "Hello World!" )
   //.setMaster("local")
   val conf = new SparkConf().setAppName("wordcount")//.setMaster("local")
   val sc = new SparkContext(conf)
   val line = sc.textFile("hdfs://localhost:9000/spark_in/").cache()  
   line.flatMap(_.split(" ")).map((_, 1)).reduceByKey(_+_).collect().foreach(println)
   sc.stop();
  }
}
 
 
  • 1
  • 2
  • 3
  • 4
  • 5
  • 6
  • 7
  • 8
  • 9
  • 10
  • 11
  • 12
  • 13
  • 14
  • 15
  • 16
  • 17
  • 18
  • 19
  • 20
  • 21
  • 1
  • 2
  • 3
  • 4
  • 5
  • 6
  • 7
  • 8
  • 9
  • 10
  • 11
  • 12
  • 13
  • 14
  • 15
  • 16
  • 17
  • 18
  • 19
  • 20
  • 21

ps:运行代码时,可能出现scala冲突的情况,需要设置scala版本

1.5 建立基于maven的scala项目

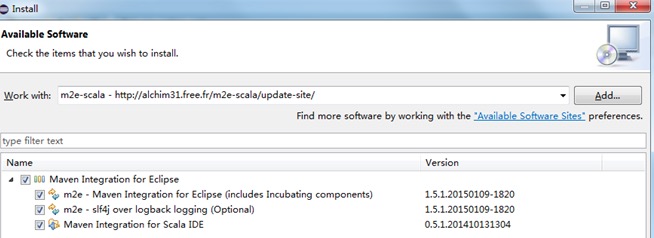
(1) 安装m2e-scala ,url是:http://alchim31.free.fr/m2e-scala/update-site/ 方法也是在eclipse中 install new soft 一样,如下图 
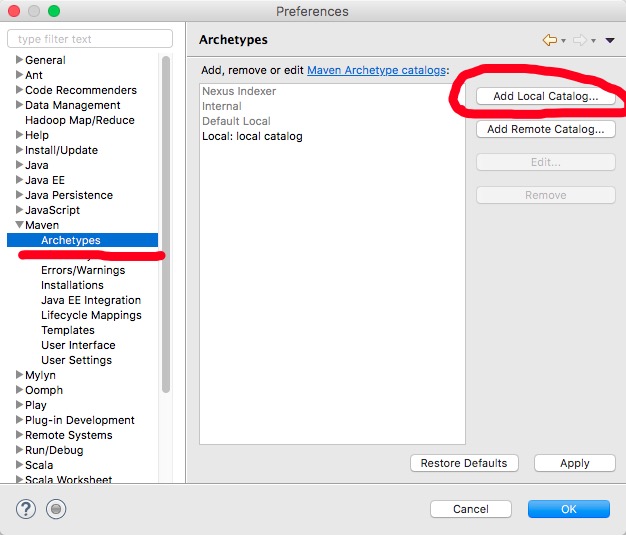
这里写图片描述 
(2) 添加远程的原型或模板目录 
http://repo1.maven.org/maven2/archetype-catalog.xml建议先下载到本地再用加载本地的方式去添加(我用远程试了几次都没有成功) 
这里写图片描述 
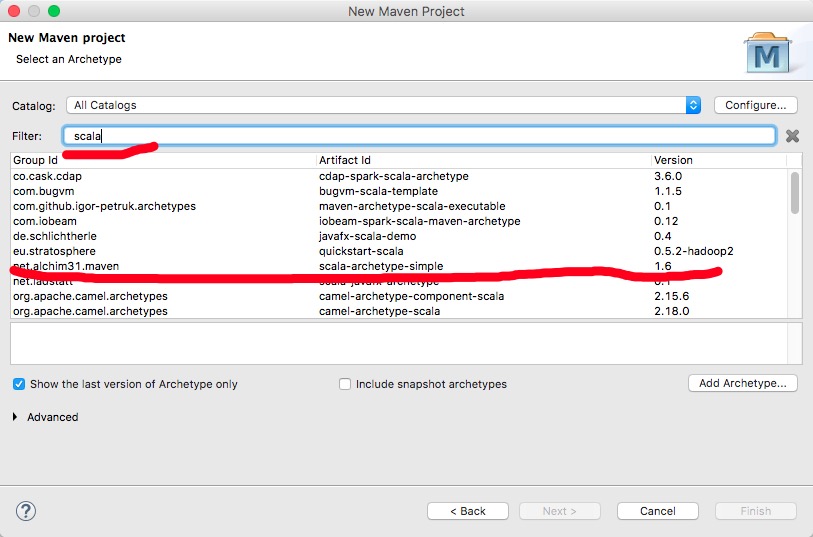
完成之后,重启eclipse,再创建maven工程就好。代码可以复用上面的。

这里写图片描述

这里尤其注意修改原pom中内容(下面是我可用的pom文件):

<project xmlns="http://maven.apache.org/POM/4.0.0" xmlns:xsi="http://www.w3.org/2001/XMLSchema-instance" xsi:schemaLocation="http://maven.apache.org/POM/4.0.0 http://maven.apache.org/maven-v4_0_0.xsd">
  <modelVersion>4.0.0</modelVersion>
  <groupId>com.devin</groupId>
  <artifactId>spark.demo</artifactId>
  <version>0.0.1-SNAPSHOT</version>
  <name>${project.artifactId}</name>
  <description>My wonderfull scala app</description>
  <inceptionYear>2015</inceptionYear>

  <properties>
    <maven.compiler.source>1.6</maven.compiler.source>
    <maven.compiler.target>1.6</maven.compiler.target>
    <encoding>UTF-8</encoding>
    <scala.version>2.10.4</scala.version>
    <scala.compat.version>2.10</scala.compat.version>
  </properties>

  <dependencies>
    <dependency>
      <groupId>org.scala-lang</groupId>
      <artifactId>scala-library</artifactId>
      <version>${scala.version}</version>
    </dependency>
       <dependency>
      <groupId>org.apache.spark</groupId>
      <artifactId>spark-core_2.10</artifactId>
      <version>1.6.0</version>
    </dependency> 


  </dependencies>

  <build>
    <sourceDirectory>src/main/scala</sourceDirectory>
    <testSourceDirectory>src/test/scala</testSourceDirectory>
    <plugins>
      <plugin>
        <!-- see http://davidb.github.com/scala-maven-plugin -->
        <groupId>net.alchim31.maven</groupId>
        <artifactId>scala-maven-plugin</artifactId>
        <version>3.2.0</version>
        <executions>
          <execution>
            <goals>
              <goal>compile</goal>
              <goal>testCompile</goal>
            </goals>
            <configuration>
              <args>
                <arg>-make:transitive</arg>
                <arg>-dependencyfile</arg>
                <arg>${project.build.directory}/.scala_dependencies</arg>
              </args>
            </configuration>
          </execution>
        </executions>
      </plugin>
      <plugin>
        <groupId>org.apache.maven.plugins</groupId>
        <artifactId>maven-surefire-plugin</artifactId>
        <version>2.18.1</version>
        <configuration>
          <useFile>false</useFile>
          <disableXmlReport>true</disableXmlReport>
          <!-- If you have classpath issue like NoDefClassError,... -->
          <!-- useManifestOnlyJar>false</useManifestOnlyJar -->
          <includes>
            <include>**/*Test.*</include>
            <include>**/*Suite.*</include>
          </includes>
        </configuration>
      </plugin>
    </plugins>
  </build>
</project>
 
 
  • 1
  • 2
  • 3
  • 4
  • 5
  • 6
  • 7
  • 8
  • 9
  • 10
  • 11
  • 12
  • 13
  • 14
  • 15
  • 16
  • 17
  • 18
  • 19
  • 20
  • 21
  • 22
  • 23
  • 24
  • 25
  • 26
  • 27
  • 28
  • 29
  • 30
  • 31
  • 32
  • 33
  • 34
  • 35
  • 36
  • 37
  • 38
  • 39
  • 40
  • 41
  • 42
  • 43
  • 44
  • 45
  • 46
  • 47
  • 48
  • 49
  • 50
  • 51
  • 52
  • 53
  • 54
  • 55
  • 56
  • 57
  • 58
  • 59
  • 60
  • 61
  • 62
  • 63
  • 64
  • 65
  • 66
  • 67
  • 68
  • 69
  • 70
  • 71
  • 72
  • 73
  • 74
  • 75

这里可能遇见一些scala版本不对呀问题,处理方式 
http://scala-ide.org/docs/current-user-doc/faq/index.html 
If this check returns a false-negative, it can be disabled at the workspace level, or at the project level. The setting is withVersionClasspathValidator in the Scala → Compiler → Build Manager preference section. 
如下图; 
这里写图片描述

在mvn打包的时候有可能会遇到: 
[ERROR] Failed to execute goal net.alchim31.maven:scala-maven-plugin:3.2.0:compi 
le (default) on project iteblog: wrap: org.apache.commons.exec.ExecuteException: 
Process exited with an error: 1 (Exit value: 1) -> [Help 1] 
原因是mvn clean package默认只处理Java源代码的编译、打包,而不管scala,所以编译时遇到Hello这个由scala语言编写的class,此时scala还没编译生成class,所以找不到相应的调用入口。 
解决办法: 
mvn clean scala:compile compile package 
也可以分开命令 
mvn clean 
mvn scala:compile compile 
mvn package

打包完成之后,提交到spark集群

./bin/spark-submit --master spark://DevindeMac-mini.local:7077 --class com.devin.spark.demo.WordCount /usr/local/Cellar/spark.demo-0.0.1-SNAPSHOT.jar
 
 
  • 1
  • 1

谢谢这位盆友,亲测有效

参考: 
http://blog.csdn.net/shuaidan19920412/article/details/53455560

  • 1
    点赞
  • 4
    收藏
    觉得还不错? 一键收藏
  • 0
    评论

“相关推荐”对你有帮助么?

  • 非常没帮助
  • 没帮助
  • 一般
  • 有帮助
  • 非常有帮助
提交
评论
添加红包

请填写红包祝福语或标题

红包个数最小为10个

红包金额最低5元

当前余额3.43前往充值 >
需支付:10.00
成就一亿技术人!
领取后你会自动成为博主和红包主的粉丝 规则
hope_wisdom
发出的红包
实付
使用余额支付
点击重新获取
扫码支付
钱包余额 0

抵扣说明:

1.余额是钱包充值的虚拟货币,按照1:1的比例进行支付金额的抵扣。
2.余额无法直接购买下载,可以购买VIP、付费专栏及课程。

余额充值