


搭建 nexus 私服(centos6.7)
备注:Centos 6.7 、 nexus-2.12.1-01-bundle.tar.gz 、java环境
- 创建私有文件夹
cd /usr/local && mkdir hy_nexus && cd hy_nexus - 下载
nexus安装包wget http://www.sonatype.org/downloads/nexus-latest-bundle.tar.gz或者 手动下载拷贝到hy_nexus中 - 解压
nexus-2.12.1-01-bundle.tar.gztar -zxvf nexus-2.12.1-01-bundle.tar.gz //解压 mv nexus-2.12.1-01 nexus //重命名 mv sonatype-work /usr/local/hy_nexus/nexus/nexus-work //移动sonatype-work到nexus下 - 编辑nexus中conf下nexus.properties文件,配置端口和work目录信息
vim /usr/local/hy_nexus/nexus/conf/nexus.properties
配置端口信息如下:#application-port=8081 application-port=8081(可选)配置IP端口访问目录如下:
#nexus-webapp-context=/nexus 如:http://ip:port/nexus  即可
   nexus-webapp-context=/(可选) 如:http://ip:port/  即可
配置work目录地址,Maven仓库JAR缓存地址如下:
#nexus-work=${bundleBasedir}/../sonatype-work/nexus nexus-work=${bundleBasedir}/nexus-work/nexus - 编辑nexus文件,拷贝nexus到/etc/init.d/下,配置NEXUS_HOME/RUN_AS_USER/PIDDIR参数,设置开机启动
vim /usr/local/hy_nexus/nexus/bin/nexus
修改如下:#NEXUS_HOME=".." NEXUS_HOME="/usr/local/hy_nexus/nexus" --------------------------------------------- #RUN_AS_USER= RUN_AS_USER=root --------------------------------------------- # Location of the pid file. #PIDDIR="." PIDDIR="/var/run" --------------------------------------------- 添加JAVA环境 # JAVA HOME JAVA_HOME=/usr/java/jdk1.7.0_79 PATH=$JAVA_HOME/bin:$PATHcp /usr/local/hy_nexus/nexus/bin/nexus /etc/init.d/ && cd /etc/init.d/ && lschmod 755 nexus && chkconfig nexus on && service nexus start//设置nexus权限,设置开机启动,启动nexus服务看到以下打印信息代表安装成功:(查看nexus服务状态命令:service nexus status)
**************************************** WARNING - NOT RECOMMENDED TO RUN AS ROOT **************************************** Starting Nexus OSS... Started Nexus OSS. - 注意开启8081端口
/sbin/iptables -I INPUT -p tcp --dport 8081 -j ACCEPT /etc/init.d/iptables save //保存修改 service iptables restart //重启防火墙,修改生效 - 打开浏览器输入
http://192.168.0.22:8081/回车,登录可通过admin/admin123 - 登录私服,进行相关配置
- 更新索引文件(由于国内网络环境不推荐使用在线自动更新),故进行手动更新,先停止
nexus服务(service nexus stop) -
手动更新索引
-
首先到
http://repo.maven.apache.org/maven2/.index/,下载nexus-maven-repository-index.gz 和 nexus-maven-repository-index.properties两个文件 -
还需要一个jar,到
http://search.maven.org搜索框中输入g:"org.apache.maven.indexer" AND a:"indexer-cli",下载indexer-cli-5.1.1.jar文件 -
将
nexus-maven-repository-index.gz 和 nexus-maven-repository-index.properties和indexer-cli-5.1.1.jar放到同一个文件夹(/usr/local/hy_nexus/index)中,通过命令解压-
cd /usr/local/hy_nexus/index,然后执行java -jar indexer-cli-5.1.1.jar -u nexus-maven-repository-index.gz -d indexer//解压时间比较长,耐心等待 -
执行完之后,把
indexer下的所有内容都复制到/usr/local/hy_nexus/nexus/nexus-work/nexus/indexer/central-ctx下面 -
重新启动
nexus,进入管理界面,选择Views/Repositories下的Repositories,然后选中Central,在下方tab中选择Configuration,将DownloadRemoteIndexs至为true(表示允许远程下载),保存(save)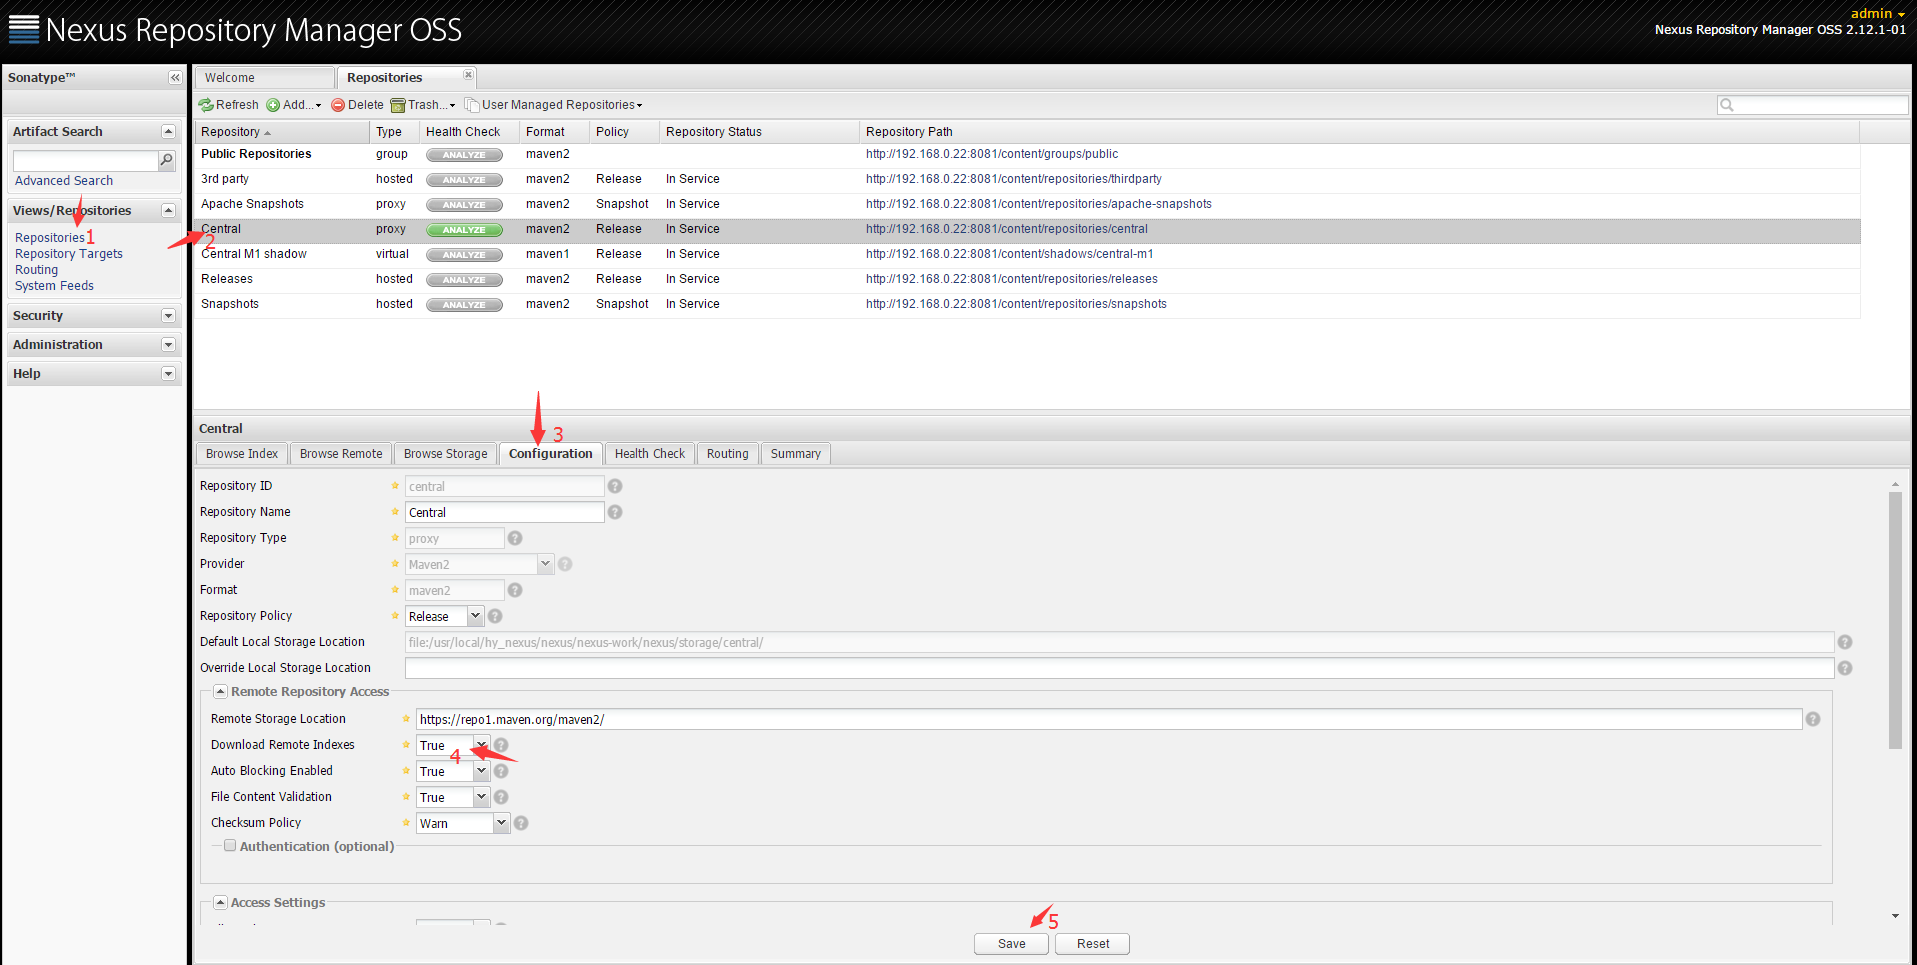
nexus远程索引设置.png - 选择
central->Browse Index,就看到更新的索引了。
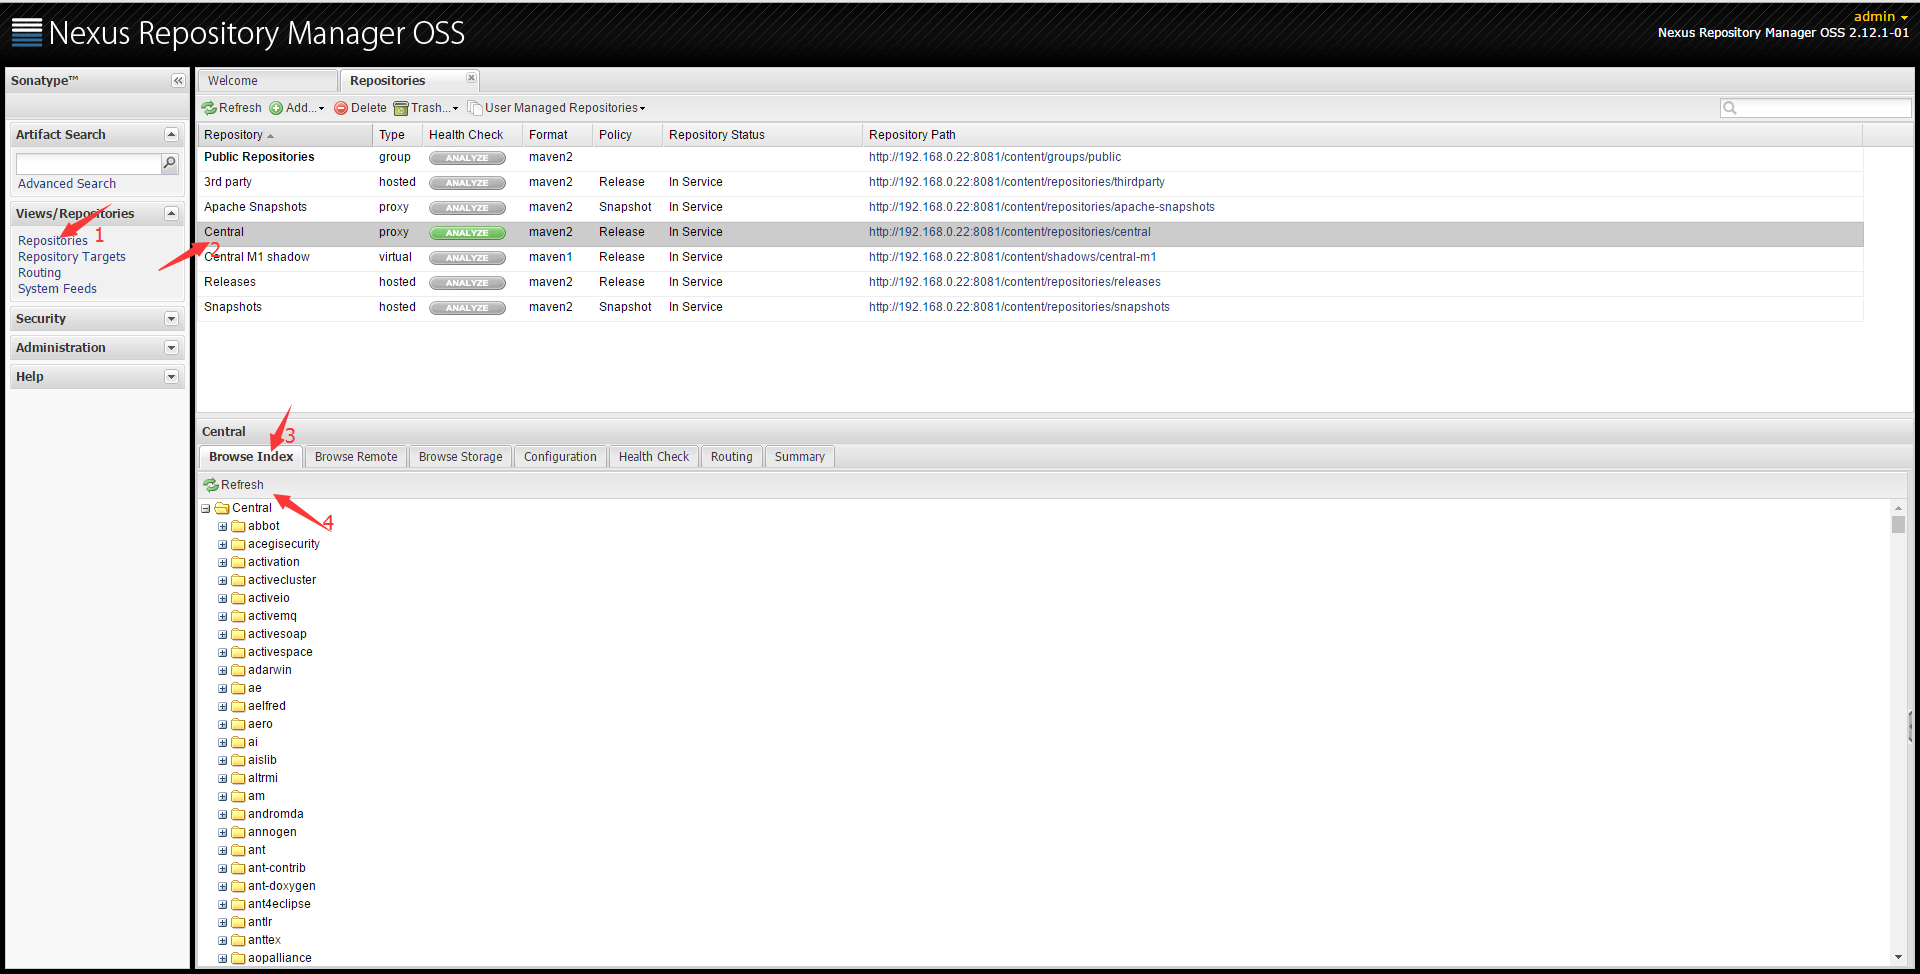
查看索引更新.png
-
-
-
如果需要允许开发中的jar发布到nexus私服,提供其他开发者下载,需要配置
3rd party选择
3rd party,在下方tab中选中Configuration,将Deployment Policy设置为Allow Redeploy,然后保存(save)即可
在开发中要发布jar到nexus中还需要在pom.xml中添加以下配置:<distributionManagement> <repository> <id>nexus-releases</id> <name>Nexus Internal Releases Repository</name> <url>http://192.168.0.22:8081/content/repositories/releases/</url> </repository> <snapshotRepository> <id>nexus-snapshots</id> <name>Nexus Internal Snapshots Repository</name> <url>http://192.168.0.22:8081/content/repositories/snapshots/</url> </snapshotRepository> </distributionManagement> - 此外要能在
maven中使用私服nexus,需要修改setting.xml文件,以下附上setting.xml配置:<?xml version="1.0" encoding="UTF-8"?> <settings xmlns="http://maven.apache.org/SETTINGS/1.0.0" xmlns:xsi="http://www.w3.org/2001/XMLSchema-instance" xsi:schemaLocation="http://maven.apache.org/SETTINGS/1.0.0 http://maven.apache.org/xsd/settings-1.0.0.xsd"> <localRepository>D:/java_develop/apache-maven-3.3.9/respository</localRepository><!--开发者自己的maven中jar存放位置地址--> <pluginGroups> </pluginGroups> <proxies> </proxies> <servers> <server> <id>nexus-releases</id> <username>deployment</username> <password>deployment123</password> </server> <server> <id>nexus-snapshots</id> <username>deployment</username> <password>deployment123</password> </server> <server> <id>nexus-thirdparty</id> <username>deployment</username> <password>deployment123</password> </server> </servers> <mirrors> <mirror> <id>nexus-mirror</id> <mirrorOf>*</mirrorOf> <url>http://192.168.0.22:8081/content/groups/public/</url> </mirror> </mirrors> <profiles> <profile> <id>nexus-profile</id> <repositories> <repository> <id>nexus-repository</id> <url>http://nexus-mirror</url> <releases> <enabled>true</enabled> </releases> <snapshots> <enabled>true</enabled> </snapshots> </repository> </repositories> <pluginRepositories> <pluginRepository> <id>nexus-plugin-repositorie</id> <url>http://nexus-mirror</url> <releases> <enabled>true</enabled> </releases> <snapshots> <enabled>true</enabled> </snapshots> </pluginRepository> </pluginRepositories> </profile> </profiles> <activeProfiles> <activeProfile>nexus-profile</activeProfile> </activeProfiles> </settings>
另附上java安装步骤
- 下载
jdk安装包rpm,地址jdk1.7 - 安装jdk
yum -y localinstall jdk-7u79-linux-x64.rpm - 配置环境变量
vim /etc/profile 加入以下配置信息: export PATH=$PATH:/usr/local/bin export JAVA_HOME=/usr/java/jdk1.7.0_79 export CLASSPATH=.:%JAVA_HOME%/lib/dt.jar:%JAVA_HOME%/lib/tools.jar export PATH=$PATH:$JAVA_HOME/bin - 刷新配置文件,配置生效
source /etc/profile - 如果要使用jps命令,只需执行以下命令
ln -s /usr/java/jdk1.7.0_79/bin/jps /usr/bin - 一切都结束了
- 测试下吧
java -version如果输出jdk信息,恭喜你,成功了!
作者:逐暗者 (转载请注明出处)


 303
303

 被折叠的 条评论
为什么被折叠?
被折叠的 条评论
为什么被折叠?
 到【灌水乐园】发言


