


1 简介
Spring支持以下几种开箱即用的作用域:
| 作用域 | 描述 |
|---|---|
| (默认的) 每个 String IoC 容器作用域中一个 bean 定义只对应一个对象实例。 | |
| 一个 bean 定义对应多个对象实例。 | |
| 一个 bean 定义作用于 HTTP | |
| 一个 bean 定义作用于 HTTP | |
| 一个 bean 定义作用于全局的 HTTP | |
| 一个 bean 定义作用于整个 |
从 Spring 3.0 开始,新增了一个thread scope,但是默认是不被注册的。要获取更多相关信息,请看文档
SimpleThreadScope。 要了解关于如何注册这个作用域或者其它自定义的作用域,请看 自定义 bean 作用域.
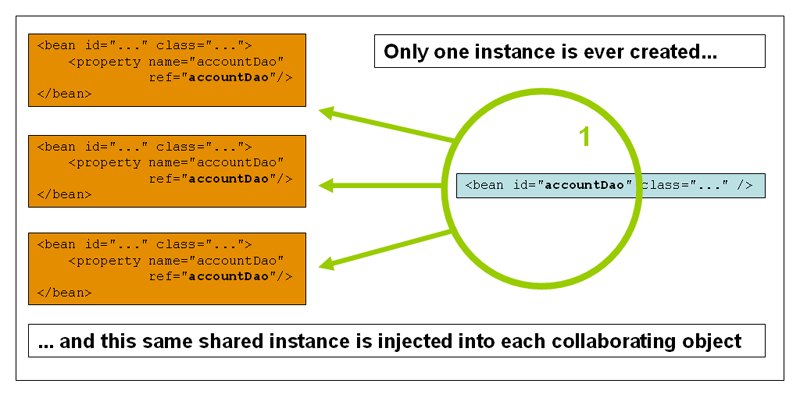
2 单例作用域
如果你定义了一个单例作用域bean ,那么所有通过 id 或者 ids 获得 bean 定义的请求获取到的都是同一个特定的 bean 实例。
在 XML 中定义一个单例作用域的 bean的配置如下:
<bean id="accountService" class="com.foo.DefaultAccountService"/>

<!-- 通过显示的冗余配置是等价的 (单例作用域是默认的) -->
<bean id="accountService" class="com.foo.DefaultAccountService" scope="singleton"/>
3 原型作用域
如果你定义了一个原型作用域的 bean ,那么所有通过 id 或者 ids 获得 bean 定义的请求获取到的都是一个新的 bean 实例。
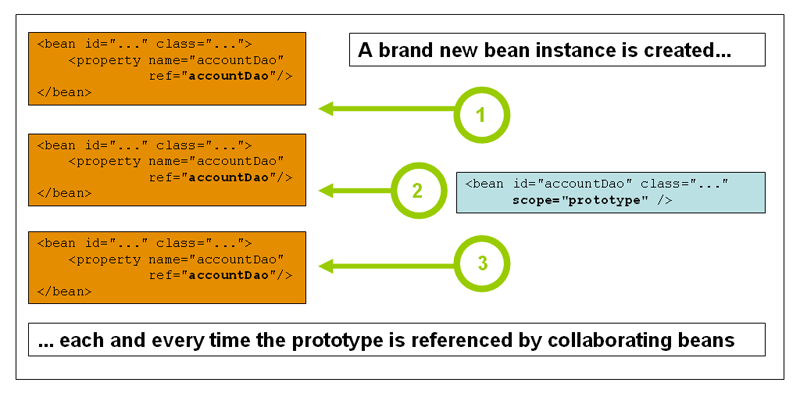
在 XML 中定义一个原型作用域的 bean的配置如下:
<bean id="accountService" class="com.foo.DefaultAccountService" scope="prototype"/>与其他作用域不同的是,Spring容器不会管理原型域bean的完整生命周期:Spring容器会初始化、 配置,亦或者组装原型域的bean对象,然后交给客户端,之后就再也不会管这个bean对象了。 因此,对于bean的生命周期方法来说,尽管所有作用域的 初始化方法 都会被调用, 但是原型域bean的 销毁方法 不会 被Spring容器调用。客户端代码要自己负责销毁原型域bean 以及和bean相关的资源(特别是开销大的资源)。如果想让Spring负责这些事(销毁bean、释放资源), 就得自定义bean的后处理器 bean post-processor ,它会持用原型域bean的引用。
从某种意义上说,对于原型域bean,Spring容器代替了Java 的 new 操作符。所有在 new 之后的生命周期管理任务, 都要由客户端自行处理。(想了解Spring容器具体如何管理bean的生命周期,请参考 Section 5.6.1, “生命周期回调”. )
4 依赖原型bean的单例bean
如果你的单例bean依赖了原型bean,那么这个依赖的原型Bean只会被注入一次,即当Spring容器初始化单例bean并解析依赖时注入,所以你每次通过该单例Bean获取到的依赖的原型Bean都是同一个Bean。如果你希望单例bean在运行时能够反复获得一个新的原型bean实例,你就不能用依赖注入的方式,而应该采用方法注入的方式。
5 请求作用域、会话作用域和全局会话作用域
仅当你使用web相关的Spring ApplicationContext(例如 XmlWebApplicationContext)时, 请求 request 、会话 session 和全局会话 global session 作用域才会起作用。如果你在普通的Spring IoC 容器(例如 ClassPathXmlApplicationContext)中使用这几个作用域,会抛出异常 IllegalStateException ,告知你这是一个未知的bean作用域。
为了使用请求 request 、会话 session 和全局会话 global session 等作用域(web作用域), 在定义bean之前要做一些最基本的初始化配置。(如果使用单例和原型这类标准作用域,是 不需要 这些初始化配置的)。
具体如何组装这些初始化配置与你使用的特定的Servlet环境有关..
事实上,如果你使用Spring Web MVC ,在 DispatcherServlet 或 DispatcherPortlet 处理的请求内去访问这些作用域的bean, 那就不用做任何专门的配置:DispatcherServlet 和 DispatcherPortlet 已经帮你做了这些事情。
如果你使用的是 Servlet2.5 标准的web容器,而且请求不是由 Spring的 DispatcherServlet 处理 (例如使用了Struts或JSF),你就得注册 org.springframework.web.context.request.RequestContextListener 这一 ServletRequestListener 。 对于Servlet 3.0 以上的环境,可以通过 WebApplicationInitializer 接口以代码的方式去实现。 或者,对于比较老旧的web 容器,在 web.xml 配置文件中加入以下的声明:
<web-app>
    ...
    <listener>
        <listener-class>
            org.springframework.web.context.request.RequestContextListener
        </listener-class>
    </listener>
    ...
</web-app>
又或者,如果你在配置监听器时有问题,也可以使用 RequestContextFilter 。过滤器的映射与具体的web应用有关,所以你得自行修改映射的内容。
<web-app>
    ...
    <filter>
        <filter-name>requestContextFilter</filter-name>
        <filter-class>org.springframework.web.filter.RequestContextFilter</filter-class>
    </filter>
    <filter-mapping>
        <filter-name>requestContextFilter</filter-name>
        <url-pattern>/*</url-pattern>
    </filter-mapping>
    ...
</web-app>DispatcherServlet, RequestContextListener 和 RequestContextFilter 做的事情是一样的,都是把每个http请求对象绑定到处理线程 Thread 上, 那么,请求、会话和全局会话作用域bean就可以沿着调用链继续往下走了。
5.1 请求作用域
XML中定义请求作用域的用法如下:
<bean id="loginAction" class="com.foo.LoginAction" scope="request"/> 对于每个http请求,Spring容器会创建一个 LoginAction bean 的新实例。也就是说,loginAction bean 的作用域限于 HTTP 请求范围。 你可以在请求内随意修改这个bean实例的状态,因为其他 loginAction bean实例看不到这些变化,bean实例是与特定的请求相关的。 当请求处理完毕,对应的bean实例也就销毁(被回收)了。
5.2 会话作用域
XML中定义会话作用域的用法如下:
<bean id="userPreferences" class="com.foo.UserPreferences" scope="session"/> 在每个HTTP Session的生命周期内,Spring容器会根据id为 userPreferences 的bean定义创建一个 UserPreferences bean 的新实例。 也就是说,userPreferences bean 的作用域限于 HTTP Session范围。和请求作用域 request-scoped bean 类似, 因为每个会话域 session-scoped bean的范围限于特定的 HTTP Session 内部,所以一个 Session 内的 userPreferences bean也是可以被随意修改, 而不会影响到其他 Session 中的 userPreferences bean。当一个HTTP Session 最终用完被JVM回收时,相关的会话域 session-scoped bean也被一起回收。
5.3 全局会话作用域
XML中定义全局会话作用域的用法如下:
<bean id="userPreferences" class="com.foo.UserPreferences" scope="globalSession"/> 全局会话作用域 global session 与 上文 提到的标准HTTP Session 作用域类似,但是仅适用于基于门户(portlet)的web应用程序上下文。 Portlet规范定义了如何在组成一个门户的多个portlet组件之间共享全局 Session 。 因此,全局会话作用域 global session bean的生命周期也就与全局门户 Session 紧密关联。
假如你开发了一个标准的、基于Servlet的web应用,并且定义了一个或多个全局会话作用域 global session bean, Spring容器会使用 HTTP Session 作用域(来代替),不会发生错误。
5.4 应用程序作用域
XML中定义应用程序作用域的用法如下:
<bean id="appPreferences" class="com.foo.AppPreferences" scope="application"/> Spring容器依据 appPreferences 的bean 定义,在整个web应用启动时创建了一个 AppPreferences bean 的实例。 也就是说, appPreferences bean 的作用域限于 ServletContext 范围,作为一个普通的 ServletContext 属性进行存储。 这跟Spring的单例作用域有些相似,但有两个重大差异:1. 这是某个 ServletContext 的单例, 不是某个Spring ApplicationContext 的单例(任何给定的web应用都可能有多个 ApplicationContext )。 2. 这是作为一个 ServletContext 属性被暴露和访问的。
5.5 将上述作用域的bean作为依赖
如果你想将一个 request 请求、 session 会话、 globalSession 全局会话 和自定义作用域的bean注入到另一个 bean,你必须要使用 <aop:scoped‐proxy/> 元素创建一个 AOP 代理来取代请求作用域的bean本身。
对于作用域为
singletons(单例)或prototypes(原型)的bean , 不需要 使用<aop:scoped‐proxy/>元素
下面是示例代码:
<?xml version="1.0" encoding="UTF-8"?>
<beans xmlns="http://www.springframework.org/schema/beans"
    xmlns:xsi="http://www.w3.org/2001/XMLSchema-instance"
    xmlns:aop="http://www.springframework.org/schema/aop"
    xsi:schemaLocation="http://www.springframework.org/schema/beans
        http://www.springframework.org/schema/beans/spring-beans.xsd
        http://www.springframework.org/schema/aop
        http://www.springframework.org/schema/aop/spring-aop.xsd">


    <!-- 将一个HTTP Session bean 暴露为一个代理bean -->
    <bean id="userPreferences" class="com.foo.UserPreferences" scope="session">

        <!-- 通知Spring容器去代理这个bean -->
        <aop:scoped-proxy/>
    </bean>


    <!-- 将上述bean 的代理注入到一个单例bean -->
    <bean id="userService" class="com.foo.SimpleUserService">

        <!-- 引用被代理的 userPreferences bean -->
        <property name="userPreferences" ref="userPreferences"/>
    </bean>
</beans>
为了创建上文提到的代理对象,要在 request 请求、 session 会话、 globalSession 全局会话 和自定义作用域的bean声明中加入 <aop:scoped‐proxy/> 子元素。 为什么要这么做呢?让我们将这几个作用域的bean定义与单例作用域的bean定义做个对比。 (下列代码的 userPreferences bean定义实际是 不完整的 )。
<bean id="userPreferences" class="com.foo.UserPreferences" scope="session"/>

<bean id="userManager" class="com.foo.UserManager">
    <property name="userPreferences" ref="userPreferences"/>
</bean>
在上述例子中,将HTTP Session 会话域的 userPreferences bean 注入进了单例域 userManager。 代码的关键在于userManager 是个单例bean,它在每个Spring 容器中只会被初始化 一次, 它的依赖对象(在这个例子中是 userPreferences bean)也只会被注入一次。这就意味着 userManager 每次操作的都是在最开始注入进来的同一个 userPreferences 对象。
当你把一个生命周期较短的bean注入至一个生命周期较长的bean时,例如把HTTP Session bean注入到单例bean, 这种情况肯定 不是 你所期望的。相反,你希望有个唯一的 userManager 单例对象,在每个HTTP Session的生命周期内, 都能有一个专门的 userPreferences 对象供 userManager 使用。因此,Spring容器会创建一个代理类, 使之与 UserPreferences 类实现相同的接口(理论上也是一个 UserPreferences 对象),并能根据作用域(HTTP 请求、 Session,等等)去获得真正的 UserPreferences 对象。 Spring容器将这个代理类的对象注入到 userManager , 但是 userManager 并不清楚它获得的 UserPreferences 其实是个代理。 在这个例子中,当UserManager 实例调用注入的 UserPreferences 对象的某个方法时,实际上调用的是代理对象的方法。 然后,代理对象从HTTP Session 中获取、并将方法调用委派给真正的 UserPreferences 对象。
所以,当你需要将 request-, session-, and globalSession-scoped 作用域的 bean 注入至其他合作者bean的时候,要按照下面的方法去正确地配置。
<bean id="userPreferences" class="com.foo.UserPreferences" scope="session">
    <aop:scoped-proxy/>
</bean>
<bean id="userManager" class="com.foo.UserManager">
    <property name="userPreferences" ref="userPreferences"/>
</bean>
5.6 选择要创建的代理类型
默认情况下,对于使用了 <aop:scoped-proxy/> 元素的bean,Spring容器会创建一个 基于CGLIB类代理机制的代理类。
CGLIB 代理只能拦截 public方法!不要在代理类上调用 非 public方法,那样不会委派给真正的目标对象。
或者,你也可以指定 <aop:scoped-proxy/> 元素的 proxy-target-class 属性为 false , 从而让Spring容器创建标准的、基于接口机制的JDK 代理类。使用 JDK 代理类意味着你不需要在应用程序的classpath 指定额外的类库。 但是,这也意味着你的 scoped-bean 至少得实现一个接口,而且 所有 合作者必须通过其中一个接口来引用被注入的scoped-bean。
<!-- DefaultUserPreferences 实现了 UserPreferences 接口 -->
<bean id="userPreferences" class="com.foo.DefaultUserPreferences" scope="session">
    <aop:scoped-proxy proxy-target-class="false"/>
</bean>
<bean id="userManager" class="com.foo.UserManager">
    <property name="userPreferences" ref="userPreferences"/>
</bean>
6 自定义作用域
待续。。。


 5000
5000

 被折叠的 条评论
为什么被折叠?
被折叠的 条评论
为什么被折叠?
 到【灌水乐园】发言


