


- 目录
- 1.NFS介绍
- 2.NFS服务端安装配置
- 3.NFS挂配置选项
- 4.exportfs命令
- 5.NFS客户端问题
- 6.FTP介绍
- 7.使用vsftpd搭建ftp服务
- 8.xshell使用xftp传输文件
- 9.使用pure-ftpd搭建ftp服务
- 扩展
1.NFS介绍
NFS是Network File System的缩写,最早由Sun公司开发,分2、3、4三个版本。2和3由Sun起草开发,4.0开始有Netapp公司参与并主导开发,最新为4.1版本。
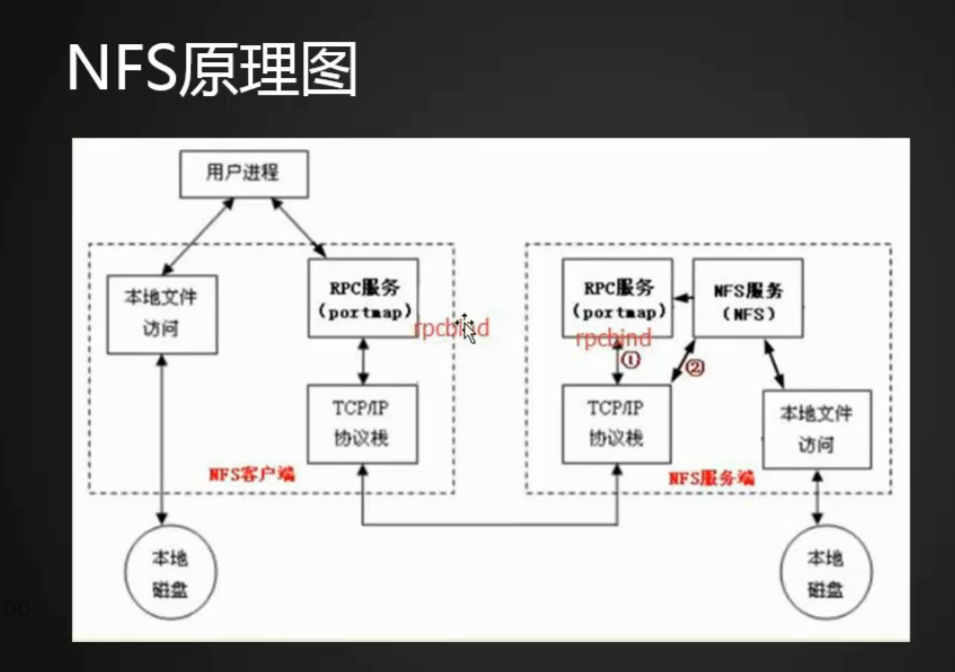
NFS数据传输基于RPC协议,RPC为Remote Procedure Call的简写。
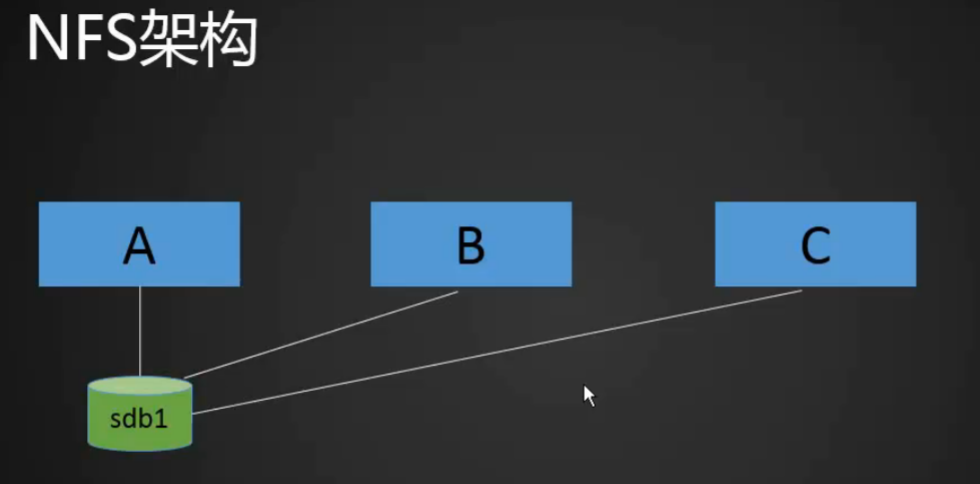
NFS应用场景:A,B,C三台机器需要保证被访问到的文件是一样的,A共享数据出来,B和C分别取挂载A共享的数据目录,从而B和C访问到的数据和A上一致。
2.NFS服务端安装配置
准备两台机器
服务端安装
[root@localhost ~]# yum install -y nfs-utils  rpcbind.x86_64


客户端安装
[root@xiaoqi ~]# yum install nfs-utils
编辑 /etc/exports 加入如下内容
/home/nfstestdir 192.168.246.0/24(rw,sync,all_squash,anonuid=1000,anongid=1000)


创建要分享的目录并修改权限

[root@localhost ~]# mkdir /home/nfstestdir
[root@localhost ~]# chmod 777 !$
chmod 777 /home/nfstestdir
正常情况下安装rpcbind后就会启动服务,如果没有开启的话需要手动开启systemctl start rpcbind ;然后启动nfs服务
[root@localhost ~]# systemctl start nfs
[root@localhost ~]# ps aux|grep nfs
root       2704  0.0  0.0      0     0 ?        S<   10:13   0:00 [nfsd4_callbacks]
root       2710  0.0  0.0      0     0 ?        S    10:13   0:00 [nfsd]
root       2711  0.0  0.0      0     0 ?        S    10:13   0:00 [nfsd]
root       2712  0.0  0.0      0     0 ?        S    10:13   0:00 [nfsd]
root       2713  0.0  0.0      0     0 ?        S    10:13   0:00 [nfsd]
root       2714  0.0  0.0      0     0 ?        S    10:13   0:00 [nfsd]
root       2715  0.0  0.0      0     0 ?        S    10:13   0:00 [nfsd]
root       2716  0.0  0.0      0     0 ?        S    10:13   0:00 [nfsd]
root       2717  0.0  0.0      0     0 ?        S    10:13   0:00 [nfsd]
root       2728  0.0  0.0 112676   984 pts/0    R+   10:13   0:00 grep --color=auto nfs

在启动nfs服务时会自动启动一些rpc服务
[root@localhost ~]# ps aux|grep rpc
rpc        2628  0.0  0.0  64956  1420 ?        Ss   10:11   0:00 /sbin/rpcbind -w
rpcuser    2675  0.0  0.0  42376  1752 ?        Ss   10:13   0:00 /usr/sbin/rpc.statd
root       2677  0.0  0.0      0     0 ?        S<   10:13   0:00 [rpciod]
root       2687  0.0  0.0  19320   404 ?        Ss   10:13   0:00 /usr/sbin/rpc.idmapd
root       2694  0.0  0.0  42564   948 ?        Ss   10:13   0:00 /usr/sbin/rpc.mountd
root       2737  0.0  0.0 112676   984 pts/0    R+   10:14   0:00 grep --color=auto rpc
开机启动rpcbind
[root@localhost ~]# systemctl enable rpcbind
3.NFS挂配置选项
rw:读写;
ro:只读;
sync:同步模式,内存数据实时写入磁盘;
async:非同步模式;
no_root_squash:客户端挂载NFS共享目录后,root用户不受约束,权限很大;
root_squash与上一条选项相对,客户端上的root用户受到约束,被限定成某个普通用户;
all_squash客户端上所有用户在使用NFS共享目录时都被限定为一个普通用户;
anonuid/anongid和上面几个选项搭配使用,定义被限定用户的uid和gid 。
在客户端上挂载,已安装nfs,测试通信
[root@xiaoqi ~]# showmount -e 192.168.246.128
clnt_create: RPC: Port mapper failure - Unable to receive: errno 113 (No route to host)
报错,需要关闭防火墙(两台都要关)

[root@xiaoqi ~]#  systemctl stop firewalld.service
[root@xiaoqi ~]# showmount -e 192.168.246.128
Export list for 192.168.246.128:
/home/nfstestdir 192.168.246.0/24
挂载目录
[root@xiaoqi ~]# mount -t nfs 192.168.246.128:/home/nfstestdir /mnt/
[root@xiaoqi ~]# df -h
文件系统                          容量  已用  可用 已用% 挂载点
/dev/sda3                          27G  1.1G   26G    4% /
devtmpfs                          902M     0  902M    0% /dev
tmpfs                             912M     0  912M    0% /dev/shm
tmpfs                             912M  8.7M  904M    1% /run
tmpfs                             912M     0  912M    0% /sys/fs/cgroup
/dev/sda1                         197M  113M   84M   58% /boot
tmpfs                             183M     0  183M    0% /run/user/0
192.168.246.128:/home/nfstestdir   27G  3.5G   23G   14% /mnt
创建文件,查看服务端有没有更新
[root@xiaoqi mnt]# touch xiaoqi
[root@xiaoqi mnt]# ll
总用量 0
-rw-r--r--. 1 1000 1000 0 7月  13 10:27 xiaoqi


[root@localhost ~]# ll !$
ll /home/nfstestdir/
总用量 0
-rw-r--r--. 1 xiaoqi xiaoqi 0 7月  13 10:27 xiaoqi

因为有限定id ,所以不管用哪个用户来操作都是以1000uid和1000gid的用户反应过来

[root@localhost ~]# id xiaoqi
uid=1000(xiaoqi) gid=1001(user1) 组=1001(user1),1000(xiaoqi)
4.exportfs命令
批量操作,无需重启nfs服务
常用选项:
-a全部挂载或者全部卸载
-r重新挂载
-u卸载某一个目录
-v显示共享目录
在配置文件中增加一行
[root@localhost ~]# !vim
vim /etc/exports


/tmp 192.168.246.78(rw,sync,no_root_squash)


[root@localhost ~]# exportfs -arv
exporting 192.168.246.78:/tmp
exporting 192.168.246.0/24:/home/nfstestdir
在客户机上查看可挂载目录
[root@xiaoqi mnt]# !show
showmount -e 192.168.246.128
Export list for 192.168.246.128:
/home/nfstestdir 192.168.246.0/24
/tmp             192.168.246.78
重新挂载
[root@xiaoqi ~]# mount -t nfs 192.168.246.128:/tmp/  /mnt/
[root@xiaoqi ~]# df -h
文件系统              容量  已用  可用 已用% 挂载点
/dev/sda3              27G  1.1G   26G    4% /
devtmpfs              902M     0  902M    0% /dev
tmpfs                 912M     0  912M    0% /dev/shm
tmpfs                 912M  8.7M  904M    1% /run
tmpfs                 912M     0  912M    0% /sys/fs/cgroup
/dev/sda1             197M  113M   84M   58% /boot
tmpfs                 183M     0  183M    0% /run/user/0
192.168.246.128:/tmp   27G  3.5G   23G   14% /mnt
5.NFS客户端问题
NFS 4版本会有该问题
客户端共享目录后,不管是root用户还是普通用户,创建新文件时属主、属组为nobody
客户端挂载是加上-o nfsvers=3
客户端和服务端都需要
[root@localhost ~]# vim  /etc/idmapd.conf


#Domain = local.domain.edu
改成
Domain = xiaoqi.conf


重启服务
[root@localhost ~]# systemctl restart rpcbind
6.FTP介绍
FTP是File Transfer Protocol(文件传输协议,简称文传协议)的英文简称,用于在Internet上控制文件的双向传输。
FTP的主要作用就是让用户连接一个远程计算机(这些计算机上运行着FTP服务器程序),并查看远程计算机中的文件,然后把文件从远程计算机复制到本地计算机,或把本地计算机的文件传送到 远程计算机。
小公司用的多,大企业不用FTP,因为不安全。
7.使用vsftpd搭建ftp服务
centos知道vsftpd
安装vsftpd
[root@chenshi ~]# yum install -y vsftpd

vsftpd是可以使用系统用户登录的
创建用户
[root@chenshi ~]# useradd -s /sbin/nologin virftp
修改用户密码文件,奇书行为用户名,偶数行为密码;多个用户写多行
[root@chenshi ~]# vim /etc/vsftpd/vsftpd_login
testuser1
xiaoqi
user1
123456

更改权限
[root@chenshi ~]# chmod 600 !$
chmod 600 /etc/vsftpd/vsftpd_login
把文本的密码文件转换成二进制文件
[root@chenshi ~]# db_load -T -t hash -f /etc/vsftpd/vsftpd_login  /etc/vsftpd/vsftpd_login.db

[root@chenshi ~]# ll /etc/vsftpd/
总用量 36
-rw------- 1 root root   125 8月   3 2017 ftpusers
-rw------- 1 root root   361 8月   3 2017 user_list
-rw------- 1 root root  5030 8月   3 2017 vsftpd.conf
-rwxr--r-- 1 root root   338 8月   3 2017 vsftpd_conf_migrate.sh
-rw------- 1 root root    30 7月  13 11:42 vsftpd_login
-rw-r--r-- 1 root root 12288 7月  13 11:45 vsftpd_login.db
创建用户配置文件目录
[root@chenshi ~]# mkdir /etc/vsftpd/vsftpd_user_conf
[root@chenshi ~]# cd !$
cd /etc/vsftpd/vsftpd_user_conf
[root@chenshi vsftpd_user_conf]# vim testuser1


local_root=/home/virftp/testuser1                定义虚拟用户的家目录
anonymous_enable=NO
write_enable=YES                                 是否允许可写
local_umask=022                                  新文件目录权限
anon_upload_enable=NO                            是否允许匿名用户可上传
anon_mkdir_write_enable=NO                       ***          可以创建目录
idle_session_timeout=600                         超过多长时间需要重新登录
data_connection_timeout=120                      数据传输超时时间
max_clients=10                                   最大客户端数量
创建虚拟用户的家目录
[root@chenshi vsftpd_user_conf]# mkdir /home/virftp/testuser1
[root@chenshi vsftpd_user_conf]# touch /home/virftp/testuser1/xiaoqi.txt

修改权限

[root@chenshi vsftpd_user_conf]# chown -R virftp:virftp /home/virftp
定义密码文件位置(修改认证文件)增加第二三行。
[root@chenshi vsftpd_user_conf]# vim /etc/pam.d/vsftpd


#%PAM-1.0
auth sufficient /lib64/security/pam_userdb.so db=/etc/vsftpd/vsftpd_login
account sufficient /lib64/security/pam_userdb.so db=/etc/vsftpd/vsftpd_login
session    optional     pam_keyinit.so    force revoke
auth       required     pam_listfile.so item=user sense=deny file=/etc/vsftpd/ftpusers onerr=succeed
auth       required     pam_shells.so
auth       include      password-auth
account    include      password-auth
session    required     pam_loginuid.so
session    include      password-auth
编辑vsftpd的主配置文件
[root@chenshi vsftpd_user_conf]# vim /etc/vsftpd/vsftpd.conf

将anonymous_enable=YES 改为 anonymous_enable=NO
将#anon_upload_enable=YES 改为 anon_upload_enable=NO
将#anon_mkdir_write_enable=YES 改为 anon_mkdir_write_enable=NO
再增加如下内容
chroot_local_user=YES
guest_enable=YES
guest_username=virftp
virtual_use_local_privs=YES
user_config_dir=/etc/vsftpd/vsftpd_user_conf
allow_writeable_chroot=YES
启动服务;监听21端口。
[root@chenshi vsftpd_user_conf]# systemctl start vsftpd
[root@chenshi vsftpd_user_conf]# ps aux|grep vsftpd
root     28660  0.0  0.0  53264   572 ?        Ss   12:17   0:00 /usr/sbin/vsftpd /etc/vsftpd/vsftpd.conf
root     28673  0.0  0.0 112724   968 pts/3    S+   12:17   0:00 grep --color=auto vsftpd
查看监听端口 (21)

[root@chenshi vsftpd_user_conf]# netstat -lntp
Active Internet connections (only servers)
Proto Recv-Q Send-Q Local Address           Foreign Address         State       PID/Program name
tcp        0      0 0.0.0.0:80              0.0.0.0:*               LISTEN      19731/nginx: master
tcp        0      0 0.0.0.0:22              0.0.0.0:*               LISTEN      15363/sshd
tcp        0      0 127.0.0.1:25            0.0.0.0:*               LISTEN      1385/master
tcp        0      0 0.0.0.0:443             0.0.0.0:*               LISTEN      19731/nginx: master
tcp6       0      0 :::3306                 :::*                    LISTEN      17950/mysqld
tcp6       0      0 :::21                   :::*                    LISTEN      28660/vsftpd
tcp6       0      0 :::22                   :::*                    LISTEN      15363/sshd
tcp6       0      0 ::1:25                  :::*                    LISTEN      1385/master
tcp6       0      0 :::2333                 :::*                    LISTEN      11417/python
在windows上安装filezilla client客户端
为了方便测试在linux上安装lftp
[root@chenshi ~]# yum install lftp -y
测试
[root@chenshi ~]# lftp testuser1@127.0.0.1
口令:
lftp testuser1@127.0.0.1:~> ls
-rw-r--r--    1 1002     1002            0 Jul 13 04:07 aming.txt
-rw-r--r--    1 1002     1002            0 Jul 13 04:07 xiaoqi.txt
查看可用命令
lftp testuser1@127.0.0.1:/> ?
    !<shell-command>                     (commands)
    alias [<name> [<value>]]             attach [PID]                         bookmark [SUBCMD]
    cache [SUBCMD]                       cat [-b] <files>                     cd <rdir>
    chmod [OPTS] mode file...            close [-a]
    [re]cls [opts] [path/][pattern]      debug [<level>|off] [-o <file>]
    du [options] <dirs>                  exit [<code>|bg]
    get [OPTS] <rfile> [-o <lfile>]      glob [OPTS] <cmd> <args>             help [<cmd>]
    history -w file|-r file|-c|-l [cnt]  jobs [-v] [<job_no...>]              kill all|<job_no>
    lcd <ldir>                           lftp [OPTS] <site>
    ln [-s] <file1> <file2>              ls [<args>]
    mget [OPTS] <files>                  mirror [OPTS] [remote [local]]       mkdir [-p] <dirs>
    module name [args]                   more <files>
    mput [OPTS] <files>                  mrm <files>
    mv <file1> <file2>                   [re]nlist [<args>]
    open [OPTS] <site>                   pget [OPTS] <rfile> [-o <lfile>]
    put [OPTS] <lfile> [-o <rfile>]      pwd [-p]
    queue [OPTS] [<cmd>]                 quote <cmd>
    repeat [OPTS] [delay] [command]      rm [-r] [-f] <files>                 rmdir [-f] <dirs>
    scache [<session_no>]                set [OPT] [<var> [<val>]]            site <site-cmd>
    source <file>                        torrent [-O <dir>] <file|URL>...
    user <user|URL> [<pass>]             wait [<jobno>]                       zcat <files>
    zmore <files>
8.xshell使用xftp传输文件
安装xftp
ctrl+alt+f
可以直接传输文件,双击下载。
9.使用pure-ftpd搭建ftp服务
安装两个文件
[root@chenshi ~]# yum install epel-release -y
已加载插件:fastestmirror
Repository base is listed more than once in the configuration
Repository updates is listed more than once in the configuration
Repository extras is listed more than once in the configuration
Repository centosplus is listed more than once in the configuration
Loading mirror speeds from cached hostfile
 * base: mirrors.zju.edu.cn
 * epel: mirrors.tongji.edu.cn
 * extras: ftp.sjtu.edu.cn
 * updates: ftp.sjtu.edu.cn
软件包 epel-release-7-11.noarch 已安装并且是最新版本
无须任何处理
[root@chenshi ~]# yum install -y pure-ftpd
删除这一行前面的#
[root@chenshi ~]# vim /etc/pure-ftpd/pure-ftpd.conf

PureDB                        /etc/pure-ftpd/pureftpd.pdb    指定密码配置文件
因为都是监听21端口,所有要停止vsftpd服务
[root@chenshi ~]# systemctl stop vsftpd.service
[root@chenshi ~]# systemctl start pure-ftpd.service
[root@chenshi ~]# netstat -lntp
Active Internet connections (only servers)
Proto Recv-Q Send-Q Local Address           Foreign Address         State       PID/Program name
tcp        0      0 0.0.0.0:80              0.0.0.0:*               LISTEN      19731/nginx: master
tcp        0      0 0.0.0.0:21              0.0.0.0:*               LISTEN      32133/pure-ftpd (SE
tcp        0      0 0.0.0.0:22              0.0.0.0:*               LISTEN      15363/sshd
tcp        0      0 127.0.0.1:25            0.0.0.0:*               LISTEN      1385/master
tcp        0      0 0.0.0.0:443             0.0.0.0:*               LISTEN      19731/nginx: master
tcp6       0      0 :::3306                 :::*                    LISTEN      17950/mysqld
tcp6       0      0 :::21                   :::*                    LISTEN      32133/pure-ftpd (SE
tcp6       0      0 :::22                   :::*                    LISTEN      15363/sshd
tcp6       0      0 ::1:25                  :::*                    LISTEN      1385/master
tcp6       0      0 :::2333                 :::*                    LISTEN      11417/python
创建测试目录
[root@chenshi ~]# useradd -u 1020 pure-ftp
[root@chenshi ~]# chown -R pure-ftp:pure-ftp /data/ftp
chown: 无法访问"/data/ftp": 没有那个文件或目录
[root@chenshi ~]# mkdir /data/ftp
[root@chenshi ~]# chown -R pure-ftp:pure-ftp /data/ftp
[root@chenshi ~]# pure-pw useradd ftp_usera -u pure-ftp  -d /data/ftp    创建虚拟用户,指定家目录,设置密码
Password:
Enter it again:
测试
[root@chenshi ~]# lftp ftp_userb@127.0.0.1
口令:
lftp ftp_userb@127.0.0.1:~> ls
drwxrwxrwx    2 1020       pure-ftp           21 Jul 13 13:33 .
drwxrwxrwx    2 1020       pure-ftp           21 Jul 13 13:33 ..
-rw-r--r--    1 1020       pure-ftp            0 Jul 13 13:33 123.txt
扩展
vsftp使用mysql存放虚拟用户并验证 http://www.aminglinux.com/bbs/thread-342-1-1.html
ftp的主动和被动模式 http://www.aminglinux.com/bbs/thread-961-1-1.html


 813
813


 被折叠的 条评论
为什么被折叠?
被折叠的 条评论
为什么被折叠?
 到【灌水乐园】发言


