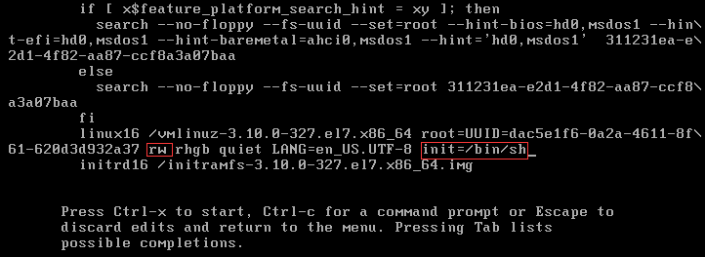
##root密码的重置方式 1、重启开机按 e
2、修改两处:ro改为rw,在LANG=en_US.UFT-8后面添加init=/bin/sh

3、按Ctrl+X重启,并修改密码
1.    echo "你的密码"|passwd --stdin root    #回车;
2.    touch /.autorelabel    #由于selinux开启着,需要执行该命令更新系统信息,否则重启之后密码未生效;
3.    exec /sbin/init    #重启系统。
##设置主机名
1.    vi /etc/hostname     #编辑配置文件
2.    www     #修改localhost.localdomain为www
3.    :wq!      #保存退出vi
4.    reboot 或 shutdown -r now  #重启系统
##网络设置 1、查看现有的网络接口
nmcli dev status```
结果如下:

1、配置IP地址,修改/etc/sysconfig/network-scripts/目录下的ifcfg-ens33文件,ens33对应上面查询出来的已连接的网络接口
- 修改:
```
BOOTPROTO=static
ONBOOT=yes```
- 添加以下内容:
```
IPADDR=192.168.153.130 #设置ip地址
NETMASK=255.255.255.0 #设置掩码
GATEWAY=192.168.153.2 #设置网关```
2、配置DNS,找到DNS设置的配置文件 /etc/resolv.conf 文件
- 动态获取DNS,设置以下内容
search localdomain
nameserver 192.168.153.2    #网关地址```
- 手动设置DNS:
    DNS1=地址1
    DNS2=备用地址2 ```

3、重启网络
service network restart```
4、用虚拟机克隆系统时
-
删除 /etc/udev/rules.d下的70-persistent-net.rules文件;
rm -f /etc/udev/rules.d/70-persistent-net.rules``` -
进入“/etc/sysconfig/network-scripts”目录 修改ifcfg-ens33文件,删除“UUID”和“HWADDR”两行,然后修改ip地址
-
重启网络或重启系统
##修改镜像源 1、先安装wget
yum -y install wget
2、备份你的原镜像文件,以免出错后可以恢复。
mv /etc/yum.repos.d/CentOS-Base.repo /etc/yum.repos.d/CentOS-Base.repo.backup
3、下载新的CentOS-Base.repo 到/etc/yum.repos.d/
- 阿里云镜像源
wget -O /etc/yum.repos.d/CentOS-Base.repo http://mirrors.aliyun.com/repo/Centos-7.repo
- 或安装163安装软件镜像源
wget -O /etc/yum.repos.d/CentOS-Base.repo http://mirrors.163.com/.help/CentOS7-Base-163.repo
4、运行以下命令生成缓存
1.    yum clean all
2.    yum makecache
##时间同步设置 使用chrony进行时间与时钟服务器同步,它由两个程序组成:chronyd和chronyc:
- chronyd是一个后台运行的守护进程,用于调整内核中运行的系统时钟和时钟服务器同步。
- chronyc提供了一个用户界面,用于监控性能并进行多样化的配置。
###1、配置时间服务器 选择一台机做时间服务器,如:192.168.0.10
安装chrony
1.    yum install chrony    //安装
2.    chronyc -v    //查看版本
修改配置文件
1. vi /etc/chrony.conf //修改配置
找到下面的内容:
server 0.rhel.pool.ntp.org iburst
server 1.rhel.pool.ntp.org iburst
server 2.rhel.pool.ntp.org iburst
server 3.rhel.pool.ntp.org iburst
修改为:
server 1.cn.pool.ntp.org
server 1.asia.pool.ntp.org
server 0.asia.pool.ntp.org
找到并修改下面的内容为自己的IP段,下面的IP为允许访问的IP
allow 10/8
allow 192.168/16
allow 172.16/12
重启chrony服务
1.    systemctl enable chronyd.service    //在开机时启用服务
2.    systemctl restart chronyd.service    //重启服务
3.    systemctl status chronyd.service    //查看服务状态
4.    chronyc sources -v    //查看时间同步源
5.    chronyc sourcestats -v    //查看时间同步源状态
###2、其它节点同步时间服务器 使用chrony工具,安装同上。
修改配置文件,只需将server设置为上面的时间服务器ip地址即可,如:
server 192.168.0.10
常用命令
###chmod
u 代表用户.
g 代表用户组.
o 代表其他.
a 代表所有.

这意味着chmod u+x somefile 只授予这个文件的所属者执行的权限
而 chmod +x somefile 和 chmod a+x somefile 是一样的
###systemctl使用https://linux.cn/article-5926-1.html
systemctl    //列出正在运行的服务状态
systemctl list-units    //列出所有运行中单元
systemd-cgls    //树形显示正在运行的进程
systemctl start postfix.service    //启动一个服务
systemctl stop postfix.service    //关闭一个服务
systemctl restart postfix.service    //重启一个服务
systemctl status postfix.service    //检查一个服务的状态
systemctl reload postfix.service    //重载一个服务
systemctl enable postfix.service    //在开机时启用一个服务
systemctl disable postfix.service    //在开机时禁用一个服务
systemctl is-enabled postfix.service    //查看服务是否开机启动
systemctl list-unit-files|grep enabled    //查看已启动的服务列表
systemctl list-unit-files --type=service    //列出所有服务(包括启用的和禁用的)
systemctl --failed    //查看启动失败的服务列表
source /etc/profile
使修改后的环境变量立即生效


 2136
2136

 被折叠的 条评论
为什么被折叠?


