


之前看了一个类似的博客,想来自己实现一下,嘿嘿,贴一下效果图:
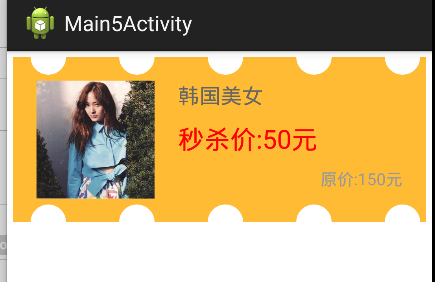
先说一下原理,卡券的实现是拓展了LinearLayout的,然后凹凸的效果是通过画圆的方式来画出来的,只要控制位置,就能够画出半圆的效果.下面我们看编码:
1.attrs属性文件:
<?xml version="1.0" encoding="utf-8"?>
<resources>

    <declare-styleable name="CustomContainer">
        <attr name="mColor" format="color" />
        <attr name="mGap" format="dimension" />
        <attr name="mHalfRadius" format="dimension" />
    </declare-styleable>

</resources>
2.CustomContainer.java文件:
package com.example.customview;

import android.content.Context;
import android.content.res.TypedArray;
import android.graphics.Canvas;
import android.graphics.Color;
import android.graphics.Paint;
import android.util.AttributeSet;
import android.util.TypedValue;
import android.widget.LinearLayout;

public class CustomContainer extends LinearLayout {

	private int		mRadius;
	private int		mGap;
	private int		mColor;
	private Paint	mPaint;

	public CustomContainer(Context context) {
		this(context, null);
	}

	public CustomContainer(Context context, AttributeSet attrs) {
		this(context, attrs, 0);
	}

	public CustomContainer(Context context, AttributeSet attrs, int defStyleAttr) {
		super(context, attrs, defStyleAttr);

		TypedArray ta = context.getTheme().obtainStyledAttributes(attrs, R.styleable.CustomContainer, defStyleAttr, 0);

		int n = ta.getIndexCount();

		for (int i = 0; i < n; i++) {
			int attr = ta.getIndex(i);
			switch (attr) {
				case R.styleable.CustomContainer_mColor:
					mColor = ta.getColor(attr, Color.TRANSPARENT);
					break;
				case R.styleable.CustomContainer_mGap:
					mGap = (int) TypedValue.applyDimension(TypedValue.COMPLEX_UNIT_DIP, ta.getDimension(attr, 3),
							getResources().getDisplayMetrics());
					break;
				case R.styleable.CustomContainer_mHalfRadius:
					mRadius = (int) TypedValue.applyDimension(TypedValue.COMPLEX_UNIT_DIP, ta.getDimension(attr, 20),
							getResources().getDisplayMetrics());
					break;

				default:
					break;
			}
		}

		ta.recycle();
		/**
		 * 上面是初始化属性参数...不想说啦!!!
		 */

		mPaint = new Paint(Paint.ANTI_ALIAS_FLAG);
		mPaint.setStyle(Paint.Style.FILL);
		mPaint.setColor(mColor);
		/**
		 * 初始化画笔
		 */
	}

	@Override
	protected void onDraw(Canvas canvas) {
		super.onDraw(canvas);

		/**
		 * 下面就是计算啦,没有意外的话,博客会给一张图来解析的
		 */

		int n = (mGap + getWidth()) / (2 * mRadius + mGap);
		/**
		 * 2*mRadius*n+(n-1)*mGap=geiWidth()转化而来
		 */

		int centerTopY = 0;
		int centerBottomY = getHeight();

		for (int i = 0; i < n; i++) {
			int centerX = 2 * mRadius * (i + 1) + i * mGap;
			canvas.drawCircle(centerX, centerTopY, mRadius, mPaint);
			canvas.drawCircle(centerX, centerBottomY, mRadius, mPaint);
		}

	}
}

3.布局文件
<RelativeLayout xmlns:android="http://schemas.android.com/apk/res/android"
    xmlns:tools="http://schemas.android.com/tools"
    xmlns:app="http://schemas.android.com/apk/res-auto"
    android:layout_width="match_parent"
    android:layout_height="match_parent"
    android:background="#fff"
    tools:context="com.example.customview.Main5Activity" >

    <com.example.customview.CustomContainer
        android:layout_width="match_parent"
        android:layout_height="wrap_content"
        android:layout_margin="5dp"
        android:background="#ffbb33"
        android:padding="20dp"
        app:mColor="#fff"
        app:mGap="15dp"
        app:mHalfRadius="5dp" >

        <RelativeLayout
            android:layout_width="match_parent"
            android:layout_height="match_parent"
            android:gravity="center" >

            <ImageView
                android:id="@+id/img"
                android:layout_width="100dp"
                android:layout_height="100dp"
                android:src="@drawable/jpg" />

            <TextView
                android:id="@+id/caption"
                android:layout_width="wrap_content"
                android:layout_height="wrap_content"
                android:layout_marginLeft="20dp"
                android:layout_toRightOf="@id/img"
                android:text="韩国美女卡券"
                android:textColor="#666666"
                android:textSize="18sp" />

            <TextView
                android:id="@+id/text1"
                android:layout_width="wrap_content"
                android:layout_height="wrap_content"
                android:layout_alignLeft="@id/caption"
                android:layout_below="@id/caption"
                android:layout_marginTop="10dp"
                android:text="秒杀价:50元"
                android:textColor="#ff0000"
                android:textSize="22sp" />

            <TextView
                android:id="@+id/text2"
                android:layout_width="wrap_content"
                android:layout_height="wrap_content"
                android:layout_alignParentRight="true"
                android:layout_below="@id/text1"
                android:layout_marginLeft="3dp"
                android:layout_marginTop="10dp"
                android:text="原价:150元"
                android:textColor="#999999"
                android:textSize="14sp" />
        </RelativeLayout>
    </com.example.customview.CustomContainer>

</RelativeLayout>


 746
746

 被折叠的 条评论
为什么被折叠?
被折叠的 条评论
为什么被折叠?
 到【灌水乐园】发言


