


Cloudify Security
Cloudify introduces a new and exciting feature, security.
This provides a discrete work environment for different customers sharing the same Cloudify server, and supports role-based and resource-based authorization.
Detailed below are some of the primary functions, and uses.
Cloudify security relies on the Spring Security framework, version 3.0.7.
Scope and Entry Points
Security is applied to the management of the Cloudify objects, including applications and services, as well as to the setup of the entire cloud environment.
The web UI and the Rest server are the main entry points to Cloudify management and monitoring, and are therefore the security focal points.
Many customers use the CLI as their main management tool.
The CLI actually performs calls to the Rest server, so a secure Rest server essentially secures the CLI as well.
The entire system can run in a secure mode or a non-secure mode, depending on the bootstrap arguments.
Communication
All communication between the client and the servers (both Rest and web UI) is over SSL. This means that the data transferred is encrypted and the servers’ identity can be verified, using a certificate provided upon bootstrap by the user. (You can find more information about securing communication in the SSL section).
The Security Model
The Cloudify security model consists of the following principles:
- Authentication – the user must be identified and authenticated by the system. This means that an anonymous user is not allowed access, and a successful login is a mandatory first step when accessing the server.
- Role-based authorization – The user must have permissions, bundled into a “Role”, to perform an action or view resources (i.e. applications, services). There are three rigid roles – “Cloud Admin”, “Application Manager” and “Viewer”, explained in detail in the Roles section.
- Resource-based authorization – Users can only perform actions and view resources that are visible to their organizational unit, represented as an “Authorization Group” in this model.
Authentication
Management actions (e.g. installing applications, or removing services) can only be performed by an authenticated user (as previously mentioned, an anonymous user will not be allowed access). Cloudify does not provide a user store, rather it utilizes an existing, populated third-party user store provided by the organization, to which connection is made using a Spring Security provider. This means the exchange of credentials is not an integrated part of Cloudify, and can be any type of token exchange, which must previously be configured. The providers currently certified are LDAP directory (recommended), and the file-based simple user-store.
See the Configuration section for configuration examples.
The web UI and Rest servers share the same user store. Both require an initial login to perform any action, either through the web UI login page, or through the CLI bootstrap command’s arguments. The CLI “Login” command can be used to switch the logged in user after bootstrap.
Authorization
After a successful login, the user is generally allowed to access the system. However, an authorization check is still performed before each action can actually take place.
Authorization is a two-step process – role-based authorization and resource-based authorization.
Role-based Authorization
The first step of authorization regards the user’s roles. A role is a set of permissions allowing the user to perform different actions (e.g. install an application, list services, teardown the cloud, etc.). A user must have at least one role defined in the user-store, as explained in the Configuration section.
Cloudify currently uses three rigid roles:
- Cloud Admin – Users granted this role can perform cloud administration tasks – add and remove cloud templates, and teardown the entire cloud. It is expected to have a very limited number of users granted the Cloud Admin role.
- Application Manager – Users granted this role can list, install and uninstall applications and services, and change the number of service instances deployed. Application managers are expected to be set for different organizational units, as will be explained later.
- Viewer – This role permits the user to only view (list) applications, services and instances. It is not uncommon to have many users granted this role.
Roles are not hierarchical – they do not fully contain one another. For example, a Cloud Admin can tear down the cloud, but is not necessarily able to uninstall applications. This depends on the authorization groups membership of the user. If you wish to allow a user to perform both actions – grant the user both roles.
Roles (Authorities) permit a user to do something. A role is practically a bunch of actions the user is allowed to execute (e.g. install-applications). Users that don’t have roles can’t do anything. They will be able to log in, but won’t see or create or modify anything.
Resource-based Authorization – Authorization Groups
A group represents an organizational unit, such as “Sales”, “Management” or “Europe”. Each user can be a member of multiple groups, or not a member of any group. The user store configuration includes a section referring to group membership. In the context of Cloudify security, group membership is used to enforce another level of authorization, and therefore refer to these groups as “Authorization Groups”.
The following illustration shows how roles and authorization groups interact. Note that the Role “Cloud Admin” permits the user to perform management on the entire cloud level, (e.g. teardown) and therefore does not require membership to any authorization group.
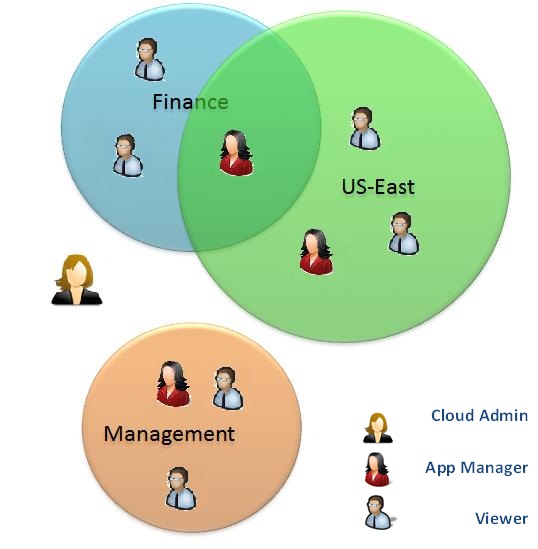
Like users, managed resources (applications and services) are also associated with one or more authorization group. This association is set automatically when an application is installed – the application is set with the authorization groups of the installing user (unless otherwise specified, as shown in the Command Examples section. Services are always associated with the authorization group of the application containing them.
Only some users are authorized to access each resource, hence the name – “resource-based authorization”. Group-based authorization is performed only after the user has been authenticated and verified as holding a role that permits the attempted action (e.g. the user has the role “App Manager” which is required when attempting to delete an application). At this stage the user’s groups are retrieved from the user store and compared to the groups associated with the managed resource. Only if the user is a member of at least one of the resource’s groups, this resource is accessible to the user.
For example, if an application is installed by a user that is a member of the groups “Finance” and “US East”, these groups will automatically be set as the authorization groups of the application, unless otherwise specified. Thereafter, only members of “Finance” or “US East” will be able to list or manage this application, depending on their roles.
Authentication groups are associated with users and with resources (e.g. Applications). This is how Cloudify determines which user can see/manage which resource.
When a user creates a resource (e.g. install-application) the user’s auth-groups are automatically set on that resource. If the user has no auth-groups, the resource has no auth-groups.
Resources that have no auth-groups will not be accessible nor seen by anyone, except for cloud admins. So in such a scenario, even the user who installed it, will not see it, unless she is a cloud admin.
Configuring & Bootstrapping a Secure Cloudify Manager
Configuring the Cloudify Manager to work in secure mode requires a few short steps, that will be explained below:
Enabling SSL
To protect the data communication between different clients and the server, Cloudify uses HTTPS.
How does this work?
To establish a secure connection, the Rest and web UI servers must have a signed certificate to authenticate their identity, and a pair of private and public keys to encrypt and decrypt the data transferred from the servers, and back to them. When a client initiates a connection with the server a handshake process takes place, in which the server’s signed certificate is presented to the client. If the client trusts this certificate and chooses to proceed – a connection is established. Further communication between the client and server will be encrypted and decrypted using the matching keys.
The certificate and keys are stored in a keystore file, protected with a password. For a secure connection these values should be supplied upon bootstrap, as shown in the Command Examples section. It is recommended that the certificate is signed by a Certificate Authority (CA), vouching for its holder’s identity. Self-signed certificates are also supported and are commonly used, although not recommended. For your convenience, a keystore with a certificate and a pair of keys can be generated easily using the keytool command, as explained in the next section.
The URLs of the servers use “https” for secure connections. Port numbers are not changed:
- Rest server: https://HostName:8100
- Web UI server: https://HostName:8099
Generating Keys and Certificates
The keytool is a key and certificate management command provided with the JDK. It generates a public & private key pair and a matching certificate, and stores them in a keystore file.
Use the same password for the keystore and the keys you create for the Cloudify server. This is a known limitation.
The keytool command then prompts for information about the certificate and for passwords.
Use the same password for the keystore and the keys you create. This is a known limitation.
The only mandatory response is to provide the fully qualified host name of the server at the “first and last name” prompt.
For example:
keytool -keystore keystore -alias Cloudify -genkey -keyalg RSA
Enter keystore password:  password
What is your first and last name?
[Unknown ]:  my-pc.my-domain.my-org
What is the name of your organizational unit?
[Unknown ]:  IT
What is the name of your organization?
[Unknown ]:  my-org. Ltd.
What is the name of your City or Locality?
[Unknown ]:
What is the name of your State or Province?
[Unknown ]:
What is the two-letter country code for this unit?
[Unknown ]:
Is CN =my-pc.my-domain.my-org, OU =IT, O =my-org. Ltd.,
L =Unknown, ST =Unknown, C =Unknown correct?
[no ]:  yes

Enter key password for <Cloudify>: password
Security Provider Configuration
Configure the user store in a spring-security.xml file (as shown in the following image), and specify this file upon bootstrap. An example of this file can be found in the Cloudify distribution, in <CLOUDIFYHOME>/config/security/spring-security.xml.
<sec:authentication-manager alias= "authenticationManager" >
<sec:authentication-provider>
<sec:user-service>
<sec:user name= "Superuser" password= "Superuser" authorities= "ROLE_CLOUDADMINS, ROLE_APPMANAGERS, ROLE_VIEWERS" />
<sec:user name= "Amanda" password= "Amanda" authorities= "ROLE_CLOUDADMINS" />
<sec:user name= "Dana" password= "Dana" authorities= "ROLE_CLOUDADMINS, ROLE_APPMANAGERS" />
<sec:user name= "Dan" password= "Dan" authorities= "ROLE_APPMANAGERS" />
<sec:user name= "Don" password= "Don" authorities= "ROLE_APPMANAGERS, ROLE_VIEWERS" />
<sec:user name= "John" password= "John" authorities= "ROLE_VIEWERS" />
<sec:user name= "Jane" password= "Jane" authorities= "" />
</sec:user-service>
</sec:authentication-provider>
</sec:authentication-manager>
Configuring a File-based User Store
The file-based user store actually configures a clear-text list of users, passwords and roles, in your xml configuration file. Authorization groups are not specified, and are set by default to the same value as the user’s roles (e.g. user John has both role “ROLE_VIEWER” and an authorization group named “ROLE_VIEWER”). Naturally, this configuration is not secure and should be used for preliminary testing or demo purposes only.
Configuring Connection to an LDAP-based User Store
This configuration defines a connection to a directory, and existing user repository connected through LDAP. Copy the default configuration (commented out in the default file) and configure these details:
- Connection details
The LDAP connection string should be set to the organization’s LDAP server: ldap://<ldap host>:<ldap port>/<directory root>
Also required are the credentials of an existing LDAP user that has READ permissions.
<bean id= "contextSource" class= "org.springframework.security.ldap.DefaultSpringSecurityContextSource" >
<constructor-arg value= "ldap://localhost:389/dc=maxcrc,dc=com" />
<property name= "userDn" value= "cn=manager,dc=maxcrc,dc=com" />
<property name= "password" value= "secret" />
</bean>
- Roles’ attribute
In order to retrieve the security roles of the user (e.g. App Manager), it is required to specify the name of the attribute holding this information, according to your schema. In our example, we used the “description” attribute, but it is preferred to use a more intuitive attribute name, such as “Roles” or even “CloudifyRoles”, to avoid ambiguity. The name of this attribute is required in two locations in the configuration:
<bean id= "CustomLdapUserDetailsMapper" class= "org.cloudifysource.rest.security.CustomLdapUserDetailsMapper" >
<property name= "roleAttributes" >
<list>
<value>description </value>
</list>
</property>
</bean>


<bean class= "org.cloudifysource.rest.security.CustomLdapAuthoritiesPopulator" >
<constructor-arg name= "roleAttributes" >
<list>
<value>description </value>
</list>
</constructor-arg>
</bean>
- Authorization groups
The authorization groups of a user are the groups this user is a member of, that are located in a specific directory branch (“ou”). This means it is possible to define Cloudify-related groups in a separate branch than other organization groups, if this is preferred.
<constructor-arg>
<bean class= "org.cloudifysource.rest.security.CustomLdapAuthGroupsPopulator" >
<constructor-arg ref= "contextSource" />
<constructor-arg value= "ou=groups" />
</bean>
</constructor-arg>
Bootstraping Cloudify in a Secure Mode
bootstrap-cloud -secured -security-file ../spring-security.xml -user Dana -password password -keystore ../keystore -keystore-password password ec2
Arguments:
- -secured – A flag indicating the system should run in a secure mode.
- -security-file – Path to spring-security.xml, the security configuration file explained in the Configuration section.
- -user – The username of the user initially logged in to the Rest server. Any following CLI commands will be performed by this user, until a different user explicitly logs in, using the “Login” command.
- -password – The password of the user.
- -keystore – Path to the keystore file, holding the certificate and keys that will be used by the server to establish SSL connections.
- -keystore-password – The password to the keystore.
- ec2 – The cloud provider.
Bootstrap in a non-secure mode
bootstrap-cloud ec2
Install an application with implicit authorization groups
install-application petclinic
The application will be set with the authorization groups of the installing user.
Install application with explicit authorization groups
install-application -authGroups Finance petclinic
-authGroups – The name of the authorization groups to be set for this application. The installing user must be a member of the specified authorization groups.
Multiple authorization groups need to be comma-separated.
Authorized roles (Who Can Do What)
Here is a list of actions and their corresponding authorized roles.
| Action | Authorized roles |
|---|---|
| bootstrap-cloud | Cloud Admin |
| teardown-cloud | Cloud Admin |
| add-templates | Cloud Admin |
| remove-template | Cloud Admin |
| install-application | Cloud Admin , App Manager |
| install-service | Cloud Admin , App Manager |
| list-applications | All Roles |
| list-attributes | Cloud Admin , App Manager |
| list-instances | All Roles |
| list-services | All Roles |
| list-templates | Cloud Admin , App Manager |
| remove-attributes | All Roles |
| set-attributes | Cloud Admin , App Manager |
| set-instances | Cloud Admin , App Manager |
| uninstall-application | Cloud Admin , App Manager |
| uninstall-service | Cloud Admin , App Manager |
| use-application | Just a shell command, not active on the server |
All Roles: Cloud Admin, App Manager, Viewer.
Users which are authorized to perform actions, are limited by the scope of their authorization-groups, e.g. : A user who is a “Viewer” can list applications, but only if they are in the user’s authorization groups.
Starting/terminating machines on the cloud requires credentials to that cloud account, regardless of the security limitations Cloudify enforces through Spring Security.
For a list of the available Cloudify commands, click here.
Integrating a Custom Authentication Provider
Dependencies
The spring-security-core version 3.1.3.RELEASE should be used.
Authentication Provider Object
Implement your custom authentication provider.
- Implement interface: org.springframework.security.authentication.AuthenticationProvider
- The method “authenticate()” should return a customized “Authentication” object, as explained below.
Authentication Object
Implement your custom “Authentication” object, returned by the authentication provider’s “authenticate()”method.
- Extend class: org.cloudifysource.rest.security.CustomAuthenticationToken
Deployment
- Create a jar file.
- Copy the jar to CLOUDIFY_ROOT_FOLDER\lib\required.
Configuration
Configure spring-security.xml to use your custom authentication provider:
<sec:authentication-manager alias= "authenticationManager" >
<sec:authentication-provider ref= "myAuthProvider" />
</sec:authentication-manager>
<bean id= "myAuthProvider" class= "com.AuthProvider.MyAuthProvider" />


 2万+
2万+

 被折叠的 条评论
为什么被折叠?
被折叠的 条评论
为什么被折叠?
 到【灌水乐园】发言


