


#IrregularTabBar gitHub地址 https://github.com/jiangyongjian/IrregularTabBar 自定义tabBar,IrregularTabBar。自己的,有什么不足请多多指教哈哈
GIF

##问题: 中间按钮 超出tabBar的范围不能响应点击事件
解决办法:
分两种思路分析问题,下面前提都是先自定义TabBarController 1.完全自定义tabBar IrregularTabBar是完全自定义的,先干掉系统tabBar,自己创建5个按钮,设置tabBar
- (void)viewWillAppear:(BOOL)animated
{
    [super viewWillAppear:animated];
    self.tabBar.hidden = YES;
    // 把系统的tabBar上的按钮干掉
    [self.tabBar removeFromSuperview];
    // 把系统的tabBar上的按钮干掉
    for (UIView *childView in self.tabBar.subviews) {
        if (![childView isKindOfClass:[BXTabBar class]]) {
            [childView removeFromSuperview];

        }
    }
}
 for (int i = 0; i < items.count; i++) {
        UITabBarItem *item = items[i];
        if (i == 2) {
            BXTabBarBigButton *btn = [BXTabBarBigButton buttonWithType:UIButtonTypeCustom];
           .........
            [self addSubview:btn];
            self.bigButton = btn;
        } else {
            BXTabBarButton *btn = [BXTabBarButton buttonWithType:UIButtonTypeCustom];
            ......
            [self addSubview:btn];
        }
    }
- (void)viewDidLoad {
    [super viewDidLoad];
    // 自定义tabBar
    [self setUpTabBar];
}
- (void)setUpTabBar
{
    BXTabBar *tabBar = [[BXTabBar alloc] init];
    tabBar.frame = self.tabBar.frame;
    [self.view addSubview:tabBar];
}
2.再系统tabBar上做一些手脚 IrregularTabBar2是继承系统UITabBar的,在自定义tabBar里面添加一个自己的按钮, 调整按钮位置,重写系统的hitTest方法
- (instancetype)initWithFrame:(CGRect)frame {
    if (self = [super initWithFrame:frame]) {
        [self addSubview:self.bigButton];
    }
    return self;
}
- (void)layoutSubviews {
    [super layoutSubviews];
    CGRect rect = self.bounds;
    CGFloat w = rect.size.width / self.items.count - 1;
    self.bigButton.frame = CGRectInset(rect, 2 * w, 0);
    [self bringSubviewToFront:self.bigButton];
}
- (UIView *)hitTest:(CGPoint)point withEvent:(UIEvent *)event
IrregularTabBar3也非常常用,中间按钮没有突出。但是不是利用系统的。在这种情况下有很多解决方法。我列出一种不用自定义,直接在系统tabBar做
- (void)viewWillLayoutSubviews {
    [super viewWillLayoutSubviews];
    [self setupComposeButton];
}
- (void)setupComposeButton {
    CGRect rect = self.tabBar.bounds;
    CGFloat w = rect.size.width / self.childViewControllers.count - 1;
    self.composeButton.frame = CGRectInset(rect, 2 * w, 0);
}
###问题二 有时候系统小红点太大了怎么办?请大家主要小红点的细节,截图 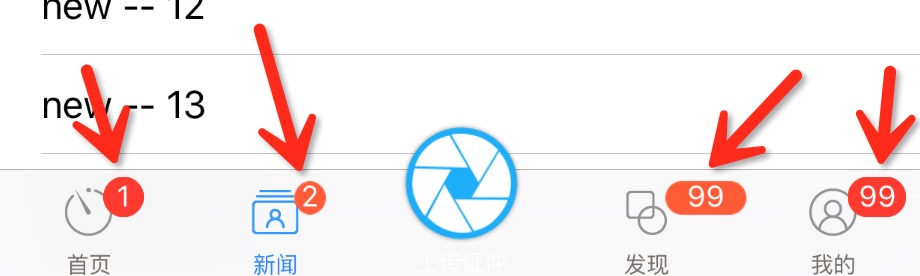
- (void)layoutSubviews {
    [super layoutSubviews];
    // 文字位置
    self.titleLabel.x = 0;
    self.titleLabel.width = self.width;
    self.titleLabel.height = 16;
    self.titleLabel.y = self.height - self.titleLabel.height;
    // 图片位置
    self.imageView.width = self.currentImage.size.width;
    self.imageView.height = self.currentImage.size.height;
    self.imageView.x = (self.width - self.imageView.width) / 2;
    self.imageView.y = self.titleLabel.y - self.imageView.height - 4;
    // 小红点位置
    self.badgeView.x = CGRectGetMaxX(self.imageView.frame) - 5;
    self.badgeView.y = 2;
}
2.再系统tabBar上做一些手脚 ##什么?能修改小红点的图片,宽度,高度 答案是非常明确的,能。怎么做呢?当然得你需要懂得运行时。
- (void)viewDidLoad {
    [super viewDidLoad];
    self.tabBarItem.badgeValue = @"99";
    UIView *badgeView = [UIView ff_firstInView:self.tabBarController.tabBar.subviews[4] clazzName:@"_UIBadgeView"];
    [badgeView setValue:[NSValue         valueWithCGRect:CGRectMake(-100, -100, 40, 18)] forKey:@"frame"];
    UIView *badgeBackground = [UIView ff_firstInView:self.tabBarController.tabBar.subviews[4] clazzName:@"_UIBadgeBackground"];
    [badgeBackground setValue:[UIImage imageNamed:@"m_badge"] forKey:@"_image"];
}
/// 查找视图 KEY
const char *FF_FIND_VIEW_KEY;
#pragma mark - 查找子视图
+ (UIView *)findView {
    return objc_getAssociatedObject(self, FF_FIND_VIEW_KEY);
}
+ (void)setFindView:(UIView *)findView {
    objc_setAssociatedObject(self, FF_FIND_VIEW_KEY, findView, OBJC_ASSOCIATION_ASSIGN);
}
+ (UIView *)ff_firstInView:(UIView *)view clazzName:(NSString *)clazzName {
    // 递归出口
    if ([self.findView isKindOfClass:NSClassFromString(clazzName)]) {
        return self.findView;
    }
    // 遍历所有子视图
    for (UIView *subView in view.subviews) {
        // 如果是要查找的类,记录并且返回
        if ([subView isKindOfClass:NSClassFromString(clazzName)]) {
            self.findView = subView;
            break;
        } else {
            // 使用子视图递归调用
            [self ff_firstInView:subView clazzName:clazzName];
        }
    }
    return self.findView;
}
OK 上面就解决了我们的两个非常常用的需求
详解UITabBar结构

联系我
QQ 453255376, 小弟不才,出现bug希望大家踊跃联系我,把程序写的更好。有更好的想法,有不明白的问我。以后tabBar想怎么搞就怎么搞,搞到它怀孕为止。喜欢的去点个星星。


 5234
5234

 被折叠的 条评论
为什么被折叠?
被折叠的 条评论
为什么被折叠?
 到【灌水乐园】发言


