


1、Nodejs环境
可以参照:vue安装node以及nrm、nrm配置,路由安装。
我们要使用Vue的前提是得安装Node.js环境,Node.js就相对于我们在Java后端的Tomcat,所以Node.js是Vue项目的运行环境。官网地址:
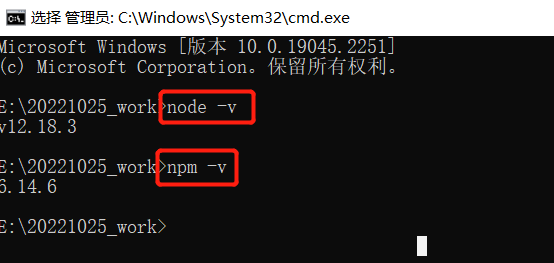
Microsoft Windows [版本 10.0.19045.2251]
(c) Microsoft Corporation。保留所有权利。

E:\20221025_work>node -v
v12.18.3

E:\20221025_work>npm -v
6.14.6

E:\20221025_work>
执行命令,node -v和npm -v,出现一下说明安装成功。
# 安装命令
npm install -g vue-cli
# 卸载脚手架
npm uninstall -g @vue.cli # 卸载3.x版本脚手架
npm uninstall -g vue-cli # 卸载2.x版本脚手架
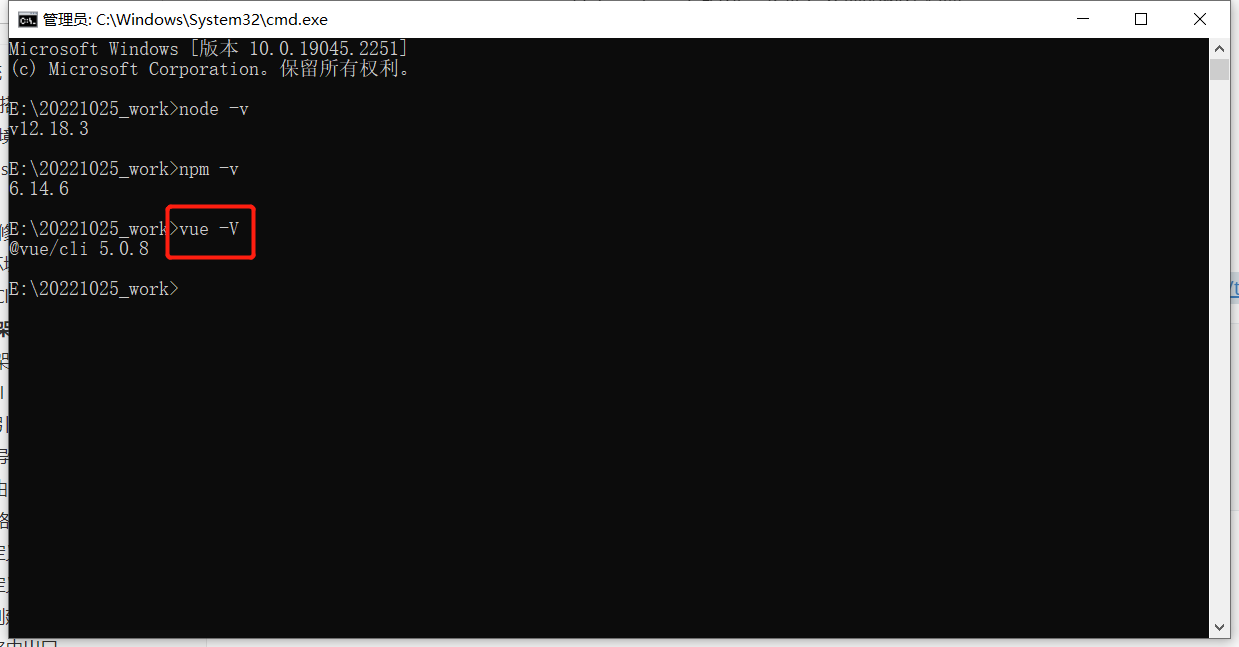
Microsoft Windows [版本 10.0.19045.2251]
(c) Microsoft Corporation。保留所有权利。

E:\20221025_work>node -v
v12.18.3

E:\20221025_work>npm -v
6.14.6

E:\20221025_work>vue -V
@vue/cli 5.0.8

E:\20221025_work>
Vue CLI2初始化项目
vue init webpack my-project
Vue CLI3初始化项目
vue create vuecli3
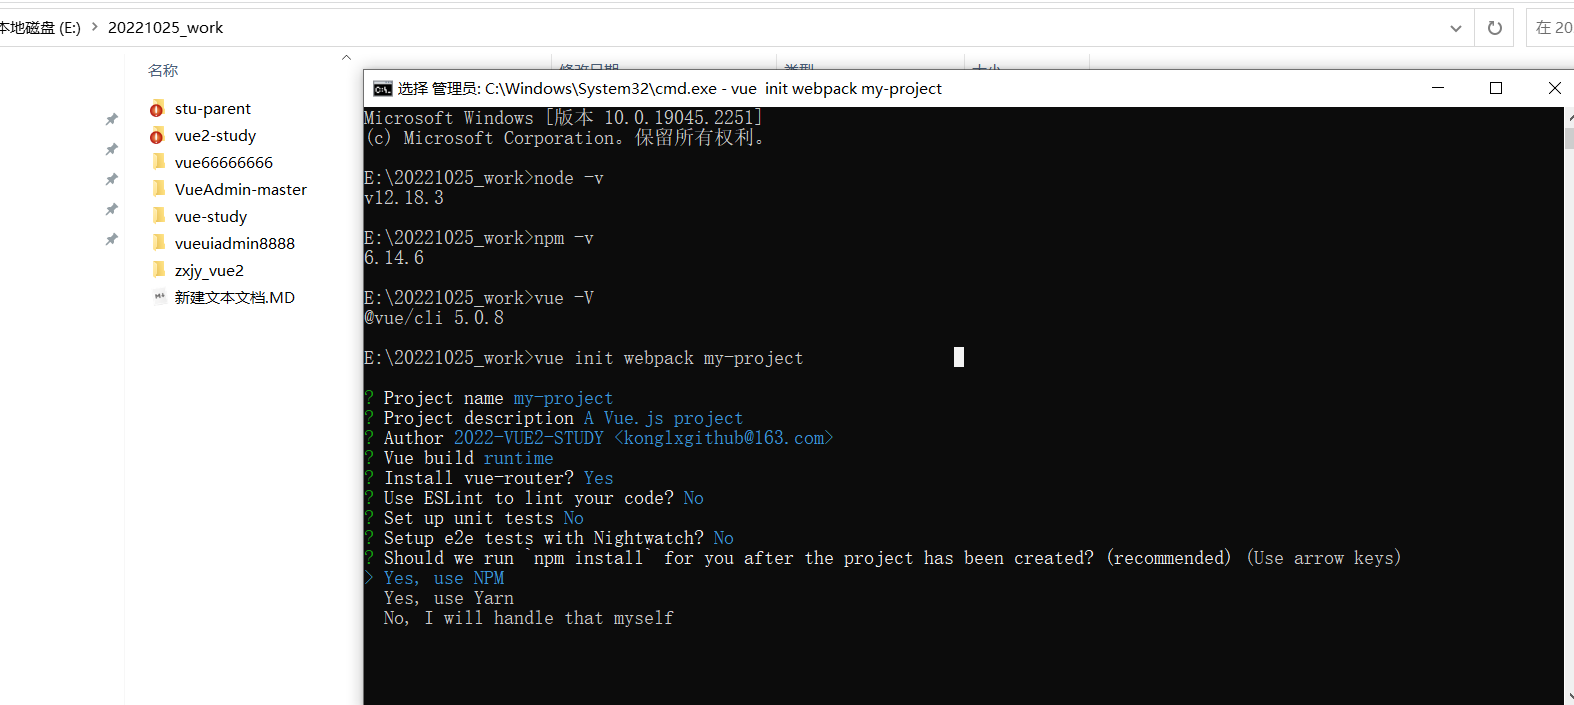
安装完成

用vs code启动项目,访问http://localhost:8080

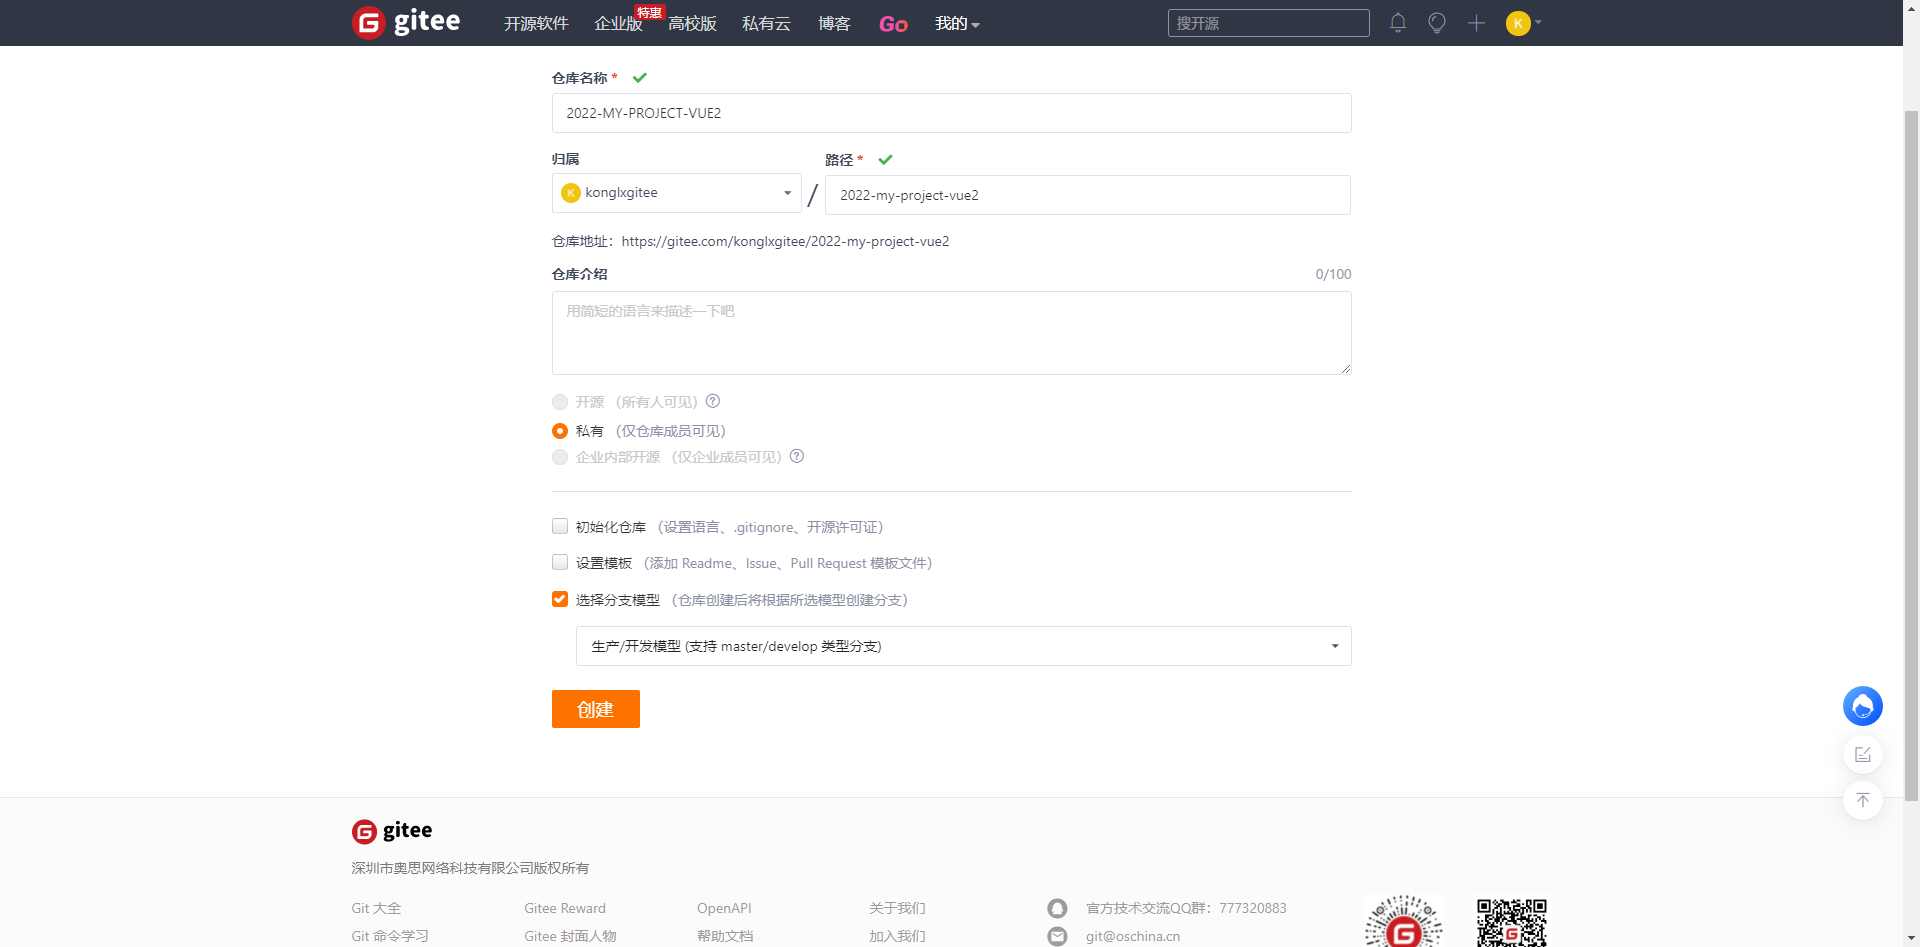
4、新建码云仓库
简易的命令行入门教程:
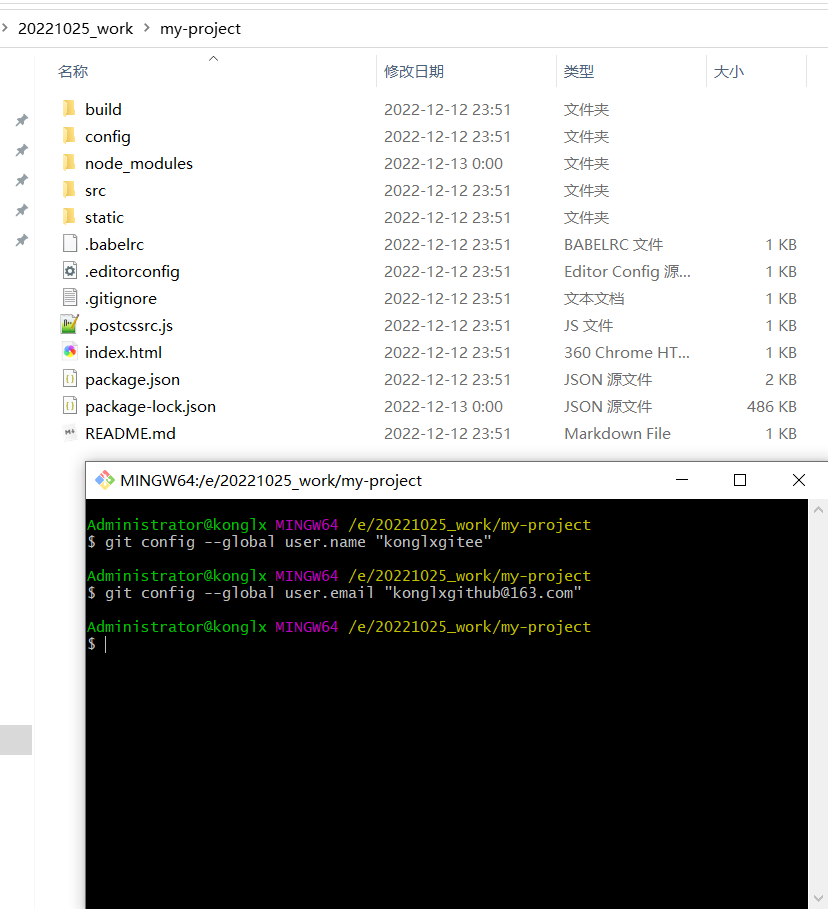
Git 全局设置:
git config --global user.name "konglxgitee"
git config --global user.email "konglxgithub@163.com"
创建 git 仓库:
mkdir 2022-my-project-vue2
cd 2022-my-project-vue2
git init
touch README.md
git add README.md
git commit -m "first commit"
git remote add origin https://gitee.com/konglxgitee/2022-my-project-vue2.git
git push -u origin "master"
已有仓库?
cd existing_git_repo
git remote add origin https://gitee.com/konglxgitee/2022-my-project-vue2.git
git push -u origin "master"
具体指令代码


Administrator@konglx MINGW64 /e/20221025_work/my-project
$ git config --global user.name "konglxgitee"

Administrator@konglx MINGW64 /e/20221025_work/my-project
$ git config --global user.email "konglxgithub@163.com"

Administrator@konglx MINGW64 /e/20221025_work/my-project
$ git remote add origin https://gitee.com/konglxgitee/2022-my-project-vue2.git
fatal: not a git repository (or any of the parent directories): .git

Administrator@konglx MINGW64 /e/20221025_work/my-project
$ csl
bash: csl: command not found

Administrator@konglx MINGW64 /e/20221025_work/my-project
$ cls
bash: cls: command not found

Administrator@konglx MINGW64 /e/20221025_work/my-project
$ git init
Initialized empty Git repository in E:/20221025_work/my-project/.git/

Administrator@konglx MINGW64 /e/20221025_work/my-project (master)
$ git add .
warning: LF will be replaced by CRLF in .babelrc.
The file will have its original line endings in your working directory
warning: LF will be replaced by CRLF in .editorconfig.
The file will have its original line endings in your working directory
warning: LF will be replaced by CRLF in .gitignore.
The file will have its original line endings in your working directory
warning: LF will be replaced by CRLF in .postcssrc.js.
The file will have its original line endings in your working directory
warning: LF will be replaced by CRLF in README.md.
The file will have its original line endings in your working directory
warning: LF will be replaced by CRLF in build/build.js.
The file will have its original line endings in your working directory
warning: LF will be replaced by CRLF in build/check-versions.js.
The file will have its original line endings in your working directory
warning: LF will be replaced by CRLF in build/utils.js.
The file will have its original line endings in your working directory
warning: LF will be replaced by CRLF in build/vue-loader.conf.js.
The file will have its original line endings in your working directory
warning: LF will be replaced by CRLF in build/webpack.base.conf.js.
The file will have its original line endings in your working directory
warning: LF will be replaced by CRLF in build/webpack.dev.conf.js.
The file will have its original line endings in your working directory
warning: LF will be replaced by CRLF in build/webpack.prod.conf.js.
The file will have its original line endings in your working directory
warning: LF will be replaced by CRLF in config/dev.env.js.
The file will have its original line endings in your working directory
warning: LF will be replaced by CRLF in config/index.js.
The file will have its original line endings in your working directory
warning: LF will be replaced by CRLF in config/prod.env.js.
The file will have its original line endings in your working directory
warning: LF will be replaced by CRLF in index.html.
The file will have its original line endings in your working directory
warning: LF will be replaced by CRLF in package-lock.json.
The file will have its original line endings in your working directory
warning: LF will be replaced by CRLF in package.json.
The file will have its original line endings in your working directory
warning: LF will be replaced by CRLF in src/App.vue.
The file will have its original line endings in your working directory
warning: LF will be replaced by CRLF in src/components/HelloWorld.vue.
The file will have its original line endings in your working directory
warning: LF will be replaced by CRLF in src/main.js.
The file will have its original line endings in your working directory
warning: LF will be replaced by CRLF in src/router/index.js.
The file will have its original line endings in your working directory

Administrator@konglx MINGW64 /e/20221025_work/my-project (master)
$ git commit -m "vue2项目搭建“
>
> git commit -m "vue2项目搭建“

[master (root-commit) 2496fac] vue2项目搭建“
 25 files changed, 13007 insertions(+)
 create mode 100644 .babelrc
 create mode 100644 .editorconfig
 create mode 100644 .gitignore
 create mode 100644 .postcssrc.js
 create mode 100644 README.md
 create mode 100644 build/build.js
 create mode 100644 build/check-versions.js
 create mode 100644 build/logo.png
 create mode 100644 build/utils.js
 create mode 100644 build/vue-loader.conf.js
 create mode 100644 build/webpack.base.conf.js
 create mode 100644 build/webpack.dev.conf.js
 create mode 100644 build/webpack.prod.conf.js
 create mode 100644 config/dev.env.js
 create mode 100644 config/index.js
 create mode 100644 config/prod.env.js
 create mode 100644 index.html
 create mode 100644 package-lock.json
 create mode 100644 package.json
 create mode 100644 src/App.vue
 create mode 100644 src/assets/logo.png
 create mode 100644 src/components/HelloWorld.vue
 create mode 100644 src/main.js
 create mode 100644 src/router/index.js
 create mode 100644 static/.gitkeep

Administrator@konglx MINGW64 /e/20221025_work/my-project (master)
$

Administrator@konglx MINGW64 /e/20221025_work/my-project (master)
$ git push -u origin master
fatal: 'origin' does not appear to be a git repository
fatal: Could not read from remote repository.

Please make sure you have the correct access rights
and the repository exists.

Administrator@konglx MINGW64 /e/20221025_work/my-project (master)
$ git remote add origin https://gitee.com/konglxgitee/2022-my-project-vue2.git

Administrator@konglx MINGW64 /e/20221025_work/my-project (master)
$ git push -u origin master
Enumerating objects: 33, done.
Counting objects: 100% (33/33), done.
Delta compression using up to 12 threads
Compressing objects: 100% (28/28), done.
Writing objects: 100% (33/33), 130.37 KiB | 6.86 MiB/s, done.
Total 33 (delta 0), reused 0 (delta 0), pack-reused 0
remote: Powered by GITEE.COM [GNK-6.4]
To https://gitee.com/konglxgitee/2022-my-project-vue2.git
 * [new branch]      master -> master
Branch 'master' set up to track remote branch 'master' from 'origin'.

Administrator@konglx MINGW64 /e/20221025_work/my-project (master)
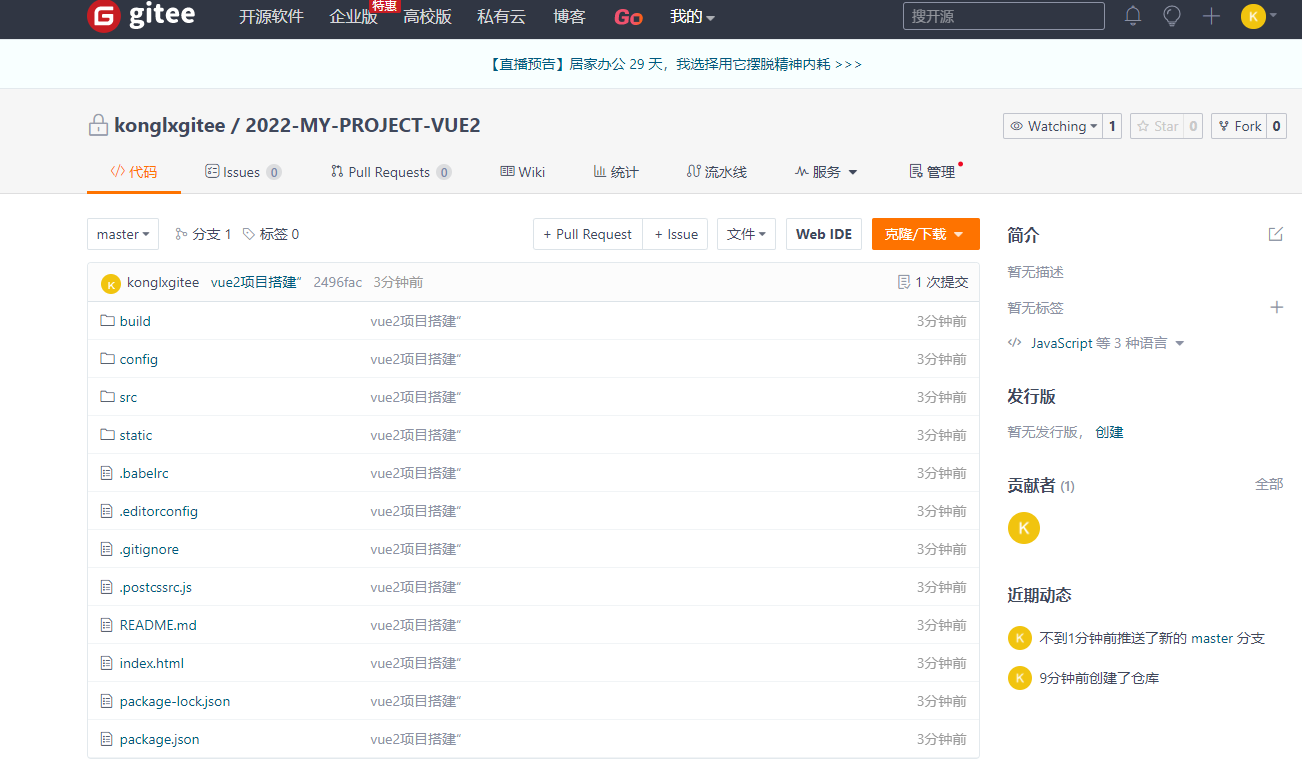
查看远程仓库,代码已经推送到远程仓库
5、ElementUI
官网地址:https://element.eleme.cn/#/zh-CN/component/quickstart
5.1、
首先需要安装依赖包
npm i element-ui -S
// 导入组件库
import ElementUI from 'element-ui'
// 导入组件样式
import  'element-ui/lib/theme-chalk/index.css';

// 配置ElementUI插件
Vue.use(ElementUI)

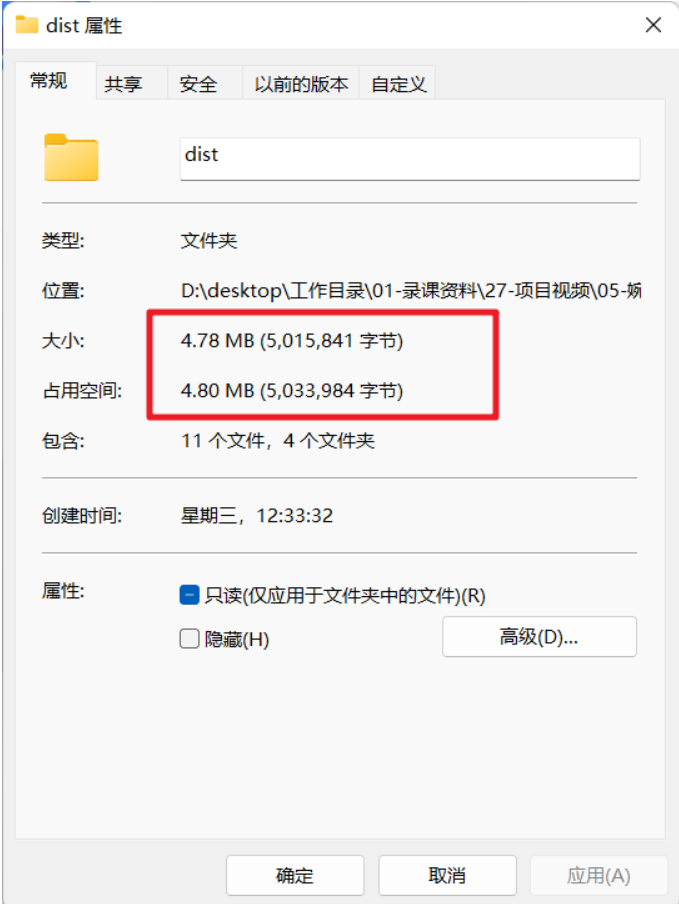
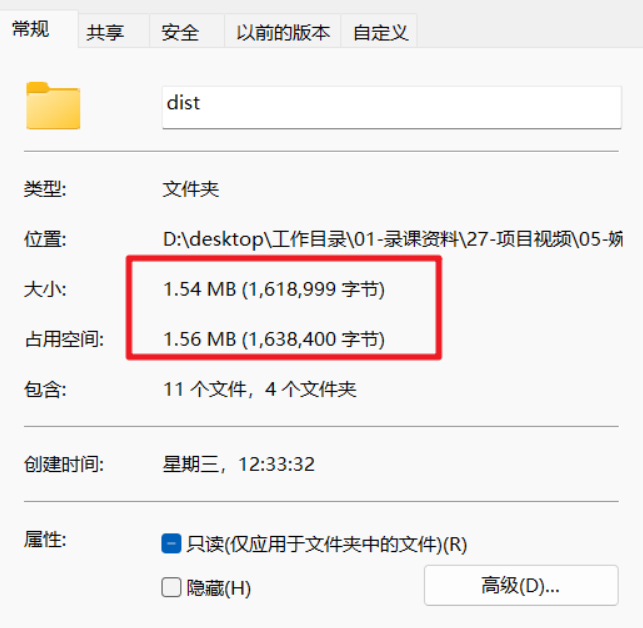
执行`npm run build` 构建项目后的目录`dist`
按需引入
借助 babel-plugin-component,我们可以只引入需要的组件,以达到减小项目体积的目的。
首先,安装 babel-plugin-component:
npm install babel-plugin-component -D
然后,将 .babelrc 修改为:
{
  "presets": [["es2015", { "modules": false }]],
  "plugins": [
    [
      "component",
      {
        "libraryName": "element-ui",
        "styleLibraryName": "theme-chalk"
      }
    ]
  ]
}
接下来,如果你只希望引入部分组件,比如 Button 和 Select,那么需要在 main.js 中写入以下内容:
import Vue from 'vue';
import { Button, Select } from 'element-ui';
import App from './App.vue';

Vue.component(Button.name, Button);
Vue.component(Select.name, Select);
/* 或写为
 * Vue.use(Button)
 * Vue.use(Select)
 */

new Vue({
  el: '#app',
  render: h => h(App)
});
完整组件列表和引入方式(完整组件列表以 components.json 为准)
import Vue from 'vue';
import {
  Pagination,
  Dialog,
  Autocomplete,
  Dropdown,
  DropdownMenu,
  DropdownItem,
  Menu,
  Submenu,
  MenuItem,
  MenuItemGroup,
  Input,
  InputNumber,
  Radio,
  RadioGroup,
  RadioButton,
  Checkbox,
  CheckboxButton,
  CheckboxGroup,
  Switch,
  Select,
  Option,
  OptionGroup,
  Button,
  ButtonGroup,
  Table,
  TableColumn,
  DatePicker,
  TimeSelect,
  TimePicker,
  Popover,
  Tooltip,
  Breadcrumb,
  BreadcrumbItem,
  Form,
  FormItem,
  Tabs,
  TabPane,
  Tag,
  Tree,
  Alert,
  Slider,
  Icon,
  Row,
  Col,
  Upload,
  Progress,
  Spinner,
  Badge,
  Card,
  Rate,
  Steps,
  Step,
  Carousel,
  CarouselItem,
  Collapse,
  CollapseItem,
  Cascader,
  ColorPicker,
  Transfer,
  Container,
  Header,
  Aside,
  Main,
  Footer,
  Timeline,
  TimelineItem,
  Link,
  Divider,
  Image,
  Calendar,
  Backtop,
  PageHeader,
  CascaderPanel,
  Loading,
  MessageBox,
  Message,
  Notification
} from 'element-ui';

Vue.use(Pagination);
Vue.use(Dialog);
Vue.use(Autocomplete);
Vue.use(Dropdown);
Vue.use(DropdownMenu);
Vue.use(DropdownItem);
Vue.use(Menu);
Vue.use(Submenu);
Vue.use(MenuItem);
Vue.use(MenuItemGroup);
Vue.use(Input);
Vue.use(InputNumber);
Vue.use(Radio);
Vue.use(RadioGroup);
Vue.use(RadioButton);
Vue.use(Checkbox);
Vue.use(CheckboxButton);
Vue.use(CheckboxGroup);
Vue.use(Switch);
Vue.use(Select);
Vue.use(Option);
Vue.use(OptionGroup);
Vue.use(Button);
Vue.use(ButtonGroup);
Vue.use(Table);
Vue.use(TableColumn);
Vue.use(DatePicker);
Vue.use(TimeSelect);
Vue.use(TimePicker);
Vue.use(Popover);
Vue.use(Tooltip);
Vue.use(Breadcrumb);
Vue.use(BreadcrumbItem);
Vue.use(Form);
Vue.use(FormItem);
Vue.use(Tabs);
Vue.use(TabPane);
Vue.use(Tag);
Vue.use(Tree);
Vue.use(Alert);
Vue.use(Slider);
Vue.use(Icon);
Vue.use(Row);
Vue.use(Col);
Vue.use(Upload);
Vue.use(Progress);
Vue.use(Spinner);
Vue.use(Badge);
Vue.use(Card);
Vue.use(Rate);
Vue.use(Steps);
Vue.use(Step);
Vue.use(Carousel);
Vue.use(CarouselItem);
Vue.use(Collapse);
Vue.use(CollapseItem);
Vue.use(Cascader);
Vue.use(ColorPicker);
Vue.use(Transfer);
Vue.use(Container);
Vue.use(Header);
Vue.use(Aside);
Vue.use(Main);
Vue.use(Footer);
Vue.use(Timeline);
Vue.use(TimelineItem);
Vue.use(Link);
Vue.use(Divider);
Vue.use(Image);
Vue.use(Calendar);
Vue.use(Backtop);
Vue.use(PageHeader);
Vue.use(CascaderPanel);

Vue.use(Loading.directive);

Vue.prototype.$loading = Loading.service;
Vue.prototype.$msgbox = MessageBox;
Vue.prototype.$alert = MessageBox.alert;
Vue.prototype.$confirm = MessageBox.confirm;
Vue.prototype.$prompt = MessageBox.prompt;
Vue.prototype.$notify = Notification;
Vue.prototype.$message = Message;
然后我们再build来看看效果
cnd可以查看路由版本:https://cdnjs.com/
6.1、安装
直接下载 / CDN
https://unpkg.com/vue-router@3/dist/vue-router.js(opens new window)
Unpkg.com (opens new window)提供了基于 NPM 的 CDN 链接。上面的链接会一直指向在 NPM 发布的最新版本。你也可以像 https://unpkg.com/vue-router@3.0.0/dist/vue-router.js 这样指定 版本号 或者 Tag。
在 Vue 后面加载 vue-router,它会自动安装的:
<script src="/path/to/vue.js"></script>
<script src="/path/to/vue-router.js"></script>
默认安装最新版本
npm install vue-router
指定版本
npm install vue-router@3.6.5
如果在一个模块化工程中使用它,必须要通过 Vue.use() 明确地安装路由功能:
import Vue from 'vue'
import VueRouter from 'vue-router'

Vue.use(VueRouter)
如果使用全局的 script 标签,则无须如此 (手动安装)。
6.2、
<template>
    <div class="hello">
      Home
    </div>
  </template>

  <script>
  export default {
    name: 'Home',
    data () {
      return {
        msg: 'Welcome to Your Vue.js App'
      }
    }
  }
  </script>

  <!-- Add "scoped" attribute to limit CSS to this component only -->
  <style scoped>

  </style>
import Vue from 'vue'
import VueRouter from 'vue-router'
import Home from '@/views/Home'

Vue.use(VueRouter)

// 0. 如果使用模块化机制编程,导入Vue和VueRouter,要调用 Vue.use(VueRouter)
// 1. 定义 (路由) 组件。
// 可以从其他文件 import 进来

// 2. 定义路由
// 每个路由应该映射一个组件。 其中"component" 可以是
// 通过 Vue.extend() 创建的组件构造器,
// 或者,只是一个组件配置对象。
// 我们晚点再讨论嵌套路由。
const routes = [
  {
    path: '/home',
    component: Home
  }
]

// 3. 创建 router 实例,然后传 `routes` 配置
// 你还可以传别的配置参数, 不过先这么简单着吧。
const router = new VueRouter({
  routes // (缩写) 相当于 routes: routes
})

// 4. 创建和挂载根实例。(在main.js里继续挂载)
// 记得要通过 router 配置参数注入路由,
// 从而让整个应用都有路由功能

export default router
import Vue from 'vue'
import App from './App'
//默认读取index文件
import router from './router'
import ElementUI from 'element-ui';
import 'element-ui/lib/theme-chalk/index.css';

Vue.use(ElementUI);
Vue.config.productionTip = false

/* eslint-disable no-new */
new Vue({
  el: '#app',
  router,//路由挂载
  render: h => h(App)
})
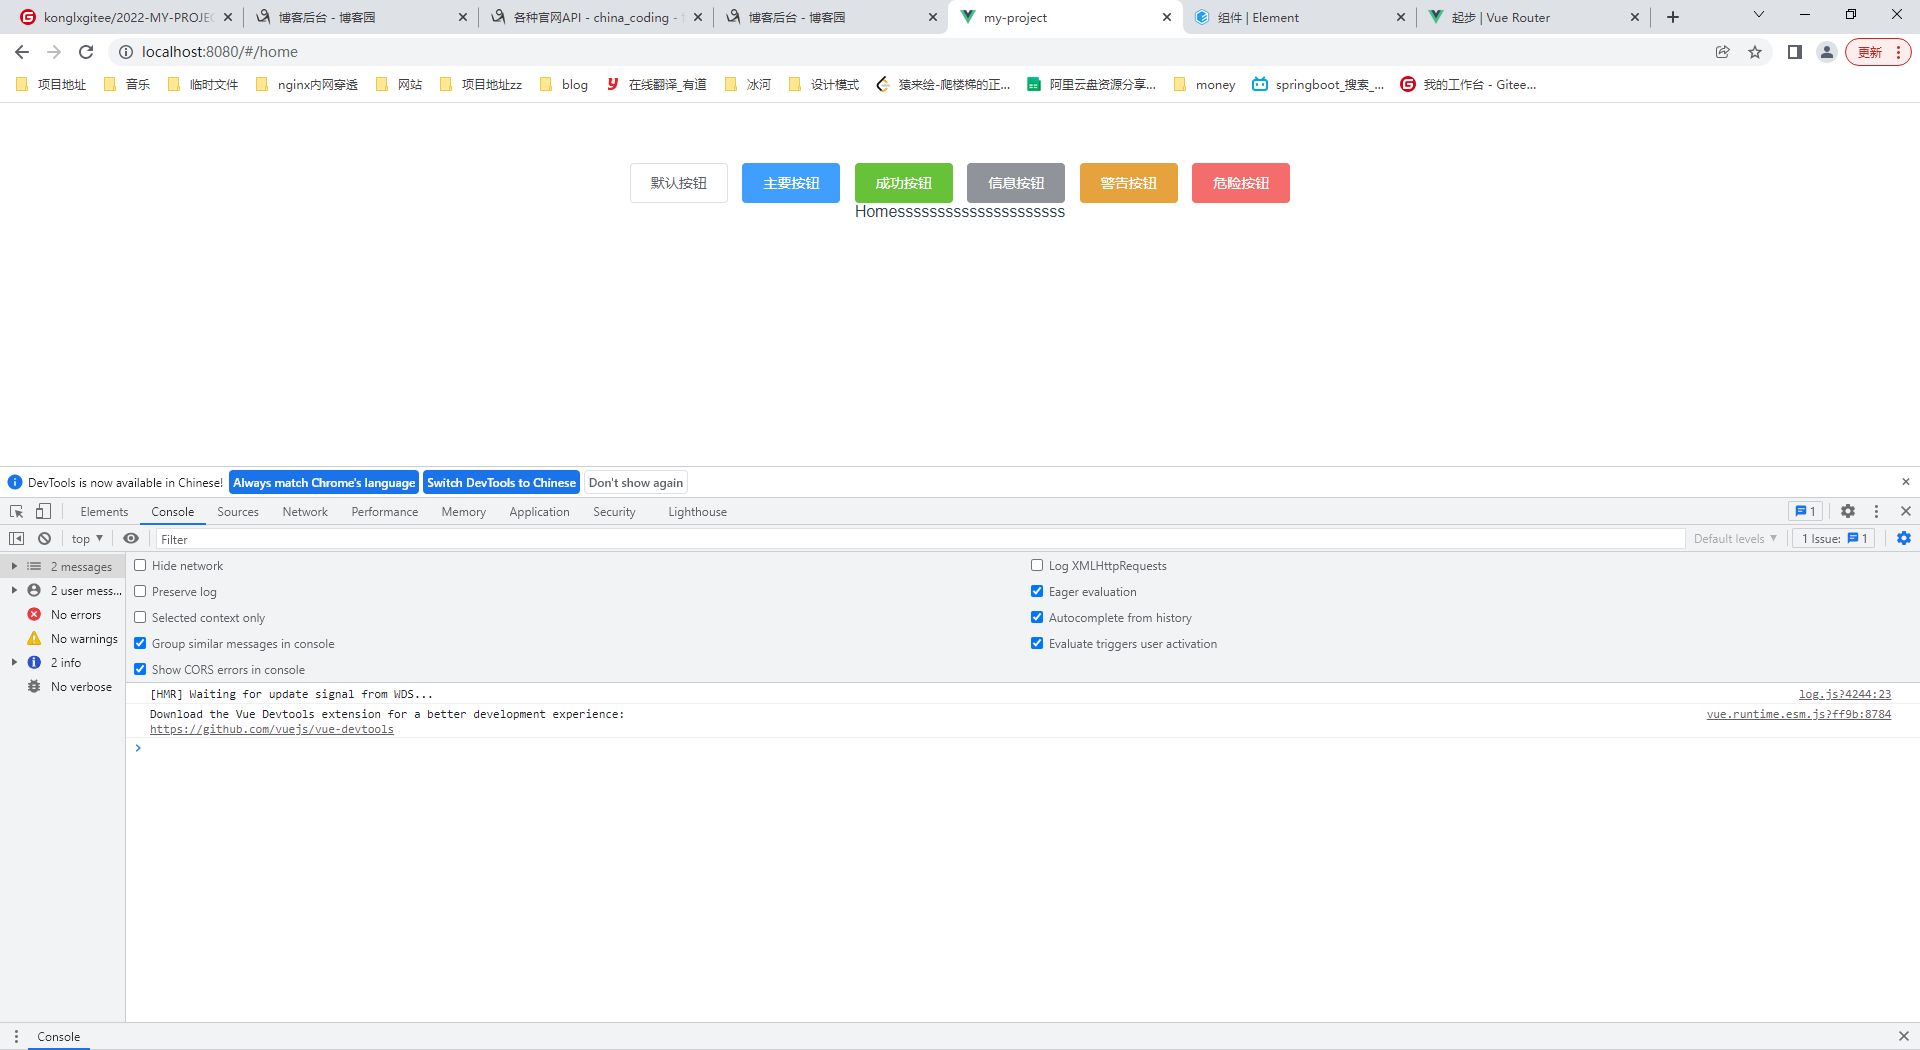
<template>
  <div id="app">
    <el-row>
      <el-button>默认按钮</el-button>
      <el-button type="primary">主要按钮</el-button>
      <el-button type="success">成功按钮</el-button>
      <el-button type="info">信息按钮</el-button>
      <el-button type="warning">警告按钮</el-button>
      <el-button type="danger">危险按钮</el-button>
    </el-row>

    <!-- 路由出口 -->
    <!-- 路由匹配到的组件将渲染在这里 -->
    <router-view />
  </div>
</template>

<script>
export default {
  name: "App",
};
</script>

<style>
#app {
  font-family: "Avenir", Helvetica, Arial, sans-serif;
  -webkit-font-smoothing: antialiased;
  -moz-osx-font-smoothing: grayscale;
  text-align: center;
  color: #2c3e50;
  margin-top: 60px;
}
</style>
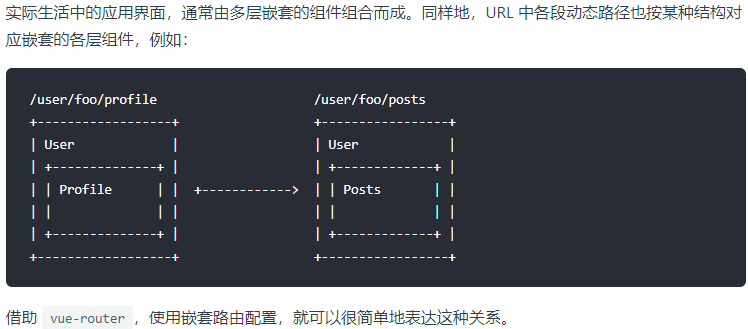
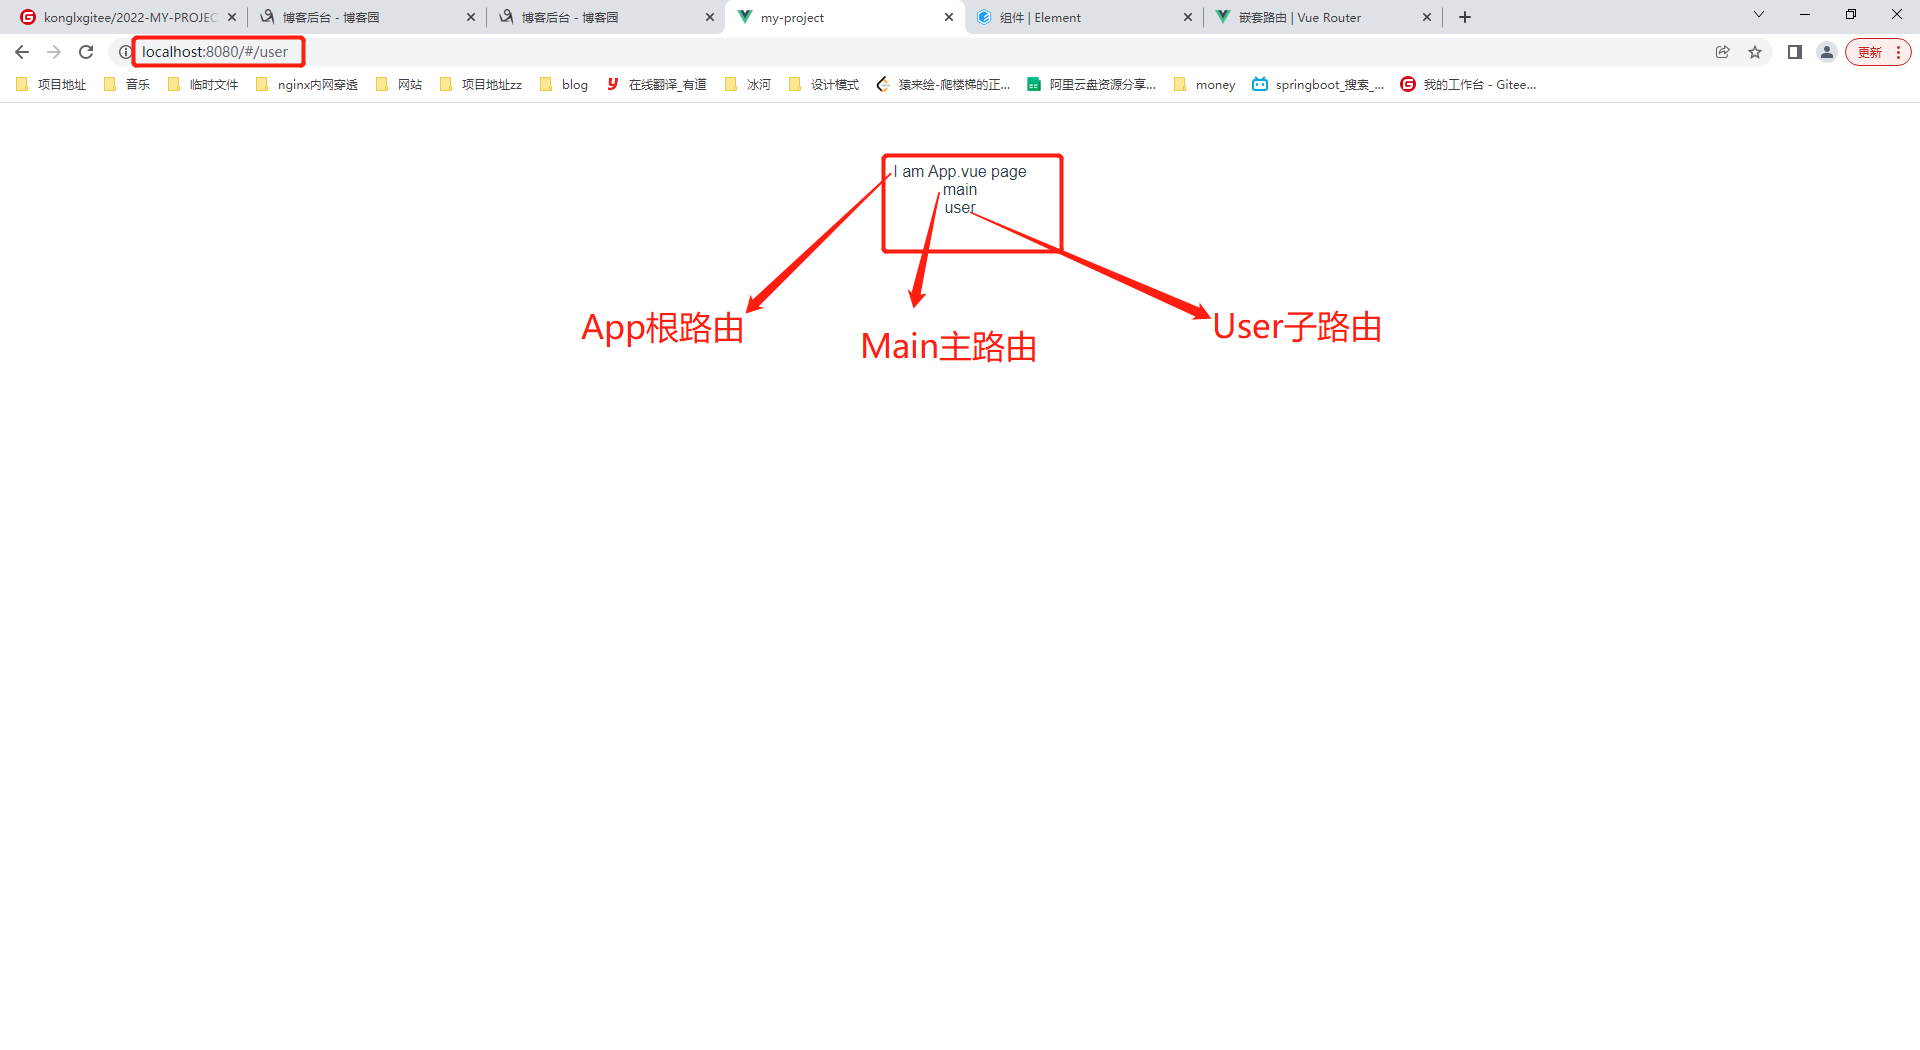
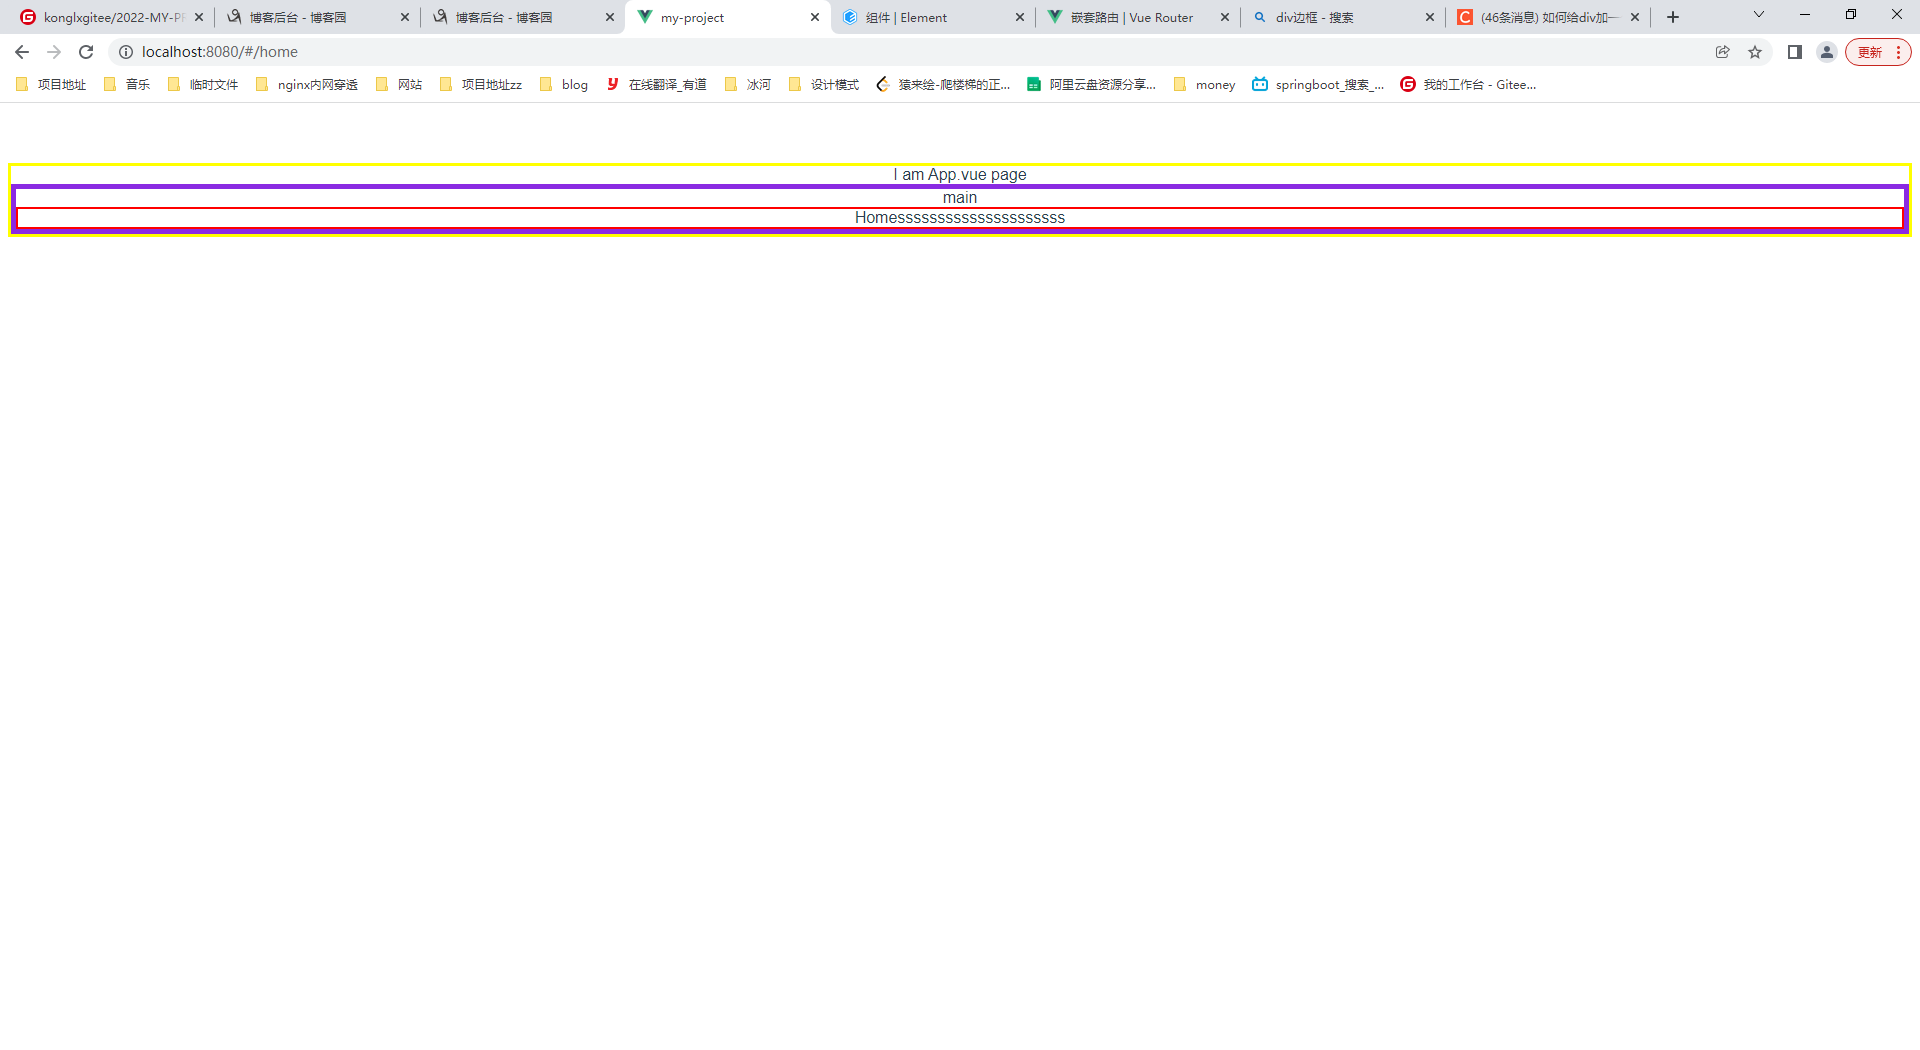
6.3、嵌套
<template>
  <div class="hello">
    main
    <!-- 路由出口 -->
    <!-- 路由匹配到的组件将渲染在这里 -->
    <!-- 路由匹配到的Main组件的子组件将渲染在这里 -->
    <router-view />
  </div>
</template>
<script>
export default {
  name: "Main",
  data() {
    return {
      msg: "Welcome to Your Vue.js App",
    };
  },
};
</script>

<!-- Add "scoped" attribute to limit CSS to this component only -->
<style scoped>
</style>
import Vue from 'vue'
import VueRouter from 'vue-router'
import Home from '@/views/Home'
import Main from '@/views/Main'
import User from '@/views/User'
Vue.use(VueRouter)

// 0. 如果使用模块化机制编程,导入Vue和VueRouter,要调用 Vue.use(VueRouter)
// 1. 定义 (路由) 组件。
// 可以从其他文件 import 进来

// 2. 定义路由
// 每个路由应该映射一个组件。 其中"component" 可以是
// 通过 Vue.extend() 创建的组件构造器,
// 或者,只是一个组件配置对象。
// 我们晚点再讨论嵌套路由。
const routes = [
  //主路由
  {
    path: '/',
    component: Main,
    children:[//子路由,嵌套路由
      {
        path: 'home',
        component: Home
      },
      {
        path: 'user',
        component: User
      },
    ]
  }

]

// 3. 创建 router 实例,然后传 `routes` 配置
// 你还可以传别的配置参数, 不过先这么简单着吧。
const router = new VueRouter({
  routes // (缩写) 相当于 routes: routes
})

// 4. 创建和挂载根实例。(在main.js里继续挂载)
// 记得要通过 router 配置参数注入路由,
// 从而让整个应用都有路由功能

export default router
<template>
  <div class="hello">
    main
    <!-- 路由出口 -->
    <!-- 路由匹配到的组件将渲染在这里 -->
    <!-- 路由匹配到的Main组件的子组件将渲染在这里 -->
    <router-view />
  </div>
</template>
<script>
export default {
  name: "Main",
  data() {
    return {
      msg: "Welcome to Your Vue.js App",
    };
  },
};
</script>

<!-- Add "scoped" attribute to limit CSS to this component only -->
<style scoped>
</style>
home


 391
391


 被折叠的 条评论
为什么被折叠?
被折叠的 条评论
为什么被折叠?
 到【灌水乐园】发言


