


测试使用gitolite搭建一个简单的git仓库,使用ngx-admin的代码做测试
一 部署环境
linux: redhat 7 (vmware)
ip: 192.168.10.129
ssh 工具:Xshell
本地客户端: win10 64
二 安装所需软件包
安装 git:
[root@localhost hadmin]# yum install -y git
Loaded plugins: langpacks, product-id, search-disabled-repos, subscription-manager
This system is not registered to Red Hat Subscription Management. You can use subscription-manager to register.
Package git-1.8.3.1-12.el7_4.x86_64 already installed and latest version
Nothing to do
[root@localhost hadmin]# 如果没有安装yum,可以参考这个:https://my.oschina.net/u/2499632/blog/1377676
我本地已经安装过了git
[root@localhost hadmin]# git --version
git version 1.8.3.1
[root@localhost hadmin]#
创建git用户:
[root@localhost hadmin]# useradd git切换到git用户,并进入到git目录下:
[root@localhost hadmin]# su git
[git@localhost hadmin]$ pwd
/home/hadmin
[git@localhost hadmin]$ cd ../git
[git@localhost ~]$
安装gitolite:
[git@localhost ~]$ git clone https://github.com/sitaramc/gitolite
Cloning into 'gitolite'...
remote: Counting objects: 9495, done.
remote: Total 9495 (delta 0), reused 0 (delta 0), pack-reused 9495
Receiving objects: 100% (9495/9495), 2.99 MiB | 7.00 KiB/s, done.
Resolving deltas: 100% (5877/5877), done.
[git@localhost ~]$
创建bin目录,并安装gitolite到bin目录
[git@localhost ~]$ ll
total 0
drwxrwxr-x. 7 git git 137 Nov 18 23:09 bin
drwxrwxr-x. 6 git git 245 Nov 18 23:03 gitolite
[git@localhost ~]$ pwd
/home/git
[git@li1455-180 ~]$ gitolite/install -to $HOME/bin
[git@li1455-180 ~]$ ls bin/
commands  gitolite  gitolite-shell  lib  syntactic-sugar  triggers  VERSION  VREF
三 开始配置
配置gitolite管理员
gitolite 使用特殊的版本库gitolite-admin 来管理用户和版本库,所以需要创建一个管理员来管理所有的用户和版本库
1. 用git用户生成公钥,一直回车就行:
[git@localhost ~]$ ssh-keygen -t rsa
Generating public/private rsa key pair.
Enter file in which to save the key (/home/git/.ssh/id_rsa):
Created directory '/home/git/.ssh'.
Enter passphrase (empty for no passphrase):
Enter same passphrase again:
Your identification has been saved in /home/git/.ssh/id_rsa.
Your public key has been saved in /home/git/.ssh/id_rsa.pub.
The key fingerprint is:
2d:36:9b:aa:e2:73:b8:68:31:d3:12:c2:b7:eb:f1:d3 git@localhost.localdomain
The key's randomart image is:
+--[ RSA 2048]----+
|                 |
|                 |
|.                |
|.o .     .       |
|. + .   S .      |
| = o   . =       |
|  =o. . o        |
| o+.+. E         |
|o.+*.oo          |
+-----------------+
[git@localhost ~]$
这样就会自动创建一个.ssh的目录:
[git@localhost ~]$ ll -a
total 12
drwx------. 9 git  git  158 Nov 18 23:16 .
drwxr-xr-x. 5 root root  45 Nov 18 22:33 ..
-rw-r--r--. 1 git  git   18 Jul 12  2016 .bash_logout
-rw-r--r--. 1 git  git  193 Jul 12  2016 .bash_profile
-rw-r--r--. 1 git  git  231 Jul 12  2016 .bashrc
drwxrwxr-x. 7 git  git  137 Nov 18 23:09 bin
drwxrwxr-x. 3 git  git   18 Nov 18 22:35 .cache
drwxrwxr-x. 3 git  git   18 Nov 18 22:35 .config
drwxrwxr-x. 6 git  git  245 Nov 18 23:03 gitolite
drwxr-xr-x. 4 git  git   39 Nov 19  2017 .mozilla
drwxrw----. 3 git  git   19 Nov 18 22:38 .pki
drwx------. 2 git  git   38 Nov 18 23:16 .ssh
[git@localhost ~]$
2. 修改.ssh 目录下的id_rsa.pub 为 admin.pub (为什么要改成admin.pub 因为gitolite根据这个文件名来设立帐号.我这里用admin):
[git@localhost ~]$ cd .ssh/
[git@localhost .ssh]$ ll
total 8
-rw-------. 1 git git 1675 Nov 18 23:16 id_rsa
-rw-r--r--. 1 git git  407 Nov 18 23:16 id_rsa.pub
[git@localhost .ssh]$ mv id_rsa.pub admin.pub
[git@localhost .ssh]$ ll
total 8
-rw-r--r--. 1 git git  407 Nov 18 23:16 admin.pub
-rw-------. 1 git git 1675 Nov 18 23:16 id_rsa
[git@localhost .ssh]$
3. 使用admin.pub 公钥安装gitolite:
[git@localhost ~]$ pwd
/home/git
[git@localhost ~]$ ll
total 4
-rw-r--r--. 1 git git 407 Nov 18 23:16 admin.pub
drwxrwxr-x. 7 git git 137 Nov 18 23:09 bin
drwxrwxr-x. 6 git git 245 Nov 18 23:03 gitolite
[git@localhost ~]$ bin/gitolite setup -pk admin.pub
Initialized empty Git repository in /home/git/repositories/gitolite-admin.git/
Initialized empty Git repository in /home/git/repositories/testing.git/
WARNING: /home/git/.ssh/authorized_keys missing; creating a new one
    (this is normal on a brand new install)
[git@localhost ~]$
这样就创建了repo 仓库,
[git@localhost ~]$ ll
total 8
-rw-r--r--. 1 git git 407 Nov 18 23:16 admin.pub
drwxrwxr-x. 7 git git 137 Nov 18 23:09 bin
drwxrwxr-x. 6 git git 245 Nov 18 23:03 gitolite
-rw-------. 1 git git  12 Nov 18 23:24 projects.list
drwx------. 4 git git  51 Nov 18 23:24 repositories
[git@localhost ~]$ ls repositories/
gitolite-admin.git  testing.git
[git@localhost ~]$
gitolite-admin.git 是用来管理仓库的,testing.git 是用来测试的
4. 生成管理员管理仓库
[git@localhost ~]$ git clone git@127.0.0.1:gitolite-admin.git
Cloning into 'gitolite-admin'...
The authenticity of host '127.0.0.1 (127.0.0.1)' can't be established.
ECDSA key fingerprint is 81:ec:a1:61:d4:b3:53:b1:a8:3b:1a:81:66:71:16:73.
Are you sure you want to continue connecting (yes/no)? yes
Warning: Permanently added '127.0.0.1' (ECDSA) to the list of known hosts.
remote: Counting objects: 6, done.
remote: Compressing objects: 100% (4/4), done.
remote: Total 6 (delta 0), reused 0 (delta 0)
Receiving objects: 100% (6/6), done.
[git@localhost ~]$ ll
total 8
-rw-r--r--. 1 git git 407 Nov 18 23:16 admin.pub
drwxrwxr-x. 7 git git 137 Nov 18 23:09 bin
drwxrwxr-x. 6 git git 245 Nov 18 23:03 gitolite
drwxrwxr-x. 5 git git  44 Nov 18 23:29 gitolite-admin
-rw-------. 1 git git  12 Nov 18 23:24 projects.list
drwx------. 4 git git  51 Nov 18 23:24 repositories
[git@localhost ~]$
生成管理员仓库之后,进入gitolite-admin 目录,可以看到conf 和keydir , conf/gitolite.conf 是添加用户/仓库的配置, keydir 是放对应用户的公钥,此时git 用户根目录下的admin.pub是可以删除的了
5. 编辑gitolite.conf文件
[git@localhost ~]$ cd gitolite-admin/
conf/   .git/   keydir/
[git@localhost ~]$ cd gitolite-admin/conf/
[git@localhost conf]$ ls
gitolite.conf
[git@localhost conf]$ vim gitolite.conf
打开之后会看到:
repo gitolite-admin
    RW+     =   admin

repo testing
    RW+     =   @all
修改为:
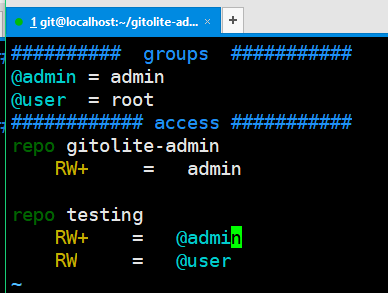
上图的含义是:
定义了2个用户组:admin 和 user
定义了2个版本库:gitolite-admin 和 testing
用户组 admin 对 gitolite-admin 和 testing 这两个版本库有读、写、删除的权限
用户组 user 对 testing 版本库有读、写的权限
如果修改为RW 就是读、写的权限,这个根据自己的实际情况来
也可以直接写用户,像这样:
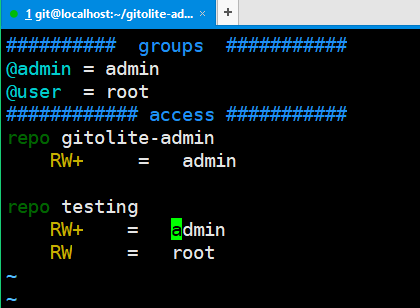
按照这样的格式,可以添加多个仓库、多个用户等
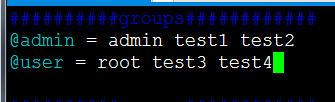
多个用户需要用空格分开:
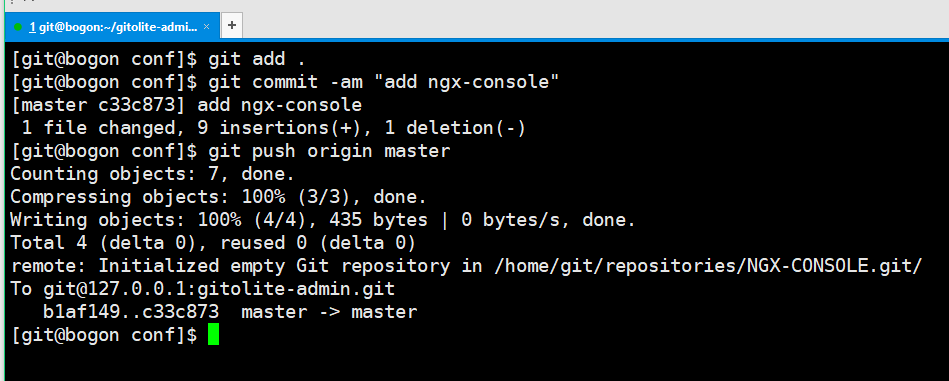
修改完后,需要在gitolite.conf 的当前目录下提交修改:
[git@localhost conf]$ git add .
[git@localhost conf]$ git commit -am "it is a test"

*** Please tell me who you are.

Run

  git config --global user.email "you@example.com"
  git config --global user.name "Your Name"

to set your account's default identity.
Omit --global to set the identity only in this repository.

fatal: empty ident name (for <git@localhost.localdomain>) not allowed
[git@localhost conf]$
出现了这个提示,说明没有设置提交git修改的用户名,就是当前是谁在提交这个修改,这个用户名将会在git 的提交记录中进行显示:
[git@localhost conf]$ git config --global user.
user.email        user.name         user.signingkey
[git@localhost conf]$ git config --global user.name lj
[git@localhost conf]$ git config --global user.email lj@qq.com
[git@localhost conf]$ git push origin master
Everything up-to-date
[git@localhost conf]$
用户名和邮箱可以自己随意定义
四 新建仓库
到这一步基本上就安装完成了,我们可以测试一下如何在仓库中新建一个仓库,在本地客户端如何提交代码到仓库总,当然前提是本地客户端也必须安装了git
1. 准备代码ngx-admin,代码已经提前 clone 好了的,放在了my-git 目录下
2. 将客户端的id_rsa.pub 文件上传到/home/git/gitolite-admin/keydir 目录下,keydir 目录是用来管理公钥的,如果要给谁添加权限,就需要将他的公钥放在该目录
[git@localhost gitolite-admin]$ ll
total 0
drwxrwxr-x. 2 git git 27 Nov 18 23:41 conf
drwxrwxr-x. 2 git git 23 Nov 18 23:29 keydir
[git@localhost gitolite-admin]$ cd keydir/
[git@localhost keydir]$ ls
admin.pub
[git@localhost keydir]$ pwd
/home/git/gitolite-admin/keydir
[git@localhost keydir]$
改下名字,方便区分:
[git@localhost ~]$ mv id_rsa.pub gitolite-admin/keydir/lj.pub
[git@localhost ~]$ git add gitolite-admin/keydir/lj.pub gitolite-admin/conf/gitolite.conf
注意:在git目录下的所有目录及文件,权限都必须是git的,不能是root或者其它用户的
3. 在gitolite.conf 目录中新建一个仓库,起名:NGX-CONSOLE,赋予lj.pub 读、写的权限:
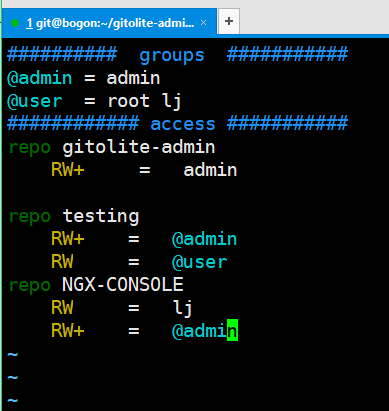
这里表示用户 lj 对NGX-CONSOLE 有读、写的权限,用户组admin 对NGX-CONSOLE有读、写、删除的权限,保存后退出
4. 提交修改
回到git 账户主目录下的repositories 目录下会看到已经创建了一个NGX-CONSOLE 的.git 目录:
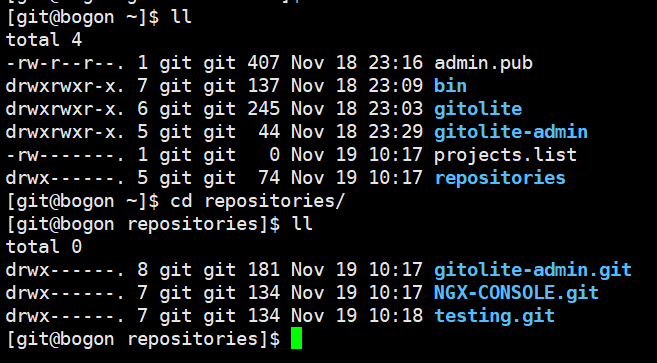
说名仓库已经创建成功,这时可以在客户端进行clone 测试下
打开本地的git bash 命令窗口:
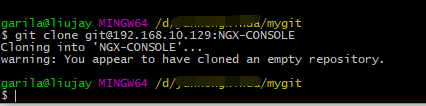
说明已经clone 成功了,此时的NGX-CONSOLE 是个空的仓库,接下来要做的就是将代码复制过去,执行commit and push 就OK 了


 6122
6122

 被折叠的 条评论
为什么被折叠?
被折叠的 条评论
为什么被折叠?
 到【灌水乐园】发言


