第一版 (首页基本布局和实现)
LongListSelector使用
<phone:LongListSelector x:Name="Artile_List" ItemsSource="{Binding Items}">
    <phone:LongListSelector.ItemTemplate>
        <DataTemplate>
            <Grid Margin="10,3,0,3" toolkit:TiltEffect.IsTiltEnabled="True"
                  Background="{StaticResource PhoneDisabledColor}">

                <!--内容-->

            </Grid>
        </DataTemplate>
    </phone:LongListSelector.ItemTemplate>
</phone:LongListSelector>
– LongListSelecter中的 DataTemplate 下可以自定义每一项的内容,且里面只能包含一个内容。
为控件添加“块倾斜”效果
<Grid Margin="10,3,0,3" toolkit:TiltEffect.IsTiltEnabled="True">– toolkit是用于呈现点击“块倾斜”效果,当然toolkit是第三方控件,需要添加引用
xmlns:toolkit="clr-namespace:Microsoft.Phone.Controls;assembly=Microsoft.Phone.Controls.Toolkit"隐藏状态栏
在 phone:PhoneApplicationPage修改
shell:SystemTray.IsVisible="False"添加进度条
<ProgressBar Name="pro" IsIndeterminate="True" Visibility="Collapsed"/>IsIndeterminate属性是是否呈现成未知值的进度条
添加底部程序栏菜单
  <!--底部Bar-->
  <phone:PhoneApplicationPage.ApplicationBar>
        <shell:ApplicationBar x:Name="AppBar" Opacity="1" BackgroundColor="#414146">
            <!--图形按钮Bar-->
            <shell:ApplicationBar.Buttons>
                <shell:ApplicationBarIconButton x:Name="share"
                    IconUri="/Assets/AppBar/share.png" Text="分享" />
                <shell:ApplicationBarIconButton x:Name="talk"
                    IconUri="/Assets/AppBar/edit.png" Text="评论"/>
            </shell:ApplicationBar.Buttons>
            <!--菜单列表Bar-->
            <shell:ApplicationBar.MenuItems>
                <shell:ApplicationBarMenuItem x:Name="light" Text="日间模式"  />
                <shell:ApplicationBarMenuItem x:Name="sharetoWeChat" Text="分享到微信"/>
            </shell:ApplicationBar.MenuItems>
        </shell:ApplicationBar>
    </phone:PhoneApplicationPage.ApplicationBar>
每一个菜单都有一个Click事件,用于处理用户点击事件
HttpWebRequest联网请求数据
    //发送请求
    private void getList_N(int pageindex, int pagesize)
    {
        string url = "http://www.ncuhome.cn/NewIndex2013/AjaxGetList.ashx?partID=394&pageindex=1&pagesize=10";
        request = (HttpWebRequest)WebRequest.Create(url);
        request.BeginGetResponse(new AsyncCallback(CallBack), null);
    }
    // 请求的异步回调函数
    private void CallBack(IAsyncResult ia)
    {
        response = (HttpWebResponse)request.EndGetResponse(ia);
        using (Stream stream = response.GetResponseStream())
        {
            StreamReader reader = new StreamReader(stream);
            string str = reader.ReadToEnd();

            // 相关数据处理……
            }

            // 更新UI
            Dispatcher.BeginInvoke(() =>
            {
                // 只能是在Dispatcher中才能更新UI

                MessageBox.Show(str);
                // 隐藏进度条
                this.pro.Visibility = System.Windows.Visibility.Collapsed;
            });
        }
    }
使用Newtonsoft.Json解析Json数据
     // 如果json字串是数组类型的(最外层为[])
    JArray ja = JArray.Parse(str);
    foreach (JObject j in ja)
    {
        var news = new NewsItem();
        news.ID = j["ID"].ToString();
        news.Content = j["Content"].ToString();

        newslist.Add(news);
    }
    // 如果json字串是对象类型的(最外层为{})
    //var jobject = JObject.Parse(str);
    //transtr = jobject[1]["ID"].ToString();
保存本地和读取本地Json序列化数据
    // 宏定义文件路径
    private const string LISTFILENAME = "local.json";

    // 序列化存储数据(Json和xml只是创建的序列类型不同)
    private async Task saveJsonData(List<NewsItem> newslist)
    {
        var serializer = new DataContractJsonSerializer(typeof(List<NewsItem>));
        // 序列化为xml格式
        //var serializer = new DataContractSerializer(typeof(List<NewsItem>));

        // 获取本地文件流
        using (var stream = await ApplicationData.Current.LocalFolder.OpenStreamForWriteAsync(
                            LISTFILENAME,
                            CreationCollisionOption.ReplaceExisting))
        {
            // 序列化写入数据
            serializer.WriteObject(stream, newslist);
        }
        //MessageBox.Show("Write data.txt succeeded!");
    }

    // 反序列化Json数据
    private async Task deserializerJsonAsync()
    {
        List<NewsItem> myNews;
        var jsonserializer = new DataContractJsonSerializer(typeof(List<NewsItem>));
        // var jsonserializer = new DataContractSerializer(typeof(List<NewsItem>));

        // 获取文件流
        using ( var stream =
                await ApplicationData.Current.LocalFolder.OpenStreamForReadAsync(LISTFILENAME))
       {
            // 反序列化读取数据
            myNews = (List<NewsItem>)jsonserializer.ReadObject(stream);
       }

        string content = string.Empty;
        //foreach (var n in myNews)
        //{
        //    content += string.Format("name:{0}, age:{1}, sex:{2}", n.ID, n.newstitle, n.Content);
        //}
        //MessageBox.Show(content);
    }
第二版(从点击列表项获取该项的文章ID)
获取LongListSelector点击项及项目数据
    <!--XAML文件中-->
    <phone:LongListSelector x:Name="Artile_List"
                            ItemsSource="{Binding Items}"
                            SelectionChanged="Longlist_selected">
        <phone:LongListSelector.ItemTemplate>
        <DataTemplate>
            <StackPanel Orientation="Horizontal" Grid.Row="0">
                <Image Source="{Binding imgUri}" MaxWidth="130" Height="100" Stretch="Fill" />
                <TextBlock Text="{Binding title}" Width="290" TextWrapping="Wrap" />
            </StackPanel>
        </DataTemplate>
    </phone:LongListSelector.ItemTemplate>
// C#文件中
private void Longlist_selected(object sender, SelectionChangedEventArgs e)
{
LongListSelector selector = sender as LongListSelector;
if (selector == null)
return;
DisplayItem data = selector.SelectedItem as DisplayItem;
if (data == null)
return;
MessageBox.Show("该文章的title为:"+ data.title);
}第三版(文章详情页布局)
页面导航和传值
    // 导航到目标页面
    this.NavigationService.Navigate(new Uri("/Detail.xaml,UriKind.Relative));

     // 传递值到目标页面
    this.NavigationService.Navigate(
                        new Uri(
                                "/Detail.xaml?id=" + data.id + "&title=" + data.title,
                                 UriKind.Relative));
    // 在目标页面接收值
    protected override void OnNavigatedTo(NavigationEventArgs e)
    {
        base.OnNavigatedTo(e);
        Article_id = this.NavigationContext.QueryString["id"];
        Article_title = this.NavigationContext.QueryString["title"];
    }
巧解TextBlock字数限制的问题
说明:由于TextBlock控件存在字数限制,导致多文字时显示不全,如果一篇文章都是用一个TextBlock来呈现,很容易出现这种Bug。
既然SDK给出了这样的限制,我们只有通过其他的方式来解决,我采用的是每一 段落 使用一个TextBlock,每个TextBlock又存在于一个LongListSelector的DataTemplate中,这样背景一致就看不出是多个TextBlock了。
同时这样做有一个好处,就是可以实现图文混排(下节介绍)。
    <!--文章段落列表-->
    <phone:LongListSelector x:Name="Detail_List" ItemsSource="{Binding Items}" Grid.Row="1">
        <phone:LongListSelector.ItemTemplate>
            <DataTemplate>
                <StackPanel>
                    <Image x:Name="image" Source="/Assets/picture.jpg" Margin="15,10,15,10"/>
                    <TextBlock x:Name="paragragh"
                                Text="祝全体老师和同学圣诞节快乐! Merry Christmas!"
                                Style="{StaticResource ArticleText}" TextWrapping="Wrap"/>
                </StackPanel>
            </DataTemplate>
        </phone:LongListSelector.ItemTemplate>
    </phone:LongListSelector>
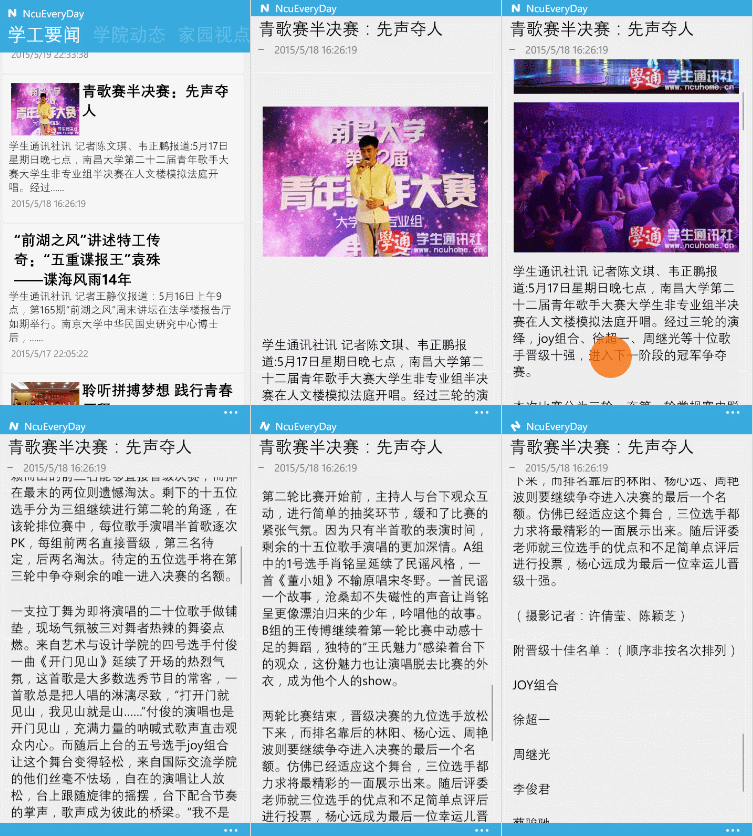
自适应文章图文混排
当我们获得一篇文章时,文章的结构是多变的,比如最常见的图文混排,在文字中间会有图片出现,如果我们硬编码UI,无法做到对每篇文章都适应。也有同学可能使用动态创建,当判断为图片是就创建一个Image标签,我使用的方法是定义一个 DataTemplate=TextBlock+Image 这样有图片就显示图片,没有就显示文字,整个放入到LongListSelector中的一项,可以自适应内容的多少,带有滚动视图,我相信大多数应用都是这么做的!
    <!--文章段落列表-->
    <phone:LongListSelector x:Name="Detail_List" ItemsSource="{Binding Items}" Grid.Row="1">
        <phone:LongListSelector.ItemTemplate>
            <DataTemplate>
                <StackPanel>
                    <Image x:Name="image" Source="/Assets/picture.jpg" Margin="15,10,15,10"/>
                    <TextBlock x:Name="paragragh"
                                Text="祝全体老师和同学圣诞节快乐! Merry Christmas!"
                                Style="{StaticResource ArticleText}" TextWrapping="Wrap"/>
                </StackPanel>
            </DataTemplate>
        </phone:LongListSelector.ItemTemplate>
    </phone:LongListSelector>
第四版(文章api接口-php服务器解析HTML)
说明:使用服务器解析HTML的好处:
* 可以减轻客户端的负担,服务器端解析更快
* 客户端只接收Json数据,数据体积小,节省流量,速度快
* 当网站改版后只需要修改服务器端接口,而不需要编码升级应用缺点:
* 需要服务器支持,Too Expensive~ Money!
=
对外接口(index.php)
    <?php
        require_once('./request.php');
        // 测试使用
        if(!isset($_GET['article_id']))
        {
            $article_id = 31083;
        }
        else{
            $article_id = $_GET['article_id'];
        }
        /* 根据id获取文章内容 */
        getArticle($article_id);
    ?>
内部处理(request.php)
    <?php
        /* 文章段落类*/
        class paragragh
        {
            public $imgUri = "";
            public $content = "";
            function __construct($img,$str)
            {
                $this->imgUri = $img;
                $this->content = $str;
            }
        };

        /* 解析HTML的主函数*/
        function getArticle($article_id)
        {
            $url = "http://www.ncuhome.cn/NewIndex2013/Article_detail.aspx?SubjectId=".$article_id;
            $contents = file_get_contents($url);
            //如果出现中文乱码使用下面代码
            //$getcontent = iconv("gb2312", "utf-8",$contents);
            $pos = strpos($contents,'utf-8');

            //获得文章主体部分,包括<div>标签和一些多余的空格
            $postb=strpos($contents,'<div class="eassy_main">')+24;
            $poste=strpos($contents,'<div class="replay">');
            $length=$poste-$postb;

            //进一步加工,得到只含有平行段落<p>的正文
            $pos = substr($contents,$postb,$length);
            $postb=strpos($pos,'<p>')+33;
            $poste=strpos($pos,'</div>')-26;
            $length=$poste-$postb;

            //正文部分,该层为并列的<p>标签
            $pos = substr($pos,$postb,$length);

            /* 段落数组*/
            $arr = array();

            $start = 0;

            // 循环解析每一段内容,并保存到array数组里,直到文章结束
            while ($start < $length-4)
            {
                /**截取从上一段末尾到整个末尾的部分*/
                $p = substr($pos, $start);


                /**解析包含图片的段落*/
                if(($is_img=strpos($p, 'src')) >0){
                    $img_start = $is_img+5;
                    $img_end = strpos($p,'title',$img_start)-2;
                    $imgUri = substr($p, $img_start,$img_end-$img_start);

                    /**定义一个对象保存该段内容*/
                    $para = new paragragh($imgUri,'');
                    /**将对象插入到数组末尾*/
                    array_push($arr, $para);
                    //定位下次搜索到当前位置
                    $start += $img_end;
                }

                /**解析文字第一段
                * 第一段与一般段落不同之处在于前面包含有<strong>XX学院</string>
                * 注意此处查找不能改为以下两种情况:
                * 1.($is_first=strpos($p, '<p><strong>')) >0'
                *   因为部分文章没有图片,首段查找<p><strong> == 0
                * 2.($is_first=strpos($p, '<p><strong>')) >=0'
                *   当找不到时默认为0,循环跳不出,后面的段落无法进行
                */
                elseif (($is_first=strpos($p, 'p><strong>')) >0) {
                    $first_start = $is_first+10;
                    $first_start2 = strpos($p, '</strong>')+9;
                    $xueyuan = substr($p, $first_start,$first_start2-$first_start-9);
                    $first_end = strpos($p, '</p>',$first_start);
                    $first = substr($p, $first_start2,$first_end-$first_start2);

                    $para = new paragragh('',$xueyuan.$first);
                    array_push($arr, $para);
                    //定位下次搜索到当前位置
                    $start += $first_end;
                }

                /**解析一般段落*/
                elseif(($is_normal=strpos($p, '<p>')) >0){
                    $normal_start = $is_normal+3;
                    $normal_end = strpos($p, '</p>',$normal_start);
                    $normal = substr($p, $normal_start,$normal_end-$normal_start);

                    if($normal != '<br/>')
                    {
                        $para = new paragragh('',$normal);
                        array_push($arr, $para);
                    }
                    //定位下次搜索到当前位置
                    $start += $normal_end;
                }else{
                    echo "没有记录";
                }

            }

            //echo "\n\n输出结果:\n";
            echo json_encode($arr,JSON_UNESCAPED_UNICODE);
        }
    ?>
代码太多,最终目的就是解析HTML生成只包含每一段落的集合Json数据。
注:原来直接请求网络的地址改为服务器接口地址
        public void get_Detail(String id)
        {
            // 使用本机调试
            String url = "http://192.168.1.102/n/index.php?article_id=" + id;

            request = (HttpWebRequest)WebRequest.Create(url);
            request.BeginGetResponse(new AsyncCallback(CallBack), null);
        }
第五版(文章api接口-使用本地解析HTML)
说明:使用本地(客户端)解析HTML的好处:
* 不依赖于服务器
* 服务器解析的缺点缺点:
* 服务器解析的优点~哈哈~
=
使用HtmlAgilityPack的Xpath语法解析HTML
需要添加引用HtmlAgilityPack
public void Html2List(String s)
{
HtmlDocument doc = new HtmlDocument();
/**载入HTML*/
doc.LoadHtml(s);
/**获取HMTL中指定的部分,即文章主体部分,使用XPath语法*/
HtmlNode node = doc.DocumentNode.SelectSingleNode(
"//*[@id=\"warpper\"]/div[1]/div[1]/div[2]/div[1]/div[2]");
/**循环解析每一段落*/
foreach (var n in node.SelectNodes(".//p/p"))
{
if (n.FirstChild.Name == "img")
{
String path = n.FirstChild.GetAttributeValue("src", "");
/**将解析到的数据存入到List中*/
detaillist.Add(new DetailItem { imgUri = path, paragragh = "" });
}
else if (n.FirstChild.Name == "strong")
{
detaillist.Add(new DetailItem { imgUri = "", paragragh = n.InnerText });
}
else
{
/**针对段落内容为<br/>的段落*/
if(n.InnerText == "")
continue;
else
{
/**去除部分文章中存在的( )字符串*/
/**使用using System.Text.RegularExpressions;中的正则表达式,一般适用于比较复杂的处理*/
//Regex reg = new Regex("[^nbsp;/g]");
//String out_string =Regex.Replace(n.InnerText, " ","");
/**使用字符串处理函数处理*/
String out_string = n.InnerText.Replace(" ","");
detaillist.Add(new DetailItem { imgUri = "", paragragh = out_string });
}
}
}
}当然,这只是初步的解析,后面还有更加详细的,在此学习方法。
注:虽然使用了本地解析,服务器解析部分仍然保留,且保持了统一的接口,需要调用服务器解析只需要改一句代码,万一哪天有钱买得起了呢~白日梦中~~
        // 使用本地解析HTML方式
            get_Detail(Article_id);
        // 使用服务器解析HTML方式
        //  get_Detail_1(Article_id);
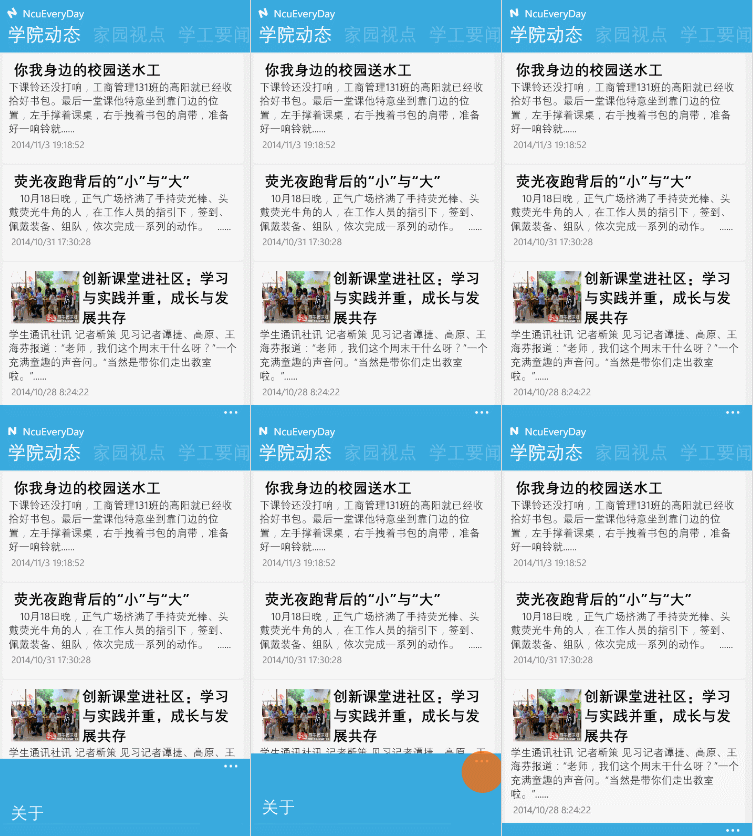
第六版(完善首页UI)
使用IValueConverter值转换器,动态调整TextBook的宽度
首页新闻列表中有的新闻项没有图片,当没有图片时,右边的标题TextBlock应该变宽以填充原来图片布局留下的空缺,所以TextBlock的宽度需要将Image的Url的值转化为宽度值,使用系统提供的IValueConverter。(当然,实现的方法很多,在此只是为了学习IValueConverter,采用此方法)
1.定义新类 ImageWidthToBlockWidth.cs
    namespace NcuEveryDay
    {
        /// <summary>
        /// 值转换类,用于调整主页面标题TextBlock宽度
        /// </summary>
        public class ImageWidthToBlockWidth : IValueConverter
        {
            //值从数据源到绑定目标的过程进行转换
            public object Convert(object value,
                                    Type targetType,
                                    object parameter,
                                    System.Globalization.CultureInfo culture)
            {
                /**传进来的值,即Binding的值*/
                var v = (string)value;

                /**对传入的值进行判断,返回相应的值*/
                /**如果图片uri为空,则标题的宽度就拉长以占据图片的位置*/
                if (v == "")
                {
                    return 420;
                }

                /**如果有图片,则标题的宽度设置为290*/
                return 290;
            }

            // 不常用,用在双向绑定中.当UI元素值改变时,返回到数据源把值转换回来
            public object ConvertBack(object value, Type targetType, object parameter,
                                        System.Globalization.CultureInfo culture)
            {
                throw new NotImplementedException();
            }
        }
    }
2.Resources中定义引用
    <phone:PhoneApplicationPage.Resources>
        <!--值转换类,将Image的sourse属性转化用于控制TextBlock的宽度-->
        <local:ImageWidthToBlockWidth x:Key="ImageWidthToBlockWidth"/>
    </phone:PhoneApplicationPage.Resources>
3.TextBlock中使用转换器
    <StackPanel Orientation="Horizontal" Grid.Row="0">
        <Image x:Name="image" Source="{Binding imgUri}" MaxWidth="130" MaxHeight="100" Stretch="Fill" />
        <TextBlock Text="{Binding title}"
                   TextWrapping="Wrap" Foreground="Black" FontSize="28" FontWeight="Bold"
                   Width="{Binding imgUri,Converter={StaticResource ImageWidthToBlockWidth}}"/>
    </StackPanel>
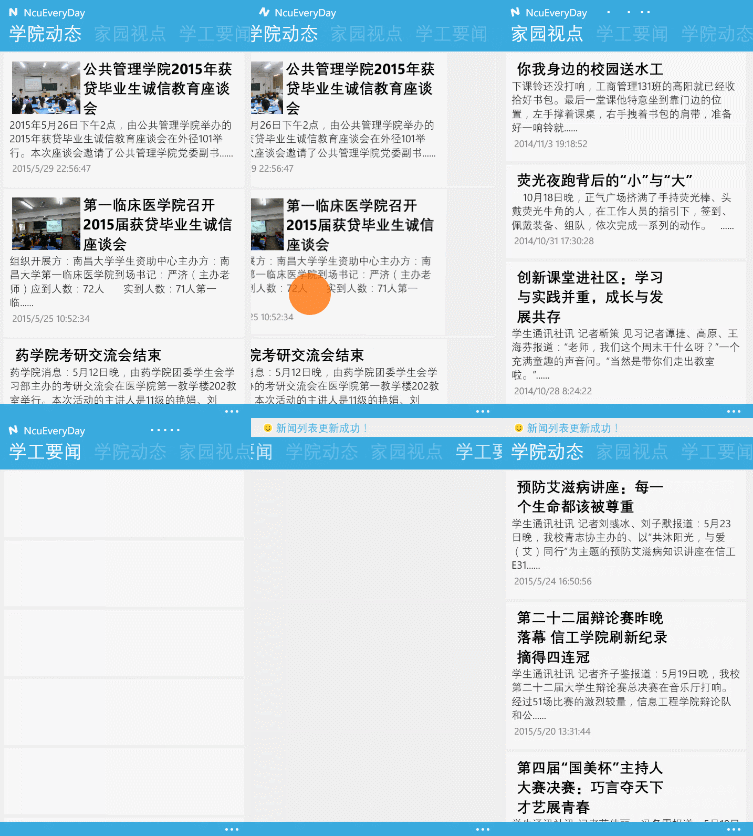
第七版(首页UI采用Pivot布局)
App.xaml自定义Pivot头部
注:完全参考于汪宇杰www.diaosbook.com《自定义Pivot头部》
    <Application.Resources>
        <Style x:Key="DiaosbookPivotStyle" TargetType="phone:Pivot">
            <Setter Property="Margin" Value="0"/>
            <Setter Property="Padding" Value="0"/>
            <Setter Property="Foreground" Value="{StaticResource PhoneForegroundBrush}"/>
            <Setter Property="Background" Value="Transparent"/>
            <Setter Property="ItemsPanel">
                <Setter.Value>
                    <ItemsPanelTemplate>
                        <Grid Margin="0,-28,0,0"/>
                    </ItemsPanelTemplate>
                </Setter.Value>
            </Setter>
            <Setter Property="Template">
                <Setter.Value>
                    <ControlTemplate TargetType="phone:Pivot">
                        <Grid HorizontalAlignment="{TemplateBinding HorizontalAlignment}"
                              VerticalAlignment="{TemplateBinding VerticalAlignment}">
                            <Grid.RowDefinitions>
                                <RowDefinition Height="Auto"/>
                                <RowDefinition Height="Auto"/>
                                <RowDefinition Height="*"/>
                            </Grid.RowDefinitions>

                            <Grid Background="#FF3AAADE" CacheMode="BitmapCache" Grid.RowSpan="2" />

                            <Grid Background="{TemplateBinding Background}"
                                  CacheMode="BitmapCache"
                                  Grid.Row="2" />

                            <ContentPresenter Grid.Row="0"
                                              ContentTemplate="{TemplateBinding TitleTemplate}"
                                              Content="{TemplateBinding Title}"
                                              Margin="17,10,0,2" />

                            <primitives:PivotHeadersControl
                                x:Name="HeadersListElement"
                                Grid.Row="1" Margin="-3,0,0,13"/>

                            <ItemsPresenter x:Name="PivotItemPresenter"
                                            Margin="{TemplateBinding Padding}"
                                            Grid.Row="2"/>
                        </Grid>
                    </ControlTemplate>
                </Setter.Value>
            </Setter>
        </Style>
    </Application.Resources>
接收Pivot滑动载入事件及页面索引
1.xaml中声明SelectionChanged事件
    <phone:Pivot Style="{StaticResource DiaosbookPivotStyle}"
                 SelectionChanged="SelectionChanged">
        <phone:PivotItem>
            <DataTemplate/>
        </phone:PivotItem>
    </phone:Pivot>
2.cs中实现事件
    private void SelectionChanged(object sender, SelectionChangedEventArgs e)
    {
        Pivot pivot = sender as Pivot;
        index = pivot.SelectedIndex;

        // 根据枢轴页索引操作
        switch(index)
        {
            case 0:
                partid = 394;LISTFILENAME="index0.json";
                break;
            case 1:
                break;
        }
}- 在PivotItem滑动进入时,可以对全局变量初始化,以使各个PivotItem公用一套变量和函数,当滑动进入时,就载入该页面的一套变量,从而简化操作,泛型适配,易于维护。
获取设备网络情况
    // 检测设备网络是否可用,不可用则toast通知
    if(!Microsoft.Phone.Net.NetworkInformation.DeviceNetworkInformation.IsNetworkAvailable)
    {
        var toast = new ToastPrompt();
        toast.Title = "提示:";
        toast.Message = "您的网络不可用!";
        toast.Background = new SolidColorBrush(Color.FromArgb(0xff,0xF0,0xA3,0x00));
        //toast.ImageSource = new BitmapImage(new Uri("/Toolkit.Content/ApplicationBar.Check.png", UriKind.Relative));
        toast.MillisecondsUntilHidden = 2000;
        toast.Show();
    }
    // IsCellularDataEnabled 是否开启了蜂窝网络
    // IsWiFiEnabled 是否开启了Wifi
使用Coding4Fun的ToastPrompt控件显示Toast通知
代码见《获取设备网络情况》
第八版(最终发布版)
解决一个请求还没完成时开始另一请求 崩溃 的Bug
CallBack中加入判断
        private void CallBack(IAsyncResult ia)
        {
            // 如果请求没有收到相应则直接返回
            if(request.HaveResponse == false)
            {
                return;
            }
            ……
        }
定义适用于全局的颜色值笔刷MyAppThemeBrush
App.xaml的Resources中加入
        <Color x:Key="MyAppThemeColor">#FF3AAADE</Color>
        <SolidColorBrush x:Key="MyAppThemeBrush" Color="{StaticResource MyAppThemeColor}" />
自定义“按两次退出”提示
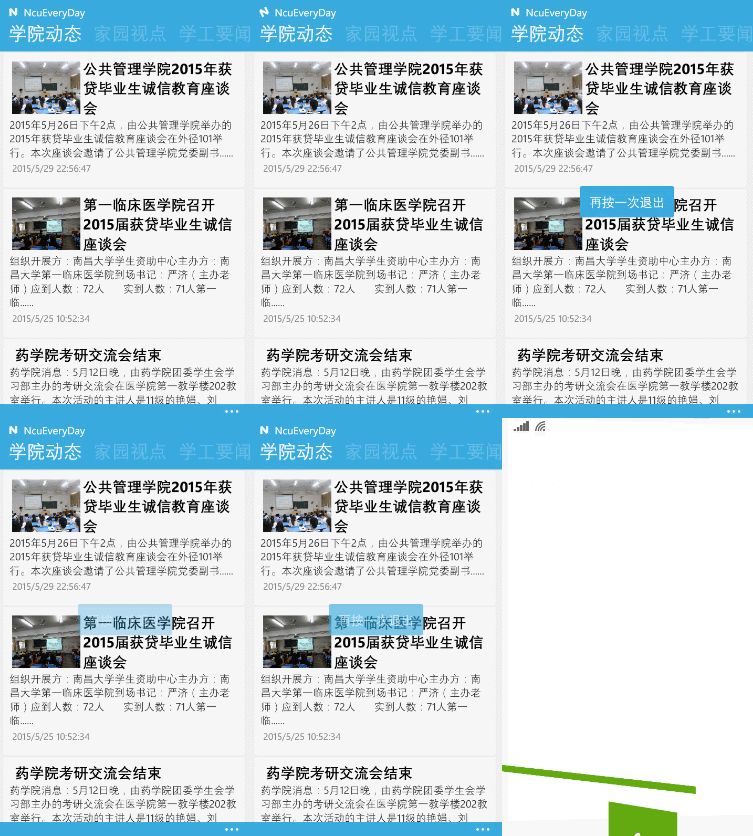
1.xaml中加入控件和动画配置
    <Border x:Name="tipBorder" Width="180" Height="60" BorderThickness="0" Background="#003AAADE" CornerRadius="5">
        <Border.Resources>
            <!--动画版-->
            <Storyboard x:Name="ExitBoard">
                <!--Border淡入淡出动画-->
                <ColorAnimationUsingKeyFrames
                        Storyboard.TargetProperty="(Border.Background).(SolidColorBrush.Color)"
                        Storyboard.TargetName="tipBorder">
                    <EasingColorKeyFrame KeyTime="0" Value="#333AAADE"/>
                    <EasingColorKeyFrame KeyTime="0:0:0.5" Value="#FF3AAADE"/>
                    <EasingColorKeyFrame KeyTime="0:0:1" Value="#FF3AAADE"/>
                    <EasingColorKeyFrame KeyTime="0:0:2" Value="#003AAADE"/>
                </ColorAnimationUsingKeyFrames>
                <!--文字淡入淡出动画-->
                <ColorAnimationUsingKeyFrames
                        Storyboard.TargetProperty="(TextBlock.Foreground).(SolidColorBrush.Color)"
                        Storyboard.TargetName="textBlock">
                    <EasingColorKeyFrame KeyTime="0" Value="#33FFFFFF"/>
                    <EasingColorKeyFrame KeyTime="0:0:0.5" Value="#FFFFFFFF"/>
                    <EasingColorKeyFrame KeyTime="0:0:1" Value="#FFFFFFFF"/>
                    <EasingColorKeyFrame KeyTime="0:0:2" Value="Transparent"/>
                </ColorAnimationUsingKeyFrames>
            </Storyboard>
        </Border.Resources>
        <TextBlock x:Name="textBlock" Text="再按一次退出" FontSize="24" TextAlignment="Center"
                   HorizontalAlignment="Center" VerticalAlignment="Center"
                   Foreground="#00FFFFFF"/>
    </Border>
2.全局定时器和标志变量
        DispatcherTimer timer = new DispatcherTimer(); // 定时器,用于按两次退出计时
        bool isExit = false; // 是否点击了一次退出键
3.构造函数中加入定时器Timer
        // 设定定时器的时间量
        timer.Interval = TimeSpan.FromSeconds(2);
        // 定时器时间结束时执行
        timer.Tick += timer_Tick;
4.重构返回键点击事件OnBackKeyPress
        // 屏蔽点击一次返回键,判断是否点击了两次返回键
        protected override void OnBackKeyPress(System.ComponentModel.CancelEventArgs e)
        {
            base.OnBackKeyPress(e);
            if (!isExit)
            {
                isExit = true;
                // 开始显示toast动画
                this.ExitBoard.Begin();
                // 定时开始
                timer.Start();
                // 取消退出事件
                e.Cancel = true;
            }
            else
            {
                timer.Stop();
                this.ExitBoard.Stop();
            }
        }
5.实现定时器结束事件timer_Tick
        // 定时器时间结束时调用
        void timer_Tick(object sender, EventArgs e)
        {
            if (isExit)
            {
                isExit = false;
                this.ExitBoard.Stop();
                timer.Stop();
            }
        }
自定义顶部topTip通知
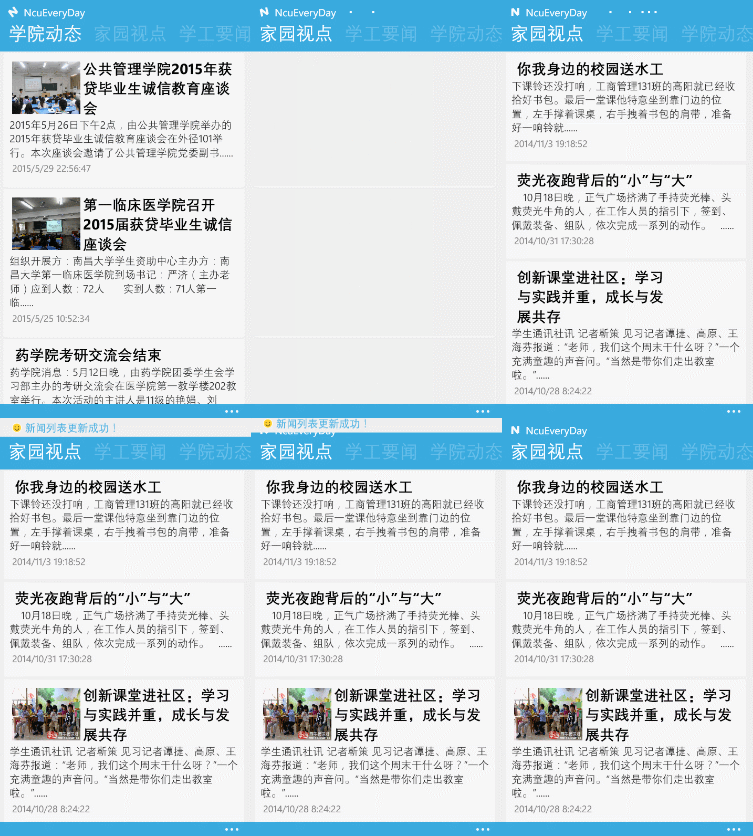
* 在使用Coding4Fun的ToastPromp控件时会与之前的“按两次退出”控件冲突,且ToastPromp控件也不是很美观,所以决定自定义,工具:VS自带的Blend
=
1.xaml中定义控件(直接放在根Grid里)
    <Border x:Name="topTip" Height="38" Background="#FFEBECEC" VerticalAlignment="Top" Grid.ColumnSpan="2"
            Margin="0,-40,0,0"
            RenderTransformOrigin="0.5,0.5" >
        <Border.Resources>
            <!--下降出现上升消失的动画-->
            <Storyboard x:Name="topTipAnimation">
                <DoubleAnimationUsingKeyFrames
                 Storyboard.TargetProperty="(UIElement.RenderTransform).(CompositeTransform.TranslateY)"
                 Storyboard.TargetName="topTip">
                    <EasingDoubleKeyFrame KeyTime="0" Value="0"/>
                    <EasingDoubleKeyFrame KeyTime="0:0:0.3" Value="39"/>
                    <EasingDoubleKeyFrame KeyTime="0:0:1.5" Value="39"/>
                    <EasingDoubleKeyFrame KeyTime="0:0:2.8" Value="0">
                        <EasingDoubleKeyFrame.EasingFunction>
                            <CircleEase EasingMode="EaseIn"/>
                        </EasingDoubleKeyFrame.EasingFunction>
                    </EasingDoubleKeyFrame>
                </DoubleAnimationUsingKeyFrames>
            </Storyboard>
        </Border.Resources>
        <Border.RenderTransform>
            <CompositeTransform/>
        </Border.RenderTransform>
        <TextBlock x:Name="topTipText"
                    Text="☂ 您的网络不可用"
                    FontSize="20"
                    VerticalAlignment="Center"
                    Margin="24,0,0,0"/>
    </Border>
2.cs中调用
        // 通过topTip提示列表更新成功
        this.topTipText.Text = "☺ 新闻列表更新成功!";
        this.topTipAnimation.Begin();
注:提示文字可以很方便的设置,使用简洁有力!越来越喜欢自己啦~~
谈谈发布
说到发布就不想再吐槽各种坑了,让我弄了一个晚上加一个早上,(学校晚上还断电,这让程序猿怎么活~)话说第二天8点多的火车票,放假之前一定要发布,嗯,当时是这样想的~
- 修改编译方案,修改为Release版,嗯,ARM吧,好像AnyCPU也可以,时间急没试~
- 重新编译一遍,用真机调试一下,真机直接打开测试一下,没问题下一步
- 项目->应用商店->启动Windows应用程序认证包(竟然让我更新!都什么时候了!……原来直接跳过更新也可以。。T_T~),认证完以后绿色通过就没有问题啦,当然如果出现红色叉叉自己解决了问题再来~表示没遇到~~
WMAppManifest.xml配置。
应用程序UI 这个,没什么要注意的
重点说一下 打包:
作者 ——–随便
发布者 ——和Windows开发者账户名称一致。
应用ID ——这里不改
发布者ID —-进入Windows Phone DevCenter,查看自己的信息,有ID这一项,拿回来修改成这个
语言什么的……
Package.appxmanifest配置(主目录里,从来没注意过,都没发现T_T)
是不是和刚刚那个很像,原来这个才是主角,泪奔啦~
也是要注意 打包:
版本和发布者要改,其他的不改好了,最后编译一遍就可以上传啦~~
编译一遍,再次通过Windows应用程序认证包验证一遍,全绿色,没问题啦,哈哈,没那么简单!
当我填好信息打算发布的最后一步,人家报个错!!!
“认证包与上传程序包内发布者不一致:a3c169be-655b-……”
再 Windows应用程序认证包 一盘发现发布者真的是不对,是本机默认的”01“用户
这家伙搞的,我回来不知道修改了多少次WMAppManifest.xml和Package.appxmanifest都没能把这01改成WangPengDev(我的开发者名称),直到深夜不争气电脑没油了T_T,我只能怪这学校太小气了,电都不给~~~呜呜
还没完,不到6点,来电了,果断爬起来改Bug,程序猿精神可嘉呀~
又试了几遍无果~万能的百度亮了!经过一番搜索,原来是要回到发布的上一步,找到程序ID和发布者ID,再选择Package.appxmanifest右键->打开方式->xml编辑器打开->T_T原来就在这里,修改了无数遍的Publisher竟然还是01,总算找到你了,坑货!!~
不说了,这两个改好了一点问题都没有啦已经7点了,回家罗~~
=
<Identity Name="32……gDev.……eryDay" Publisher="CN=28……CD5777" Version="1.0.0.1" /> 2015.01.23
汪鹏





 1458
1458

 被折叠的 条评论
为什么被折叠?


