


使用mybatis generator自动生成代码,生成项目所需要的Model层 、 Mapper层、mapping映射文件(本文件设置属性将映射文件XML转换成Java类)。下图是:代码生成器
<?xml version="1.0" encoding="UTF-8"?>
<!DOCTYPE generatorConfiguration PUBLIC "-//mybatis.org//DTD MyBatis Generator Configuration 1.0//EN" "http://mybatis.org/dtd/mybatis-org.mybatis.generator-config_1_0.dtd">
<generatorConfiguration>
    <!-- 数据库驱动:选择你的本地硬盘上面的数据库驱动包-->
    <classPathEntry  location="E:\ProgramData\repo\com\oracle\ojdbc6\11.2.0.3\ojdbc6-11.2.0.3.jar"/>
    <!--
    context:生成一组对象的环境
    id:必选,上下文id,用于在生成错误时提示
    defaultModelType:指定生成对象的样式
        1,conditional:类似hierarchical;
        2,flat:所有内容(主键,blob)等全部生成在一个对象中;
        3,hierarchical:主键生成一个XXKey对象(key class),Blob等单独生成一个对象,其他简单属性在一个对象中(record class)
    targetRuntime:
        1,MyBatis3:默认的值,生成基于MyBatis3.x以上版本的内容,包括XXXBySample;
        2,MyBatis3Simple:类似MyBatis3,只是不生成XXXBySample;
    introspectedColumnImpl:类全限定名,用于扩展MBG
    -->
    <context id="DB2Tables"  targetRuntime="MyBatis3">
        <!-- 生成的Java文件的编码 -->
        <property name="javaFileEncoding" value="UTF-8"/>
        <!-- 格式化java代码 -->
        <property name="javaFormatter" value="org.mybatis.generator.api.dom.DefaultJavaFormatter"/>
        <!-- 格式化XML代码 -->
        <property name="xmlFormatter" value="org.mybatis.generator.api.dom.DefaultXmlFormatter"/>

        <!-- beginningDelimiter和endingDelimiter:指明数据库的用于标记数据库对象名的符号,比如ORACLE就是双引号,MYSQL默认是`反引号; -->
        <property name="beginningDelimiter" value="`"/>
        <property name="endingDelimiter" value="`"/>

        <!-- 这里的type里写的是你的实现类的类全路径>
        <commentGenerator type="org.mybatis.org.mybatis.generator.MyCommentGenerator" >
            <property name="suppressDate" value="true"/-->
            <!-- 是否去除自动生成的注释 true:是 : false:否 >
            <property name="suppressAllComments" value="true"/>
        </commentGenerator-->
        <commentGenerator type="org.mybatis.generator.MyCommentGenerator" >
            <property name="suppressDate" value="false"/>
            <!-- 是否去除自动生成的注释 true:是 : false:否 -->
            <property name="suppressAllComments" value="false"/>
        </commentGenerator>

        <!--数据库链接URL,用户名、密码 -->
        <jdbcConnection driverClass="oracle.jdbc.driver.OracleDriver" connectionURL="jdbc:oracle:thin:@10.0.5.24:1521:orcl" userId="anytxn_v2_dev" password="jrx123">
            <!-- 这里面可以设置property属性,每一个property属性都设置到配置的Driver上 -->
            <!-- 针对oracle数据库 需要增加下面配置才能生成注释-->
            <property name="remarksReporting" value="true"></property>
        </jdbcConnection>

        <!-- java类型处理器
        用于处理DB中的类型到Java中的类型,默认使用JavaTypeResolverDefaultImpl;
        注意一点,默认会先尝试使用Integer,Long,Short等来对应DECIMAL和 NUMERIC数据类型;
        -->
        <javaTypeResolver>
            <!--
                true:使用BigDecimal对应DECIMAL和 NUMERIC数据类型
                false:默认,
                    scale>0;length>18:使用BigDecimal;
                    scale=0;length[10,18]:使用Long;
                    scale=0;length[5,9]:使用Integer;
                    scale=0;length<5:使用Short;
             -->
            <property name="forceBigDecimals" value="false"/>
        </javaTypeResolver>

        <!-- 生成模型的包名和位置-->
        <!-- java模型创建器,是必须要的元素
            负责:1,key类(见context的defaultModelType);2,java类;3,查询类
            targetPackage:生成的类要放的包,真实的包受enableSubPackages属性控制;
            targetProject:目标项目,指定一个存在的目录下,生成的内容会放到指定目录中,如果目录不存在,MBG不会自动建目录
         -->
        <javaModelGenerator targetPackage="com.jrx.anytxn.param.common.example.model" targetProject="src/test/java">
            <property name="enableSubPackages" value="true"/>
            <property name="trimStrings" value="true"/>
        </javaModelGenerator>

        <!-- 生成映射文件的包名和位置-->
        <!-- 生成SQL map的XML文件生成器,
            注意,在Mybatis3之后,我们可以使用mapper.xml文件+Mapper接口(或者不用mapper接口),
                或者只使用Mapper接口+Annotation,所以,如果 javaClientGenerator配置中配置了需要生成XML的话,这个元素就必须配置
            targetPackage/targetProject:同javaModelGenerator
         -->
        <sqlMapGenerator targetPackage="mapping" targetProject="src/test/resources">
            <property name="enableSubPackages" value="true"/>
        </sqlMapGenerator>

        <!-- 生成DAO的包名和位置-->
        <!-- 对于mybatis来说,即生成Mapper接口,注意,如果没有配置该元素,那么默认不会生成Mapper接口
            targetPackage/targetProject:同javaModelGenerator
            type:选择怎么生成mapper接口(在MyBatis3/MyBatis3Simple下):
                1,ANNOTATEDMAPPER:会生成使用Mapper接口+Annotation的方式创建(SQL生成在annotation中),不会生成对应的XML;
                2,MIXEDMAPPER:使用混合配置,会生成Mapper接口,并适当添加合适的Annotation,但是XML会生成在XML中;
                3,XMLMAPPER:会生成Mapper接口,接口完全依赖XML;
            注意,如果context是MyBatis3Simple:只支持ANNOTATEDMAPPER和XMLMAPPER
        -->
        <javaClientGenerator type="ANNOTATEDMAPPER" targetPackage="com.jrx.anytxn.param.common.example.mapper" targetProject="src/test/java">
            <property name="enableSubPackages" value="true"/>
        </javaClientGenerator>

        <!-- 要生成的表 tableName是数据库中的表名或视图名 domainObjectName是实体类名-->
        <!-- 选择一个table来生成相关文件,可以有一个或多个table,必须要有table元素
            选择的table会生成一下文件:
            1,SQL map文件
            2,生成一个主键类;
            3,除了BLOB和主键的其他字段的类;
            4,包含BLOB的类;
            5,一个用户生成动态查询的条件类(selectByExample, deleteByExample),可选;
            6,Mapper接口(可选)

            tableName(必要):要生成对象的表名;
            注意:大小写敏感问题。正常情况下,MBG会自动的去识别数据库标识符的大小写敏感度,在一般情况下,MBG会
                根据设置的schema,catalog或tablename去查询数据表,按照下面的流程:
                1,如果schema,catalog或tablename中有空格,那么设置的是什么格式,就精确的使用指定的大小写格式去查询;
                2,否则,如果数据库的标识符使用大写的,那么MBG自动把表名变成大写再查找;
                3,否则,如果数据库的标识符使用小写的,那么MBG自动把表名变成小写再查找;
                4,否则,使用指定的大小写格式查询;
            另外的,如果在创建表的时候,使用的""把数据库对象规定大小写,就算数据库标识符是使用的大写,在这种情况下也会使用给定的大小写来创建表名;
            这个时候,请设置delimitIdentifiers="true"即可保留大小写格式;

            可选:
            1,schema:数据库的schema;
            2,catalog:数据库的catalog;
            3,alias:为数据表设置的别名,如果设置了alias,那么生成的所有的SELECT SQL语句中,列名会变成:alias_actualColumnName
            4,domainObjectName:生成的domain类的名字,如果不设置,直接使用表名作为domain类的名字;可以设置为somepck.domainName,那么会自动把domainName类再放到somepck包里面;
            5,enableInsert(默认true):指定是否生成insert语句;
            6,enableSelectByPrimaryKey(默认true):指定是否生成按照主键查询对象的语句(就是getById或get);
            7,enableSelectByExample(默认true):MyBatis3Simple为false,指定是否生成动态查询语句;
            8,enableUpdateByPrimaryKey(默认true):指定是否生成按照主键修改对象的语句(即update);
            9,enableDeleteByPrimaryKey(默认true):指定是否生成按照主键删除对象的语句(即delete);
            10,enableDeleteByExample(默认true):MyBatis3Simple为false,指定是否生成动态删除语句;
            11,enableCountByExample(默认true):MyBatis3Simple为false,指定是否生成动态查询总条数语句(用于分页的总条数查询);
            12,enableUpdateByExample(默认true):MyBatis3Simple为false,指定是否生成动态修改语句(只修改对象中不为空的属性);
            13,modelType:参考context元素的defaultModelType,相当于覆盖;
            14,delimitIdentifiers:参考tableName的解释,注意,默认的delimitIdentifiers是双引号,如果类似MYSQL这样的数据库,使用的是`(反引号,那么还需要设置context的beginningDelimiter和endingDelimiter属性)
            15,delimitAllColumns:设置是否所有生成的SQL中的列名都使用标识符引起来。默认为false,delimitIdentifiers参考context的属性

            注意,table里面很多参数都是对javaModelGenerator,context等元素的默认属性的一个复写;
         -->
        <table tableName="PR_CC_AUTH_LMT_USE_TABLE" domainObjectName="PrCcAuthLmtUseTable" enableCountByExample="false" enableUpdateByExample="false" enableDeleteByExample="false" enableSelectByExample="false" selectByExampleQueryId="false"/>
        <table tableName="PR_CC_AUTH_LMT_USE_TAB_HIS" domainObjectName="PrCcAuthLmtUseTableHistory" enableCountByExample="false" enableUpdateByExample="false" enableDeleteByExample="false" enableSelectByExample="false" selectByExampleQueryId="false"/>

        <table tableName="PR_CC_AUTHTYPE_LMT_USE_TABLE" domainObjectName="PrCcAuthtypeLmtUseTable" enableCountByExample="false" enableUpdateByExample="false" enableDeleteByExample="false" enableSelectByExample="false" selectByExampleQueryId="false"/>
        <table tableName="PR_CC_AUTHTYPE_LMT_USE_TAB_HIS" domainObjectName="PrCcAuthtypeLmtUseTableHistory" enableCountByExample="false" enableUpdateByExample="false" enableDeleteByExample="false" enableSelectByExample="false" selectByExampleQueryId="false"/>

        <table tableName="PR_CC_LMT_TYP_TABLE" domainObjectName="PrCcLmtTypTable" enableCountByExample="false" enableUpdateByExample="false" enableDeleteByExample="false" enableSelectByExample="false" selectByExampleQueryId="false"/>
        <table tableName="PR_CC_LMT_TYP_TAB_HIS" domainObjectName="PrCcLmtTypTableHistory" enableCountByExample="false" enableUpdateByExample="false" enableDeleteByExample="false" enableSelectByExample="false" selectByExampleQueryId="false"/>

        <table tableName="PR_CC_LMT_TEMPLATE_TABLE" domainObjectName="PrCcLmtTemplateTable" enableCountByExample="false" enableUpdateByExample="false" enableDeleteByExample="false" enableSelectByExample="false" selectByExampleQueryId="false"/>
        <table tableName="PR_CC_LMT_TEMPLATE_TYP_TABLE" domainObjectName="PrCcLmtTemplateTypTable" enableCountByExample="false" enableUpdateByExample="false" enableDeleteByExample="false" enableSelectByExample="false" selectByExampleQueryId="false"/>

        <table tableName="PR_CC_DELIN_CTRL_TAB" domainObjectName="PrCcDelinquencyControlTable" enableCountByExample="false" enableUpdateByExample="false" enableDeleteByExample="false" enableSelectByExample="false" selectByExampleQueryId="false"/>
        <table tableName="PR_CC_DELIN_CTRL_DTL_TAB" domainObjectName="PrCcDelinquencyControlDetailTable" enableCountByExample="false" enableUpdateByExample="false" enableDeleteByExample="false" enableSelectByExample="false" selectByExampleQueryId="false"/>


    </context>
</generatorConfiguration>
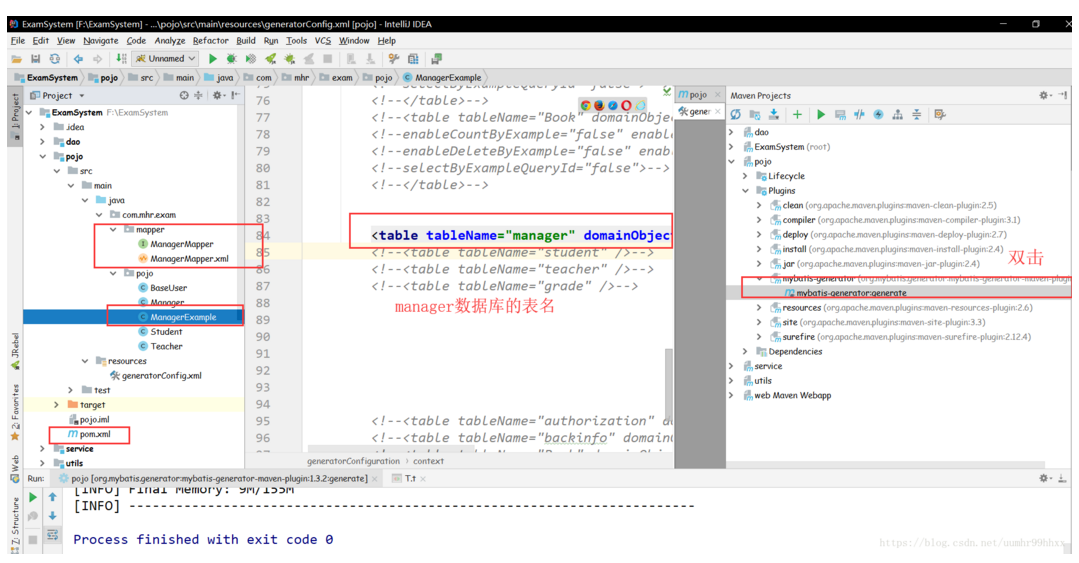
如何操作自动生成器,步骤如下:
- 首先修改并选择自己本地的数据库驱动包,然后修改数据库的URL,用户名,密码。
- 然后修改要生成Model层、Mapper层的包路径,和生成文件的存放的路径(targetPackage:生成的类要放的包,真实的包受enableSubPackages属性控制;targetProject:目标项目,指定一个存在的目录下,生成的内容会放到指定目录中,如果目录不存在,MBG不会自动建目录)
- 在table中写自己需要生成的数据库表名和实体类型

4. 双击mybatis-generator便能执行此文件。


 1372
1372


 被折叠的 条评论
为什么被折叠?
被折叠的 条评论
为什么被折叠?
 到【灌水乐园】发言


