


1、安装mysql之前需要确保系统中有libaio依赖,使用如下命令:
shell> rpm -qa | grep -i libaio
libaio-0.3.109-13.el7.x86_64
如果没有先下载安装
打开 https://pkgs.org/download/libaio ,根据操作系统选择相应的安装包,下载到本地
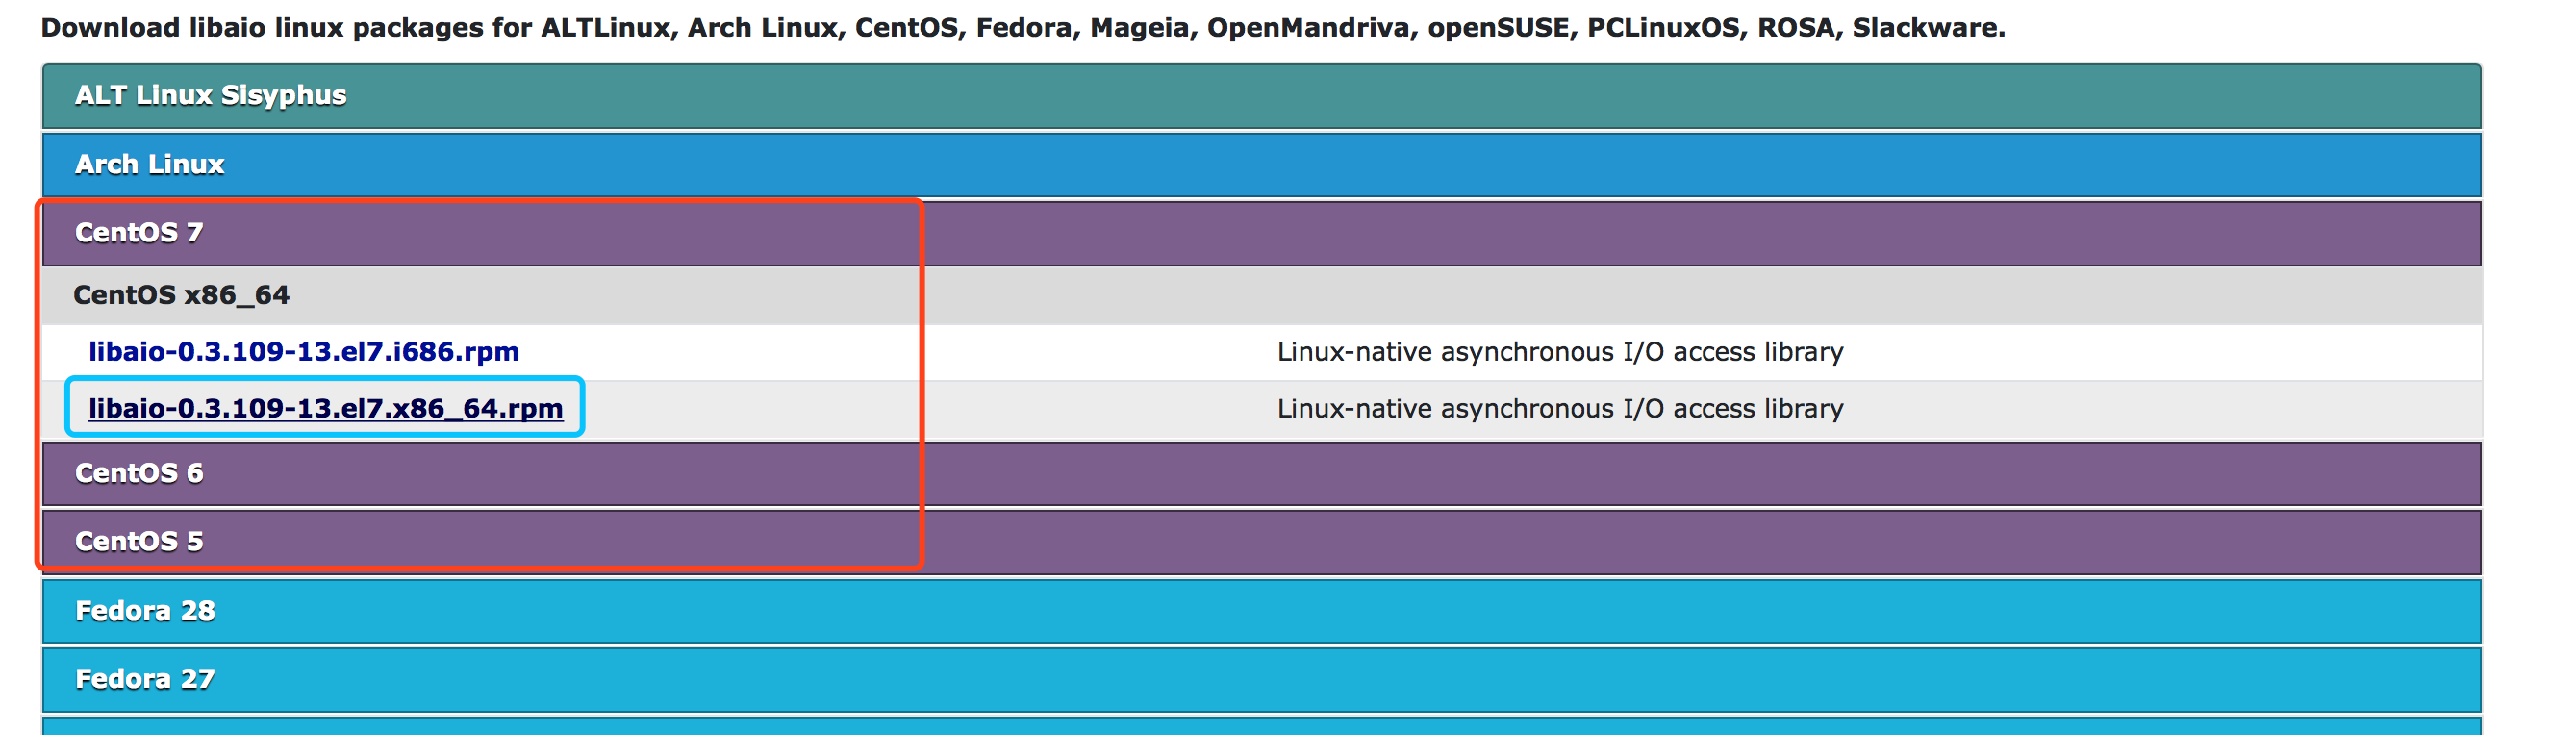
shell> rpm -Uvh libaio-0.3.109-13.el7.x86_64.rpm
Preparing...                          ################################# [100%]
Updating / installing...
   1:libaio-0.3.109-13.el7            ################################# [100%]
2、检查是否安装老版本的MySQL和mariadb,如果有先卸载,确保不存在 /etc/my.cnf 文件
shell> rpm -qa | grep mysql
shell> rpm -qa | grep mariadb
mariadb-libs-5.5.52-1.el7.x86_64
shell> yum remove mariadb-libs
... ...
Removed:
  mariadb-libs.x86_64 1:5.5.52-1.el7

Dependency Removed:
  postfix.x86_64 2:2.10.1-6.el7                  redhat-lsb-core.x86_64 0:4.1-27.el7.centos.1

Complete!
shell> rpm -qa | grep mariadb

shell> ll /etc/my*
ls: cannot access /etc/my*: No such file or directory
如果不想删除依赖
shell> rpm -e –nodeps mariadb-libs3、下载MySQL安装包
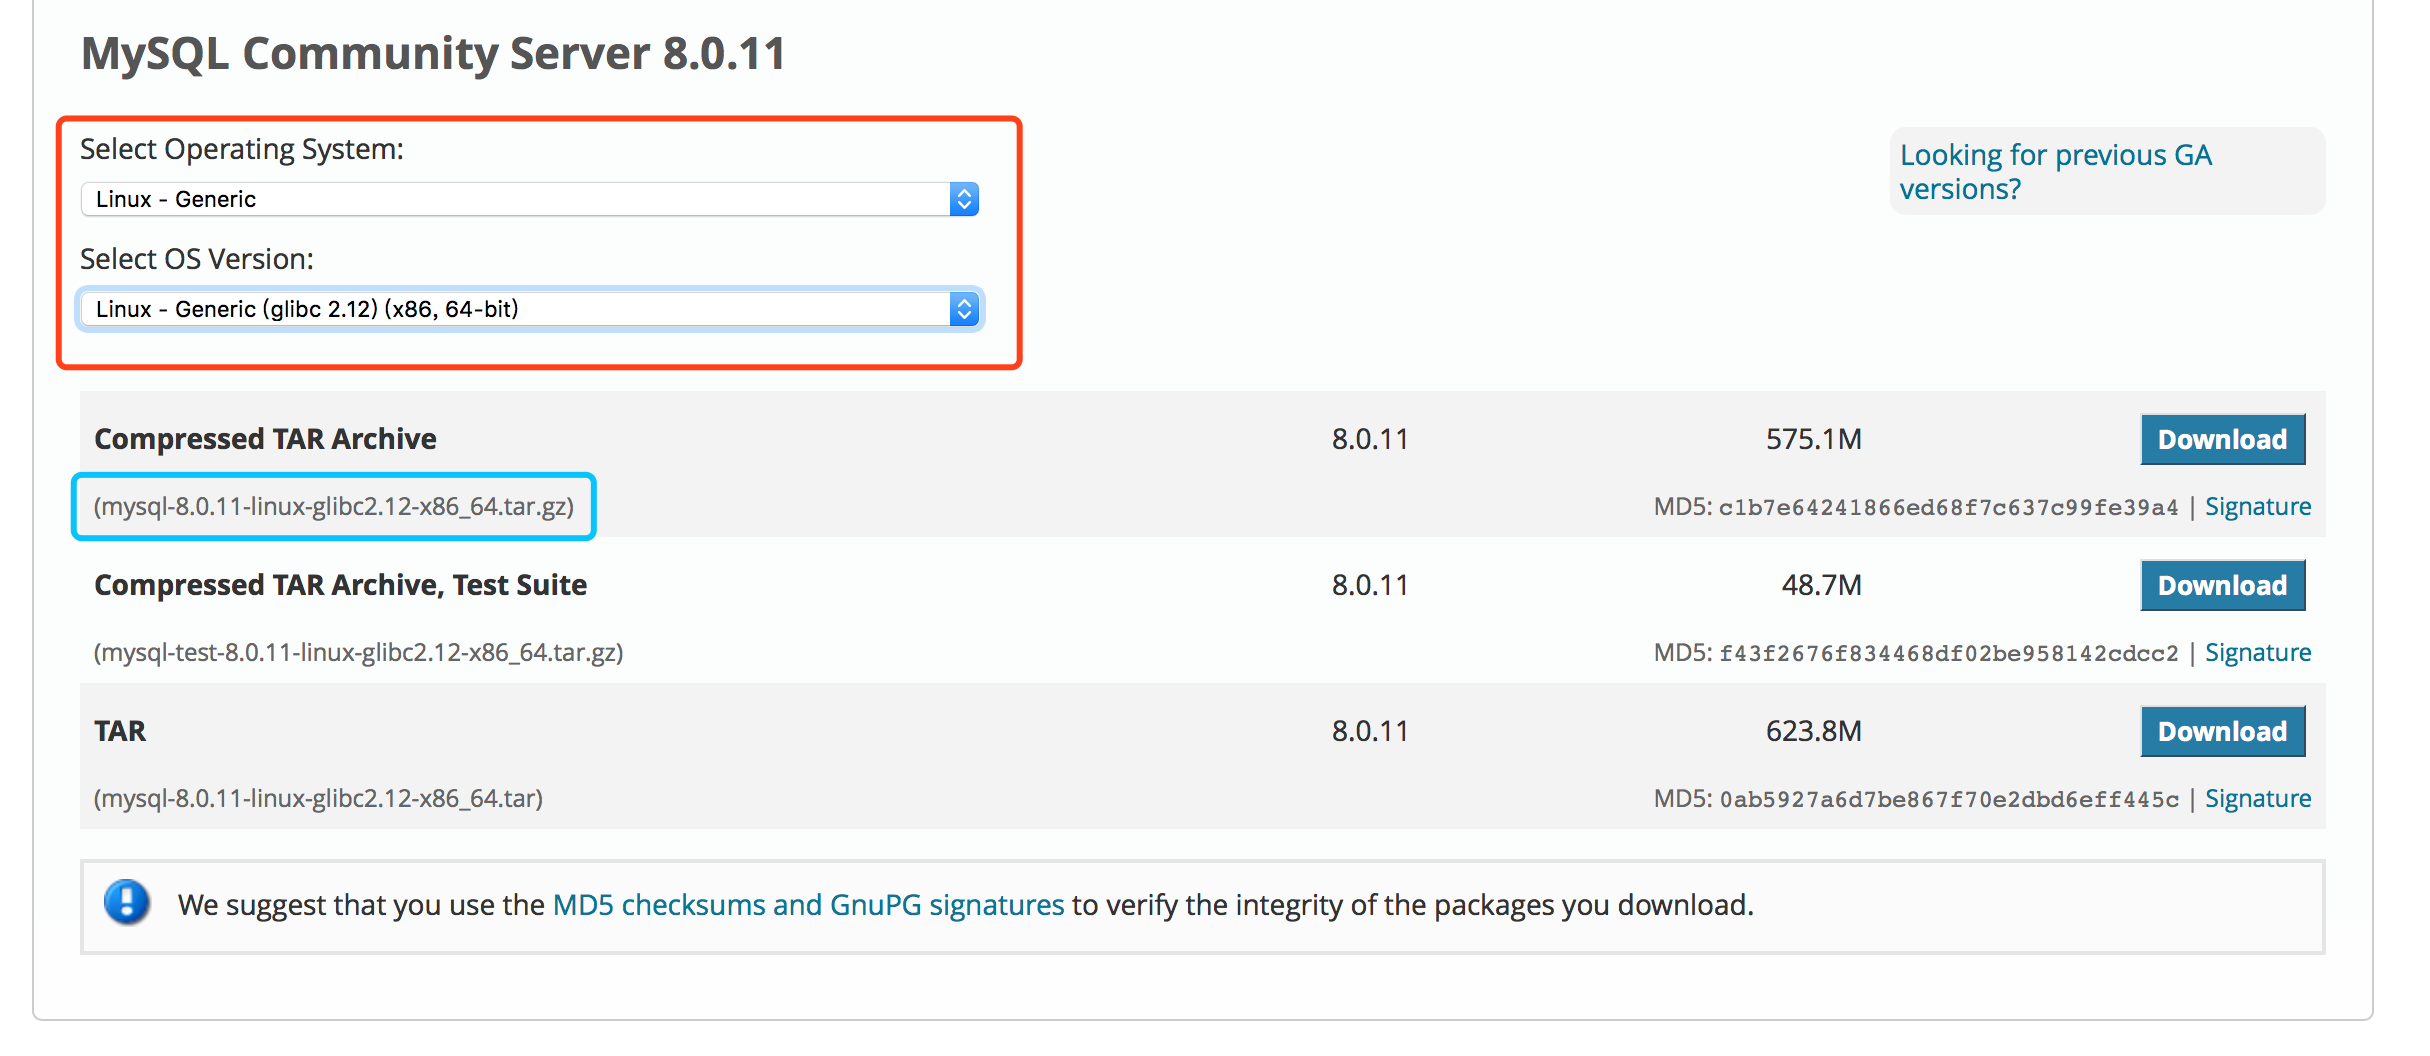
打开 https://dev.mysql.com/downloads/mysql/ ,根据相应的操作系统选择安装包下载
4、将mysql安装包解压到指定目录,命令如下:
shell> tar -zxvf mysql-8.0.11-linux-glibc2.12-x86_64.tar.gz -C /usr/local
shell> cd /usr/local/
shell> ll | grep mysql-8.0
drwxr-xr-x. 9 root root        129 Jun 29 17:10 mysql-8.0.11-linux-glibc2.12-x86_64
5、为mysql安装目录创建软链接
shell> ln -s mysql-8.0.11-linux-glibc2.12-x86_64 mysql
shell> ll | grep mysql
lrwxrwxrwx. 1 root root  35 Jun 29 17:14 mysql -> mysql-8.0.11-linux-glibc2.12-x86_64
drwxr-xr-x. 9 root root 129 Jun 29 17:10 mysql-8.0.11-linux-glibc2.12-x86_64
6、为centos添加mysql用户组和mysql用户(-s /bin/false参数指定mysql用户仅拥有所有权,而没有登录权限):
shell> groupadd mysql
shell> useradd -r -g mysql -s /bin/false mysql
7、修改当前目录拥有者为新建的mysql用户,命令如下
shell> cd /usr/local/
shell> chown -R mysql:mysql ./mysql/
8、安装MySQL
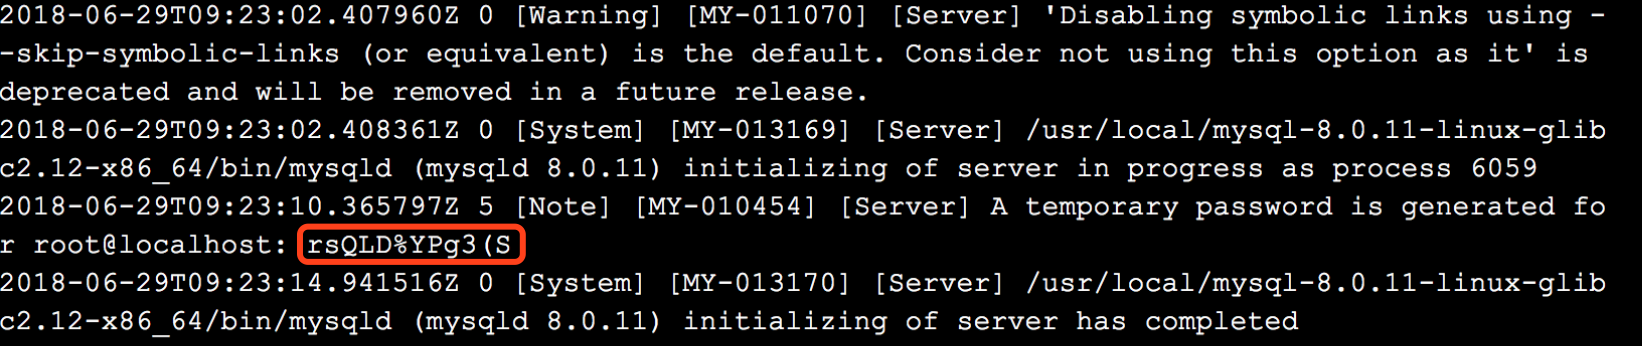
注意参数配置数据目录。安装完成,出现如下信息,将随机生成的登录密码记录下来:
shell> cd /usr/local/mysql
shell> ./bin/mysqld --user=mysql --basedir=/usr/local/mysql --datadir=/usr/local/mysql/data --initialize
2018-06-29T09:23:02.407960Z 0 [Warning] [MY-011070] [Server] 'Disabling symbolic links using --skip-symbolic-links (or equivalent) is the default. Consider not using this option as it' is deprecated and will be removed in a future release.
2018-06-29T09:23:02.408361Z 0 [System] [MY-013169] [Server] /usr/local/mysql-8.0.11-linux-glibc2.12-x86_64/bin/mysqld (mysqld 8.0.11) initializing of server in progress as process 6059
2018-06-29T09:23:10.365797Z 5 [Note] [MY-010454] [Server] A temporary password is generated for root@localhost: rsQLD%YPg3(S
9、修改配置文件 vim /etc/my.cnf
[mysqld]
datadir=/usr/local/mysql/data
socket=/usr/local/mysql/data/mysql.sock
sql_mode=STRICT_TRANS_TABLES,NO_ZERO_IN_DATE,NO_ZERO_DATE,ERROR_FOR_DIVISION_BY_ZERO,NO_AUTO_CREATE_USER,NO_ENGINE_SUBSTITUTION

# Disabling symbolic-links is recommended to prevent assorted security risks
symbolic-links=0

log-error=/var/log/mysqld.log
pid-file=/usr/local/mysql/data/mysqld.pid

[client]
socket=/usr/local/mysql/data/mysql.sock
10、开启mysql服务
shell> cd /usr/local/mysql
shell> ./support-files/mysql.server start
Starting MySQL.Logging to '/usr/local/mysql/data/iZwz9d8weeo8h026gou7vuZ.err'.
 SUCCESS!
如果有错误,检查并修改 /usr/local/mysql/support-files/mysql.server文件
basedir=/usr/local/mysql
datadir=/usr/local/mysql/data
11、将mysql进程放入系统进程中
shell> cp support-files/mysql.server /etc/init.d/mysqld12、重新启动mysql服务
shell> service mysqld restart
Shutting down MySQL.. SUCCESS!
Starting MySQL. SUCCESS!
13、使用随机密码登录mysql数据库,等待系统提示,输入随机密码,即可登录
shell> /usr/local/mysql/bin/mysql -u root -p
Enter password: rsQLD%YPg3(S
Welcome to the MySQL monitor.  Commands end with ; or \g.
Your MySQL connection id is 8
Server version: 8.0.11

Copyright (c) 2000, 2018, Oracle and/or its affiliates. All rights reserved.

Oracle is a registered trademark of Oracle Corporation and/or its
affiliates. Other names may be trademarks of their respective
owners.

Type 'help;' or '\h' for help. Type '\c' to clear the current input statement.

mysql>
14、进入mysql操作行,为root用户设置新密码(我设为Root@1234)
mysql> alter user 'root'@'localhost' identified by 'Root@1234';
Query OK, 0 rows affected (0.08 sec)
15、设置允许远程连接数据库
MySQL 5.7
mysql> GRANT ALL PRIVILEGES ON *.* TO 'root'@'%' IDENTIFIED BY 'Root@1234' WITH GRANT OPTION;
Query OK, 0 rows affected, 1 warning (0.13 sec)

mysql> FLUSH PRIVILEGES;
Query OK, 0 rows affected (0.00 sec)
MySQL 8.0
mysql> CREATE USER `root`@`%` IDENTIFIED WITH mysql_native_password BY 'Root@1234';
Query OK, 0 rows affected (0.42 sec)

mysql> GRANT ALL ON *.* TO `root`@`%` WITH GRANT OPTION;
Query OK, 0 rows affected (0.19 sec)

mysql> FLUSH PRIVILEGES;
Query OK, 0 rows affected (0.00 sec)
16、将MySQL设为开机启动
shell> chkconfig --add mysqld
shell> chkconfig mysqld on


 544
544


 被折叠的 条评论
为什么被折叠?
被折叠的 条评论
为什么被折叠?
 到【灌水乐园】发言


