


一、简介
1.为什么要配置中心?
随着系统微服务的不断增加,首要考虑的是系统的可伸缩、可扩展性好,随之就是一个配置管理的问题。各自管各自的开发时没什么问题,到了线上之后管理就会很头疼,到了要大规模更新就更烦了。 配置中心就是一个比较好的解决方案,下图就是一个配置中心的解决方案: 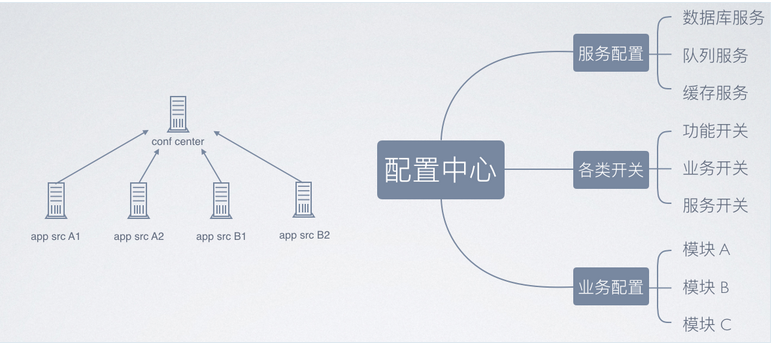
常见的配置中心的实现方法有:
- 硬编码(缺点:需要修改代码,风险大)
- 放在xml等配置文件中,和应用一起打包(缺点:需要重新打包和重启)
- 文件系统中(缺点:依赖操作系统等)
- 环境变量(缺点:有大量的配置需要人工设置到环境变量中,不便于管理,且依赖平台)
2.spring cloud config
特性
- 集中式管理分布式环境下的应用配置
- 配置存储默认基于 git 仓库,可进行版本管理
- 基于spring环境和Spring应用无缝集成
- 提供服务端和客户端支持(java)
- 基于restful接口获取配置,客户端可实现多语言
- 可集群部署,实现高可用
- 配合eureke可实现服务发现,配合cloud bus可实现配置推送更新
- 支持数据结构丰富,yml, json, properties
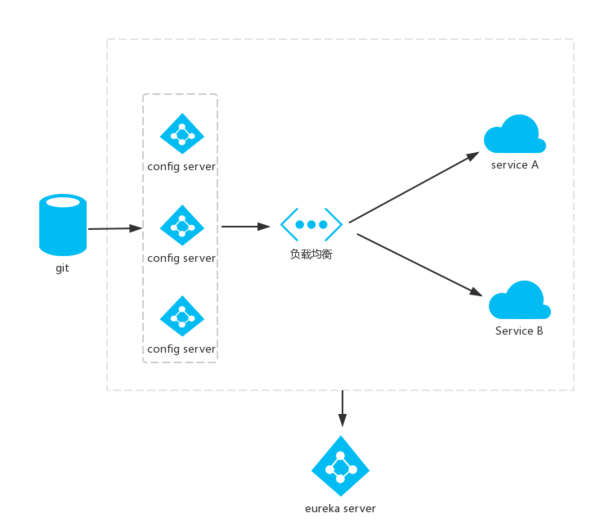
演示图

- 配置数据存储在Git等版本仓库中
- Config Server获取最新的配置数据
- Config Client基于restful接口获取配置
二、初级使用
1.构造config server
(1) pom.xml依赖
<parent>
    <groupId>org.springframework.boot</groupId>
    <artifactId>spring-boot-starter-parent</artifactId>
    <version>1.5.6.RELEASE</version>
</parent>

<properties>
    <project.build.sourceEncoding>UTF-8</project.build.sourceEncoding>
    <project.reporting.outputEncoding>UTF-8</project.reporting.outputEncoding>
    <java.version>1.8</java.version>
</properties>

<dependencyManagement>
    <dependencies>
        <dependency>
            <groupId>org.springframework.cloud</groupId>
            <artifactId>spring-cloud-dependencies</artifactId>
            <version>Dalston.SR3</version>
            <type>pom</type>
            <scope>import</scope>
        </dependency>
    </dependencies>
</dependencyManagement>
<dependencies>
    <dependency>
        <groupId>org.springframework.cloud</groupId>
        <artifactId>spring-cloud-config-server</artifactId>
    </dependency>
</dependencies>
(2) 程序入口
@SpringBootApplication
@EnableConfigServer
public class ConfigServer {
    public static void main(String[] args) {
        SpringApplication.run(ConfigServer.class, args);
    }
}
(3) 配置文件
在bootstrap.yml中添加配置:
spring:
  application:
    name: config-server
  cloud:
    config:
      server:
        git:
          uri: http://gitlab.**.cn/java/config-repository.git
          username: ***
          password: ***
          default-label: master
          search-paths: java*,ruby*,go*

server:
  port: 9992
search-paths表示git仓库的存放配置文件的目录
(4) 启动程序
在上面的git仓库中添加一个config-client-test.yml配置文件,配置内容如下:
env: alpha
访问http://localhost:9992/config-client/test/master 可以查看配置信息
表示config server启动成功
{
  "name": "config-client",
  "profiles": Array[1][
    "test"
  ],
  "label": "master",
  "version": "1b28f79de8c4097dc68a4be986d13232662eb036",
  "state": null,
  "propertySources": Array[1][
    {
      "name": "http://gitlab.**.cn/java/config-repository.git/java/config-client-test.yml",
      "source": {
        "env": "alpha"
      }
    }
  ]
}
URL与配置文件的映射关系如下:
/{application}/{profile}[/{label}]
/{application}-{profile}.yml
/{label}/{application}-{profile}.yml
/{application}-{profile}.properties
/{label}/{application}-{profile}.properties
http://localhost:9992/master/config-client-test.yml
env: alpha
http://localhost:9992/master/config-client-test.json
{
  "env": "alpha"
}
http://localhost:9992/master/config-client-test.properties
env: alpha
2.构造config client
(1) pom.xml依赖
<parent>
    <groupId>org.springframework.boot</groupId>
    <artifactId>spring-boot-starter-parent</artifactId>
    <version>1.5.6.RELEASE</version>
</parent>

<properties>
    <project.build.sourceEncoding>UTF-8</project.build.sourceEncoding>
    <project.reporting.outputEncoding>UTF-8</project.reporting.outputEncoding>
    <java.version>1.8</java.version>
</properties>

<dependencyManagement>
    <dependencies>
        <dependency>
            <groupId>org.springframework.cloud</groupId>
            <artifactId>spring-cloud-dependencies</artifactId>
            <version>Dalston.SR3</version>
            <type>pom</type>
            <scope>import</scope>
        </dependency>
    </dependencies>
</dependencyManagement>
<dependencies>
    <dependency>
        <groupId>org.springframework.cloud</groupId>
        <artifactId>spring-cloud-starter-config</artifactId>
    </dependency>
</dependencies>
(2) 在bootstrap.yml文件中添加相关配置
spring:
  application:
    name: config-client
  profiles:
    active: test
  cloud:
    config:
      label: master
      uri: http://localhost:9992/
(3) 使用配置
启动类
@SpringBootApplication
public class ConfigClientApplication {
	public static void main(String[] args) {
		SpringApplication.run(ConfigClientApplication.class, args);
	}
}
Controller类
@RestController
public class EnvController {

  @Value("${env}")
  private String env;

  @RequestMapping(value = "/hi")
  public String hi() {
    return env;
  }
}
(4) 启动观察日志
2017-11-08 17:56:49.730  INFO 3680 --- [  restartedMain] c.c.c.ConfigServicePropertySourceLocator : Fetching config from server at: http://localhost:9992/
2017-11-08 17:56:50.313  INFO 3680 --- [  restartedMain] c.c.c.ConfigServicePropertySourceLocator : Located environment: name=config-client, profiles=[test], label=master, version=06ef59ccd30be2089bc8c7d214b57f0497f1f3f5, state=null
2017-11-08 17:56:50.313  INFO 3680 --- [  restartedMain] b.c.PropertySourceBootstrapConfiguration : Located property source: CompositePropertySource [name='configService', propertySources=[MapPropertySource [name='configClient'], MapPropertySource [name='http://****/config-repository.git/java/config-client-test.yml']]]
(5) 读取配置
访问http://localhost:8080/hi 直接返回
alpha
三、高级使用
1.使用Spring Security进行安全控制
(1) config-server端配置
pom加入依赖:
<dependency>
    <groupId>org.springframework.boot</groupId>
    <artifactId>spring-boot-starter-security</artifactId>
</dependency>
bootstrap.yml文件中加入:
security:
  user:
    name: admin
    password: 123
重新启动后进入页面的时候要求输入用户名和密码

(2) config-client端配置
config-client需要在配置文件中添加验证信息:
spring:
  application:
    name: config-client
  profiles:
    active: test
  cloud:
    config:
      label: master
      uri: http://localhost:9992/
      username: admin
      password: 123
2.配置中心微服务化、集群化
原理图如下所示:
负载均衡可以用nginx,这样spring.cloud.uri配置写域名就行
这里只介绍用spring cloud服务发现组件eureka配置
(1) 准备eureka-server
<dependencies>
    <dependency>
        <groupId>org.springframework.cloud</groupId>
        <artifactId>spring-cloud-starter-eureka-server</artifactId>
    </dependency>
</dependencies>
spring:
  application:
    name: eureka-server
server:
  port: 9991
eureka:
  client:
    service-url:
      defaultZone: http://localhost:9991/eureka/
    fetch-registry: false
    register-with-eureka: false
@SpringBootApplication
@EnableEurekaServer
public class EurekaServer {
    public static void main(String[] args) {
        SpringApplication application = new SpringApplication(EurekaServer.class);
        application.run(args);
    }
}
(2) 改造config-server
修改pom文件,添加maven依赖
<dependency>
    <groupId>org.springframework.cloud</groupId>
    <artifactId>spring-cloud-starter-eureka</artifactId>
</dependency>
在程序的入口Application类加上@EnableEurekaClient或者@EnableDiscoveryClient注解
配置文件中添加注册地址,将服务注册到eureka-server中
eureka:
  client:
    service-url:
      defaultZone: http://localhost:9991/eureka/
(3) 改造config-client
修改pom文件,添加maven依赖
<dependency>
    <groupId>org.springframework.cloud</groupId>
    <artifactId>spring-cloud-starter-eureka</artifactId>
</dependency>
在程序的入口Application类加上@EnableEurekaClient或者@EnableDiscoveryClient注解
修改配置文件,将其注册到eureka-server服务
spring:
  application:
    name: config-client
  profiles:
    active: test
  cloud:
    config:
      label: master
      username: admin
      password: 123
      discovery:
        enabled: true
        service-id: config-server
eureka:
  client:
    service-url:
      defaultZone: http://localhost:9991/eureka/
通过service-id查找config-server服务,可部署多台config-server,实现集群化部署达到高可用
(4) 启动
访问eureka-server的服务器,可以看到config-server和config-client同时都注册在上面: 
(5) 读取配置
访问http://localhost:8080/hi 直接返回,表示服务部署成功
alpha
3.刷新配置信息
(1) 单台服务配置刷新
config-client项目
修改pom文件,添加maven依赖,可以调用/refresh接口刷新配置
<dependency>
	<groupId>org.springframework.boot</groupId>
	<artifactId>spring-boot-starter-actuator</artifactId>
</dependency>
boostrap.yml添加配置,暂时去掉安全认证
management:
  security:
    enabled: false
修改配置引用的地方,添加 @RefreshScope
@RestController
@RefreshScope
public class EnvController {

  @Value("${env}")
  private String env;

  @RequestMapping(value = "/hi")
  public String hi() {
    return env;
  }
}
重新启动 访问http://localhost:8080/hi 返回
alpha
修改git仓库里config-client-test.yml文件
env: alpha123
调用refresh接口
curl -X POST http://localhost:8080/refresh
重新访问返回 alpha123表示配置刷新成功
alpha123
(2) 集群配置刷新
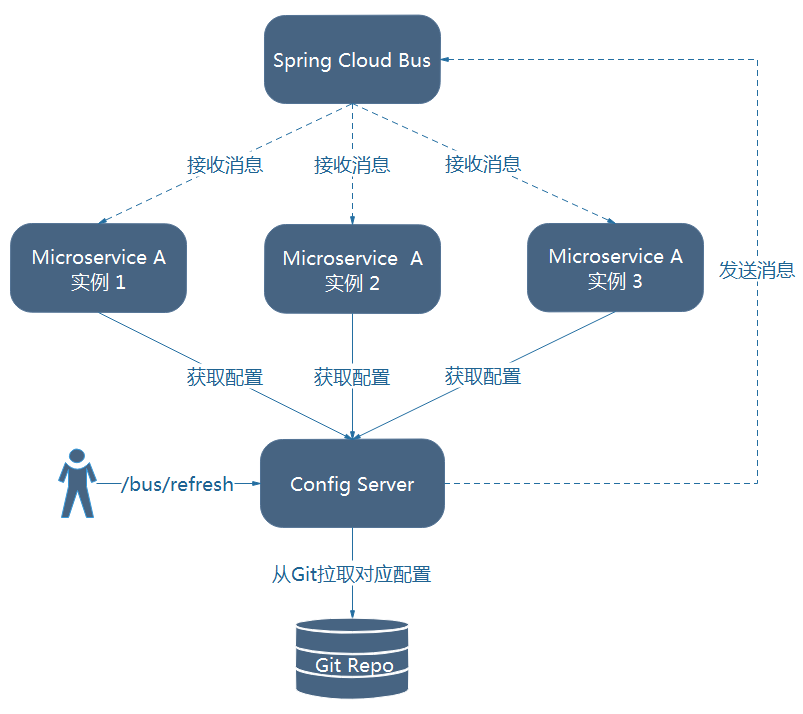
往往我们系统都是集群部署,一台一台调用/refresh接口维护成本太高,这里我们介绍如何使用Spring Cloud Bus实现集群配置的自动刷新,它使用轻量级的消息代理(如RabbitMQ、Kafka)连接分布式系统的节点,广播配置的变化或者其他的管理指令。
(2.1) 安装部署rabbitmq服务(这里省略)
(2.2) 改造config-server和config-client
修改pom文件,添加maven依赖
<dependency>
    <groupId>org.springframework.cloud</groupId>
    <artifactId>spring-cloud-starter-bus-amqp</artifactId>
</dependency>
修改配置文件,添加rabbitmq配置
spring:
  rabbitmq:
    host: localhost
    port: 5672
    username: guest
    password: guest
(2.3) 启动服务
这里我们再启动一个8081端口的config-client服务
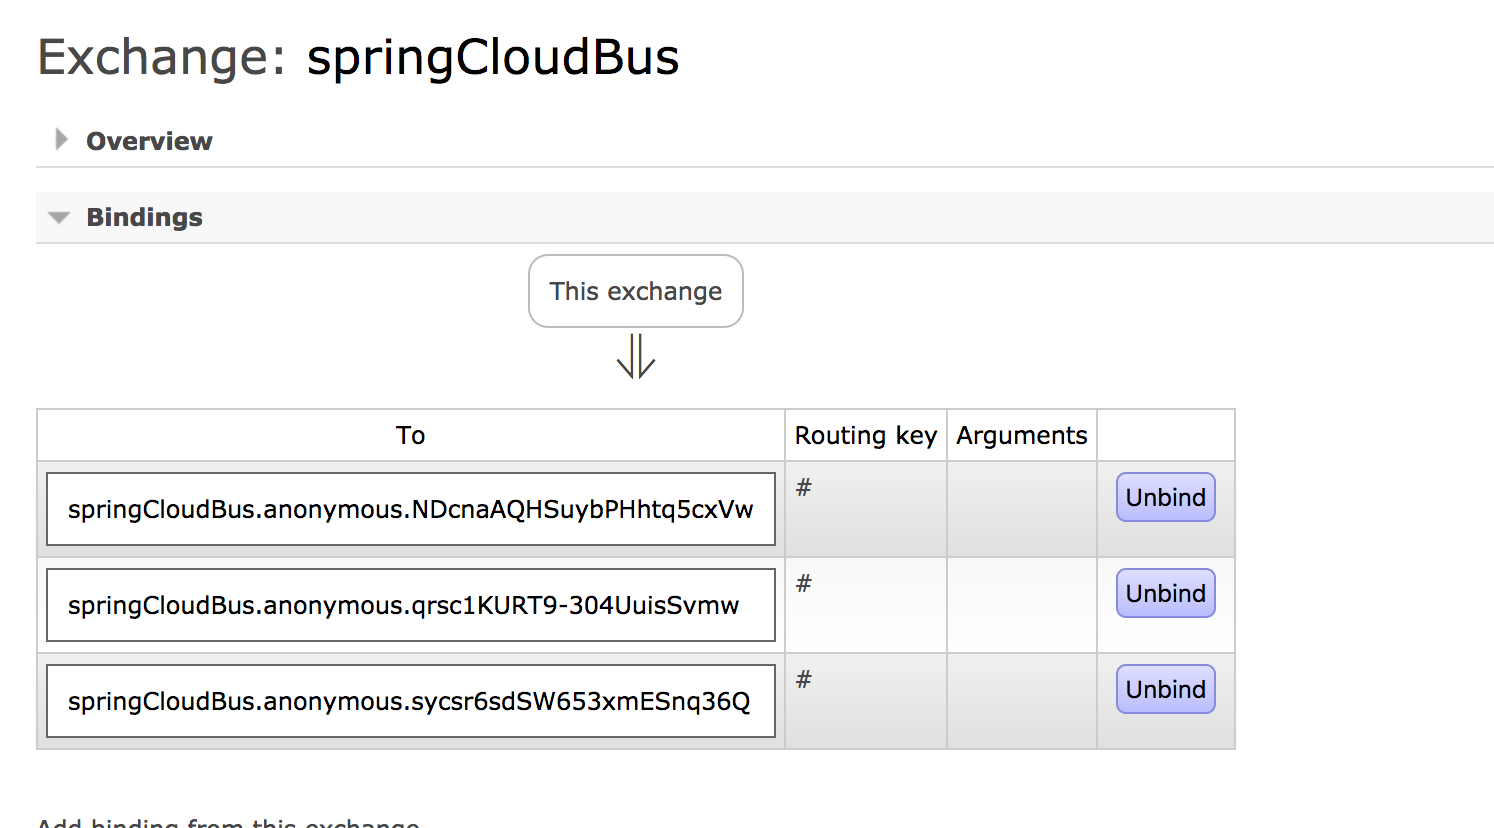
访问http://localhost:15672/#/ ,新增了一个Exchange,以及三个queue
因为我们启动了1个config-server、2个config-client 每个服务监听各自的队列消息
(2.4) 刷新配置
先访问http://localhost:8080/hi 和 http://localhost:8081/hi 返回
alpha123
修改git仓库里config-client-test.yml文件
env: alpha123123
调用config-server的/bus/refresh接口
curl -u admin:123 -X POST http://localhost:9992/bus/refresh
重新访问返回如下,表示集群配置刷新成功
alpha123123
(2.5) 局部刷新配置
调用/bus/refresh,会刷新所有使用spring cloud bus连到rabbitmq的服务,如果需要局部刷新,可通过/bus/refresh的destination参数来定位要刷新的应用程序。
例如 /bus/refresh?destination=config-client:test:8080
这里只刷新8080端口的config-client服务,另一个8081端口的config-client配置没有刷新
我们打断点发现,调用/bus/refresh的服务会向rabbitmq服务发送消息,message的body里有"destinationService":"config-client:test:8080" 
因为routing key 是 # ,这样使用spring cloud bus连接rabbitmq的服务都会收到这个消息,
我们发现有个ServiceMatcher类
public class ServiceMatcher implements ApplicationContextAware {
	private ApplicationContext context;
	private PathMatcher matcher;

	@Override
	public void setApplicationContext(ApplicationContext context) throws BeansException {
		this.context = context;
	}

	public void setMatcher(PathMatcher matcher) {
		this.matcher = matcher;
	}

	public boolean isFromSelf(RemoteApplicationEvent event) {
		String originService = event.getOriginService();
		String serviceId = getServiceId();
		return this.matcher.match(originService, serviceId);
	}

	public boolean isForSelf(RemoteApplicationEvent event) {
		String destinationService = event.getDestinationService();
		return (destinationService == null || destinationService.trim().isEmpty() || this.matcher
				.match(destinationService, getServiceId()));
	}

	public String getServiceId() {
		return this.context.getId();
	}

}
重点看isForSelf方法,发现会拿destinationService跟serviceId比较
serviceId实际就是context的id,是由ContextIdApplicationContextInitializer生成的,格式是 name:profiles:index
根据代码可知 name是spring.application.name、index是server.port,如果相匹配就会刷新此服务的配置。
public class ContextIdApplicationContextInitializer implements ApplicationContextInitializer<ConfigurableApplicationContext>, Ordered {

	private static final String NAME_PATTERN = "${spring.application.name:${vcap.application.name:${spring.config.name:application}}}";

	private static final String INDEX_PATTERN = "${vcap.application.instance_index:${spring.application.index:${server.port:${PORT:null}}}}";

	private final String name;

	private int order = Ordered.LOWEST_PRECEDENCE - 10;

	public ContextIdApplicationContextInitializer() {
		this(NAME_PATTERN);
	}

	public ContextIdApplicationContextInitializer(String name) {
		this.name = name;
	}

	public void setOrder(int order) {
		this.order = order;
	}

	@Override
	public int getOrder() {
		return this.order;
	}

	@Override
	public void initialize(ConfigurableApplicationContext applicationContext) {
		applicationContext.setId(getApplicationId(applicationContext.getEnvironment()));
	}

	private String getApplicationId(ConfigurableEnvironment environment) {
		String name = environment.resolvePlaceholders(this.name);
		String index = environment.resolvePlaceholders(INDEX_PATTERN);
		String profiles = StringUtils
				.arrayToCommaDelimitedString(environment.getActiveProfiles());
		if (StringUtils.hasText(profiles)) {
			name = name + ":" + profiles;
		}
		if (!"null".equals(index)) {
			name = name + ":" + index;
		}
		return name;
	}
}
四、参考链接
http://tech.lede.com/2017/06/12/rd/server/springCloudConfig/


 282
282

 被折叠的 条评论
为什么被折叠?
被折叠的 条评论
为什么被折叠?
 到【灌水乐园】发言


