


RabbitMQ
先来看一张流程图:
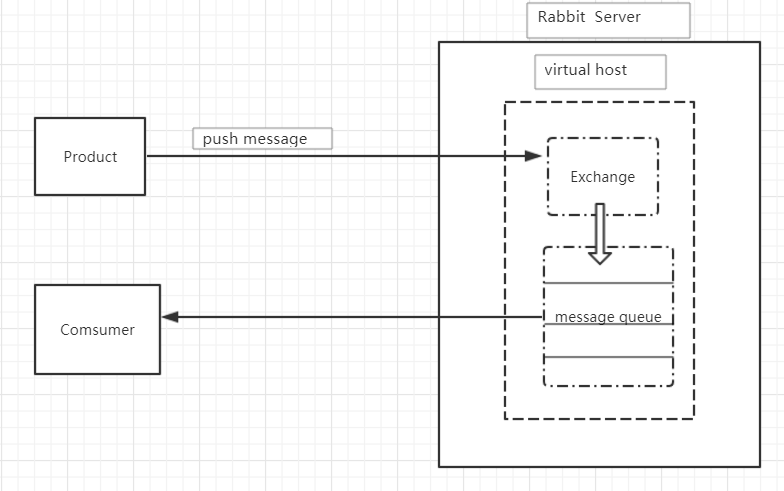
说明:消息生产者将消息发送到对应的Exchange中,exchange根据消息路由规则将消息发送到指定的message queue中,然后发给消息消费者。
linux环境安装: yum install build-essential openssl openssl-devel unixODBC unixODBC-devel make gcc gcc-c++ kernel-devel m4 ncurses-devel tk tc xz
安装:erlang语言环境 www.rabbitmq.com/releases/erlang/erlang-18.3-1.el7.centos.x86_64.rpm
密钥安装:http://repo.iotti.biz/CentOS/7/x86_64/socat-1.7.3.2-5.el7.lux.x86_64.rpm
rabbbitMQ安装:https://www.rabbitmq.com/releases/rabbitmq-server/v3.6.5/rabbitmq-server-3.6.5-1.noarch.rpm
rpm -ivh erlang-18.3-1.el7.centos.x86_64.rpm
rpm -ivh socat-1.7.3.2-5.el7.lux.x86_64.rpm
rpm -ivh rabbitmq-server-3.6.5-1.noarch.rpm
安装完之后 配置文件在 /usr/lib/rabbitmq/lib/rabbitmq_server-3.6.5/ebin 修改里面的 {loopback_users, [guest]} 即可。
启动应用:rabbitmqctl start_app 节点状态:rabbitmqctl status 添加用户:rabbitmqctl add_user username password 用户列表:rabbitmqctl list_user 删除用户:rabbitmqctl delete_user username
关闭应用:rabbitmqctl stop_app 清除用户权限:rabbitmqctl clear_permissions -p vhostpath username 修改密码:rabbitmqctl change_password username newPassword
创建虚拟主机:rabbitmqctl add_vhost vhostpath 虚拟主机列表:rabbitmq list_vhosts 虚拟主机权限列表:rabbimqctl list_permissions -p vhostpath 删除:rabbbtmqctl delete_vhost vhostpath
队列列表:rabbitmqctl list_queues 清除队列消息:tabbitmqctl -p vhostpath purge_queue blue
启动时遇到问题时重启下服务器就好了 # service rabbitmq-server stop
# service rabbitmq-server start
第一次访问官方提供的web管理界面需要执行以下命令:rabbitmq-plugins enable rabbitmq_management
开放端口:iptables -I INPUT -p tcp --dport 15672 -j ACCEPT
rabbitmq官方申明:创建新的用户和guest用户都没有远程访问权限,如果我们自己创建新用户,需要设置权限。步骤如下:
创建用户密码:rabbitmqctl add_user mq 123456
赋予用户管理者:rabbitmqctl set_user_tags mq administrator

设置用户管理权限:rabbitmqctl set_permissions -p "/" mq ".*" ".*" ".*"
Exchange
交换机模式:direct exchange:所有发送的direct exchange将会把消息发送到routekey指定的queue中。注意:direct模式时rabbitmq自动的exchange:default exchange,所以不需要将exchange进行banding操作,消息传递时,routekey完全被queuename完全匹配才会被接收,否则被遗弃。
topic exchange:所有发送到topic exchange的消息被转发到所关心Routekey中指定的topic 的queue中。exchange将routekey和某个topic进行模糊匹配,此时队列需要绑定一个topic。
fanout exchange:不处理路由键,只需要简单的将队列绑定到交换机上,发送到交换机的消息都会被转发到与该交换机绑定的所有队列上,fanout交换机转发消息是最快的。
在producer端进行设置
channel.confirmSelect();//启动发行者通道确认
channel.addConfirmListener(new ConfirmListener() {
    @Override
    public void handleAck(long deliveryTag, boolean multiple) throws IOException { //只要将消息发送到Exchange上就会回调确认ack,即使路由失败也能回调
        System.out.println(deliveryTag);
        System.out.println(multiple);
        System.out.println("action is success");
    }

    @Override
    public void handleNack(long deliveryTag, boolean multiple) throws IOException {//消息丢失才会回调此方法,发送到错误的exchange上不会回调
        System.out.println(deliveryTag);
        System.out.println(multiple);
        System.out.println("action is failed");
    }
});
channel.addReturnListener(( replyCode,  replyText,  exchange,  routingKey,  //消息路由失败才会回调此方法,发送到错误的exchange上不会回调
        properties, body)->{
        System.out.println(replyCode);
        System.out.println(replyText);
        System.out.println(exchange);
        System.out.println(routingKey);
        System.out.println(properties);
        System.out.println(body);
});
自定义一个consumer
自定义的consumer需要implement接口Consumer,方便的话可以实现继承DefaultConsumer类,只需重写handleDelivery方法即可。每当有效消息路由到queue转到consumer上时,都会执行handleDelivery方法,相应得message都在handleDelivery方法的参数中。
消费端限流
当rabbitMq上有成千上万的消息堆积未处理时,此时打开客户端(消费端)进行消息推送,会造成消费端拥堵甚至崩溃,此时就需要做一个限流处理。
RabbtMQ提供一种qos功能,即在非自动确认消息的前提下,如果一定数目的消息(通过基于consume或者channel设置Qos的值)未被确认前,不进行消费新的消息。
在消费端设置:channel.basicQos(3,false); 设置一次接受3个消息,并且设置false意思是在consumer上进行限制,ture是在channel上进行设置。
channel.basicConsume(queueName,false,myConsumer);channel绑定consumer时设置autoack为false,也就是第二个参数。
在自定义的consumer类方法handleDelivery中进行手动ack:channel.basicAck(envelope.getDeliveryTag(),true);如果不行进行手动ack,rabbitmq就不会再往consumer发送消息,必须等到ack确认才会继续发送(重新开始发送,不是接着上次发送),这样就实现了消息的限流。
RabbitMQ整合Spring AMQP实战
导入jar包:
compile 'com.rabbitmq:amqp-client'
compile 'org.springframework.boot:spring-boot-starter-amqp'
定义rabbitAdmin:
@Bean
public ConnectionFactory getConnectionFactory(){
    CachingConnectionFactory cachingConnectionFactory = new CachingConnectionFactory();
    cachingConnectionFactory.setHost("192.168.11.10");
    cachingConnectionFactory.setPort(5672);
    cachingConnectionFactory.setVirtualHost("/");
    cachingConnectionFactory.setUsername("name");
    cachingConnectionFactory.setPassword("123456");
    cachingConnectionFactory.setConnectionTimeout(3000);
    return cachingConnectionFactory;
}

@Bean
public RabbitAdmin rabbitadmin(ConnectionFactory getConnectionFactory){
     RabbitAdmin rabbitAdmin = new RabbitAdmin(getConnectionFactory);
     rabbitAdmin.setAutoStartup(false);
     return rabbitAdmin;
}
这样就可以在java代码中随时随地运用exchange ,queue, 例如:
rabbitAdmin.declareExchange(new DirectExchange("test.config.direct.exchange",false,false));//申明一个direct路由
rabbitAdmin.declareExchange(new TopicExchange("test.config.topic.exchange",false,false));//申明一个topic路由
rabbitAdmin.declareExchange(new FanoutExchange("test.config.fanout.exchange",false,false));//申明一个fanout路由
rabbitAdmin.declareQueue(new Queue("derect.queue",false)); //申明一个queue
rabbitAdmin.declareQueue(new Queue("topic.queue",false)); //申明一个queue
rabbitAdmin.declareQueue(new Queue("fanout.queue",false)); //申明一个queue
rabbitAdmin.declareBinding(new Binding("derect.queue",Binding.DestinationType.QUEUE,
        "test.config.direct.exchange","direct",new HashMap<>()));   //绑定direct
rabbitAdmin.declareBinding(BindingBuilder.bind(new Queue("topic.queue",false))
.to(new TopicExchange("test.config.topic.exchange",false,false))   //绑定topic另一个方式
.with("topic.#"))
rabbitAdmin.declareBinding(BindingBuilder.bind(new Queue("fanout.queue",false))
        .to(new FanoutExchange("test.config.fanout.exchange",false,false)));//绑定fanout另一个方式
还可以直接申明出来exchang queue binding ,都交给spring管理,例如:
/**
 * 申明一个direct exchange
 */
@Bean
public DirectExchange directExchange(){
    return new DirectExchange("direct.exchange.001",false,false);
}
/**
 * 申明一个queue
 */
@Bean
public Queue queue(){
    return new Queue("direct.queue.001",false,false,false);
}
/**
 * 申明一个绑定
 */
public Binding bingding(Queue queue,DirectExchange directExchange){
    return BindingBuilder.bind(queue).to(directExchange).with("spring.#");
}
申明一个rabbitTemplate交给spring管理,他可以帮我们发送消息到exchange上。
rabbitTemplate.convertAndSend(exchangename,routekeying,"我是大大大大001");
总结
rabbitmq无论从性能,高可用,视图控制,spring融合都有不错的效果,我这边只是简单的做个介绍,想要深入了解的小伙伴还需要更系统的学习。


 1298
1298

 被折叠的 条评论
为什么被折叠?
被折叠的 条评论
为什么被折叠?
 到【灌水乐园】发言


