


最近在项目中需要用到多数据源,进行数据半夜同步。研究了两天。mark一下。
在正常的项目中,我们经常是一个datasource 对应一个sessionFactory,在DAO层调用sessionFactory访问数据库。如下图所示:

但是在某些项目中,需要用到的数据源不止一个。这个时候就需要配置多个数据源。
第一种方法:配置多个多个sessionFactory
这种方法就是在项目中为每一个数据源都配置一个sessionFatory,在DAO层通过调用不同的sessionFactory访问不同的数据库。如下图所示:
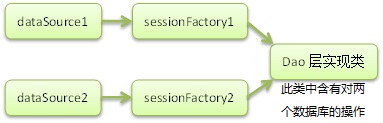
但是这种方法的弊端也比较明显:
1、如果日后datasource 数据源增加或减少,还需要修改对应的代码
2、对sessionFactory 的调用写在dao层中,这样增加了DAO层中代码的维护量。
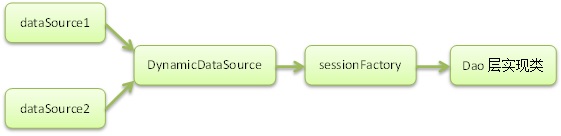
第二种方法:
采用动态数据源的模式,讲多个数据源交由动态数据源来管理,sessionFactory 调用动态数据源返回的数据源,动态数据源负责数据源的切换。
部分代码实现:
两个数据源配置:
<!-- 数据源 -->
	<bean id="dataSource" class="com.alibaba.druid.pool.DruidDataSource" init-method="init" destroy-method="close">
		<!-- 基本属性 url、user、password -->
		<property name="url" value="${connection.url}" />
		<property name="username" value="${connection.username}" />
		<property name="password" value="${connection.password}" />
		<property name="driverClassName" value="${connection.driver}"></property>

		<!-- 配置初始化大小、最小、最大 -->
		<property name="initialSize" value="${druid.initialSize}" />
		<property name="minIdle" value="${druid.minIdle}" />
		<property name="maxActive" value="${druid.maxActive}" />

		<!-- 配置获取连接等待超时的时间 -->
		<property name="maxWait" value="${druid.maxWait}" />
		<!-- 配置间隔多久才进行一次检测,检测需要关闭的空闲连接,单位是毫秒 -->
		<property name="timeBetweenEvictionRunsMillis" value="${druid.timeBetweenEvictionRunsMillis}" />

		<!-- 配置一个连接在池中最小生存的时间,单位是毫秒 -->
		<property name="minEvictableIdleTimeMillis" value="${druid.minEvictableIdleTimeMillis}" />

		<property name="validationQuery" value="${druid.validationQuery}" />
		<property name="testWhileIdle" value="${druid.testWhileIdle}" />
		<property name="testOnBorrow" value="${druid.testOnBorrow}" />
		<property name="testOnReturn" value="${druid.testOnReturn}" />

		<!-- 打开PSCache,并且指定每个连接上PSCache的大小 如果用Oracle,则把poolPreparedStatements配置为true,mysql可以配置为false。 -->
		<property name="poolPreparedStatements" value="${druid.poolPreparedStatements}" />
		<property name="maxPoolPreparedStatementPerConnectionSize"
			value="${druid.maxPoolPreparedStatementPerConnectionSize}" />

		<!-- 配置监控统计拦截的filters -->
		<property name="filters" value="${druid.filters}" />
	</bean>

	<!-- 同步数据源 -->
	<bean id="syncDataSource" class="com.alibaba.druid.pool.DruidDataSource"
		init-method="init" destroy-method="close">
		<!-- 基本属性 url、user、password -->
		<property name="url" value="${syncConnection.url}" />
		<property name="username" value="${syncConnection.username}" />
		<property name="password" value="${syncConnection.password}" />
		<property name="driverClassName" value="${syncConnection.driver}"></property>

		<!-- 配置初始化大小、最小、最大 -->
		<property name="initialSize" value="${syncDruid.initialSize}" />
		<property name="minIdle" value="${syncDruid.minIdle}" />
		<property name="maxActive" value="${syncDruid.maxActive}" />

		<!-- 配置获取连接等待超时的时间 -->
		<property name="maxWait" value="${syncDruid.maxWait}" />
		<!-- 配置间隔多久才进行一次检测,检测需要关闭的空闲连接,单位是毫秒 -->
		<property name="timeBetweenEvictionRunsMillis" value="${syncDruid.timeBetweenEvictionRunsMillis}" />

		<!-- 配置一个连接在池中最小生存的时间,单位是毫秒 -->
		<property name="minEvictableIdleTimeMillis" value="${syncDruid.minEvictableIdleTimeMillis}" />

		<property name="validationQuery" value="${syncDruid.validationQuery}" />
		<property name="testWhileIdle" value="${syncDruid.testWhileIdle}" />
		<property name="testOnBorrow" value="${syncDruid.testOnBorrow}" />
		<property name="testOnReturn" value="${syncDruid.testOnReturn}" />

		<!-- 打开PSCache,并且指定每个连接上PSCache的大小 如果用Oracle,则把poolPreparedStatements配置为true,mysql可以配置为false。 -->
		<property name="poolPreparedStatements" value="${syncDruid.poolPreparedStatements}" />
		<property name="maxPoolPreparedStatementPerConnectionSize"
			value="${syncDruid.maxPoolPreparedStatementPerConnectionSize}" />

		<!-- 配置监控统计拦截的filters -->
		<property name="filters" value="${syncDruid.filters}" />
	</bean>
配置动态数据源:
	<!-- 动态数据源 -->
	<bean id="dynamicDataSource" class="com.XXX.XXXX.core.dataSource.DynamicDataSource">
        <property name="targetDataSources">
            <map key-type="java.lang.String">
                <!--第一个数据源-->
        		<entry key="dataSource" value-ref="dataSource"></entry>
                <!--第二个数据源-->
                <entry key="syncDataSource" value-ref="syncDataSource"></entry>
            </map>
        </property>
    	<!-- 默认目标数据源为你主库数据源 -->
        <property name="defaultTargetDataSource" ref="dataSource"/>
    </bean>
sessionFactory 配置
<bean id="baseSessionFactory" class="org.mybatis.spring.SqlSessionFactoryBean">
		<!-- 数据源配置 -->
		<property name="dataSource" ref="dynamicDataSource" />
		<!-- mybatis参数配置 -->
		<property name="configLocation" value="classpath:datasource/sqlMapConfig.xml"></property>
		<!-- 类型包引用在xml中可以省略包名 -->
		<property name="typeAliasesPackage"
			value="com.XXXX.XXXXX.core.vo,com.XXXX.XXXXX.core.po"></property>
		<!-- 获取mybatis映射的mapper文件 -->
		<property name="mapperLocations">
			<list>
				<value>classpath:datasource/*/*Mapper.xml</value>
			</list>
		</property>
	</bean>
我们看到,在动态数据源配置中我们自定义了一个DynamicDataSource类。这个类就是动态数据源管理类
public class DynamicDataSource extends AbstractRoutingDataSource {

    /* (non Javadoc)
     * @Title: determineCurrentLookupKey
     * @Description: 获取动态数据源
     * @return
     * @see org.springframework.jdbc.datasource.lookup.AbstractRoutingDataSource#determineCurrentLookupKey()
     */
    @Override
    protected Object determineCurrentLookupKey() {

        return DataSourceContextHolder.getDataSourceType();
    }
}
在这个类中,我们继承了spring中的AbstractRoutingDataSource 的类,实现determineCurrentLookupKey这个方法。我们在spring的源码中看到,在AbstractRoutingDataSource获取数据源的时候,先调用determineCurrentLookupKey方法获取lookupkey,根据获取数据源。
/**
	 * Retrieve the current target DataSource. Determines the
	 * {@link #determineCurrentLookupKey() current lookup key}, performs
	 * a lookup in the {@link #setTargetDataSources targetDataSources} map,
	 * falls back to the specified
	 * {@link #setDefaultTargetDataSource default target DataSource} if necessary.
	 * @see #determineCurrentLookupKey()
	 */
	protected DataSource determineTargetDataSource() {
		Assert.notNull(this.resolvedDataSources, "DataSource router not initialized");
		Object lookupKey = determineCurrentLookupKey();
		DataSource dataSource = this.resolvedDataSources.get(lookupKey);
		if (dataSource == null && (this.lenientFallback || lookupKey == null)) {
			dataSource = this.resolvedDefaultDataSource;
		}
		if (dataSource == null) {
			throw new IllegalStateException("Cannot determine target DataSource for lookup key [" + lookupKey + "]");
		}
		return dataSource;
	}

	/**
	 * Determine the current lookup key. This will typically be
	 * implemented to check a thread-bound transaction context.
	 * <p>Allows for arbitrary keys. The returned key needs
	 * to match the stored lookup key type, as resolved by the
	 * {@link #resolveSpecifiedLookupKey} method.
	 */
	protected abstract Object determineCurrentLookupKey();
创建DynamicDataSourceHolder用于持有当前线程中使用的数据源标识
public class DataSourceContextHolder {
    private static final ThreadLocal<String> contextHolder = new ThreadLocal<String>();

    private static final String defaultType = "dataSource";

    /**
     * @Title: setDataSourceType
     * @Description: 设置数据源类型
     * @param dataSourceType
     * @return: void
     */
    public static void setDataSourceType(String dataSourceType){
        contextHolder.set(dataSourceType);
    }


    /**
     * @Title: getDataSourceType
     * @Description: 获取数据源类型
     * @return
     * @return: String
     */
    public static String getDataSourceType(){
        return contextHolder.get();
    }

    /**
     * @Title: clearDataSourceType
     * @Description:清除数据源类型
     * @return
     * @return: String
     */
    public static void clearDataSourceType() {
        contextHolder.remove();
    }


    /**
     * @Title: setDefaultDataSourceType
     * @Description: 设置默认数据源类型
     * @return: void
     */
    public static void setDefaultDataSourceType(){
        clearDataSourceType();
        setDataSourceType(defaultType);
    }
}
至此,多数据源动态切换配置完成,我们在junit中测试:
 @Test
    public void test() {
        //设置数据源为syncDataSource
        DataSourceContextHolder.setDataSourceType("syncDataSource");
        List<SyncClass> list = syncService.getList();
        List<TurbineClass> TurbineClassList = new ArrayList<TurbineClass>();
        Date curentDate = new Date();
        try {
            for (SyncTurbineClass syncTurbineClass : list) {
                //业务逻辑
                TurbineClassList.add(turbineClass);
            }
            if (TurbineClassList.size() > 0) {
                //设置数据源为dataSource
                DataSourceContextHolder.setDataSourceType("dataSource");
                syncService.insertByBatchForTurbineClass(TurbineClassList);
            }
        } catch (Exception e) {
            e.printStackTrace();
        }
    }
在项目中我们每次切换数据源都需要再代码中手动设置,这样数据源切换代码和业务逻辑代码就混在一起。我们可以将数据源的动态切换抽出为spring的aop,通过注解来实现
我们先定义一个DataSource的注解:
@Retention(RetentionPolicy.RUNTIME)
@Target({ElementType.TYPE,ElementType.METHOD})
public @interface DataSource {
    String value();
}
然后定义AOP切面以便拦截所有带有注解@DataSource的方法,取出注解的值作为数据源标识放到DynamicDataSourceHolder的线程变量中
public class DataSourceAspect  {
    /**
     * @Title: intercept
     * @Description: 拦截目标方法,获取由@DataSource指定的数据源标识,设置到线程存储中以便切换数据源
     * @param joinPoint
     * @return: void
     */
    public void intercept(JoinPoint joinPoint){
        Class<?> target = joinPoint.getTarget().getClass();
        MethodSignature methodSignature = (MethodSignature)joinPoint.getSignature();
        for(Class<?> clazz : target.getInterfaces()){
            resolveDataSource(clazz,methodSignature.getMethod());
        }

        resolveDataSource(target,methodSignature.getMethod());
    }

    public void resolveDataSource(Class<?> clazz, Method method){

        try {
            if(clazz.isAnnotationPresent(DataSource.class)){
                DataSource source = clazz.getAnnotation(DataSource.class);
                DataSourceContextHolder.setDataSourceType(source.value());
            }

            Class<?>[] types = method.getParameterTypes();
            Method m = clazz.getDeclaredMethod(method.getName(), types);
            if(null != m && m.isAnnotationPresent(DataSource.class)){
                DataSource source = m.getAnnotation(DataSource.class);
                DataSourceContextHolder.setDataSourceType(source.value());
            }
        } catch (Exception e) {
            e.printStackTrace();
        }
    }

}
在spring的配置文件中,我们定义下这个切面,使其生效:
<!--动态数据源切换 注解配置-->
	<bean id="dataSourceAspect" class="com.XXX.XXXX.core.aspect.DataSourceAspect" />
	<aop:config>
        <aop:aspect ref="dataSourceAspect" order="0">
            <aop:pointcut id="dataSourcePointcut" expression="execution(* com.XXXX.XXXXX.core.service..*.*(..))"/>
            <aop:before pointcut-ref="dataSourcePointcut" method="intercept" />
        </aop:aspect>
    </aop:config>
至此,我们的动态数据源切换注解就配置完成,我们只要在对应的service方法或者类上加上@DataSource注解,即可实现数据源动态切换。
参考:
http://www.cnblogs.com/liujiduo/p/5004691.html
http://blog.csdn.net/wangpeng047/article/details/8866239/


 684
684


 被折叠的 条评论
为什么被折叠?
被折叠的 条评论
为什么被折叠?
 到【灌水乐园】发言


