基于注解版的AOP入门项目
step1.创建包
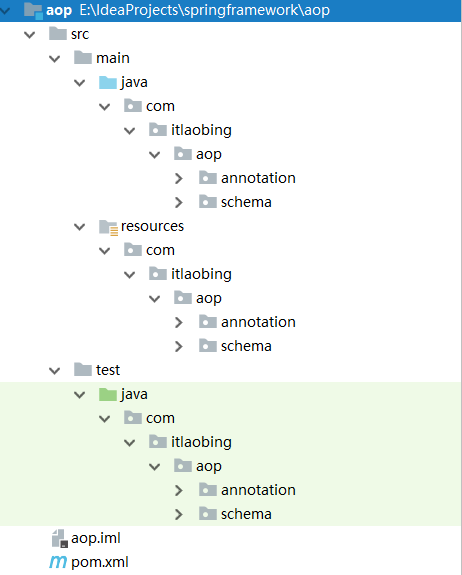
- src/main/java中创建com.itlaobing.aop.annotation 包用来放相应的类 和 aspect 类
- src/main/resources中创建com.itlaobing.aop.annotation 包用来放配置文件
- src/test/java中创建com.itlaobing.aop.annotation包用来放测试类
step2.创建 domain 包并创建 Student 实体类
package com.itlaobing.aop.annotation.domain;

public class Student {

    private Integer id;
    private String name;

//提供相应的 getter 和 setter 方法
}
step3.创建 dao 包并创建 StudentDao 类(因为只涉及一个实体类(数据库中只对应一张表),因此不需要创建接口及其实现类)
package com.itlaobing.aop.annotation.dao;
import com.itlaobing.aop.annotation.domain.Student;
import org.springframework.stereotype.Repository;
@Repository
public class StudentDao {
public void persist(Student s ){
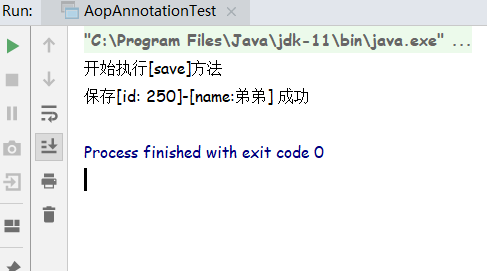
System.out.println("保存[id: "+s.getId()+"]-[name:"+s.getName()+"] 成功");
}
}
- studentDao类上标注的 @Resposity 是专门标注 "数据访问组件"的注解
step4.创建 service 包并创建 StudentService 类
package com.itlaobing.aop.annotation.service;

import com.itlaobing.aop.annotation.dao.StudentDao;
import com.itlaobing.aop.annotation.domain.Student;
import org.springframework.beans.factory.annotation.Autowired;
import org.springframework.stereotype.Service;

@Service
public class StudentService {

    @Autowired
    private StudentDao studentDao;

    public void save(Student s ){
        studentDao.persist(s);
    }

    public StudentDao getStudentDao() {
        return studentDao;
    }

    public void setStudentDao(StudentDao studentDao) {
        this.studentDao = studentDao;
    }
}
- StudentService类上标注的 @Service 是专门标注 "业务层组件"的注解
- 内部声明 StudentDao 字段,并通过 @Autowired 实现自动装配,即可调用 StudentDao 类中的方法
step5.创建 controller 包并创建 StudentController 类
package com.itlaobing.aop.annotation.controller;

import com.itlaobing.aop.annotation.domain.Student;
import com.itlaobing.aop.annotation.service.StudentService;
import org.springframework.beans.factory.annotation.Autowired;
import org.springframework.stereotype.Controller;

@Controller
public class StudentController {

    @Autowired
    private StudentService studentService;

    public void signUp(Student s ){
        studentService.save(s);
    }

    public StudentService getStudentService() {
        return studentService;
    }

    public void setStudentService(StudentService studentService) {
        this.studentService = studentService;
    }
}
- StudentController类上标注的 @Controller 是专门标注 "控制器组件"的注解
- 内部声明 StudentService 字段,通过 @Autowired 实现自动装配,即可调用 StudentService 类中的方法
step6.创建配置文件
- 在resources目录下的com.itlaobing.aop.annotation目录中创建 aop-annotation.xml 配置文件
<?xml version="1.0" encoding="UTF-8"?>
<beans xmlns="http://www.springframework.org/schema/beans"
       xmlns:xsi="http://www.w3.org/2001/XMLSchema-instance"
       xmlns:context="http://www.springframework.org/schema/context"
       xmlns:aop="http://www.springframework.org/schema/aop"
       xsi:schemaLocation="http://www.springframework.org/schema/beans
                            http://www.springframework.org/schema/beans/spring-beans.xsd
                            http://www.springframework.org/schema/context
                            http://www.springframework.org/schema/context/spring-context.xsd
                            http://www.springframework.org/schema/aop
                            http://www.springframework.org/schema/aop/spring-aop.xsd">


    <!-- 扫描在类上标注了@Controller 的类-->
    <context:component-scan base-package="com.itlaobing.aop.annotation.controller" />
    <!-- 扫描在类上标注了@Service 的类-->
    <context:component-scan base-package="com.itlaobing.aop.annotation.service" />
    <!-- 扫描在类上标注了@Repository 的类-->
    <context:component-scan base-package="com.itlaobing.aop.annotation.dao" />

</beans>
step7.创建 apsect 包并创建 StudentAspect 切面类
package com.itlaobing.aop.annotation.aspect;

import org.aspectj.lang.JoinPoint;
import org.aspectj.lang.annotation.Aspect;
import org.aspectj.lang.annotation.Before;
import org.aspectj.lang.annotation.Pointcut;
import org.springframework.stereotype.Component;

@Component
@Aspect
public class StudentAspect {

    //声明切点
    @Pointcut("execution(* com.itlaobing..service.*.save*(..))")
    private void myPointcut(){
    }

    //声明定位
    @Before("myPointcut()")
    public void before(JoinPoint joinPoint){
        System.out.println("开始执行["+joinPoint.getSignature().getName()+"]方法");
    }

}
- @Component 标注任意类型的组件
- @Aspect 标注该类是一个切面类
step8.在配置文件 aop-annotation.xml 中扫描切面类上标注了注解的包
    <!-- 扫描在类上标注了@Component @Aspect 的切面类-->
    <context:component-scan base-package="com.itlaobing.aop.annotation.aspect" />

    <!-- 告知容器需要为注解提供自动代理支持 -->
    <aop:aspectj-autoproxy />
step9.测试
package com.itlaobing.aop.annotation;

import com.itlaobing.aop.annotation.controller.StudentController;
import com.itlaobing.aop.annotation.domain.Student;
import org.springframework.context.support.AbstractApplicationContext;
import org.springframework.context.support.ClassPathXmlApplicationContext;

public class AopAnnotationTest {

    public static void main(String[] args) {
        //创建spring IoC 容器并指定配置文件
        AbstractApplicationContext container = new ClassPathXmlApplicationContext("classpath*:com/**/annotation/aop-annotation.xml");
        //从容器中获取名称是"studentController"的bean
        StudentController studentController = container.getBean("studentController", StudentController.class);
        Student s = new Student();
        s.setId(250);
        s.setName("弟弟");

        studentController.signUp(s);//调用 studentController 的 signUp 方法保存 Student 对象
        //关闭容器
        container.close();
    }

}
step10.运行结果为
心得:
- 使用注解版依然可以添加aop支持,虽然代码更加简洁,但是可读性很差,因此建议使用配置文件版。


 1万+
1万+

 被折叠的 条评论
为什么被折叠?
被折叠的 条评论
为什么被折叠?
 到【灌水乐园】发言


