


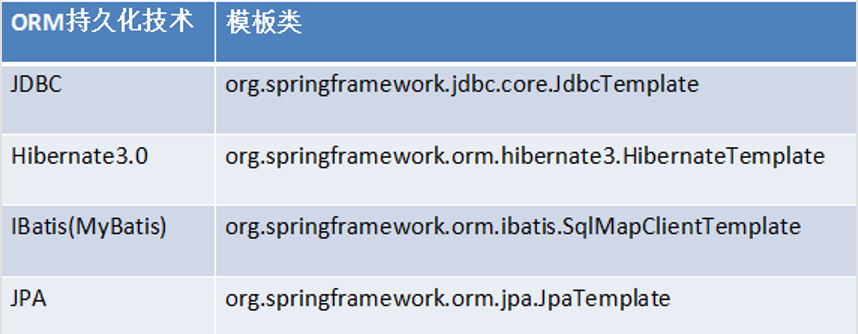
1.Spring整合JDBC
spring提供了很多模板来整合dao
2 . jdbc模板对象:jdbcTemplate
(1)spring中提供了一个可以操作数据库的模板对象:jdbcTemplate,它封装了jdbc技术。与DBUtils中的QueryRunner非常相似。
	@Test
	public void fun1() throws Exception{

		//0 准备c3p0连接池
		ComboPooledDataSource dataSource = new ComboPooledDataSource();
		dataSource.setDriverClass("com.mysql.jdbc.Driver");
		dataSource.setJdbcUrl("jdbc:mysql:///hibernate_32");
		dataSource.setUser("root");
		dataSource.setPassword("1234");
		//1 创建JDBC模板对象
		JdbcTemplate jt = new JdbcTemplate();
		jt.setDataSource(dataSource);
		//2 书写sql,并执行
		String sql = "insert into t_user values(null,'rose') ";
		jt.update(sql);

	}
(2)spring中jdbcTemplate演示:
(2.1)导包:4+2+2(spring-test.jar、spring-aop.jar)+c3p0连接池(com.springsource.com.mchange.v2.c3p0-0.9.1.2.jar)和jdbc驱动(mysql-connector-java-5.0.4-bin.jar)+spring-jdbc.jar和spring-tx.jar(事务)
(2.2)书写dao
package com.xing.jdbc;

import java.util.List;

import bean.User;

public interface UserDao {

	public void save(User u);

	public void delete(Integer id);

	public void update(User u);

	public User getById(Integer id);

	public List<User> getAll();

	public int getTotalCount();
}
书写实现类(jdbcTemplate的获得方式2种、jdbcTemplate的访问数据库的API需要掌握)
package com.xing.jdbc;

import java.sql.ResultSet;
import java.sql.SQLException;
import java.util.List;

import org.springframework.jdbc.core.JdbcTemplate;
import org.springframework.jdbc.core.RowMapper;
import org.springframework.jdbc.core.support.JdbcDaoSupport;

import bean.User;

public class UserDaoImpl extends JdbcDaoSupport implements UserDao{
	//使用JdbcTemplate增删改查,获取jdbcTemplate有两种方式

	//(1)获取jdbcTemplate。(需要在xml中配置一个bean,并注入数据源dataSource)
	//public JdbcTemplate jt;//在xml中把jt属性注入UserDao对象需要有set方法
	/*public void setJt(JdbcTemplate jt) {
		this.jt = jt;
	}*/


	//(2)更方便的获取jdbcTemplate:使用继承JdbcDaoSupport的方法来获取jdbcTemplate:super.getJdbcTemplate()--(需要在xml中配置一个数据源dataSource)
	//不需要在xml中手动配置jdbc模板,使用父类方法即可获得
	@Override
	public void save(User u) {
		String sql="insert into myuser values(null,?)";
		super.getJdbcTemplate().update(sql, u.getUsername());
	}

	@Override
	public void delete(Integer id) {
		String sql="delete from myuser where id=?";
		super.getJdbcTemplate().update(sql, id);
	}

	@Override
	public void update(User u) {
		String sql="update myuser set name=? where id=?";
		super.getJdbcTemplate().update(sql, u.getUsername(),u.getId());
	}

	@Override
	public User getById(Integer id) {
		String sql="select * from myuser where id=?";
		//API:super.getJdbcTemplate().queryForObject(sql, requiredType, args)查询单个对象
		User u = super.getJdbcTemplate().queryForObject(sql, new RowMapper<User>(){
			@Override
			public User mapRow(ResultSet rs, int arg1) throws SQLException {//自动遍历,arg1是遍历次数
				User u=new User();
				u.setId(rs.getInt("id"));
				u.setUsername(rs.getString("name"));
				return u;
			}

		}, id);
		return u;
	}

	@Override
	public List<User> getAll() {
		String sql="select * from myuser";
		//super.getJdbcTemplate().query(sql, rowMapper)查询list集合类型
		List<User> userList = super.getJdbcTemplate().query(sql, new RowMapper<User>(){
			@Override
			public User mapRow(ResultSet rs, int arg1) throws SQLException {
				User u=new User();
				u.setId(rs.getInt("id"));
				u.setUsername(rs.getString("name"));
				return u;
			}
		});
		return userList;
	}

	@Override
	public int getTotalCount() {
		String sql="select count(*) from myuser";
		//super.getJdbcTemplate().queryForObject(sql, requiredType)查询值类型
		Integer totalCount = super.getJdbcTemplate().queryForObject(sql, Integer.class);
		return totalCount;
	}

}
(2.3)配置applicationContext.xml
导入相关的约束
配置顺序根据 依赖关系:UserDaoImpl依赖jdbcTemplate,jdbcTemplate依赖dataSource。
<?xml version="1.0" encoding="UTF-8"?>
<beans xmlns:xsi="http://www.w3.org/2001/XMLSchema-instance" xmlns="http://www.springframework.org/schema/beans" xmlns:context="http://www.springframework.org/schema/context" xsi:schemaLocation="http://www.springframework.org/schema/beans http://www.springframework.org/schema/beans/spring-beans-4.2.xsd http://www.springframework.org/schema/context http://www.springframework.org/schema/context/spring-context-4.2.xsd ">

<!-- 将连接池放入spring容器 -->
<bean name="dataSource" class="com.mchange.v2.c3p0.ComboPooledDataSource">
 	<property name="driverClass" value="com.mysql.jdbc.Driver"></property>
 	<property name="jdbcUrl" value="jdbc:mysql:///user"></property>
 	<property name="user" value="root"></property>
 	<property name="password" value="123"></property>
 </bean>

 <!-- 方式1获取jdbcTemplate:将JDBCTemplate对象放入spring容器 -->
<!-- <bean name="jdbcTemplate" class="org.springframework.jdbc.core.JdbcTemplate">
	<property name="dataSource" ref="dataSource"></property>
</bean> -->

 <!-- 将UserDaoImpl放入spring容器 -->
<bean name="userDao" class="com.xing.jdbc.UserDaoImpl">
<!-- 为方式1注入JDBCTemplate(必须有set方法才能注入)-->
	<!--<property name="jt" ref="jdbcTemplate"></property>-->
</bean>

 </beans>
改进:因为在UserDaoImpl中使用了JdbcDaoSupport类来获得jdbc模板(jdbcTemplate),所以配置文件不需要再配置jdbcTemplate对象。因此依赖关系也变了。UserDaoImpl依赖JDBCDaoSupport(需要连接池),只需配置连接池对象和UserDaoImpl对象
改进:使用properties配置文件读取数据库。
jdbc.driverClass=com.mysql.jdbc.Driver
jdbc.jdbcUrl=jdbc:mysql:///user
jdbc.user=root
jdbc.password=123
改进的applicationcontext.xml:
<?xml version="1.0" encoding="UTF-8"?>
<beans xmlns:xsi="http://www.w3.org/2001/XMLSchema-instance" xmlns="http://www.springframework.org/schema/beans" xmlns:context="http://www.springframework.org/schema/context" xsi:schemaLocation="http://www.springframework.org/schema/beans http://www.springframework.org/schema/beans/spring-beans-4.2.xsd http://www.springframework.org/schema/context http://www.springframework.org/schema/context/spring-context-4.2.xsd ">

<!-- 1.将连接池放入spring容器 -->
<!--  <bean name="dataSource" class="com.mchange.v2.c3p0.ComboPooledDataSource">
 	<property name="driverClass" value="com.mysql.jdbc.Driver"></property>
 	<property name="jdbcUrl" value="jdbc:mysql:///user"></property>
 	<property name="user" value="root"></property>
 	<property name="password" value="123"></property>
 </bean> -->
<!-- 改进第一步:使用配置文件读取 -->
<context:property-placeholder location="com/xing/jdbc/db.properties"/>
<bean name="dataSource" class="com.mchange.v2.c3p0.ComboPooledDataSource">
 	<property name="driverClass" value="${jdbc.driverClass}"></property>
 	<property name="jdbcUrl" value="${jdbc.jdbcUrl}"></property>
 	<property name="user" value="${jdbc.user}"></property>
 	<property name="password" value="${jdbc.password}"></property>
</bean>


 <!-- 2.将JDBCTemplate对象放入spring容器 (因为实现类使用JdbcDaoSupport获取jdbc模板,此处不需要再配置)-->
<!-- <bean name="jdbcTemplate" class="org.springframework.jdbc.core.JdbcTemplate">
	<property name="dataSource" ref="dataSource"></property>
</bean> -->

 <!-- 3.将UserDaoImpl放入spring容器 -->
<bean name="userDao" class="com.xing.jdbc.UserDaoImpl">
<!-- 使用JDBCDaoSupport来获得jdbcTemplate,此处不需要注入jt属性了-->
	<!-- <property name="jt" ref="jdbcTemplate"></property> -->

<!-- 因为UserDaoImpl使用JDBCDaoSupport来获得jdbcTemplate,JDBCDaoSupport需要连接池,此处需要注入-->
	<property name="dataSource" ref="dataSource"></property>

</bean>

 </beans>
(2.4)测试
package com.xing.jdbc;


import javax.annotation.Resource;

import org.junit.Test;
import org.junit.runner.RunWith;
import org.springframework.jdbc.core.JdbcTemplate;
import org.springframework.test.context.ContextConfiguration;
import org.springframework.test.context.junit4.SpringJUnit4ClassRunner;

import com.mchange.v2.c3p0.ComboPooledDataSource;

import bean.User;

@RunWith(SpringJUnit4ClassRunner.class)
@ContextConfiguration("classpath:com/xing/jdbc/applicationContext.xml")
public class JdbcTemplateTest {

	@Resource(name="userDao")
	UserDao userDao;
	@Test
	public void test2() {
		User u=new User();
		u.setUsername("aliyun");
		userDao.save(u);
		System.out.println(userDao.getAll());
		System.out.println(userDao.getTotalCount());
		System.out.println(userDao.getById(1));
		userDao.update(u);
		userDao.delete(2);
	}
}
3.spring管理事务的方式(AOP思想)
spring封装了事务管理代码,因为在不同平台,操作事务的代码各不相同.spring提供了一个接口:PlatformTransactionManager 接口,里面有几个方法分别用于不同平台:DataSourceTransactionManager,HibernateTransitionmanager......注意:在spring中玩事务管理.最为核心的对象就是TransactionManager对象
spring管理事务的方式:
(1)编码式(了解)
(2)xml配置管理事务
(2.1)导包:4+2+(aop+aspect)+(aop联盟+weaving织入包)
(2.2)导入新的约束tx(配置事务通知)
约束说明:beans最基本,context读取properties配置,aop配置aop,tx配置事务通知
(2.3)书写目标对象,配置通知,并且将通知织入目标
package com.xing.dao;

import org.springframework.jdbc.core.support.JdbcDaoSupport;
//dao层代码,使用继承JDBCDaoSupport来获取jdbcTemplate。配置文件中只需注入dataSource即可
public class AccountDaoImpl extends JdbcDaoSupport implements AccountDao {

	@Override
	public void increaseMoney(Integer id, Double money) {
		super.getJdbcTemplate().update("update account set money=money+? where id=?", money,id);
	}

	@Override
	public void decreaseMoney(Integer id, Double money) {
		super.getJdbcTemplate().update("update account set money=money-? where id=?", money,id);
	}

}
package com.xing.service;

import org.springframework.transaction.TransactionStatus;
import org.springframework.transaction.annotation.Isolation;
import org.springframework.transaction.annotation.Propagation;
import org.springframework.transaction.annotation.Transactional;
import org.springframework.transaction.support.TransactionCallbackWithoutResult;
import org.springframework.transaction.support.TransactionTemplate;

import com.xing.dao.AccountDao;
//目标对象(通知织入service层的方法)
public class AccountServiceImpl implements AccountService {

	public AccountDao dao;//配置文件中注入dao即可
	public void setDao(AccountDao dao) {
		this.dao = dao;
	}


	@Override
	public void transferMoney(Integer from, Integer to, Double money) {
		dao.decreaseMoney(from, money);
		int i=1/0;
		dao.increaseMoney(to, money);


	}

}
<?xml version="1.0" encoding="UTF-8"?>
<beans xmlns:xsi="http://www.w3.org/2001/XMLSchema-instance" xmlns="http://www.springframework.org/schema/beans" xmlns:context="http://www.springframework.org/schema/context" xmlns:aop="http://www.springframework.org/schema/aop" xmlns:tx="http://www.springframework.org/schema/tx" xsi:schemaLocation="http://www.springframework.org/schema/beans http://www.springframework.org/schema/beans/spring-beans-4.2.xsd http://www.springframework.org/schema/context http://www.springframework.org/schema/context/spring-context-4.2.xsd http://www.springframework.org/schema/aop http://www.springframework.org/schema/aop/spring-aop-4.2.xsd http://www.springframework.org/schema/tx http://www.springframework.org/schema/tx/spring-tx-4.2.xsd ">

<!-- 指定spring读取db.properties配置 -->
<context:property-placeholder location="classpath:db.properties"  />
<!-- 配置连接池 -->
<bean name="dataSource" class="com.mchange.v2.c3p0.ComboPooledDataSource" >
	<property name="jdbcUrl" value="${jdbc.jdbcUrl}" ></property>
	<property name="driverClass" value="${jdbc.driverClass}" ></property>
	<property name="user" value="${jdbc.user}" ></property>
	<property name="password" value="${jdbc.password}" ></property>
</bean>
<!-- 事务核心管理器,封装了所有事务操作. 依赖于连接池 -->
<bean name="transactionManager" class="org.springframework.jdbc.datasource.DataSourceTransactionManager" >
	<property name="dataSource" ref="dataSource" ></property>
</bean>

<!-- 配置事务通知 -->
<tx:advice id="txAdvice" transaction-manager="transactionManager" >
	<tx:attributes>
		<!-- 以方法为单位,指定方法应用什么事务属性
			isolation:隔离级别
			propagation:传播行为
			read-only:是否只读
		 -->
		<tx:method name="save*" isolation="REPEATABLE_READ" propagation="REQUIRED" read-only="false" />
		<tx:method name="persist*" isolation="REPEATABLE_READ" propagation="REQUIRED" read-only="false" />
		<tx:method name="update*" isolation="REPEATABLE_READ" propagation="REQUIRED" read-only="false" />
		<tx:method name="modify*" isolation="REPEATABLE_READ" propagation="REQUIRED" read-only="false" />
		<tx:method name="delete*" isolation="REPEATABLE_READ" propagation="REQUIRED" read-only="false" />
		<tx:method name="remove*" isolation="REPEATABLE_READ" propagation="REQUIRED" read-only="false" />
		<tx:method name="get*" isolation="REPEATABLE_READ" propagation="REQUIRED" read-only="true" />
		<tx:method name="find*" isolation="REPEATABLE_READ" propagation="REQUIRED" read-only="true" />
		<tx:method name="transfer" isolation="REPEATABLE_READ" propagation="REQUIRED" read-only="false" />
	</tx:attributes>
</tx:advice>


<!-- 将通知织入目标对象的方法 -->
<aop:config  >
	<!-- 配置切点表达式(注意:第一个星号后面加空格) -->
	<aop:pointcut expression="execution(* cn.itcast.service.*ServiceImpl.*(..))" id="txPc"/>
	<!-- 配置切面 : 通知+切点
		 	advice-ref:通知的名称
		 	pointcut-ref:切点的名称
	 -->
	<aop:advisor advice-ref="txAdvice" pointcut-ref="txPc" />
</aop:config>

<!-- Dao-->
<bean name="accountDao" class="cn.itcast.dao.AccountDaoImpl" >
	<property name="dataSource" ref="dataSource" ></property>
</bean>
<!-- Service-->
<bean name="accountService" class="cn.itcast.service.AccountServiceImpl" >
	<property name="dao" ref="accountDao" ></property>
</bean>

</beans>
package com.xing.test;
import javax.annotation.Resource;
import org.junit.Test;
import org.junit.runner.RunWith;
import org.springframework.test.context.ContextConfiguration;
import org.springframework.test.context.junit4.SpringJUnit4ClassRunner;
import com.xing.service.AccountService;
@RunWith(SpringJUnit4ClassRunner.class)
@ContextConfiguration("classpath:applicationContext.xml")
public class test {
@Resource(name="accountService")
public AccountService service;
@Test
public void test() {
service.transferMoney(1, 2, 100d);
}
}
(3) 使用注解配置管理事务(代替xml配置)
<?xml version="1.0" encoding="UTF-8"?>
<beans xmlns:xsi="http://www.w3.org/2001/XMLSchema-instance" xmlns="http://www.springframework.org/schema/beans" xmlns:aop="http://www.springframework.org/schema/aop" xmlns:context="http://www.springframework.org/schema/context" xmlns:tx="http://www.springframework.org/schema/tx" xsi:schemaLocation="http://www.springframework.org/schema/beans http://www.springframework.org/schema/beans/spring-beans-4.2.xsd http://www.springframework.org/schema/aop http://www.springframework.org/schema/aop/spring-aop-4.2.xsd http://www.springframework.org/schema/context http://www.springframework.org/schema/context/spring-context-4.2.xsd http://www.springframework.org/schema/tx http://www.springframework.org/schema/tx/spring-tx-4.2.xsd ">
<context:property-placeholder location="classpath:db.properties"/>

<!-- 事务核心管理器,封装了所有事务操作. 依赖于连接池 -->
<bean name="transactionManager" class="org.springframework.jdbc.datasource.DataSourceTransactionManager" >
	<property name="dataSource" ref="mydataSource" ></property>
</bean>
<!-- 开启使用注解管理aop事务 -->
<tx:annotation-driven/>


<!-- 1.配置dataSource -->
<bean name="mydataSource" class="com.mchange.v2.c3p0.ComboPooledDataSource">
	<property name="driverClass" value="${jdbc.driverClass}"></property>
	<property name="jdbcUrl" value="${jdbc.jdbcUrl}"></property>
	<property name="user" value="${jdbc.user}"></property>
	<property name="password" value="${jdbc.password}"></property>
</bean>
<!-- 2.配置dao -->
<bean name="accountDao" class="com.xing.dao.AccountDaoImpl">
	<property name="dataSource" ref="mydataSource"></property>
</bean>
<!-- 3.配置service -->
<bean name="accountService" class="com.xing.service.AccountServiceImpl">
	<property name="dao" ref="accountDao"></property>
</bean>
</beans>
package com.xing.service;

import org.springframework.transaction.TransactionStatus;
import org.springframework.transaction.annotation.Isolation;
import org.springframework.transaction.annotation.Propagation;
import org.springframework.transaction.annotation.Transactional;
import org.springframework.transaction.support.TransactionCallbackWithoutResult;
import org.springframework.transaction.support.TransactionTemplate;

import com.xing.dao.AccountDao;

public class AccountServiceImpl implements AccountService {

	public AccountDao dao;
	public void setDao(AccountDao dao) {
		this.dao = dao;
	}


	@Override
	//使用注解控制事务(isolation隔离级别,propagation传播行为,readOnly是否只读)
	@Transactional(isolation=Isolation.REPEATABLE_READ,propagation=Propagation.REQUIRED,readOnly=false)
	public void transferMoney(Integer from, Integer to, Double money) {
		dao.decreaseMoney(from, money);
		int i=1/0;//出现异常,转账会失败,数据不会改变
		dao.increaseMoney(to, money);


	}

}


 1274
1274

 被折叠的 条评论
为什么被折叠?
被折叠的 条评论
为什么被折叠?
 到【灌水乐园】发言


