


第五天
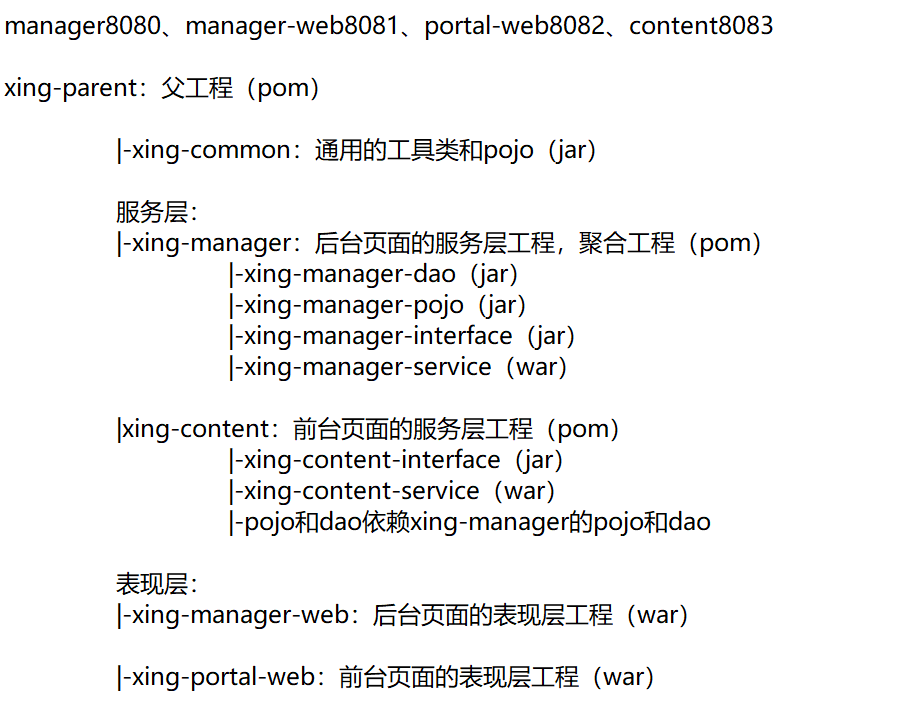
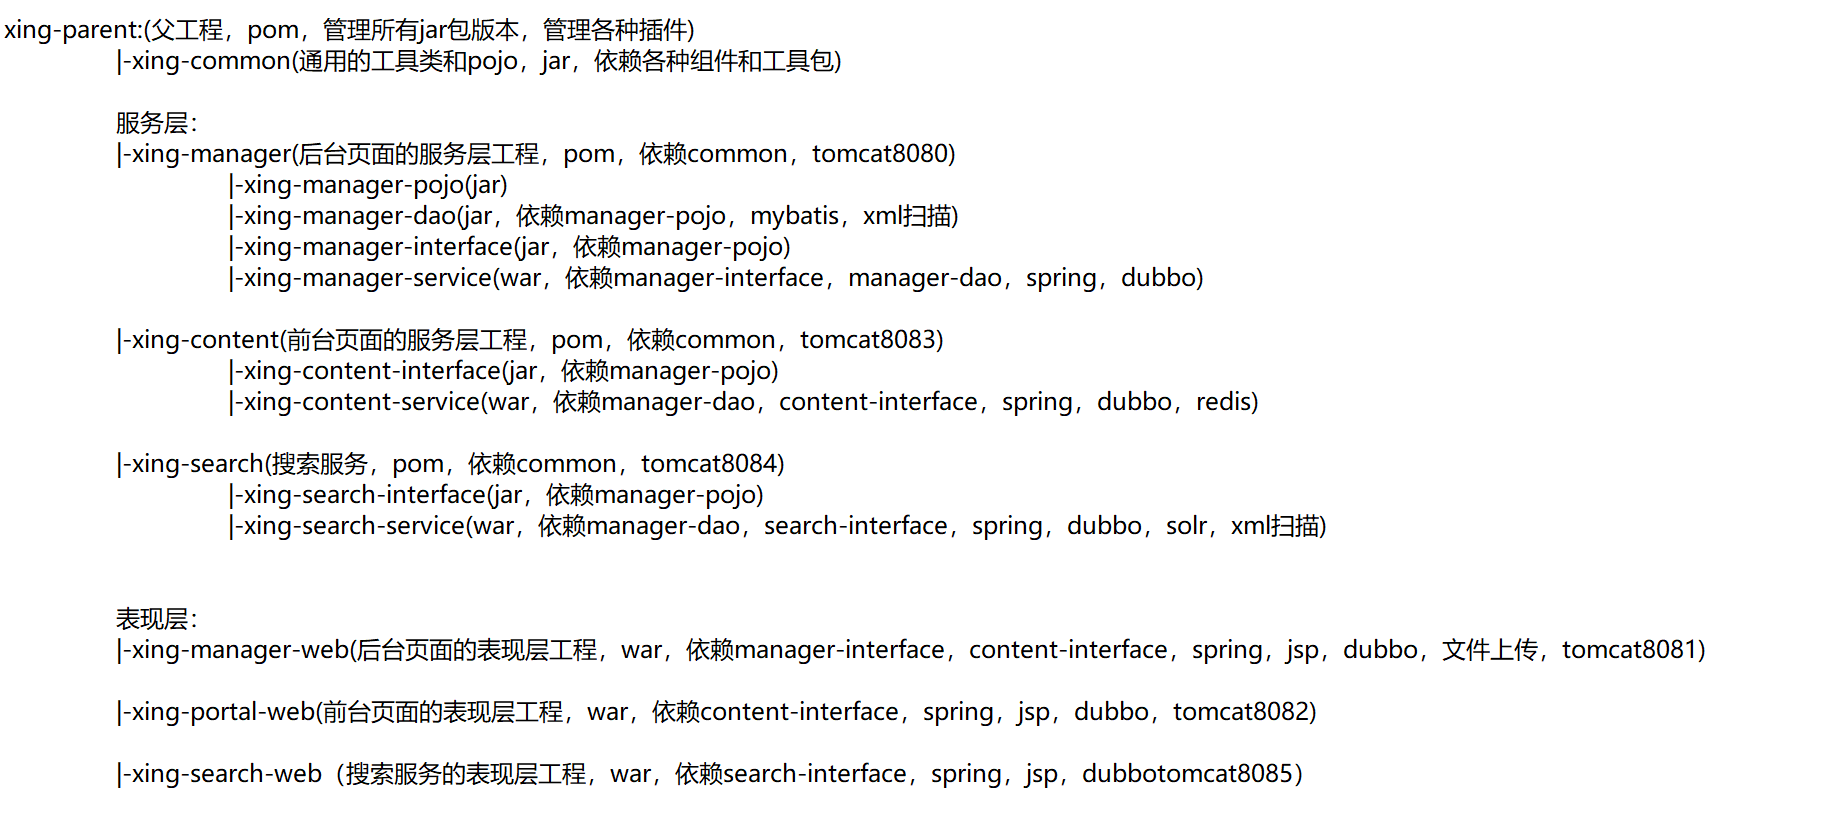
今天开始做前台。需要新建一个前台页面的表现层工程xing-portal-web,和一个管理前台页面内容的服务层工程xing-content。
整个工程依赖关系如下:
第六天
-
redis的安装
Redis是c语言开发的。安装redis需要c语言的编译环境。如果没有gcc需要在线安装。yum install gcc-c++
安装步骤:
第一步:redis的源码包上传到linux系统。
第二步:解压缩redis。tar zxvf redis-3.0.0.tar
第三步:编译。进入redis源码目录。make (这不是安装)
第四步:安装。make install PREFIX=/usr/local/redis(指定目录)。PREFIX参数指定redis的安装目录。一般软件安装到/usr目录下
前端启动:
在redis的安装目录下(/usr/local/redis/bin)直接启动redis-server
[root@localhost bin]# ./redis-server
后台启动:
把解压目录/root/redis-3.0.0/redis.conf复制到/usr/local/redis/bin目录下[root@localhost redis-3.0.0]# cp redis.conf /usr/local/redis/bin/
修改配置文件redis.conf,no改为yes。
带上配置文件启动redis:[root@localhost bin]# ./redis-server redis.conf
查看redis进程:[root@localhost bin]# ps aux|grep redis
root 5190 0.1 0.3 33936 1712 ? Ssl 18:23 0:00 ./redis-server *:6379
root 5196 0.0 0.1 4356 728 pts/0 S+ 18:24 0:00 grep redis
关闭redis:
[root@localhost bin]kill+进程号:kill 5190
或者使用客户端关闭:./redis-cli shutdown(推荐)
使用客户端连接服务端:[root@localhost bin]# ./redis-cli
默认连接localhost(127.0.0.1)运行在6379端口的redis服务。
指定连接的ip和端口:[root@localhost bin]# ./redis-cli -h 192.168.25.153 -p 6379
-h:连接的服务器的地址 -p:服务的端口号
常用命令:健康检查:ping
redis的windows客户端管理软件:RedisDesktopManager
-
五种数据类型
redis五种数据类型string,hash,list,set,sortedset,常用的有两个:string、hash。Redis中所有的数据都是字符串。命令不区分大小写,key是区分大小写的。Redis是单线程的。Redis中不适合保存内容大的数据。
String:key-value
创建:set key1 value1 查看key1的值:get key1 查看所有的key:keys *
加一:incr key2(key2的值加1,key2的值需要是整数,如果key2不存在会自动创建) 减一:decr key2
删除:del key2
Hash:key-fields-values(一般用于给key分类)
创建:hset hash1(这是key) field1(这是key) 1(这是value) 查看:hget hash1 field1
查看所有的key:keys * 查看hash1的所有key:hkeys hash1 查看hash1的所有值:hvals hash1
查看hash1所有的key和value:hgetall hash1
删除hash1里的某个key:hdel hash1 field1
List:有序可重复
从左边添加:lpush list1 1 2 3 4 5 6 对应的顺序是:6 5 4 3 2 1
从右边添加:rpush list1 a b c 对应的顺序是:6 5 4 3 2 1 a b c
查看list1中所有的元素:lrange list1 0 -1
从左边取出一个元素:lpop list1(取出之后list1里就没有这个元素了) 从右边取出一个元素:rpop list1(取出之后list1里就没有这个元素了)
Set:无序不能重复
创建:sadd set1 a b c d a b(set不允许重复,所以会去掉重复元素,只会存abcd) 删除一个元素:srem set1 a
查看set1的所有元素:smembers set1
set1减去set2的元素(补集):sdiff set1 set2 (set1{1,2,3}、set2{3,4,5},减去之后就是{1,2})
set1和set2交集:sinter set1 set2 并集:sunion set1 set2
SortedSet(zset):有序不能重复
创建:zadd zset1 1 a 3 b 2 c 4 d(四条数据,按指定顺序排列)
查看zset1的所有元素:zrange zset1 0 -1 )(顺序是a,c,b,d)(withscores,如果加上这个,会把分数也显示出来)
删除某个元素:zrem zset1 a
查询之后按降序排列:zrevrange zset1 0 -1 (withscores,如果加上这个,会把分数也显示出来)
Key命令:
设置key的过期时间:expire key1 100 (100s后key1过期)
查看key的有效期:ttl key1 (如果是-1,表示是永久保存持久化的,如果是-2.表示不存在,如果是正数,表示有效期时间)
清除key的过期时间:persist key1 (此时key1就持久化了)
redis的持久化方案
Redis的所有数据都是保存到内存中的。
rdb:快照形式,定期把内存中当前时刻的数据保存到磁盘。Redis默认支持的持久化方案。(/usr/local/redis/bin目录下redis.conf中可以配置,dump.rdb)

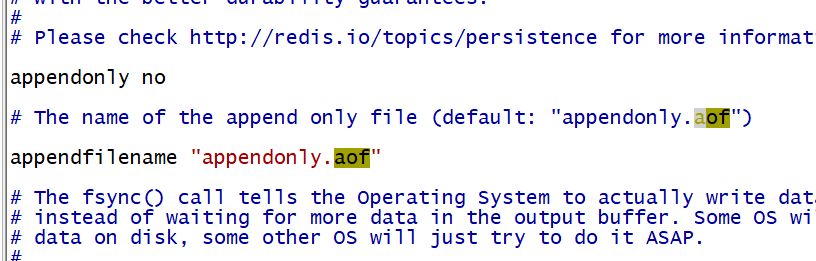
aof形式:append only file。把所有对redis数据库操作的命令,增删改操作的命令。保存到文件中。数据库恢复时把所有的命令执行一遍即可。
配置:把no改为yes即可(如果使用这种方式,bin下会生成一个.aof文件):
如果两种持久化方案同时开启,会使用aof文件来恢复数据库。
-
redis集群
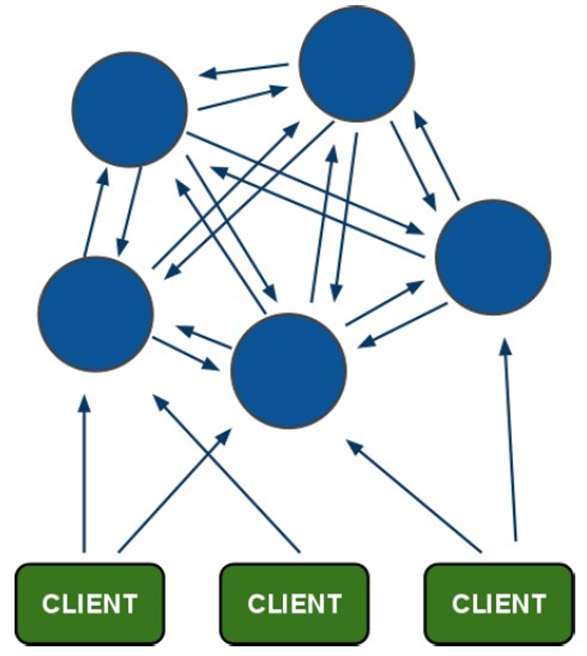
架构细节:
(1)所有的redis节点彼此互联(PING-PONG机制),内部使用二进制协议优化传输速度和带宽.
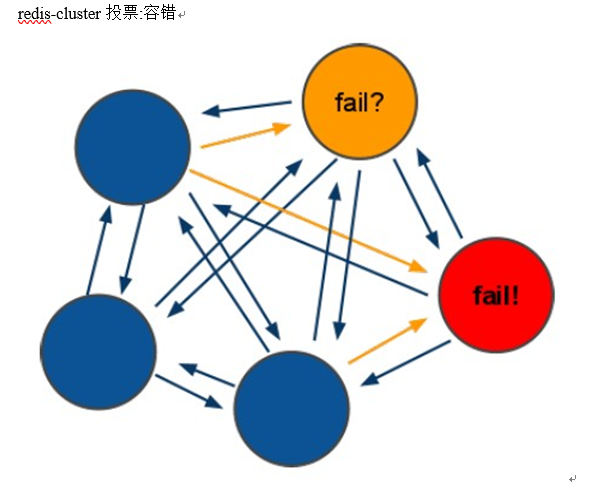
(2)节点的fail是通过集群中超过半数的节点检测失效时才生效.
(3)客户端与redis节点直连,不需要中间proxy层.客户端不需要连接集群所有节点,连接集群中任何一个可用节点即可
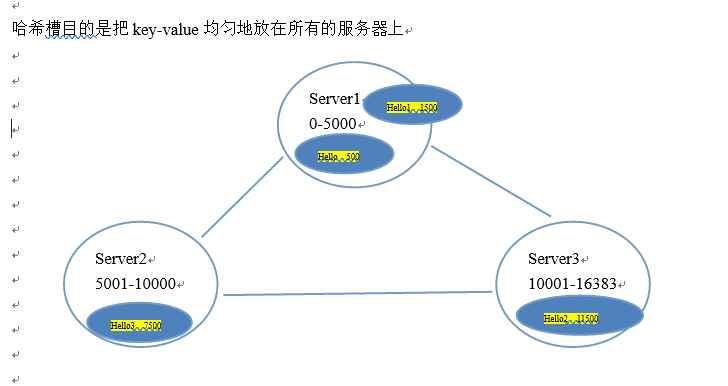
(4)redis-cluster把所有的物理节点映射到[0-16383]slot上,cluster 负责维护node<->slot<->value
Redis 集群中内置了 16384 个哈希槽,当需要在 Redis 集群中放置一个 key-value 时,redis 先对 key 使用 crc16 算法算出一个结果,然后把结果对 16384 求余数,这样每个 key 都会对应一个编号在 0-16383 之间的哈希槽,redis 会根据节点数量大致均等的将哈希槽映射到不同的节点
搭建redis集群:比较麻烦,不记录了
-
Jedis连接redis单机版
需要把jedis依赖的jar包添加到工程中,推荐添加到服务层。xing-content-Service工程中。
- 连接单机版
第一步:创建一个Jedis对象。需要指定服务端的ip及端口。
第二步:使用Jedis对象操作数据库,每个redis命令对应一个方法。
第三步:打印结果。
第四步:关闭Jedis
@Test

     public void testJedis() throws Exception {

          // 第一步:创建一个Jedis对象。需要指定服务端的ip及端口。

          Jedis jedis = new Jedis("192.168.25.153", 6379);

          // 第二步:使用Jedis对象操作数据库,每个redis命令对应一个方法。

          String result = jedis.get("hello");

          // 第三步:打印结果。

          System.out.println(result);

          // 第四步:关闭Jedis

          jedis.close();

     }
2.连接单机版使用连接池
第一步:创建一个JedisPool对象。需要指定服务端的ip及端口。
第二步:从JedisPool中获得Jedis对象。
第三步:使用Jedis操作redis服务器。
第四步:操作完毕后关闭jedis对象,连接池回收资源。
第五步:关闭JedisPool对象。
@Test

     public void testJedisPool() throws Exception {

          // 第一步:创建一个JedisPool对象。需要指定服务端的ip及端口。

          JedisPool jedisPool = new JedisPool("192.168.25.153", 6379);

          // 第二步:从JedisPool中获得Jedis对象。

          Jedis jedis = jedisPool.getResource();

          // 第三步:使用Jedis操作redis服务器。

          jedis.set("jedis", "test");

          String result = jedis.get("jedis");

          System.out.println(result);

          // 第四步:操作完毕后关闭jedis对象,连接池回收资源。

          jedis.close();

          // 第五步:关闭JedisPool对象。

          jedisPool.close();

     }
-
向业务逻辑中添加缓存
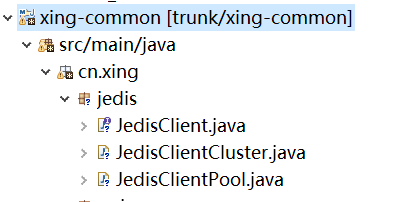
因为在开发中连接的是redis单机版,而项目上线运行使用的是集群版,而向集群版和单机版存取数据的代码是不一样的,所以需要灵活切换。使用接口+两个实现类完成。工具类代码如下:
package com.xing.utils;

import java.util.List;

public interface JedisClient {

	String set(String key, String value);
	String get(String key);
	Boolean exists(String key);
	Long expire(String key, int seconds);
	Long ttl(String key);
	Long incr(String key);
	Long hset(String key, String field, String value);
	String hget(String key, String field);
	Long hdel(String key, String... field);
	Boolean hexists(String key, String field);
	List<String> hvals(String key);
	Long del(String key);
}
package com.xing.utils;

import java.util.List;

import redis.clients.jedis.Jedis;
import redis.clients.jedis.JedisPool;

public class JedisClientPool implements JedisClient {

	private JedisPool jedisPool;

	public JedisPool getJedisPool() {
		return jedisPool;
	}

	public void setJedisPool(JedisPool jedisPool) {
		this.jedisPool = jedisPool;
	}

	@Override
	public String set(String key, String value) {
		Jedis jedis = jedisPool.getResource();
		String result = jedis.set(key, value);
		jedis.close();
		return result;
	}

	@Override
	public String get(String key) {
		Jedis jedis = jedisPool.getResource();
		String result = jedis.get(key);
		jedis.close();
		return result;
	}

	@Override
	public Boolean exists(String key) {
		Jedis jedis = jedisPool.getResource();
		Boolean result = jedis.exists(key);
		jedis.close();
		return result;
	}

	@Override
	public Long expire(String key, int seconds) {
		Jedis jedis = jedisPool.getResource();
		Long result = jedis.expire(key, seconds);
		jedis.close();
		return result;
	}

	@Override
	public Long ttl(String key) {
		Jedis jedis = jedisPool.getResource();
		Long result = jedis.ttl(key);
		jedis.close();
		return result;
	}

	@Override
	public Long incr(String key) {
		Jedis jedis = jedisPool.getResource();
		Long result = jedis.incr(key);
		jedis.close();
		return result;
	}

	@Override
	public Long hset(String key, String field, String value) {
		Jedis jedis = jedisPool.getResource();
		Long result = jedis.hset(key, field, value);
		jedis.close();
		return result;
	}

	@Override
	public String hget(String key, String field) {
		Jedis jedis = jedisPool.getResource();
		String result = jedis.hget(key, field);
		jedis.close();
		return result;
	}

	@Override
	public Long hdel(String key, String... field) {
		Jedis jedis = jedisPool.getResource();
		Long result = jedis.hdel(key, field);
		jedis.close();
		return result;
	}

	@Override
	public Boolean hexists(String key, String field) {
		Jedis jedis = jedisPool.getResource();
		Boolean result = jedis.hexists(key, field);
		jedis.close();
		return result;
	}

	@Override
	public List<String> hvals(String key) {
		Jedis jedis = jedisPool.getResource();
		List<String> result = jedis.hvals(key);
		jedis.close();
		return result;
	}

	@Override
	public Long del(String key) {
		Jedis jedis = jedisPool.getResource();
		Long result = jedis.del(key);
		jedis.close();
		return result;
	}

}
在xing-common中新建一个接口,两个实现类(一个单机版,一个集群版),这样可以便捷地切换单机版和集群版
在xing-content-service中,配置applicationContext-redis.xml:
<?xml version="1.0" encoding="UTF-8"?>
<beans xmlns="http://www.springframework.org/schema/beans"
	xmlns:context="http://www.springframework.org/schema/context" xmlns:p="http://www.springframework.org/schema/p"
	xmlns:aop="http://www.springframework.org/schema/aop" xmlns:tx="http://www.springframework.org/schema/tx"
	xmlns:xsi="http://www.w3.org/2001/XMLSchema-instance"
	xsi:schemaLocation="http://www.springframework.org/schema/beans http://www.springframework.org/schema/beans/spring-beans-4.2.xsd
	http://www.springframework.org/schema/context http://www.springframework.org/schema/context/spring-context-4.2.xsd
	http://www.springframework.org/schema/aop http://www.springframework.org/schema/aop/spring-aop-4.2.xsd http://www.springframework.org/schema/tx http://www.springframework.org/schema/tx/spring-tx-4.2.xsd
	http://www.springframework.org/schema/util http://www.springframework.org/schema/util/spring-util-4.2.xsd">

	<!-- 配置redis单机版的连接 -->
	<bean id="jedisPool" class="redis.clients.jedis.JedisPool">
		<constructor-arg name="host" value="192.168.159.130"></constructor-arg>
		<constructor-arg name="port" value="6379"></constructor-arg>
	</bean>
	<!-- 这个是操作单机版redis的工具类,实例化的是实现类,不是接口 -->
	<bean id="jedisClientPool" class="cn.xing.jedis.JedisClientPool">
		<property name="jedisPool" ref="jedisPool"></property>
	</bean>


</beans>
测试:
@Test
	public void testJedisClient() throws Exception {
		//初始化Spring容器
		ApplicationContext applicationContext = new ClassPathXmlApplicationContext("classpath:spring/applicationContext-redis.xml");
		//从容器中获得JedisClient对象
		JedisClient jedisClient = applicationContext.getBean(JedisClient.class);//这里使用接口,切换集群版时不需要改代码,只需改配置文件
		jedisClient.set("first", "100");
		String result = jedisClient.get("first");
		System.out.println(result);


	}
向业务(xing-content-service)中添加缓存:
分析:查询内容列表时添加缓存。
- 查询数据库之前先查询缓存。
- 查询到结果,直接响应结果。
- 查询不到,缓存中没有,需要查询数据库。
- 把查询结果添加到缓存中。
- 返回结果。
向redis中添加缓存,即键值对:
key:cid
value:内容列表。需要把java对象转换成json。
使用hash对key进行归类。key-fields-value
content_key:
|--cid:内容所属的分类id
|--value:list
注意:添加缓存不能影响正常业务逻辑。
代码:
@Override
	public List<TbContent> getContentList(long cid) {
		//查询缓存
		try {
			String json = jedisClient.hget(CONTENT_KEY, cid + "");
			//判断json是否为空
			if (StringUtils.isNotBlank(json)) {
				//把json转换成list
				List<TbContent> list = JsonUtils.jsonToList(json, TbContent.class);
				return list;
			}
		} catch (Exception e) {
			e.printStackTrace();
		}
		//根据cid查询内容列表
		TbContentExample example = new TbContentExample();
		//设置查询条件
		Criteria criteria = example.createCriteria();
		criteria.andCategoryIdEqualTo(cid);
		//执行查询
		List<TbContent> list = contentMapper.selectByExample(example);
		//向缓存中添加数据
		try {
			jedisClient.hset(CONTENT_KEY, cid + "", JsonUtils.objectToJson(list));
		} catch (Exception e) {
			e.printStackTrace();
		}
		return list;
	}
缓存同步:如果修改了数据库的数据,而redis缓存没有清除,查询的依然是缓存中的数据,所以需要做同步
对内容信息做增删改操作后只需要把对应缓存删除即可。
例如添加一条新的内容,需要把对应的缓存删除,可以根据cid删除缓存。
@Override
	public E3Result addContent(TbContent content) {
		//补全属性
		content.setCreated(new Date());
		content.setUpdated(new Date());
		//插入数据
		contentMapper.insert(content);
		//缓存同步
		jedisClient.hdel(CONTENT_KEY, content.getCategoryId().toString());

		return E3Result.ok();
	}
第七天
-
solr服务搭建
Solr是一个独立的企业级搜索应用服务器,是java开发。需要安装jdk。安装环境Linux。需要安装Tomcat。
1.搭建步骤
第一步:把solr 的压缩包上传到Linux系统
第二步:解压solr:tar zxf solor….tgz
第三步:安装Tomcat,解压缩即可。
第四步:把解压后的solr文件夹里的/dist/solor-4.10.3.war复制到Tomcat的webapps下。
cp solr-4.10.3.war /usr/local/tomcat7/webapps/solr.war
第五步:解压缩war包:启动Tomcat即可解压,得到solr文件夹
第六步:把/root/solr-4.10.3/example/lib/ext目录下的所有的jar包,添加到solr工程中。
[root@localhost ext]# cp * /usr/local/tomcat7/webapps/solr/WEB-INF/lib/
第七步:创建一个solrhome。/example/solr目录就是一个solrhome。复制此目录到/usr/local/,改名为solrhome,和tomcat同级目录。
[root@localhost example]# cp -r solr /usr/local/solrhome
第八步:关联solr及solrhome。需要修改solr工程的web.xml文件。(图里面是错的,按照上面的命令,应该是/usr/local/solrhome)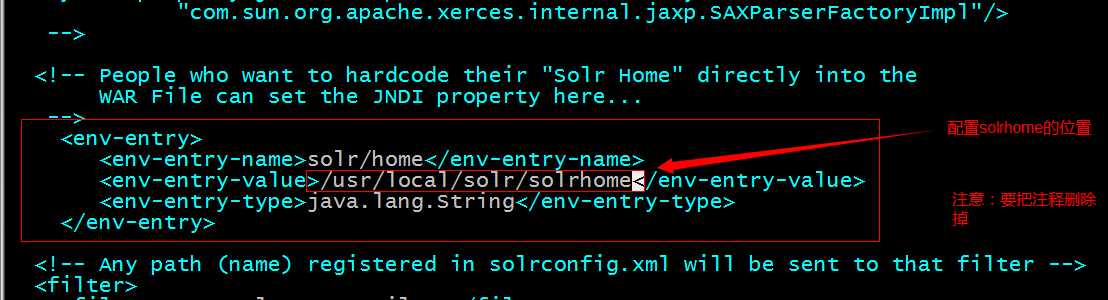
第九步:启动Tomcat
和windows下的配置完全一样。
- 2.配置业务域
搜索商品,结果需要包含:
- 商品Id(solr自带id,不用设置)
- 商品标题
- 商品卖点
- 商品价格
- 商品图片
- 分类名称
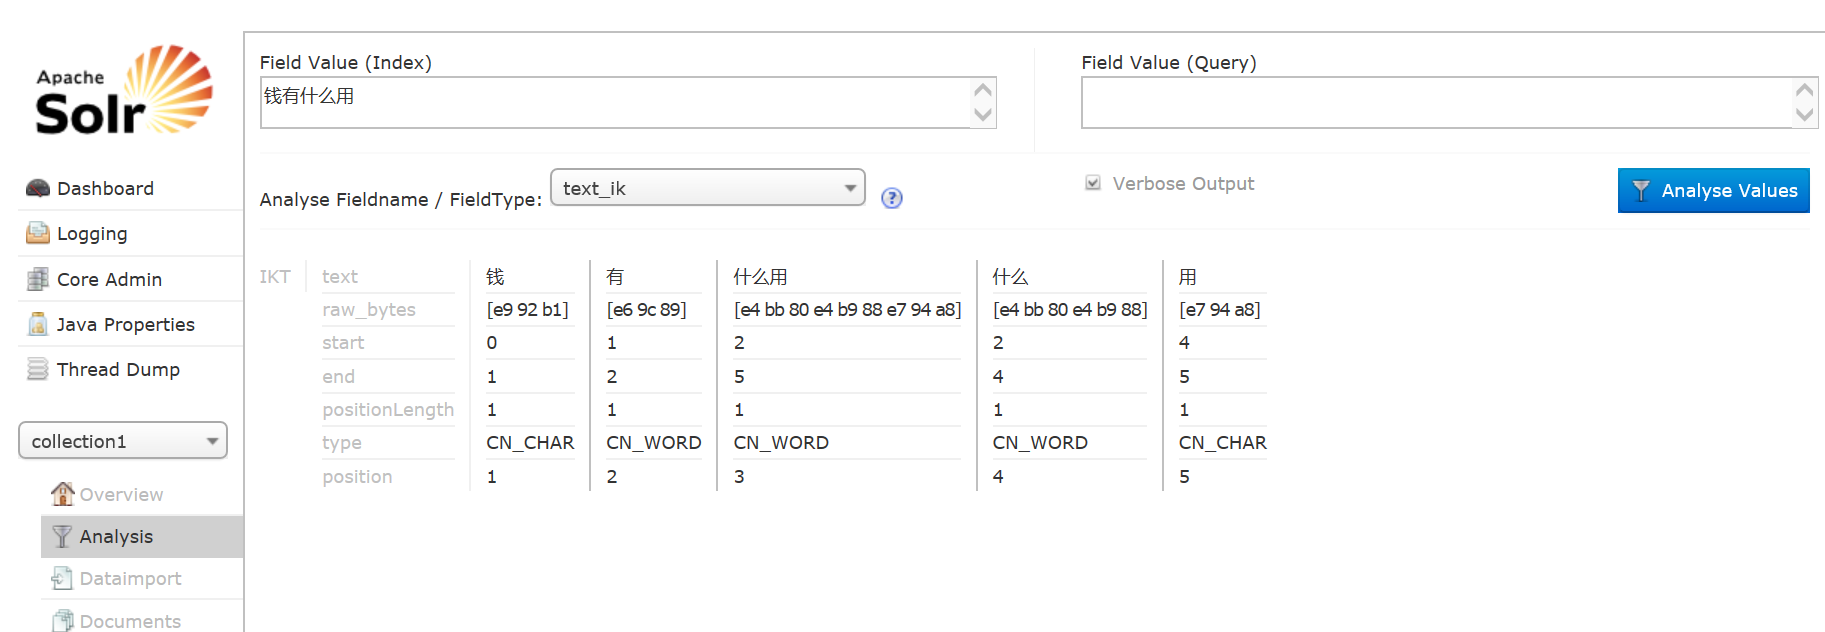
创建对应的业务域,因为标题、卖点等有中文,需要制定中文分析器。
创建步骤:
把IK Analyzer 2012FF_hf1文件夹上传到linux
第一步:把中文分析器添加到工程中。
- 把文件夹里的IKAnalyzer2012FF_u1.jar添加到solr工程的lib目录下:
打开文件夹(\去掉空格干扰):cd IK\ Analyzer\ 2012FF_hf,有一个jar包IKAnalyzer2012FF_u1.jar,把jar包复制到solr的lib下:
cp IKAnalyzer2012FF_u1.jar /usr/local/tomcat7/webapps/solr/WEB-INF/lib/ - 把扩展词典、配置文件放到solr工程的WEB-INF/classes目录下:
在tomcat7/webapps/solr/WEB-INF/下新建classes文件夹:mkdir classes
把三个文件复制到classes里:cp ext_stopword.dic IKAnalyzer.cfg.xml mydict.dic /usr/local/tomcat7/webapps/solr/WEB-INF/classes/
第二步:配置字段类型FieldType,指定使用IKAnalyzer:
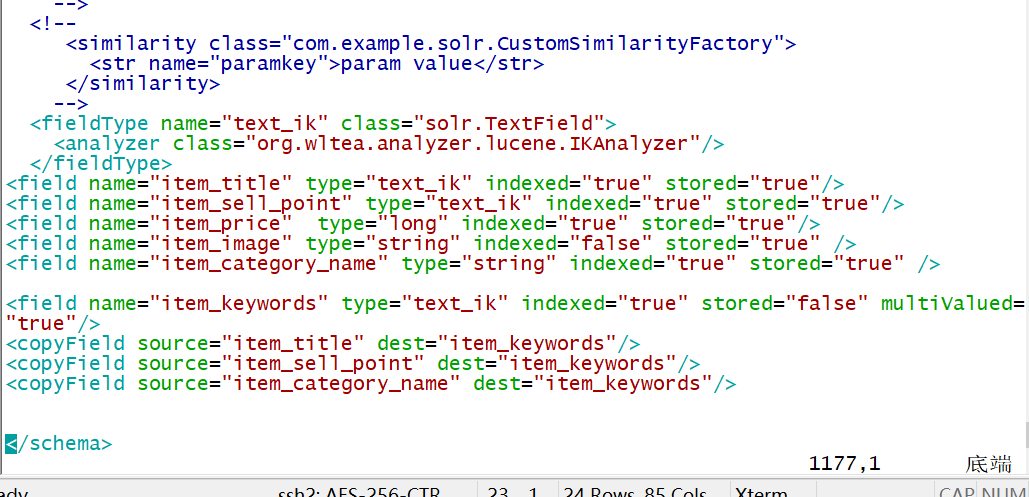
修改Solr的schema.xml文件(在solrhome/collection1/conf下),在最后一行,schema标签里添加FieldType:
<fieldType name="text_ik" class="solr.TextField">
  <analyzer class="org.wltea.analyzer.lucene.IKAnalyzer"/>
</fieldType>
第三步:配置业务域,type指定使用自定义的FieldType。
设置业务系统的字段Field,中文字段的type需要设置成自定义的字段类型
<field name="item_title" type="text_ik" indexed="true" stored="true"/>

<field name="item_sell_point" type="text_ik" indexed="true" stored="true"/>

<field name="item_price"  type="long" indexed="true" stored="true"/>

<field name="item_image" type="string" indexed="false" stored="true" />

<field name="item_category_name" type="string" indexed="true" stored="true" />


<field name="item_keywords" type="text_ik" indexed="true" stored="false" multiValued="true"/>

<copyField source="item_title" dest="item_keywords"/>

<copyField source="item_sell_point" dest="item_keywords"/>

<copyField source="item_category_name" dest="item_keywords"/>
如图:
第四步:重启tomcat
网页访问solr,测试中文分析器和业务域
-
solr索引库增删改查测试
1.添加文档测试:
把solr的jar包依赖添加到search-service的pom工程中,
@Test

     public void addDocument() throws Exception {

          // 第一步:把solrJ的jar包添加到工程中。

          // 第二步:创建一个SolrServer,使用HttpSolrServer创建对象。

          SolrServer solrServer = new HttpSolrServer("http://192.168.25.154:8080/solr");

          // 第三步:创建一个文档对象SolrInputDocument对象。

          SolrInputDocument document = new SolrInputDocument();

          // 第四步:向文档中添加域。必须有id域,域的名称必须在schema.xml中定义。

          document.addField("id", "test001");

          document.addField("item_title", "测试商品");//名称和schema.xml中一样

          document.addField("item_price", "199");

          // 第五步:把文档添加到索引库中。

          solrServer.add(document);

          // 第六步:提交。

          solrServer.commit();

     }
2.删除文档测试
根据id删除
@Test
	public void deleteDocumentById() throws Exception {
		// 第一步:创建一个SolrServer对象。
		SolrServer solrServer = new HttpSolrServer("http://192.168.25.154:8080/solr");
		// 第二步:调用SolrServer对象的根据id删除的方法。
		solrServer.deleteById("1");
		// 第三步:提交。
		solrServer.commit();
	}
根据查询删除
@Test
	public void deleteDocumentByQuery() throws Exception {
		SolrServer solrServer = new HttpSolrServer("http://192.168.25.154:8080/solr");
		solrServer.deleteByQuery("title:change.me");//域+关键字
		solrServer.commit();
	}
查询索引库:
简单查询:
@Test
	public void queryDocument() throws Exception {
		// 第一步:创建一个SolrServer对象
		SolrServer solrServer = new HttpSolrServer("http://192.168.25.154:8080/solr");
		// 第二步:创建一个SolrQuery对象。
		SolrQuery query = new SolrQuery();
		// 第三步:向SolrQuery中添加查询条件、过滤条件。。。
		query.setQuery("*:*");
		// 第四步:执行查询。得到一个Response对象。
		QueryResponse response = solrServer.query(query);
		// 第五步:取查询结果。
		SolrDocumentList solrDocumentList = response.getResults();
		System.out.println("查询结果的总记录数:" + solrDocumentList.getNumFound());
		// 第六步:遍历结果并打印。
		for (SolrDocument solrDocument : solrDocumentList) {
			System.out.println(solrDocument.get("id"));
			System.out.println(solrDocument.get("item_title"));
			System.out.println(solrDocument.get("item_price"));
		}
	}
带高亮显示的查询:
@Test
public void queryDocumentWithHighLighting() throws Exception {
// 第一步:创建一个SolrServer对象
SolrServer solrServer = new HttpSolrServer("http://192.168.25.154:8080/solr");
// 第二步:创建一个SolrQuery对象。
SolrQuery query = new SolrQuery();
// 第三步:向SolrQuery中添加查询条件、过滤条件。。。
query.setQuery("测试");
//指定默认搜索域
query.set("df", "item_keywords");
//开启高亮显示
query.setHighlight(true);
//高亮显示的域
query.addHighlightField("item_title");
query.setHighlightSimplePre("<em>");
query.setHighlightSimplePost("</em>");
// 第四步:执行查询。得到一个Response对象。
QueryResponse response = solrServer.query(query);
// 第五步:取查询结果。
SolrDocumentList solrDocumentList = response.getResults();
System.out.println("查询结果的总记录数:" + solrDocumentList.getNumFound());
// 第六步:遍历结果并打印。
for (SolrDocument solrDocument : solrDocumentList) {
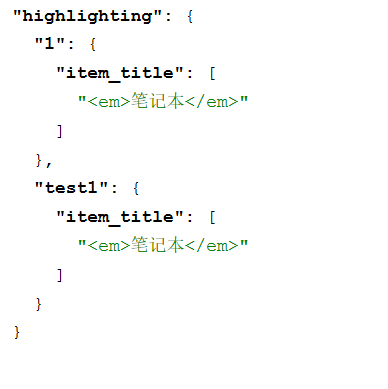
System.out.println(solrDocument.get("id"));
//取高亮显示
Map<String, Map<String, List<String>>> highlighting = response.getHighlighting();
List<String> list = highlighting.get(solrDocument.get("id")).get("item_title");
String itemTitle = null;
if (list != null && list.size() > 0) {
itemTitle = list.get(0);
} else {
itemTitle = (String) solrDocument.get("item_title");
}
System.out.println(itemTitle);
System.out.println(solrDocument.get("item_price"));
}
}
-
一键导入商品数据到solr索引库功能实现
从数据库查询所有的商品信息,把信息导入索引库
新建服务层工程:
可以参考e3-manager创建。
e3-search(聚合工程pom)
|--e3-search-interface(jar)
|--e3-search-Service(war)
表现层是manager-web的索引库管理
dao层:
查询需要的信息:商品Id、商品标题、商品卖点、商品价格、商品图片、分类名称
创建需要的pojo来封装数据,因为涉及到多表查询,需要手动创建接口和mapper映射文件。
SELECT

        a.id,

        a.title,

        a.sell_point,

        a.price,

        a.image,

        b.`name` category_name(把b的name字段改名为category_name)

FROM

        `tb_item` a

LEFT JOIN tb_item_cat b ON a.cid = b.id

WHERE a.`status`=1
service层:查询商品列表,循环把商品数据添加到索引库。使用solr实现,返回E3Result
@Service
public class SearchItemServiceImpl implements SearchItemService {

	@Autowired
	private ItemMapper itemMapper;//自己写的
	@Autowired
	private SolrServer solrServer;//需要在spring配置

	@Override
	public E3Result importItmes() {
		try {
			//查询商品列表
			List<SearchItem> itemList = itemMapper.getItemList();
			//导入索引库
			for (SearchItem searchItem : itemList) {
				//创建文档对象
				SolrInputDocument document = new SolrInputDocument();
				//向文档中添加域
				document.addField("id", searchItem.getId());
				document.addField("item_title", searchItem.getTitle());
				document.addField("item_sell_point", searchItem.getSell_point());
				document.addField("item_price", searchItem.getPrice());
				document.addField("item_image", searchItem.getImage());
				document.addField("item_category_name", searchItem.getCategory_name());
				//写入索引库
				solrServer.add(document);
			}
			//提交
			solrServer.commit();
			//返回成功
			return E3Result.ok();

		} catch (Exception e) {
			e.printStackTrace();
			return E3Result.build(500, "商品导入失败");
		}
	}

}
applicationContext-solr.xml配置solrServer:
<bean id="httpSolrServer" class="org.apache.solr.client.solrj.impl.HttpSolrServer">
		<constructor-arg index="0" value="http://192.168.25.154:8080/solr"/>
	</bean>
然后发布服务。
表现层:是manager-web的索引库管理
表现层引用服务,
@Controller
public class SearchItemController {

	@Autowired
	private SearchItemService searchItemService;

	@RequestMapping("/index/item/import")
	@ResponseBody
	public E3Result impotItemIndex() {
		E3Result result = searchItemService.importItmes();
		return result;
	}

}
-
解决Mapper映射文件不存在异常
mybatis报错,一般是找不到映射文件。(这个项目中,在search-service中,有手写的mapperxml和接口)
在e3-search-service的pom文件中需要添加资源配置。
<!-- 如果不添加此节点mybatis的mapper.xml文件都会被漏掉。 -->

      <build>

            <resources>

            <resource>

                <directory>src/main/java</directory>

                <includes>

                    <include>**/*.properties</include>

                    <include>**/*.xml</include>

                </includes>

                <filtering>false</filtering>

            </resource>

            <resource>

                <directory>src/main/resources</directory>

                <includes>

                    <include>**/*.properties</include>

                    <include>**/*.xml</include>

                </includes>

                <filtering>false</filtering>

            </resource>

        </resources>

</build>-
首页搜索功能实现
整体思路:在search-service里,新建一个dao,serviceImpl负责组装查询条件和高亮条件,dao负责拿到条件进行查询,返回结果给serviceImpl。
原理代码:
//使用solrJ实现查询
	@Test
	public void queryDocument() throws Exception {
		//创建一个SolrServer对象
		SolrServer solrServer = new HttpSolrServer("http://192.168.25.154:8080/solr");
		//创建一个查询对象,可以参考solr的后台的查询功能设置条件
		SolrQuery query = new SolrQuery();
		//设置查询条件
//		query.setQuery("阿尔卡特");
		query.set("q","阿尔卡特");
		//设置分页条件
		query.setStart(1);
		query.setRows(2);
		//开启高亮
		query.setHighlight(true);
		query.addHighlightField("item_title");
		query.setHighlightSimplePre("<em>");
		query.setHighlightSimplePost("</em>");
		//设置默认搜索域
		query.set("df", "item_title");
		//执行查询,得到一个QueryResponse对象。
		QueryResponse queryResponse = solrServer.query(query);
		//取查询结果总记录数
		SolrDocumentList solrDocumentList = queryResponse.getResults();
		System.out.println("查询结果总记录数:" + solrDocumentList.getNumFound());
		//取查询结果
		Map<String, Map<String, List<String>>> highlighting = queryResponse.getHighlighting();
		for (SolrDocument solrDocument : solrDocumentList) {
			System.out.println(solrDocument.get("id"));
			//取高亮后的结果
			List<String> list = highlighting.get(solrDocument.get("id")).get("item_title");
			String title= "";
			if (list != null && list.size() > 0) {
				//取高亮后的结果
				title = list.get(0);
			} else {
				title = (String) solrDocument.get("item_title");
			}
			System.out.println(title);
			System.out.println(solrDocument.get("item_sell_point"));
			System.out.println(solrDocument.get("item_price"));
			System.out.println(solrDocument.get("item_image"));
			System.out.println(solrDocument.get("item_category_name"));
		}

	}
项目中的代码:
package cn.xing.search.service.impl;

import org.apache.solr.client.solrj.SolrQuery;
import org.springframework.beans.factory.annotation.Autowired;
import org.springframework.stereotype.Service;

import cn.xing.pojo.SearchResult;
import cn.xing.search.dao.SearchDao;
import cn.xing.search.service.SearchService;
/**
 * 商品搜索service
 * @author Xing
 *
 */

@Service
public class SearchServiceImpl implements SearchService {

	@Autowired
	private SearchDao searchDao;


	@Override
	public SearchResult search(String keyword, int page, int rows) throws Exception {
		//设置查询条件,调用dao查询
		SolrQuery query=new SolrQuery();
		query.setQuery(keyword);//设置查询条件
		if(page<=0) page=1;
		query.setStart((page-1)*rows);//设置分页索引
		query.setRows(rows);
		//设置默认搜索域
		query.set("df", "item_title");
		//设置高亮显示
		query.setHighlight(true);
		query.addHighlightField("item_title");
		query.setHighlightSimplePre("<em style=\"color:red\">");
		query.setHighlightSimplePost("</em>");
		//执行查询
		SearchResult rs = searchDao.querySolr(query);
		//设置总页数
		int totalpages=rs.getRecourdCount()/rows;
		if(rs.getRecourdCount()%rows>0) totalpages++;
		rs.setTotalPages((long) totalpages);
		return rs;
	}

}
package cn.xing.search.dao;

import java.util.ArrayList;
import java.util.List;
import java.util.Map;

import org.apache.solr.client.solrj.SolrQuery;
import org.apache.solr.client.solrj.SolrServer;
import org.apache.solr.client.solrj.SolrServerException;
import org.apache.solr.client.solrj.response.QueryResponse;
import org.apache.solr.common.SolrDocument;
import org.apache.solr.common.SolrDocumentList;
import org.springframework.beans.factory.annotation.Autowired;
import org.springframework.stereotype.Repository;

import cn.xing.pojo.SearchItem;
import cn.xing.pojo.SearchResult;

/**
 * 搜索商品dao
 * @author Xing
 *
 */
@Repository
public class SearchDao {

	@Autowired
	private SolrServer solrServer;

	//根据查询条件query查询索引库
	public SearchResult querySolr(SolrQuery query) throws SolrServerException{
		QueryResponse queryResponse = solrServer.query(query);//查询索引库
		//取出总记录数
		SolrDocumentList results = queryResponse.getResults();
		long num = results.getNumFound();
		SearchResult rs=new SearchResult();
		rs.setRecourdCount((int) num);
		//取出商品列表,高亮
		Map<String, Map<String, List<String>>> highlighting = queryResponse.getHighlighting();
		List<SearchItem> itemList=new ArrayList<>();
		for (SolrDocument solrDocument : results) {
			SearchItem item=new SearchItem();
			item.setId((String) solrDocument.get("id"));
			item.setCategory_name((String) solrDocument.get("item_category_name"));
			item.setImage((String) solrDocument.get("item_image"));
			item.setPrice((long) solrDocument.get("item_price"));
			item.setSell_point((String) solrDocument.get("item_sell_point"));
			//取高亮结果
			List<String> list = highlighting.get(solrDocument.get("id")).get("item_title");
			if(list!=null&&list.size()>0){
				item.setTitle(list.get(0));
			}else{
				item.setTitle((String) solrDocument.get("item_title"));
			}
			itemList.add(item);
		}
		rs.setItemList(itemList);
		return rs;
	}


}
高亮结果:Map<String, Map<String, List<String>>>
整个工程的结构图:


 3112
3112


 被折叠的 条评论
为什么被折叠?
被折叠的 条评论
为什么被折叠?
 到【灌水乐园】发言


