


- LNMP架构介绍
- MySQL安装
- PHP安装
- Nginx介绍
- Nginx安装
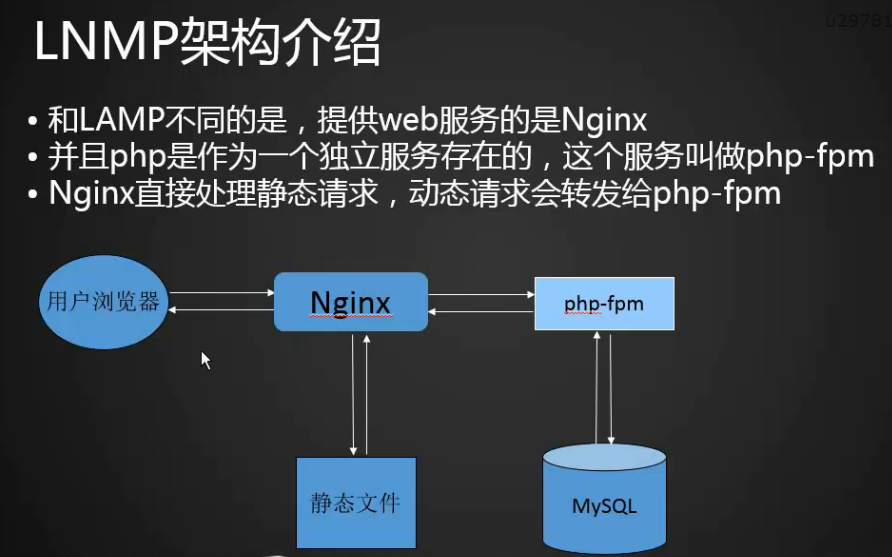
1. LNMP架构介绍
2. MySQL安装
删除Mysql
rm -rf /usr/local/mysql   #mysql安装目录
rm -rf /etc/init.d/mysqld #mysql启动脚本

cd /usr/local/src/
wget http://mirrors.163.com/mysql/Downloads/MySQL-5.6/mysql-5.6.43-linux-glibc2.12-x86_64.tar.gz
tar zxvf mysql-5.6.43-linux-glibc2.12-x86_64.tar.gz
mv mysql-5.6.43-linux-glibc2.12-x86_64 /usr/local/mysql
cd /usr/local/mysql
useradd mysql
mkdir data    #可能会已经创建
./scripts/mysql_install_db --user=mysql --datadir=/data/mysql
#可能提示以下内容
[root@test mysql]# ./scripts/mysql_install_db --user=mysql --datadir=/data/mysql
FATAL ERROR: please install the following Perl modules before executing ./scripts/mysql_install_db:
Data::Dumper  #提示缺少perl脚本的Dumper包
解决思路
缺少包首先想到的是去安装这个包,不确定包的名字先去搜索一下
yum list |grep perl |grep -i dumper   #搜索软件库首先包含perl并且包含Dumper,不确定包名大小写用-i忽略大小写
[root@test mysql]# yum list |grep perl |grep -i dumper
perl-Data-Dumper.x86_64                 2.145-3.el7                    base
perl-Data-Dumper-Concise.noarch         2.020-6.el7                    epel
perl-Data-Dumper-Names.noarch           0.03-17.el7                    epel
perl-Data-TreeDumper.noarch             0.40-19.el7                    epel
perl-XML-Dumper.noarch                  0.81-17.el7                    base
yum install -y perl-Data-Dumper  #实际上是依赖这个包(不确定可以全部安装)
./scripts/mysql_install_db --user=mysql --datadir=/data/mysql  #继续执行初始化
#继续报错,如下内容
[root@test mysql]# ./scripts/mysql_install_db --user=mysql --datadir=/data/mysql
Installing MySQL system tables..../bin/mysqld: error while loading shared libraries: libaio.so.1: cannot open shared object file: No such file or directory
解决该问题
yum install -y libaio   #缺少libaio   yum安装
./scripts/mysql_install_db --user=mysql --datadir=/data/mysql  #继续执行初始化
echo $?    #检验上一条命令是否正确执行
[root@test mysql]# echo $?
0       #输出0说明上一条命令被正确执行

启动脚本

cp support-files/mysql.server /etc/init.d/mysqld #拷贝启动脚本到/etc/init.d/目录下
编辑启动脚本
vim /etc/init.d/mysqld
basedir=/usr/local/mysql    #定义软件安装目录
datadir=/data/mysql         #定义数据目录
chown 755 /etc/init.d/mysqld  #设置权限为755 默认就是755
chkconfig --add mysqld     #加入到系统启动服务里面去(开机启动)
查看系统启动服务
[root@test mysql]# chkconfig --list

Note: This output shows SysV services only and does not include native
      systemd services. SysV configuration data might be overridden by native
      systemd configuration.

      If you want to list systemd services use 'systemctl list-unit-files'.
      To see services enabled on particular target use
      'systemctl list-dependencies [target]'.

aegis          	0:off	1:off	2:on	3:on	4:on	5:on	6:off
agentwatch     	0:off	1:off	2:on	3:on	4:on	5:on	6:off
mysqld         	0:off	1:off	2:on	3:on	4:on	5:on	6:off
netconsole     	0:off	1:off	2:off	3:off	4:off	5:off	6:off
network        	0:off	1:off	2:on	3:on	4:on	5:on	6:off
#mysql  234都是on,下次开机会自动起来
同样可以使用启动
/etc/init.d/mysqld resart
service mysqld start
/usr/local/mysql/bin/mysqld_safe --defaults-file=/etc/my.cnf --use=mysql --datadir=/data/mysql &
#--defaults-file=/etc/my.cnf 指定配置文件
#--use=mysql    指定启动用户
#--datadir=/data/mysql  指定数据文件
#&            丢到后台启动
ps aux |grep mysql #查看进程
netstat -lntp      #查看监听端口
关闭
killall mysql   #还算安全的杀死进程的命令(先停止读写将内容写入磁盘后在杀死进程)
kill 进程号     #尽量不使用(内存部分的数据会丢失)

mysql配置文件

#使用本机自带的配置文件/etc/my.cnf更改为以下内容
[root@test mysql]# cat /etc/my.cnf
[mysqld]
datadir=/data/mysql
socket=/tmp/mysql.sock
# Disabling symbolic-links is recommended to prevent assorted security risks
symbolic-links=0
# Settings user and group are ignored when systemd is used.
# If you need to run mysqld under a different user or group,
# customize your systemd unit file for mariadb according to the
# instructions in http://fedoraproject.org/wiki/Systemd

[mysqld_safe]
#log-error=/var/log/mariadb/mariadb.log
#pid-file=/var/run/mariadb/mariadb.pid

#
# include all files from the config directory
#
#!includedir /etc/my.cnf.d
3. PHP安装
需要开启php-fpm服务
cd /usr/local/src/
 wget http://cn2.php.net/distributions/php-5.6.30.tar.gz
 tar zxf php-5.6.30.tar.gz
 useradd -s /sbin/nologin php-fpm
 cd php-5.6.30
 ./configure --prefix=/usr/local/php-fpm --with-config-file-path=/usr/local/php-fpm/etc
 --enable-fpm --with-fpm-user=php-fpm --with-fpm-group=php-fpm --with-mysql=/usr/local/mysql
 --with-mysqli=/usr/local/mysql/bin/mysql_config --with-pdo-mysql=/usr/local/mysql
 --with-mysql-sock=/tmp/mysql.sock --with-libxml-dir --with-gd --with-jpeg-dir
 --with-png-dir --with-freetype-dir --with-iconv-dir --with-zlib-dir --with-mcrypt
 --enable-soap --enable-gd-native-ttf --enable-ftp --enable-mbstring --enable-exif
 --with-pear --with-curl  --with-openssl
 #问题
 依赖:
 yum install -y gcc libxml2 libxml2-devel openssl-devel libcurl-devel libjpeg-devel epel-release libmcrypt-devel  libpng-devel

make && make install
 cp php.ini-production /usr/local/php-fpm/etc/php.ini
 vi /usr/local/php/etc/php-fpm.conf //写入如下内容
 cp sapi/fpm/init.d.php-fpm /etc/init.d/php-fpm
 chmod 755 /etc/init.d/php-fpm
 chkconfig --add php-fpm
 chkconfig php-fpm on
 service php-fpm start
 ps aux |grep php-fpm
php-fpm.conf
[global]
pid = /usr/local/php-fpm/var/run/php-fpm.pid
error_log = /usr/local/php-fpm/var/log/php-fpm.log
[www]
listen = /tmp/php-fcgi.sock
listen.mode = 666
user = php-fpm
group = php-fpm
pm = dynamic
pm.max_children = 50
pm.start_servers = 20
pm.min_spare_servers = 5
pm.max_spare_servers = 35
pm.max_requests = 500
rlimit_files = 1024
4. Nginx介绍
Nginx官网 nginx.org,最新版1.13,最新稳定版1.12
 Nginx应用场景:web服务、反向代理、负载均衡
 Nginx著名分支,淘宝基于Nginx开发的Tengine,使用上和Nginx一致,服务名,
 配置文件名都一样,和Nginx的最大区别在于Tenging增加了一些定制化模块,
 在安全限速方面表现突出,另外它支持对js,css合并
 Nginx核心+lua相关的组件和模块组成了一个支持lua的高性能web容器openresty
5. Nginx安装
cd /usr/local/src
 wget http://nginx.org/download/nginx-1.12.1.tar.gz
 tar zxf nginx-1.12.1.tar.gz
 ./configure --prefix=/usr/local/nginx
 make &&  make install
 vim /etc/init.d/nginx
chmod 755 /etc/init.d/nginx
 chkconfig --add nginx
 chkconfig nginx on
 cd /usr/local/nginx/conf/; mv nginx.conf nginx.conf.bak
 vim nginx.conf //写入如下内容
 /usr/local/nginx/sbin/nginx -t
 /etc/init.d/nginx  start
 netstat -lntp |grep 80
nginx.conf
user nobody nobody;
worker_processes 2;
error_log /usr/local/nginx/logs/nginx_error.log crit;
pid /usr/local/nginx/logs/nginx.pid;
worker_rlimit_nofile 51200;

events
{
    use epoll;
    worker_connections 6000;
}

http
{
    include mime.types;
    default_type application/octet-stream;
    server_names_hash_bucket_size 3526;
    server_names_hash_max_size 4096;
    log_format combined_realip '$remote_addr $http_x_forwarded_for [$time_local]'
    ' $host "$request_uri" $status'
    ' "$http_referer" "$http_user_agent"';
    sendfile on;
    tcp_nopush on;
    keepalive_timeout 30;
    client_header_timeout 3m;
    client_body_timeout 3m;
    send_timeout 3m;
    connection_pool_size 256;
    client_header_buffer_size 1k;
    large_client_header_buffers 8 4k;
    request_pool_size 4k;
    output_buffers 4 32k;
    postpone_output 1460;
    client_max_body_size 10m;
    client_body_buffer_size 256k;
    client_body_temp_path /usr/local/nginx/client_body_temp;
    proxy_temp_path /usr/local/nginx/proxy_temp;
    fastcgi_temp_path /usr/local/nginx/fastcgi_temp;
    fastcgi_intercept_errors on;
    tcp_nodelay on;
    gzip on;
    gzip_min_length 1k;
    gzip_buffers 4 8k;
    gzip_comp_level 5;
    gzip_http_version 1.1;
    gzip_types text/plain application/x-javascript text/css text/htm
    application/xml;

    server
    {
        listen 80;
        server_name localhost;
        index index.html index.htm index.php;
        root /usr/local/nginx/html;

        location ~ \.php$
        {
            include fastcgi_params;
            fastcgi_pass unix:/tmp/php-fcgi.sock;
            fastcgi_index index.php;
            fastcgi_param SCRIPT_FILENAME /usr/local/nginx/html$fastcgi_script_name;
        }
    }
}
开机启动脚本
#!/bin/bash
# chkconfig: - 30 21
# description: http service.
# Source Function Library
. /etc/init.d/functions
# Nginx Settings

NGINX_SBIN="/usr/local/nginx/sbin/nginx"
NGINX_CONF="/usr/local/nginx/conf/nginx.conf"
NGINX_PID="/usr/local/nginx/logs/nginx.pid"
RETVAL=0
prog="Nginx"

start()
{
    echo -n $"Starting $prog: "
    mkdir -p /dev/shm/nginx_temp
    daemon $NGINX_SBIN -c $NGINX_CONF
    RETVAL=$?
    echo
    return $RETVAL
}

stop()
{
    echo -n $"Stopping $prog: "
    killproc -p $NGINX_PID $NGINX_SBIN -TERM
    rm -rf /dev/shm/nginx_temp
    RETVAL=$?
    echo
    return $RETVAL
}

reload()
{
    echo -n $"Reloading $prog: "
    killproc -p $NGINX_PID $NGINX_SBIN -HUP
    RETVAL=$?
    echo
    return $RETVAL
}

restart()
{
    stop
    start
}

configtest()
{
    $NGINX_SBIN -c $NGINX_CONF -t
    return 0
}

case "$1" in
  start)
        start
        ;;
  stop)
        stop
        ;;
  reload)
        reload
        ;;
  restart)
        restart
        ;;
  configtest)
        configtest
        ;;
  *)
        echo $"Usage: $0 {start|stop|reload|restart|configtest}"
        RETVAL=1
esac

exit $RETVAL
总结
lnmp 是通过php-fpm服务来解析php然后交给nginx来展示
lamp 是通过apache的一个模块来解析php
nginx是采用epoll模式
Apache是采用event模式
nginx是基于事件,1个进程处理多个请求
Apache是采用进程及多线程的方式,缺点是进程出问题,进程下面的线程全部中断
ps、top命令查看到的都是进程
一个进程可以有多个线程,进程出问题,进程下面的线程全部崩溃
nginx正反代理配置说明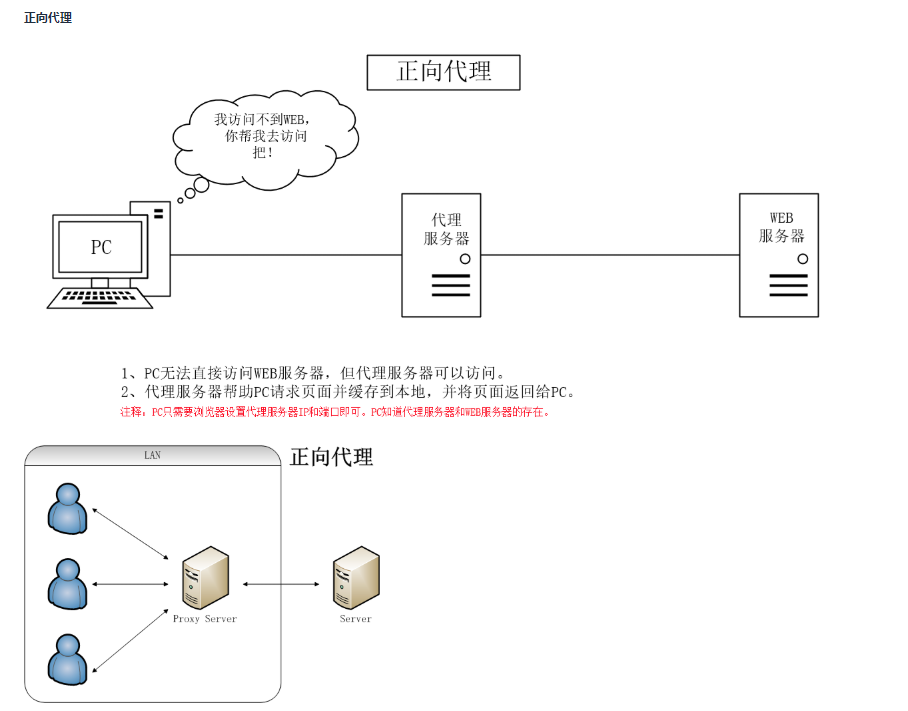

扩展
io模式
为什么基于事件驱动的服务器能实现高并发?
Nginx为什么比Apache Httpd高效:原理篇
https://www.zhihu.com/question/64727674 apache和nginx工作原理比较
概念了解:CGI,FastCGI,PHP-CGI与PHP-FPM


 710
710

 被折叠的 条评论
为什么被折叠?
被折叠的 条评论
为什么被折叠?
 到【灌水乐园】发言


