


android程序在不同的环境(如分辨率不同的机型,不同语言的操作系统)或状态(如横竖屏)下,需要不同的资源(如图片,语言),一般情况下,这些资源是自适配的,只需要命名不同的资源文件夹,把同名的资源放入这些文件夹中即可
比如下面就是一个程序项目的资源文件夹:
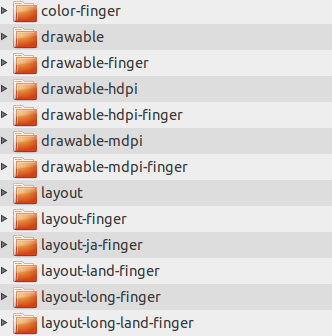
不同的命名代表什么含义呢?详细见下表:
| 限定符Qualifier | 值Values |
| 移动国家码MCC和移动网络码MNC | 手机设备SIM卡上的移动国家码和移动网络码。比如mcc310-mnc004 (美国,Verizon品牌); mcc208-mnc00 (法国,Orange品牌); mcc234-mnc00 (英国,BT品牌). |
| 语言和区域Languageand region | 两个字母的ISO639-1语言码和ISO3166-1-alpha-2区域码 (以"r"为前缀)。比如en-rUS,fr-rFR,es-rES.这个代码是大小写敏感的:语言码是小写字母,国家码是大写字母。你不能单独指定一个区域,但是你可以单独指定一个语言,比如en,fr, es, zh. |
| 屏幕方向Screenorientation | 纵向,横向,正方形(port,land, square) |
| 屏幕像素密度Screenpixel density | 92dpi,108dpi等. 当Android选择使用哪个资源时,它对屏幕像素密度的处理和其它限定符不同。在文章后面描述的步骤1Android如何查找最匹配的目录中,屏幕密度总被认为是匹配的。在步骤4中,如果被考虑的限定符是屏幕密度,Android将选择在那个位置的最佳匹配,而无需继续步骤5。 |
| 触摸屏类型Touchscreentype | 非触摸式,触摸笔,手指(notouch,stylus, finger) |
| 键盘可用方式Whetherthe keyboard is available to the user | 外在键盘,隐藏键盘,软键盘(keysexposed,keyshidden,keyssoft) |
| 首选文本输入方法Primarytext input method | 不支持按键,标准键盘,12键(nokeys,qwerty, 12key) |
| 首选非触摸式导航方法Primarynon-touchscreen | 不支持导航,滑板,跟踪球,滚轮(nonav,dpad, trackball, wheel) |
| 屏幕分辨率Screendimensions | 320x240,640x480, 等. 更大的分辨率必须先被指定。 |
| SDK版本SDKversion | 设备支持的SDK版本,比如v3。Android1.0SDK是v1,1.1SDK是v2,1.5SDK是v3。 |
| 小版本(Minorversion) | 你目前还不能指定小版本,它总是被设置为0。 |
drawable-en-rUS-land-mdpi
drawable-en-rUS-port-160dpi-finger-qwerty-dpad-480x320/(US代表美式英语)
举个使用过程中的例子:
任意建一个android项目。看一下res目录结构:
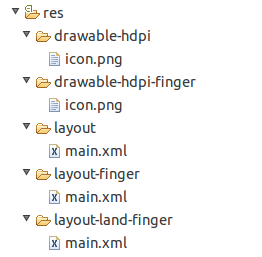
drawable-hdpi-finger与drawable-ldpi目录下面两张图片名称一样,但是图片不是同一张,分别是:
 、
、
layout、layout-finger、layout-land-finger下面的main.xml文件内容分别是:
layout/main.xml
- <?xml version="1.0" encoding="utf-8"?>
- <LinearLayout xmlns:android="http://schemas.android.com/apk/res/android"
- android:orientation="vertical"
- android:layout_width="fill_parent"
- android:layout_height="fill_parent"
- >
- <ImageView
- android:layout_width="wrap_content"
- android:layout_height="wrap_content"
- android:src="@drawable/icon"
- />
- <Button
- android:layout_width="wrap_content"
- android:layout_height="wrap_content"
- android:background="@drawable/icon"
- />
- <TextView
- android:layout_width="fill_parent"
- android:layout_height="fill_parent"
- android:text="layout on
ly"/> - </LinearLayout>
- <?xml version="1.0" encoding="utf-8"?>
- <LinearLayout xmlns:android="http://schemas.android.com/apk/res/android"
- android:orientation="vertical"
- android:layout_width="fill_parent"
- android:layout_height="fill_parent"
- >
- <ImageView
- android:layout_width="wrap_content"
- android:layout_height="wrap_content"
- android:src="@drawable/icon"
- />
- <Button
- android:layout_width="wrap_content"
- android:layout_height="wrap_content"
- android:background="@drawable/icon"
- />
- <TextView
- android:layout_width="fill_parent"
- android:layout_height="fill_parent"
- android:text="layout-finger"/>
- </LinearLayout>
layout-land-finger/main.xml
- <?xml version="1.0" encoding="utf-8"?>
- <LinearLayout xmlns:android="http://schemas.android.com/apk/res/android"
- android:orientation="vertical"
- android:layout_width="fill_parent"
- android:layout_height="fill_parent"
- >
- <ImageView
- android:layout_width="wrap_content"
- android:layout_height="wrap_content"
- android:src="@drawable/icon"
- />
- <Button
- android:layout_width="wrap_content"
- android:layout_height="wrap_content"
- android:background="@drawable/icon"
- />
- <TextView
- android:layout_width="fill_parent"
- android:layout_height="fill_parent"
- android:text="layout-land-finger"/>
- </LinearLayout>
运行App,在模拟器上显示效果
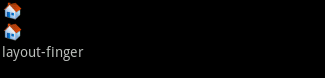
切换模拟器屏幕方向:
可以看出,显示的图片始终是,而不是。说明带有finger的文件夹优先级别较高。
layout-land-finger:适合电容屏、电阻屏以及非触摸屏的设备并且该设备是水平方向。
layout-finger:适合电容屏、电阻屏以及非触摸屏的设备但不要求是水平方向。
layout:适合电阻屏以及非触摸屏的设备。
另外,图片资源应该按照l:m:h = 3:4:6 的比例来设计,就是如果你只准备适合一种像素的drawable文件夹,如drawable-hdpi,并不是在低像素密度的手机上就不会显示图片或者报错的问题。因为资源名称是惟一的,在低像素密度手机上照样可以显示图片资源,只不过不好看而已,因为系统会自动调整hdi的大小来适配,如果系统想找一个ldpi(低密度)的资源,但找不到。那么系统会等比缩小hdpi的资源,为什么不寻找mdpi呢?因为系统对于hdpi更容易缩放,它的系数为0.5,相比mdpi的0.75来说。0.5的的性价比更高(方便计算,正确率也高一点)。关于这一点最好的证明就是android版本的QQ浏览器。你解压后发现它关于drawable就只有drawable和drawable-hdpi两个文件夹,看来腾讯里android的开发者应该很熟悉android系统规律了,因为默认的drawable 就是mdpi,只需要定义一套hdpi的drawable资源就行了。
当然,如果你想保证一些资源文件保持原样,尤其是图片不被拉伸或压缩,可以放入drawable-nodpi这个目录下
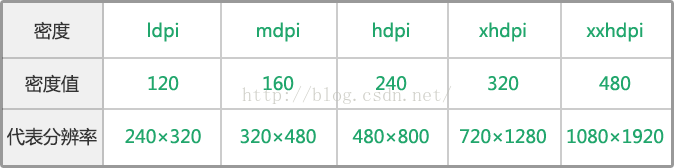
图片分辨率对应的文件夹
每部安卓手机屏幕都有一个初始的固定密度,这些数值是120、160、240、320、480,我们权且称为“系统密度”。大家发现规律没 有?相隔数值之间是2倍的关系。一般情况下,240×320的屏幕是低密度120dpi,即ldpi;320×480的屏幕是中密度160dpi,即 mdpi;480×800的屏幕是高密度240dpi,即hdpi;720×1280的屏幕是超高密度320dpi,即xhdpi;1080×1920的 屏幕是超超高密度480dpi,即xxhdpi。
安卓对界面元素进行缩放的比例依据正是系统密度,而不是实际密度。


 565
565

 被折叠的 条评论
为什么被折叠?
被折叠的 条评论
为什么被折叠?
 到【灌水乐园】发言


