


对于知乎的爬取已经进行了一段时间了,这也是真正意义上的爬虫实战,我在这段时间学到了很多。在这片文章中想进行较详细的总结。
爬取思路:对于社交网络的爬取,我们一般利用用户的关注人和粉丝人去进行遍历,而遍历到下一层的用户时再去遍历这个用户的关注和粉丝列表,这样利用递归函数我们就能够爬取到大部分用户的信息。在我的代码中,我的主要思路是先把所有用户的ID放入一个列表,然后遍历这个列表再分别去收集每个用户的信息。那么接下来让我们正式开始:
这里注意:我用的是python2,使用到的库函数以及模块有requests,json,BeautifulSoup,re,urllib2,sys,xlsxwriter,cookielib,time.
1.艰难的第一步:爬虫模拟登陆
最开始的时候尝试过免登陆爬取,因为现在有个发现-知乎,里面的内容是不需要登陆就可以查看的。但是如果不登陆,直接爬取html,爬出来的情况是只能看到粉丝或者关注人的前三个,之后就没了,它怎么实现了我也不知道......于是,开始尝试模拟登陆。
这里我们要用到requests和cookielib这两个库来对会话和cookie进行处理
关于相当厉害的requests大家可以看这里(官方文档)我主要说说cookielib这个库,cookielib模块的主要作用是提供可存储cookie的对象,coiokielib模块用到的对象主要有下面几个:CookieJar、FileCookieJar、MozillaCookieJar、LWPCookieJar。以下是详细的说明:
1、CookieJar ():管理HTTP cookie值、存储HTTP请求生成的cookie、向传出的HTTP请求添加cookie的对象。整个cookie都存储在内存中,对CookieJar实例进行垃圾回收后cookie也将丢失。
2、FileCookieJar (filename,delayload=None,policy=None):创建FileCookieJar实例,检索cookie信息并将cookie存储到文件中。filename是存储cookie的文件名。delayload为True时支持延迟访问访问文件,即只有在需要时才读取文件或在文件中存储数据。
3、MozillaCookieJar (filename,delayload=None,policy=None):创建与Mozilla浏览器cookies.txt兼容的FileCookieJar实例。
4、LWPCookieJar (filename,delayload=None,policy=None):创建与libwww-perl的Set-Cookie3文件格式兼容的FileCookieJar实例。
上四个关系如下:
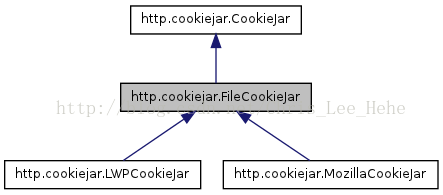
这里我们选用LWPCookiejar。当我们第一次登陆成功后,之后就能够用requests的session去访问网址了,这样就不用每次都重复登陆。现在情况是我们能够保存下来cookie,那么现在去进行第一次登陆吧!(知乎的这个cookie真的能够用好长时间)
通过观察,我们发现登陆时需要填写这几样东西:用户名(手机或邮箱);密码;时有时无的验证码;一个动态的_xsrf参数。用户名和密码我们可以加入data里面然后去post网址,验证码的话采取的办法是将图片下载下来然后手动输入。以下是login函数(只包含手机登陆)
def login(secret, account): _xsrf = get_xsrf() headers["X-Xsrftoken"] = _xsrf headers["X-Requested-With"] = "XMLHttpRequest" post_url = 'https://www.zhihu.com/login/phone_num' postdata = { '_xsrf': _xsrf, 'password': secret, 'phone_num': account } login_page = session.post(post_url, data=postdata, headers=headers) login_code = login_page.json() if login_code['r'] == 1: postdata["captcha"] = get_captcha() login_page = session.post(post_url, data=postdata, headers=headers) login_code = login_page.json() print login_code['msg'] session.cookies.save()代码说明:两个参数分别是密码和账户名(在这里是手机号码),我们通过get_xsrf()函数(之后说明这个函数)去获得_xsrf这个动态变化的参数,然后构造headers,加入postdata之后利用session去访问。这里如果不需要验证码,那么我们就直接登陆成功了。而如果需要验证码,我们就利用get_captcha()去得到验证码并加入postdata,然后再来访问。最后记得把cookie保存下来。
接下来来看看get_xsrf()和get_captcha()
def get_xsrf():
    index_url = 'https://www.zhihu.com'
    index_page = session.get(index_url, headers=headers)
    html = index_page.text
    pattern = r'name="_xsrf" value="(.*?)"'
    _xsrf = re.findall(pattern, html)
    return _xsrf[0]
大家可以发现我们找_xsrf是从html中找的。这一点是网上的先行者们找到的。知乎上有个 专栏写这里写的很详细。
def get_captcha():
    t = str(int(time.time() * 1000))
    captcha_url = 'https://www.zhihu.com/captcha.gif?r=' + t + "&type=login"
    r = session.get(captcha_url, headers=headers)
    with open('captcha.jpg', 'wb') as f:
        f.write(r.content)
        f.close()
    print '手动输入验证码'
    captcha = raw_input("输入\n>")
    return captcha
这个函数思路是访问图片所在网址并且下载下来,之后我们手动输入。这里要注意的是:首先图片是根据时间变化的,所以我们像第一行一样构造 t ,大家注意 time.time() 返回的是当前时间的时间戳(1970纪元后经过的浮点秒数);第二点是with open......as这句话为什么要这样写的原因,总体来说这是为了 提供一个有效的机制,让代码更简练,同时在异常产生时,清理工作更简单 。具体可看这里。
目前看来我们基本实现了模拟登陆,现在我们需要一个函数来测试是否登陆成功
def isLogin():
    url = "https://www.zhihu.com/settings/profile"
    login_code = session.get(url, headers=headers, allow_redirects=False).status_code
    if login_code == 200:
        return True
    else:
        return False
这个函数中的url只有某用户登陆后才能看到的,通过这个网站的响应码就可以判断我们是否登陆成功。
ok!那么我们现在实现了模拟登陆!按照之前的思路,我们要去找到一个用户的关注列表和粉丝列表。那么这就涉及到找API的问题了。
2.访问知乎API获得数据
方法是通过分析网络数据,发现接口。
第一张图:张公子的主页

我们在这里需要先打开浏览器的查看元素,然后选择网络,并圈上XHR。然后先进入某用户的主页,之后再点击关注。这样就会出现下面这张图的样子。
第二张图:查看元素
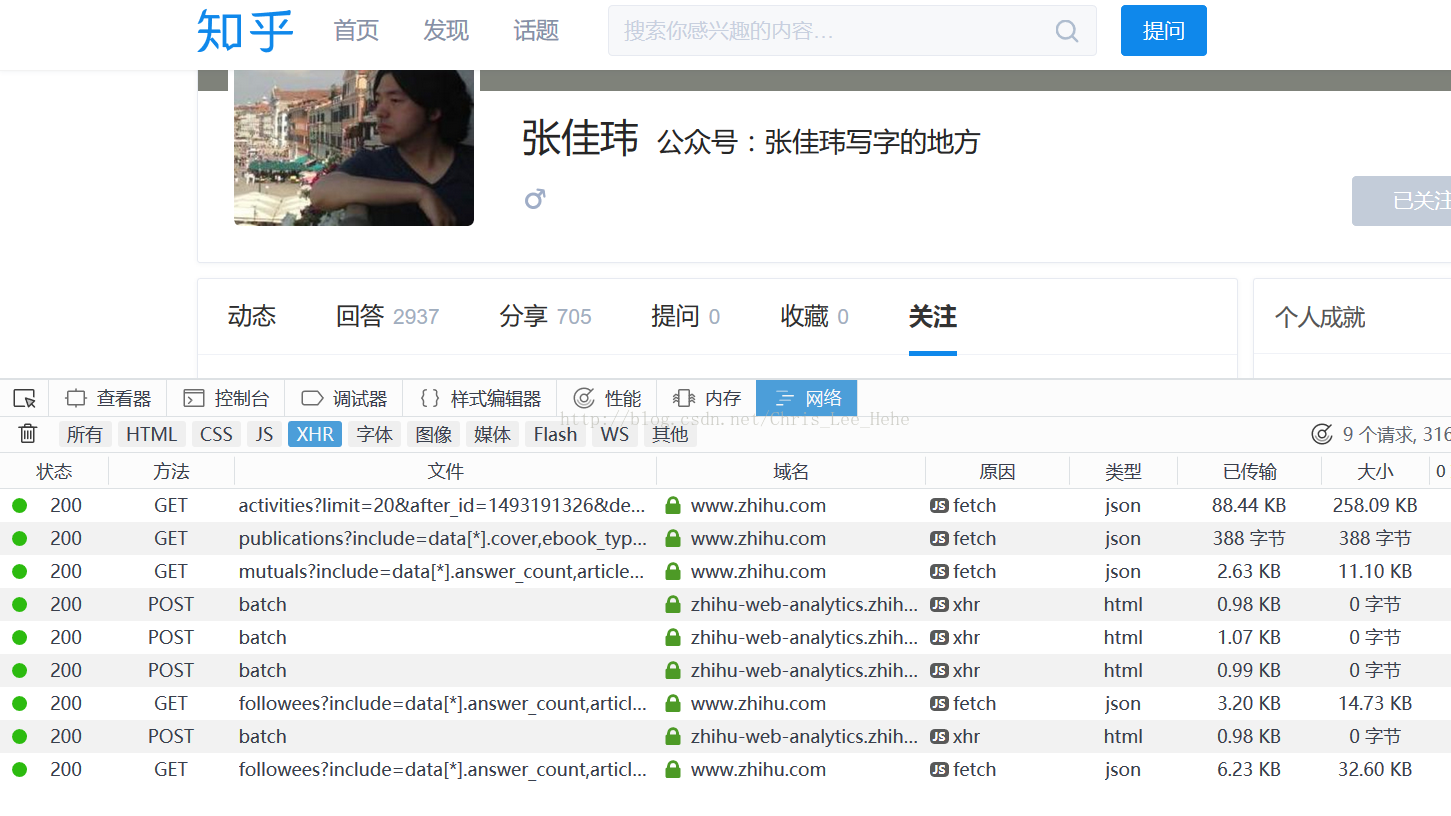
之后我们点开followee?include.......这一项,请求网址就是我们想要的API了(https://www.zhihu.com/api/v4/members/zhang-jia-wei/followees?include=data[*].answer_count,articles_count,gender,follower_count,is_followed,is_following,badge[?(type=best_answerer)].topics&offset=0&limit=20),之后我们的爬虫就可以访问这个API去获得某个用户的关注列表了。当然,这里把followees变成followers就是粉丝的接口了。这里要注意的是API网址里面的三个参数的意义:include就是包含哪些数据,offset是偏移量(每一页增加20),limit是对显示数量的限制。
3.第三步:正式开始写爬虫
根据之前的思路,我们要先遍历整个知乎全站,收集到知乎所有用户的ID,然后再来收集信息。这里我先贴出利用递归的遍历函数代码。
def Traversal(list,depth):
    if depth >= 5:
        pass
    else:
        for i in list:
            if i in BigUserIDList:
                continue
             BigUserIDList.append(i)
            print 'ID:',i
            print 'depth:',depth
            NumList=NumOfFans(i)
            if len(NumList)==0:
                pass
            else:
                try:
                    Traversal(NumList,depth+1)
                except:
                    pass
代码说明:这里的depth当然是可以不用设置的,但是在测试代码阶段还是挺有用的。这个函数的思路是,当获得一个列表,我们就用个for循环去遍历它,然后对于每个元素,我们在尝试去获得它的列表,然后反复做同样的事情,知道某个元素的列表是空的。换个方式说,我们先有一个种子用户的关注列表和粉丝列表合成的大列表,然后我们去遍历这个大列表,对于其中的每个用户再去获得他们的大列表......就这么一直下去......(去找到某个用户的大列表是用NumOfFans()这个函数实现的,具体如下)
def NumOfFans(ID):
    IDList=[]
    offset=0
    while(offset<=20):
        followers_url='https://www.zhihu.com/api/v4/members/'+ID+'/followers?include=data[*].answer_count,articles_count,gender,follower_count,is_followed,is_following,badge[?(type=best_answerer)].topics&offset='+str(offset)+'&limit=20'
        followees_url='https://www.zhihu.com/api/v4/members/'+ID+'/followees?include=data[*].answer_count,articles_count,gender,follower_count,is_followed,is_following,badge[?(type=best_answerer)].topics&offset='+str(offset)+'&limit=20'
        try:
            time.sleep(3)
            html1 = session.get(followers_url, headers=headers).text
            dic1 = json.loads(html1)  # 将json数据转换成python的字典格式
            if len(dic1['data'])!=0:
                for i in dic1['data']:  # 输出粉丝的数量
                    IDList.append(i['url_token'])
            #print '正在遍历' + ID + '关注的人'
            html2=session.get(followees_url,headers=headers).text
            dic2=json.loads(html2)
            if len(dic2['data'])!=0:
                for j in dic2['data']:
                    IDList.append(j['url_token'])
            if len(dic1['data'])==len(dic2['data'])==0:
                break
        except:
            pass
        offset+=20
    return IDList
这里offset也是为了测试所以设置了20,在你遍历时只要while(Ture)就行了...
现在我们有了一个相当长的列表,里面是无数个人的ID。那么要做的就是遍历这个列表,并且开始收集每个ID的信息了。(获取用户信息的API之前忘了说了,方法类似,只要我们将鼠标移动到某个用户的头像上,我们就能够看到我们浏览器在向那个API请求数据,这个API是https://www.zhihu.com/api/v4/members/wang-you-28?include=locations,employments,gender,educations,business,voteup_count,thanked_Count,follower_count,following_count,cover_url,following_topic_count,following_question_count,following_favlists_count,following_columns_count,avatar_hue,answer_count,articles_count,pins_count,question_count,commercial_question_count,favorite_count,favorited_count,logs_count,marked_answers_count,marked_answers_text,message_thread_token,account_status,is_active,is_force_renamed,is_bind_sina,sina_weibo_url,sina_weibo_name,show_sina_weibo,is_blocking,is_blocked,is_following,is_followed,mutual_followees_count,vote_to_count,vote_from_count,thank_to_count,thank_from_count,thanked_count,description,hosted_live_count,participated_live_count,allow_message,industry_category,org_name,org_homepage,badge[?(type=best_answerer)].topics)
可以看到这里面包含很多的信息!
那么这时候就开始收集信息吧!我们来写一个collect()函数
def collect(id):
    print '采集信息中...'
    try:
        VarUrl = 'https://www.zhihu.com/api/v4/members/' + str(
            id) + '?include=locations,employments,gender,educations,business,voteup_count,thanked_Count,follower_count,following_count,cover_url,following_topic_count,following_question_count,following_favlists_count,following_columns_count,avatar_hue,answer_count,articles_count,pins_count,question_count,commercial_question_count,favorite_count,favorited_count,logs_count,marked_answers_count,marked_answers_text,message_thread_token,account_status,is_active,is_force_renamed,is_bind_sina,sina_weibo_url,sina_weibo_name,show_sina_weibo,is_blocking,is_blocked,is_following,is_followed,mutual_followees_count,vote_to_count,vote_from_count,thank_to_count,thank_from_count,thanked_count,description,hosted_live_count,participated_live_count,allow_message,industry_category,org_name,org_homepage,badge[?(type=best_answerer)].topics'
        time.sleep(1)
        html = session.get(VarUrl, headers=headers).text
        dic = json.loads(html)
        '''注意用户的机构号的构造不同'''
        if dic['user_type'] == "people":  # 如果是用户
            VarDict = {}
           VarDict['voteup_count'] = sure(dic, 'voteup_count') # 赞同数
            VarDict['answer_count'] = sure(dic, 'answer_count')  # 回答数
            VarDict['following_count'] = sure(dic, 'following_count')  # 关注数
            VarDict['follower_count'] = sure(dic, 'follower_count')
            VarDict['following_question_count'] = sure(dic, 'following_question_count')
            VarDict['thanked_count'] = sure(dic, 'thanked_count')
            VarDict['favorited_count'] = sure(dic, 'favorited_count')
            VarDict['hosted_live_count'] = sure(dic, 'hosted_live_count')
            VarDict['participated_live_count'] = sure(dic, 'participated_live_count')
            VarDict['following_columns_count'] = sure(dic, 'following_columns_count')
            VarDict['marked_answers_count'] = sure(dic, 'marked_answers_count')
            VarDict['favorite_count'] = sure(dic, 'favorite_count')
            VarDict['following_topic_count'] = sure(dic, 'following_topic_count')
            VarDict['question_count'] = sure(dic, 'question_count')
            VarDict['gender'] = sure(dic, 'gender')
           VarDict['vote_from_count'] = sure(dic, 'vote_from_count')
           VarDict['pins_count'] = sure(dic, 'pins_count')
           VarDict['commercial_question_count'] = sure(dic, 'commercial_question_count')
           VarDict['following_favlists_count'] = sure(dic, 'following_favlists_count')
           VarDict['is_org'] = sure(dic, 'is_org')
           VarDict['is_advertiser'] = sure(dic, 'is_advertiser')
           VarDict['is_bind_sina'] = sure(dic, 'is_bind_sina')
           VarDict['is_active'] = sure(dic, 'is_active')
           VarDict['articles_count'] = sure(dic, 'articles_count')
           VarDict['logs_count'] = sure(dic, 'logs_count')
           BigDict[id] = VarDict
    except:
        pass
有了这个函数我们就可以收集用户的信息啦!
文章先写到这里:之后会在补充以下内容
1.代码中的一些小亮点
2.依然存在的问题以及优化方案


 2470
2470


 被折叠的 条评论
为什么被折叠?
被折叠的 条评论
为什么被折叠?
 到【灌水乐园】发言


