


RabbitMQ - 整合Spring
目录
1. Spring 整合 RabbitMQ
注意:RabbitMQ相关配置在 安装配置 中已涉及。
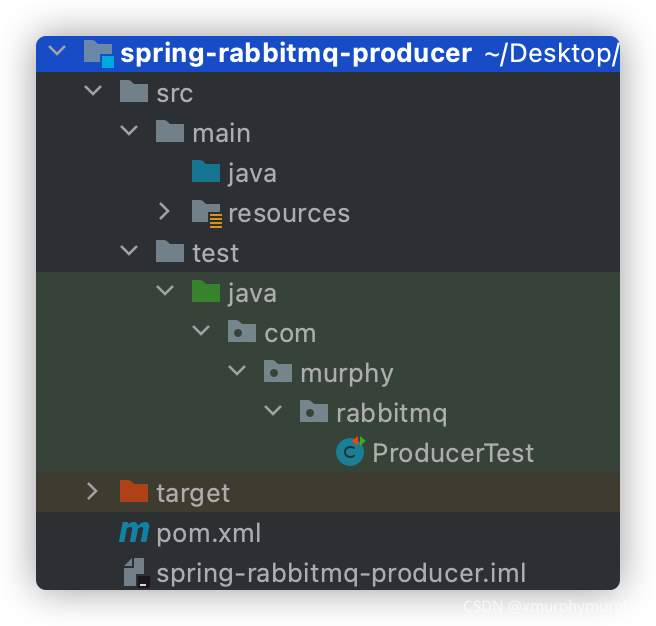
1.1 搭建生产者工程
1.1.1 创建工程
1.1.2 添加依赖
修改pom.xml文件内容为如下:
<dependencies>
    <dependency>
        <groupId>org.springframework</groupId>
        <artifactId>spring-context</artifactId>
        <version>5.2.13.RELEASE</version>
    </dependency>

    <dependency>
        <groupId>org.springframework.amqp</groupId>
        <artifactId>spring-rabbit</artifactId>
        <version>2.1.8.RELEASE</version>
    </dependency>

    <dependency>
        <groupId>org.springframework</groupId>
        <artifactId>spring-test</artifactId>
        <version>5.2.13.RELEASE</version>
    </dependency>

    <dependency>
        <groupId>junit</groupId>
        <artifactId>junit</artifactId>
        <version>4.12</version>
        <scope>test</scope>
    </dependency>
</dependencies>
1.1.3 配置整合
- 创建
spring-rabbitmq-producer\src\main\resources\properties\rabbitmq.properties连接参数等配置文件;
rabbitmq.host=192.168.2.190 # 虚拟机地址
rabbitmq.port=5672
rabbitmq.username=murphy
rabbitmq.password=xmf123123
rabbitmq.virtual-host=/mq
- 创建
spring-rabbitmq-producer\src\main\resources\spring\spring-rabbitmq.xml整合配置文件;
<?xml version="1.0" encoding="UTF-8"?>
<beans xmlns="http://www.springframework.org/schema/beans"
xmlns:xsi="http://www.w3.org/2001/XMLSchema-instance"
xmlns:context="http://www.springframework.org/schema/context"
xmlns:rabbit="http://www.springframework.org/schema/rabbit"
xsi:schemaLocation="http://www.springframework.org/schema/beans
http://www.springframework.org/schema/beans/spring-beans.xsd
http://www.springframework.org/schema/context
http://www.springframework.org/schema/context/spring-context.xsd
http://www.springframework.org/schema/rabbit
http://www.springframework.org/schema/rabbit/spring-rabbit.xsd ">
<!-- 加载配置文件 -->
<context:property-placeholder location="classpath:properties/rabbitmq.properties"/>
<!-- 定义 rabbitmq connectionFactory -->
<rabbit:connection-factory id="connectionFactory"
host="${rabbitmq.host}"
port="${rabbitmq.port}"
username="${rabbitmq.username}"
password="${rabbitmq.password}"
virtual-host="${rabbitmq.virtual-host}"/>
<!-- 定义管理交换机、队列 -->
<rabbit:admin connection-factory="connectionFactory"/>
<!-- 定义持久化队列,不存在则自动创建,不绑定到交换机则绑定到默认交换机 - 默认交换机类型为direct,名字为:"",路由键为队列的名称 -->
<rabbit:queue id="spring_queue" name="spring_queue" auto-declare="true"/>
<!-- 广播:所有队列均能接收到消息 -->
<!-- 定义广播交换机中的持久化队列,不存在则自动创建 - auto-declare: 自动声明 -->
<rabbit:queue id="spring_fanout_queue_1" name="spring_fanout_queue_1" auto-declare="true"/>
<rabbit:queue id="spring_fanout_queue_2" name="spring_fanout_queue_2" auto-declare="true"/>
<!-- 定义广播类型交换机:并绑定上述两个队列 -->
<rabbit:fanout-exchange id="spring_fanout_exchange" name="spring_fanout_exchange" auto-declare="true">
<rabbit:bindings>
<rabbit:binding queue="spring_fanout_queue_1"/>
<rabbit:binding queue="spring_fanout_queue_2"/>
</rabbit:bindings>
</rabbit:fanout-exchange>
<!-- 通配符:* - 匹配一个单词 / # - 匹配多个单词 -->
<!-- 定义广播交换机中的持久化队列,不存在则自动创建 -->
<rabbit:queue id="spring_topic_queue_star" name="spring_topic_queue_star" auto-declare="true"/>
<rabbit:queue id="spring_topic_queue_well1" name="spring_topic_queue_well1" auto-declare="true"/>
<rabbit:queue id="spring_topic_queue_well2" name="spring_topic_queue_well2" auto-declare="true"/>
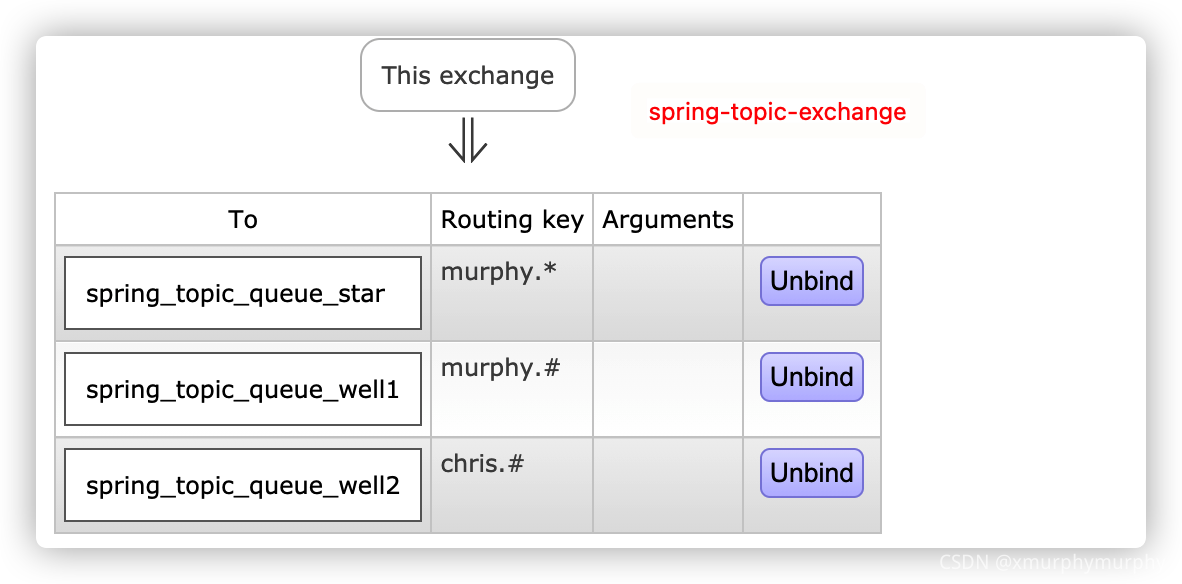
<!-- 定义Topic类型交换机:并绑定上述队列 -->
<rabbit:topic-exchange id="spring_topic_exchange" name="spring_topic_exchange" auto-declare="true">
<rabbit:bindings>
<rabbit:binding pattern="murphy.*" queue="spring_topic_queue_star"/>
<rabbit:binding pattern="murphy.#" queue="spring_topic_queue_well1"/>
<rabbit:binding pattern="chris.#" queue="spring_topic_queue_well2"/>
</rabbit:bindings>
</rabbit:topic-exchange>
<!-- 定义 rabbitTemplate 对象操作可以在代码中方便发送消息 -->
<rabbit:template id="rabbitTemplate" connection-factory="connectionFactory"/>
</beans>
1.1.4 发送消息
创建测试文件spring-rabbitmq-producer\src\test\java\com\murphy\rabbitmq\ProducerTest.java
/**
 * 生产者
 *
 * @author murphy
 */
@RunWith(SpringJUnit4ClassRunner.class)
@ContextConfiguration(locations = "classpath:/spring/spring-rabbitmq.xml")
public class ProducerTest {

    @Autowired
    private RabbitTemplate rabbitTemplate;

    /**
     * 只发队列消息
     * 默认交换机类型:direct
     * 交换机的名字为空,路由键为队列的名称
     */
    @Test
    public void testQueue() {
        // 路由键与队列同名
        rabbitTemplate.convertAndSend("spring_queue","Send Messages - spring_queue");
    }

    /**
     * 发送广播
     * 交换机类型:Fanout
     * 绑定到该交换机的所有队列均能接收消息
     */
    @Test
    public void fanoutTest() {
        /**
         * 参数1:交换机名称
         * 参数2:路由键名(广播设置为空)
         * 参数3:发送的消息名称
         */
        rabbitTemplate.convertAndSend("spring_fanout_exchange","",
                "Send Messages - spring_fanout_exchange");
    }

    /**
     * 通配符
     * 交换机类型:Topic
     * 匹配路由键的通配符,*表示一个单词,#表示多个单词
     * 绑定到该交换机的匹配队列能够收到对应消息
     */
    @Test
    public void topicTest() {
        /**
         * 参数1:交换机名称
         * 参数2:路由键名
         * 参数3:发送的消息内容
         */
        rabbitTemplate.convertAndSend("spring_topic_exchange","murphy.test",
                "Send Messages - spring_topic_exchange - Murphy.Test");
        rabbitTemplate.convertAndSend("spring_topic_exchange","murphy.test.1",
                "Send Messages - spring_topic_exchange - Murphy.Test.1");
        rabbitTemplate.convertAndSend("spring_topic_exchange","murphy.test.2",
                "Send Messages - spring_topic_exchange - Murphy.Test.2");
        rabbitTemplate.convertAndSend("spring_topic_exchange","chris.#",
                "Send Messages - spring_topic_exchange - chris.com");
    }
}
测试运行效果

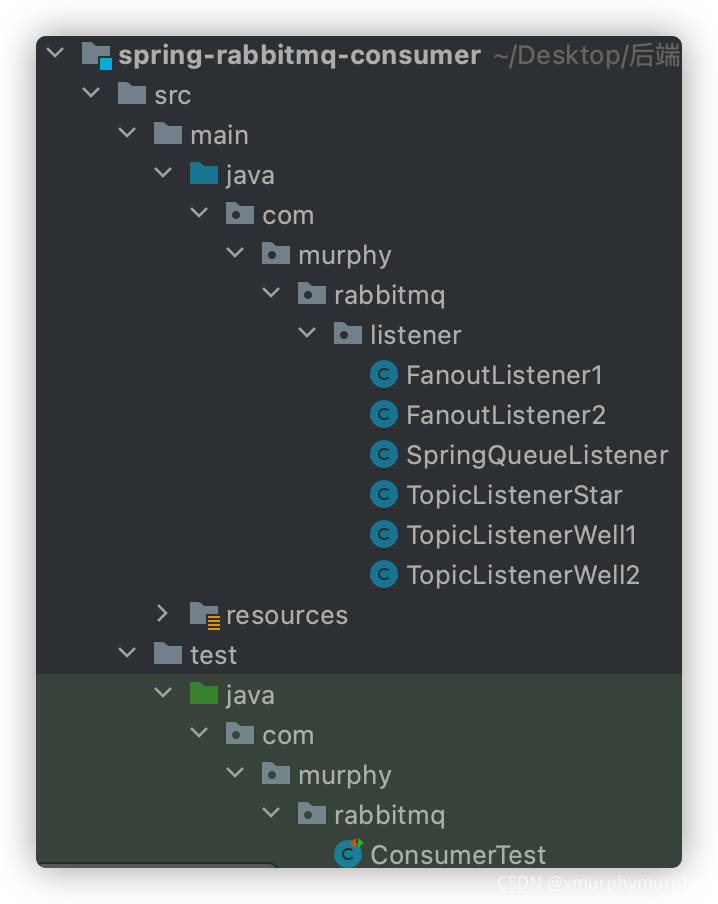
1.2 搭建消费者工程
1.2.1 创建工程
1.2.2 添加依赖
修改pom.xml文件内容为如下:
<dependencies>
    <dependency>
        <groupId>org.springframework</groupId>
        <artifactId>spring-context</artifactId>
        <version>5.2.13.RELEASE</version>
    </dependency>

    <dependency>
        <groupId>org.springframework.amqp</groupId>
        <artifactId>spring-rabbit</artifactId>
        <version>2.1.8.RELEASE</version>
    </dependency>

    <dependency>
        <groupId>org.springframework</groupId>
        <artifactId>spring-test</artifactId>
        <version>5.2.13.RELEASE</version>
    </dependency>

    <dependency>
        <groupId>junit</groupId>
        <artifactId>junit</artifactId>
        <version>4.12</version>
        <scope>test</scope>
    </dependency>
</dependencies>
1.2.3 配置整合
- 创建
spring-rabbitmq-consumer\src\main\resources\properties\rabbitmq.properties连接参数等配置文件;
rabbitmq.host=192.168.2.190
rabbitmq.port=5672
rabbitmq.username=murphy
rabbitmq.password=xmf123123
rabbitmq.virtual-host=/mq
- 创建
spring-rabbitmq-consumer\src\main\resources\spring\spring-rabbitmq.xml整合配置文件;
<?xml version="1.0" encoding="UTF-8"?>
<beans xmlns="http://www.springframework.org/schema/beans"
       xmlns:xsi="http://www.w3.org/2001/XMLSchema-instance"
       xmlns:context="http://www.springframework.org/schema/context"
       xmlns:rabbit="http://www.springframework.org/schema/rabbit"
       xsi:schemaLocation="http://www.springframework.org/schema/beans
       http://www.springframework.org/schema/beans/spring-beans.xsd
       http://www.springframework.org/schema/context
       http://www.springframework.org/schema/context/spring-context.xsd
       http://www.springframework.org/schema/rabbit
       http://www.springframework.org/schema/rabbit/spring-rabbit.xsd ">

    <!-- 加载配置文件 -->
    <context:property-placeholder location="classpath:properties/rabbitmq.properties"/>

    <!-- 定义 rabbitmq connectionFactory -->
    <rabbit:connection-factory id="connectionFactory"
                               host="${rabbitmq.host}"
                               port="${rabbitmq.port}"
                               username="${rabbitmq.username}"
                               password="${rabbitmq.password}"
                               virtual-host="${rabbitmq.virtual-host}"/>
    <!-- 监听器 - 注册 -->
    <bean id="springQueueListener" class="com.murphy.rabbitmq.listener.SpringQueueListener"/>
    <bean id="fanoutListener1" class="com.murphy.rabbitmq.listener.FanoutListener1"/>
    <bean id="fanoutListener2" class="com.murphy.rabbitmq.listener.FanoutListener2"/>
    <bean id="topicListenerStar" class="com.murphy.rabbitmq.listener.TopicListenerStar"/>
    <bean id="topicListenerWell1" class="com.murphy.rabbitmq.listener.TopicListenerWell1"/>
    <bean id="topicListenerWell2" class="com.murphy.rabbitmq.listener.TopicListenerWell2"/>
    <!-- 监听器 - 监听与消费 -->
    <rabbit:listener-container connection-factory="connectionFactory" auto-declare="true">
        <rabbit:listener ref="springQueueListener" queue-names="spring_queue"/>
        <rabbit:listener ref="fanoutListener1" queue-names="spring_fanout_queue_1"/>
        <rabbit:listener ref="fanoutListener2" queue-names="spring_fanout_queue_2"/>
        <rabbit:listener ref="topicListenerStar" queue-names="spring_topic_queue_star"/>
        <rabbit:listener ref="topicListenerWell1" queue-names="spring_topic_queue_well1"/>
        <rabbit:listener ref="topicListenerWell2" queue-names="spring_topic_queue_well2"/>
    </rabbit:listener-container>
</beans>
1.2.4 消息监听器
- 队列监听器
- 创建
spring-rabbitmq-consumer\src\main\java\com\murphy\rabbitmq\listener\SpringQueueListener.java
/**
 * 消息队列
 *
 * @author murphy
 */
public class SpringQueueListener implements MessageListener {

    public void onMessage(Message message) {
        try {
            String msg = new String(message.getBody(),"UTF-8");
            System.out.printf("Receiving —— 路由名称:%s,路由键:%s,队列名:%s,消息内容:%s \n",
                    message.getMessageProperties().getReceivedExchange(),
                    message.getMessageProperties().getReceivedRoutingKey(),
                    message.getMessageProperties().getConsumerQueue(),
                    msg);
        } catch (Exception e) {
            e.printStackTrace();
        }
    }
}
- 广播监听器 1
- 创建
spring-rabbitmq-consumer\src\main\java\com\murphy\rabbitmq\listener\FanoutListener1.java
/**
 * 消息队列
 *
 * @author murphy
 */
public class FanoutListener1 implements MessageListener {

    public void onMessage(Message message) {
        try {
            String msg = new String(message.getBody(),"UTF-8");
            System.out.printf("Receiving —— 路由名称:%s,路由键:%s,队列名:%s,消息内容:%s \n",
                    message.getMessageProperties().getReceivedExchange(),
                    message.getMessageProperties().getReceivedRoutingKey(),
                    message.getMessageProperties().getConsumerQueue(),
                    msg);
        } catch (Exception e) {
            e.printStackTrace();
        }
    }
}
- 广播监听器 2
- 创建
spring-rabbitmq-consumer\src\main\java\com\murphy\rabbitmq\listener\FanoutListener2.java
/**
 * 消息队列
 *
 * @author murphy
 */
public class FanoutListener2 implements MessageListener {

    public void onMessage(Message message) {
        try {
            String msg = new String(message.getBody(),"UTF-8");
            System.out.printf("Receiving —— 路由名称:%s,路由键:%s,队列名:%s,消息内容:%s \n",
                    message.getMessageProperties().getReceivedExchange(),
                    message.getMessageProperties().getReceivedRoutingKey(),
                    message.getMessageProperties().getConsumerQueue(),
                    msg);
        } catch (Exception e) {
            e.printStackTrace();
        }
    }
}
*号通配符监听器
- 创建
spring-rabbitmq-consumer\src\main\java\com\murphy\rabbitmq\listener\TopicListenerStar.java
/**
 * 消息队列
 *
 * @author murphy
 */
public class TopicListenerStar implements MessageListener {

    public void onMessage(Message message) {
        try {
            String msg = new String(message.getBody(),"UTF-8");
            System.out.printf("Receiving —— 路由名称:%s,路由键:%s,队列名:%s,消息内容:%s \n",
                    message.getMessageProperties().getReceivedExchange(),
                    message.getMessageProperties().getReceivedRoutingKey(),
                    message.getMessageProperties().getConsumerQueue(),
                    msg);
        } catch (Exception e) {
            e.printStackTrace();
        }
    }
}
#号通配符监听器 1
- 创建
spring-rabbitmq-consumer\src\main\java\com\murphy\rabbitmq\listener\TopicListenerWell1.java
/**
 * 消息队列
 *
 * @author murphy
 * @since 2021/9/12 12:12 下午
 */
public class TopicListenerWell1 implements MessageListener {

    public void onMessage(Message message) {
        try {
            String msg = new String(message.getBody(),"UTF-8");
            System.out.printf("Receiving —— 路由名称:%s,路由键:%s,队列名:%s,消息内容:%s \n",
                    message.getMessageProperties().getReceivedExchange(),
                    message.getMessageProperties().getReceivedRoutingKey(),
                    message.getMessageProperties().getConsumerQueue(),
                    msg);
        } catch (Exception e) {
            e.printStackTrace();
        }
    }
}
#号通配符监听器 2
- 创建
spring-rabbitmq-consumer\src\main\java\com\murphy\rabbitmq\listener\TopicListenerWell2.java
/**
 * 消息队列
 *
 * @author murphy
 */
public class TopicListenerWell2 implements MessageListener {

    public void onMessage(Message message) {
        try {
            String msg = new String(message.getBody(),"UTF-8");
            System.out.printf("Receiving —— 路由名称:%s,路由键:%s,队列名:%s,消息内容:%s \n",
                    message.getMessageProperties().getReceivedExchange(),
                    message.getMessageProperties().getReceivedRoutingKey(),
                    message.getMessageProperties().getConsumerQueue(),
                    msg);
        } catch (Exception e) {
            e.printStackTrace();
        }
    }
}
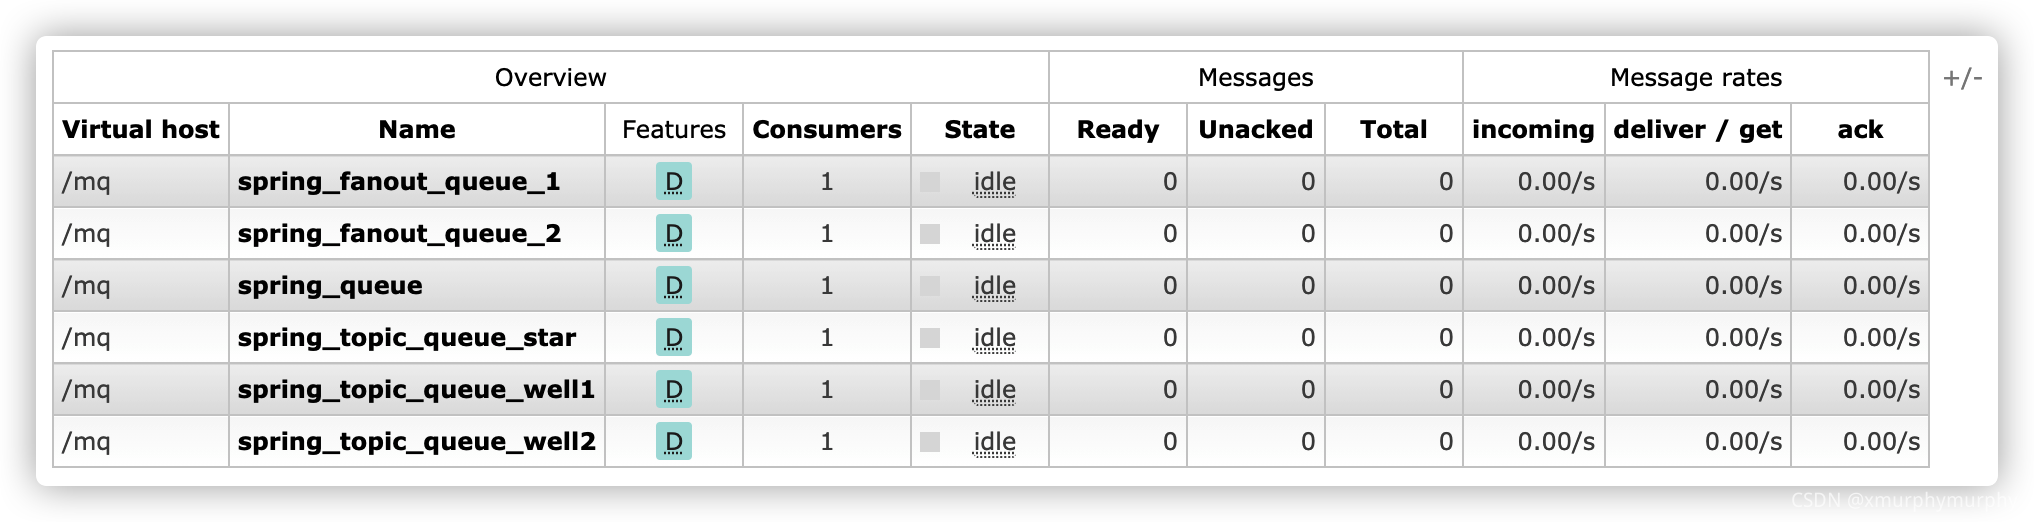
1.2.5 接收信息
创建测试类
/**
 * 消费者
 *
 * @author murphy
 */
@RunWith(SpringJUnit4ClassRunner.class)
@ContextConfiguration(locations = "classpath:/spring/spring-rabbitmq.xml")
public class ConsumerTest {

    @Test
    public void test() {
        while (true) {

        }
    }
}
测试结果

2. SpringBoot 整合 RabbitMQ
2.1 简介
在Spring项目中,可以使用Spring-Rabbit去操作RabbitMQ ,而在SpringBoot项目中只需要引入对应的amqp启动器依赖即可,方便的使用RabbitTemplate发送消息,使用注解接收消息。
一般在开发过程中:
-
生产者工程:
application.yml文件配置RabbitMQ相关信息;- 在生产者工程中编写配置类,用于创建交换机和队列,并进行绑定
- 注入
RabbitTemplate对象,通过RabbitTemplate对象发送消息到交换机
-
消费者工程:
application.yml文件配置RabbitMQ相关信息- 创建消息处理类,用于接收队列中的消息并进行处理
2.2 搭建生产者工程
2.2.1 创建工程

2.2.2 添加依赖
<parent>
    <groupId>org.springframework.boot</groupId>
    <artifactId>spring-boot-starter-parent</artifactId>
    <version>2.3.0.RELEASE</version>
</parent>

<dependencies>
    <dependency>
        <groupId>org.springframework.boot</groupId>
        <artifactId>spring-boot-starter-amqp</artifactId>
    </dependency>
    <dependency>
        <groupId>org.springframework.boot</groupId>
        <artifactId>spring-boot-starter-test</artifactId>
    </dependency>
</dependencies>
2.2.3 配置整合
创建启动类 - com.murphy.rabbitmq.ProducerApplication
@SpringBootApplication
public class ProducerApplication {
    public static void main(String[] args) {
        SpringApplication.run(ProducerApplication.class, args);
    }
}
创建配置文件 - resources/application.yml
spring:
  rabbitmq:
    host: 192.168.2.190
    port: 5672
    username: murphy
    password: xmf123123
    virtual-host: /mq
创建配置文件 - com.murphy.rabbitmq.config.RabbitMQConfig - 进行RabbitMQ的相关配置
/**
 * RabbitMQ配置
 *
 * @author murphy
 */
@Configuration
public class RabbitMQConfig {
    // 交换机名称
    public static final String ITEM_TOPIC_EXCHANGE = "springboot_item_topic_exchange";
    // 队列名称
    public static final String ITEM_QUEUE = "springboot_item_queue";

    // 声明交换机
    @Bean
    public Exchange itemTopicExchange() {
        return ExchangeBuilder.topicExchange(ITEM_TOPIC_EXCHANGE).durable(true).build();
    }

    // 声明队列
    @Bean
    public Queue itemQueue() {
        return QueueBuilder.durable(ITEM_QUEUE).build();
    }

    // 绑定队列和交换机 - noargs:不传参数
    @Bean
    public Binding itemQueueExchange(@Qualifier("itemQueue") Queue queue,
                                     @Qualifier("itemTopicExchange") Exchange exchange) {
        return BindingBuilder.bind(queue).to(exchange).with("item.*").noargs();
    }
}
2.2.4 发送消息
创建测试类
/**
 * 生产者
 *
 * @author murphy
 */
@RunWith(SpringRunner.class)
@SpringBootTest
public class SpringBootProducerTest {

    @Autowired
    private RabbitTemplate rabbitTemplate;

    @Test
    public void test() {
        rabbitTemplate.convertAndSend(RabbitMQConfig.ITEM_TOPIC_EXCHANGE,"item.insert",
                "INSERT - Routing Key:item.insert");
        rabbitTemplate.convertAndSend(RabbitMQConfig.ITEM_TOPIC_EXCHANGE,"item.update",
                "UPDATE - Routing Key:item.update");
        rabbitTemplate.convertAndSend(RabbitMQConfig.ITEM_TOPIC_EXCHANGE,"item.delete",
                "DELETE - Routing Key:item.delete");
    }
}
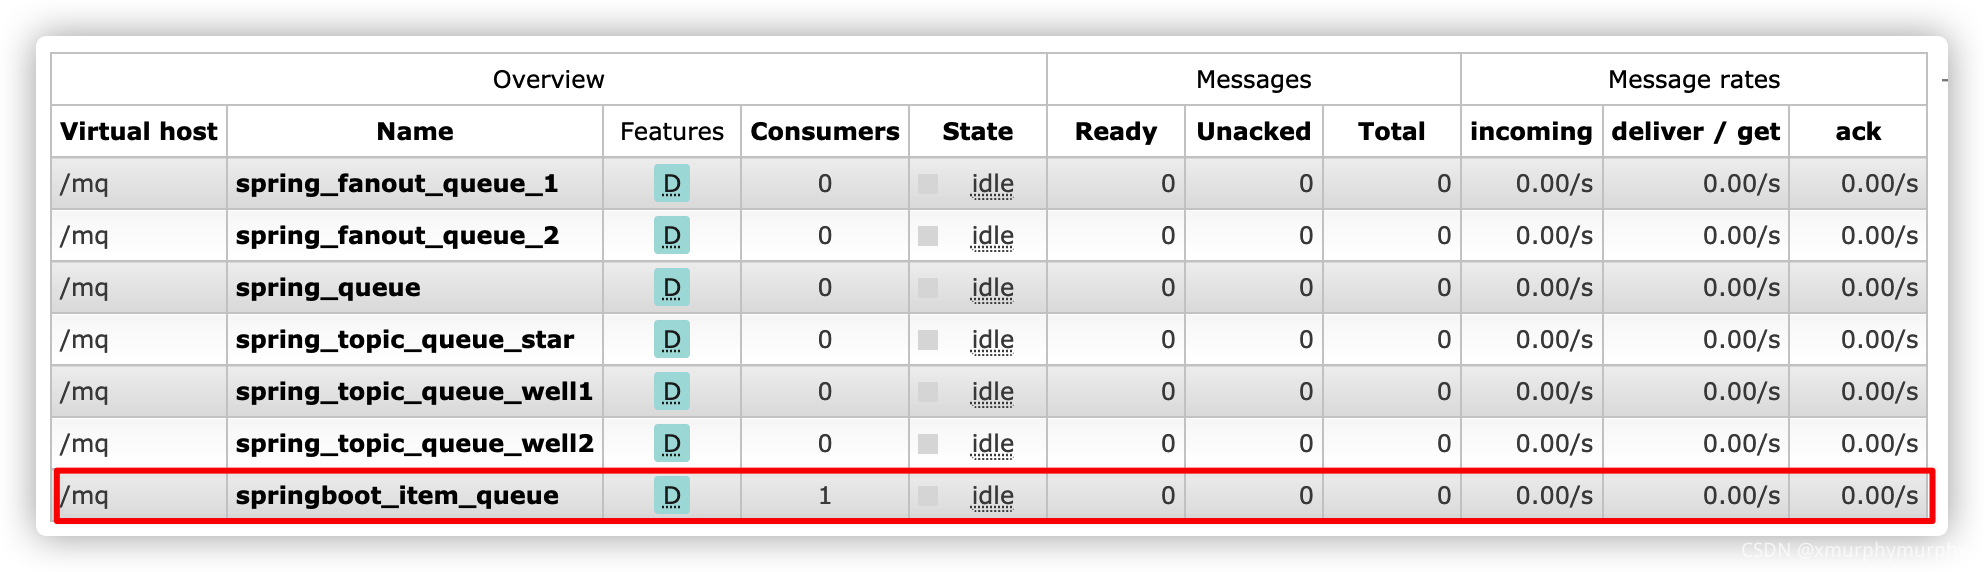
先运行上述测试程序(交换机和队列才能先被声明和绑定),然后启动消费者;在消费者工程springboot-rabbitmq-consumer中控制台查看是否接收到对应消息。
运行结果 - 交换机与队列的绑定


2.3 搭建消费者工程
2.3.1 创建工程

2.3.2 添加依赖
<parent>
    <groupId>org.springframework.boot</groupId>
    <artifactId>spring-boot-starter-parent</artifactId>
    <version>2.3.0.RELEASE</version>
</parent>

<dependencies>
    <dependency>
        <groupId>org.springframework.boot</groupId>
        <artifactId>spring-boot-starter-amqp</artifactId>
    </dependency>
    <dependency>
        <groupId>org.springframework.boot</groupId>
        <artifactId>spring-boot-starter-test</artifactId>
    </dependency>
</dependencies>
2.3.3 配置整合
启动类 - com.murphy.rabbitmq.ConsumerApplication
@SpringBootApplication
public class ConsumerApplication {
    public static void main(String[] args) {
        SpringApplication.run(ConsumerApplication.class, args);
    }
}
配置类 application.yml - resources/application.yml
spring:
  rabbitmq:
    host: 192.168.2.190
    port: 5672
    username: murphy
    password: xmf123123
    virtual-host: /mq
2.3.4 消息监听
消息监听器 - com.murphy.rabbitmq.listener.MyListener
/**
 * 监听器
 *
 * @author murphy
 */
@Component
public class MyListener {

    /**
     * 监听某个队列的消息
     * @param message 消息内容
     */
    @RabbitListener(queues = "springboot_item_queue")
    public void myListener1(String message) {
        System.out.println("Receiving:" + message);
    }
}
2.3.5 接收消息
测试类
@RunWith(SpringRunner.class)
@SpringBootTest
public class ConsumerTest {

    @Test
    public void test() {
        while (true) {

        }
    }
}
运行结果


 649
649


 被折叠的 条评论
为什么被折叠?
被折叠的 条评论
为什么被折叠?
 到【灌水乐园】发言


