


1、去mycat官网下载至少1.6的官方版本 我的是Mycat-server-1.6.7.3-release-20190809210613-linux.tar.gz(centos7)
2、解压,配置jdk和其环境变量。因为mycat就是java开发的。不多解释
3、mycat配置的主文件一定要注意,格式不能有问题。配置的host可以连接到主从库
server.xml,原本我想把user用户给弄成只读的。。结果忘记了。尴尬。
注意哈。。这个user标签代表 对客户端的连接用户名称和密码已经能作的什么操作。
<?xml version="1.0" encoding="UTF-8"?> <!-- - - Licensed under the Apache License, Version 2.0 (the "License"); - you may not use this file except in compliance with the License. - You may obtain a copy of the License at - - http://www.apache.org/licenses/LICENSE-2.0 - - Unless required by applicable law or agreed to in writing, software - distributed under the License is distributed on an "AS IS" BASIS, - WITHOUT WARRANTIES OR CONDITIONS OF ANY KIND, either express or implied. - See the License for the specific language governing permissions and - limitations under the License. --> <!DOCTYPE mycat:server SYSTEM "server.dtd"> <mycat:server xmlns:mycat="http://io.mycat/"> <system> <property name="useSqlStat">1</property> <!-- 1为开启实时统计、0为关闭 --> </system> <!-- 全局SQL防火墙设置 --> <!--白名单可以使用通配符%或着*--> <!--例如<host host="127.0.0.*" user="root"/>--> <!--例如<host host="127.0.*" user="root"/>--> <!--例如<host host="127.*" user="root"/>--> <!--例如<host host="1*7.*" user="root"/>--> <!--这些配置情况下对于127.0.0.1都能以root账户登录--> <!-- <firewall> <whitehost> <host host="1*7.0.0.*" user="root"/> </whitehost> <blacklist check="false"> </blacklist> </firewall> --> <user name="root" defaultAccount="true"> <property name="password">123456</property> <property name="schemas">TESTDB</property> <!-- 表级 DML 权限设置 --> <!-- <privileges check="false"> <schema name="TESTDB" dml="0110" > <table name="tb01" dml="0000"></table> <table name="tb02" dml="1111"></table> </schema> </privileges> --> </user> <user name="user"> <property name="password">user</property> <property name="schemas">TESTDB</property> </user> </mycat:server>
schema.xml:这里没啥新鲜的。就是简单的配置了一个库test,就只访问test库。
并指定了 读写的库分别连接的地址,因为service.xml中没有配置读的用户所以user也能写入。尴尬。。
<?xml version="1.0"?> <!DOCTYPE mycat:schema SYSTEM "schema.dtd"> <mycat:schema xmlns:mycat="http://io.mycat/"> <schema name="TESTDB" checkSQLschema="false" sqlMaxLimit="100" dataNode="dn1"> <!-- auto sharding by id (long) --> </schema> <dataNode name="dn1" dataHost="localhost1" database="test" /> <dataHost name="localhost1" maxCon="1000" minCon="10" balance="1" writeType="0" dbType="mysql" dbDriver="native" switchType="1" slaveThreshold="100"> <heartbeat>select user()</heartbeat> <!-- can have multi write hosts --> <writeHost host="hostM1" url="192.168.1.29:3308" user="root" password="123456"> <!-- can have multi read hosts --> <readHost host="hostS2" url="192.168.1.29:3307" user="root" password="user" /> </writeHost> </dataHost> </mycat:schema>
注意:读写配置中的user与password 对应的是数据库实例的账户和密码。不是对客户端的。
4、mycat启动,可以到mycat/bin/ ./mycat console命令
如果报错。比如空指针异常,大都是因为配置文件配置与数据库中的数据对不上。或者是schema.xml文件中配置节点数与dataNODe对不上导致的。
大都是因为配置导致的异常。细心一些基本上问题不大。
启动日志可以取mycat/log/mycat.log中查看,能看到连接主库与从库的信息,
5、使用nactive 连接mycat
mycat服务正常启动后就会创建一个逻辑库对外,也就是给客户端使用,这个逻辑库就是把分表又分库的数据合并成一个,进行展示。比如我的配置:
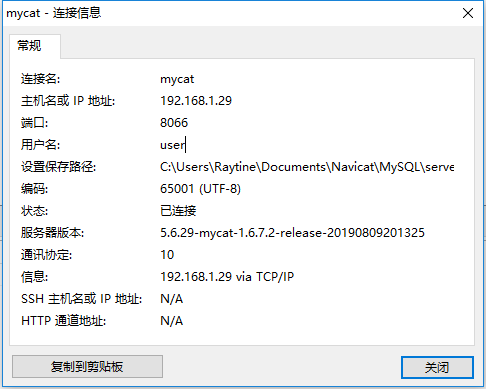
连接user用户。端口号是mycat服务的端口号,默认是8066,密码是123456,在service.xml中配置好的。地址是虚拟机的地址。很简单。
后续更新mycat复杂操作
===================================================================================
2019-08-11 更新。使用mycat进行水平分库分表操作
首先看配置:
service.xml先不做变更。schema.xml如下(我把从库的读配置注掉了)emp只是用来测试写入功能。可以忽略
item表只有id 和name 还有一个create_time三个字段,id是自增的
因为是水平分表的,所以要求主键策略使用mod-long
<?xml version="1.0"?>
<!DOCTYPE mycat:schema SYSTEM "schema.dtd">
<mycat:schema xmlns:mycat="http://io.mycat/">

        <schema name="TESTDB" checkSQLschema="false" sqlMaxLimit="100">
                <!-- auto sharding by id (long) -->
                <table name="emp" primaryKey="id"  dataNode="dn1" />
                <table name="item" primaryKey="id" dataNode="node_db02,node_db03" rule="mod-long" />


        </schema>

        <dataNode name="dn1" dataHost="localhost1" database="test" />
        <dataNode name="node_db02" dataHost="localhost1" database="db02" />
        <dataNode name="node_db03" dataHost="localhost1" database="db03" />


        <dataHost name="localhost1" maxCon="1000" minCon="10" balance="0"
                          writeType="0" dbType="mysql" dbDriver="native" switchType="1"  slaveThreshold="100">
                <heartbeat>select user()</heartbeat>
                <!-- can have multi write hosts -->
                <writeHost host="hostM1" url="192.168.1.29:3308" user="root"
                                   password="123456">
                        <!-- can have multi read hosts -->
                <!--    <readHost host="hostS1" url="192.168.1.29:3307" user="root" password="123456" /> -->
                </writeHost>

                <!-- <writeHost host="hostM2" url="localhost:3316" user="root" password="123456"/> -->
        </dataHost>


</mycat:schema>
rule.xml配置如下,因为使用了同一个实例的mysql 进行分库水平分表。所以节点设置为2
<?xml version="1.0" encoding="UTF-8"?>
<!-- - - Licensed under the Apache License, Version 2.0 (the "License");
        - you may not use this file except in compliance with the License. - You
        may obtain a copy of the License at - - http://www.apache.org/licenses/LICENSE-2.0
        - - Unless required by applicable law or agreed to in writing, software -
        distributed under the License is distributed on an "AS IS" BASIS, - WITHOUT
        WARRANTIES OR CONDITIONS OF ANY KIND, either express or implied. - See the
        License for the specific language governing permissions and - limitations
        under the License. -->
<!DOCTYPE mycat:rule SYSTEM "rule.dtd">
<mycat:rule xmlns:mycat="http://io.mycat/">
        <tableRule name="mod-long">
                <rule>
                        <columns>id</columns>
                        <algorithm>mod-long</algorithm>
                </rule>
        </tableRule>


        <function name="mod-long" class="io.mycat.route.function.PartitionByMod">
                <!-- how many data nodes -->
                <property name="count">2</property>
        </function>


</mycat:rule>
相关数据库配置如下:master 与slave配置截图,
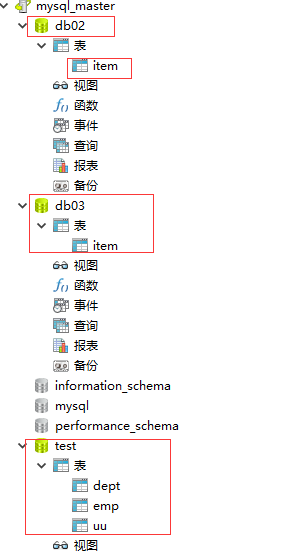
启动mycat后 使用nactive连接后 简易连接版的数据表消失。取而代之的是table标签中配置的表。

向item 插入5条数据。结果为
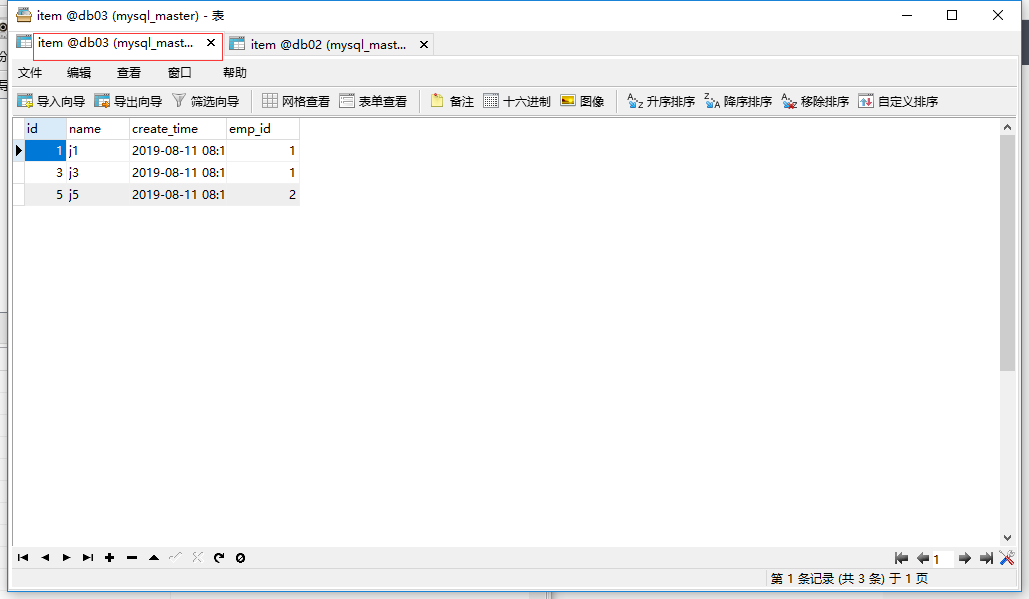
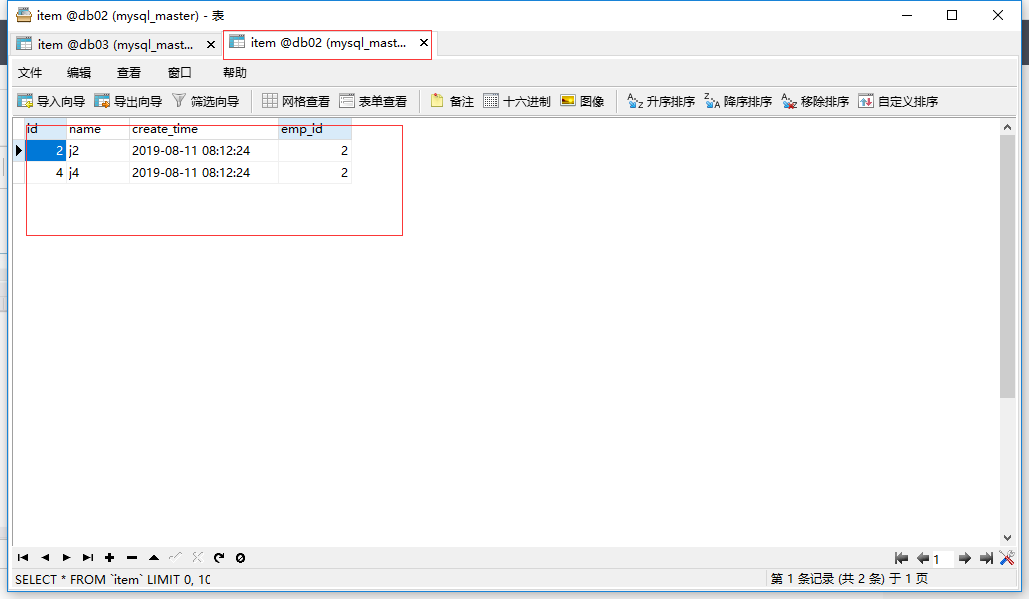
两个库中的表分别插入的3条和2条。成功!!!
连表查询需要在table中配置childTable 并注明关联字段即可(单实例没有限制,多实例就2个)
注意,因为使用的是同一个mysql实例进行的mycat操作。所以正常的连表查询没有问题。
一旦多实例连表查询,那么最多也就能2个表进行join 并且sql不能过于复杂,数据量也不能大,这个是mycat软件功能限制。
详细配置说明参照:http://www.mycat.io/document/mycat-definitive-guide.pdf 官方文档


 868
868

 被折叠的 条评论
为什么被折叠?
被折叠的 条评论
为什么被折叠?
 到【灌水乐园】发言


