不管是在Android(如果只会用Eclipse自带的可视化编辑器的话,你根本称不上是会写Android)、Swing还是SWT中,布局都是非常重要的一部分。好像NetBeans也有Swing的可视化编辑器,但我非常不推荐使用——那样生成的代码完全无法维护,效率也是很低下的。 本文将会介绍如何使用SWT中的布局管理器,包括FillLayout、RowLayout、GridLayout等。通常,单一的布局管理器是无法满足实际需要的,而对于某一个布局管理器来说,通过无参构造函数返回的实例也是没什么用处的——参数是非常重要的一部分。简单来说,了解每个布局管理器的特性(参数的使用)以及如何相互配合是我们需要掌握的。 下面,我会依次介绍每个布局管理器,并给出示例代码以及截图:
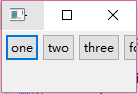
[caption id="attachment_2676" align="aligncenter" width="194"]
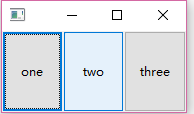
swt.FillLayout.simple[/caption] [codesyntax lang="java"]
/**
 * Copyright By suren.
 * You can get more information from my website:
 * http://surenpi.com
 */
package org.suren.swt.test;

import org.eclipse.swt.SWT;
import org.eclipse.swt.layout.FillLayout;
import org.eclipse.swt.widgets.Button;
import org.eclipse.swt.widgets.Display;
import org.eclipse.swt.widgets.Shell;

/**
 * @author suren
 * @date 2015年9月30日 下午2:59:05
 */
public class FillLayoutTest
{

	/**
	 * @param args
	 */
	public static void main(String[] args)
	{
		Display display = new Display();
		Shell shell = new Shell(display);

		shell.setSize(200, 120);

		shell.setLayout(new FillLayout());

		new Button(shell, SWT.PUSH).setText("one");
		new Button(shell, SWT.PUSH).setText("two");
		new Button(shell, SWT.PUSH).setText("three");

		shell.open();
		while(!shell.isDisposed()){
			if(!display.readAndDispatch()){
				display.sleep();
			}
		}
		display.dispose();
	}

}
[/codesyntax] [caption id="attachment_2677" align="aligncenter" width="194"]
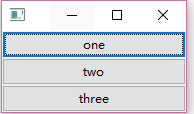
swt.FillLayout.vertical.simple[/caption] [codesyntax lang="java"]
/**
 * Copyright By suren.
 * You can get more information from my website:
 * http://surenpi.com
 */
package org.suren.swt.test;

import org.eclipse.swt.SWT;
import org.eclipse.swt.layout.FillLayout;
import org.eclipse.swt.widgets.Button;
import org.eclipse.swt.widgets.Display;
import org.eclipse.swt.widgets.Shell;

/**
 * @author suren
 * @date 2015年9月30日 下午2:59:05
 */
public class FillLayoutTest
{

	/**
	 * @param args
	 */
	public static void main(String[] args)
	{
		Display display = new Display();
		Shell shell = new Shell(display);

		shell.setSize(200, 120);

		shell.setLayout(new FillLayout(SWT.VERTICAL));

		new Button(shell, SWT.PUSH).setText("one");
		new Button(shell, SWT.PUSH).setText("two");
		new Button(shell, SWT.PUSH).setText("three");

		shell.open();
		while(!shell.isDisposed()){
			if(!display.readAndDispatch()){
				display.sleep();
			}
		}
		display.dispose();
	}

}
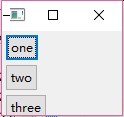
[/codesyntax] [caption id="attachment_2679" align="aligncenter" width="130"]
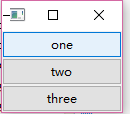
swt.FillLayout.vertical.pack[/caption] [codesyntax lang="java"]
/**
 * Copyright By suren.
 * You can get more information from my website:
 * http://surenpi.com
 */
package org.suren.swt.test;

import org.eclipse.swt.SWT;
import org.eclipse.swt.layout.FillLayout;
import org.eclipse.swt.widgets.Button;
import org.eclipse.swt.widgets.Display;
import org.eclipse.swt.widgets.Shell;

/**
 * @author suren
 * @date 2015年9月30日 下午2:59:05
 */
public class FillLayoutTest
{

	/**
	 * @param args
	 */
	public static void main(String[] args)
	{
		Display display = new Display();
		Shell shell = new Shell(display);

		shell.setSize(200, 220);

		shell.setLayout(new FillLayout(SWT.VERTICAL));

		new Button(shell, SWT.PUSH).setText("one");
		new Button(shell, SWT.PUSH).setText("two");
		new Button(shell, SWT.PUSH).setText("three");

		shell.pack();

		shell.open();
		while(!shell.isDisposed()){
			if(!display.readAndDispatch()){
				display.sleep();
			}
		}
		display.dispose();
	}

}
[/codesyntax] 从上面的几个例子里,我们可以总结出如下几点:FillLayout默认是横向布局的,可以通过type来设置为纵向,给容器内的元素平均分配空间,通过调用容器的pack方法可以让每个元素保持最合适的大小。
[caption id="attachment_2681" align="aligncenter" width="144"]
swt.RowLayout.simple[/caption] [codesyntax lang="java"]
/**
 * Copyright By suren.
 * You can get more information from my website:
 * http://surenpi.com
 */
package org.suren.swt.test;

import org.eclipse.swt.SWT;
import org.eclipse.swt.layout.RowLayout;
import org.eclipse.swt.widgets.Button;
import org.eclipse.swt.widgets.Display;
import org.eclipse.swt.widgets.Shell;

/**
 * @author suren
 * @date 2015年9月30日 下午3:53:59
 */
public class RowLayoutTest
{

	/**
	 * @param args
	 */
	public static void main(String[] args)
	{
		Display display = new Display();
		Shell shell = new Shell(display);

		shell.setSize(150, 100);
		shell.setLayout(new RowLayout());

		new Button(shell, SWT.PUSH).setText("one");
		new Button(shell, SWT.PUSH).setText("two");
		new Button(shell, SWT.PUSH).setText("three");
		new Button(shell, SWT.PUSH).setText("four");
		new Button(shell, SWT.PUSH).setText("five");
		new Button(shell, SWT.PUSH).setText("six");

		shell.open();
		while(!shell.isDisposed()){
			if(!display.readAndDispatch()){
				display.sleep();
			}
		}
		display.dispose();
	}

}
[/codesyntax] [caption id="attachment_2682" align="aligncenter" width="138"]
swt.RowLayout.wrap[/caption] [codesyntax lang="java"]
/**
 * Copyright By suren.
 * You can get more information from my website:
 * http://surenpi.com
 */
package org.suren.swt.test;

import org.eclipse.swt.SWT;
import org.eclipse.swt.layout.RowLayout;
import org.eclipse.swt.widgets.Button;
import org.eclipse.swt.widgets.Display;
import org.eclipse.swt.widgets.Shell;

/**
 * @author suren
 * @date 2015年9月30日 下午3:53:59
 */
public class RowLayoutTest
{

	/**
	 * @param args
	 */
	public static void main(String[] args)
	{
		Display display = new Display();
		Shell shell = new Shell(display);

		RowLayout rowLayout = new RowLayout();
		rowLayout.wrap = false;

		shell.setSize(150, 100);
		shell.setLayout(rowLayout);

		new Button(shell, SWT.PUSH).setText("one");
		new Button(shell, SWT.PUSH).setText("two");
		new Button(shell, SWT.PUSH).setText("three");
		new Button(shell, SWT.PUSH).setText("four");
		new Button(shell, SWT.PUSH).setText("five");
		new Button(shell, SWT.PUSH).setText("six");

		shell.open();
		while(!shell.isDisposed()){
			if(!display.readAndDispatch()){
				display.sleep();
			}
		}
		display.dispose();
	}

}
[/codesyntax] [caption id="attachment_2683" align="aligncenter" width="124"]
swt.RowLayout.vertical[/caption] [codesyntax lang="java"]
/**
 * Copyright By suren.
 * You can get more information from my website:
 * http://surenpi.com
 */
package org.suren.swt.test;

import org.eclipse.swt.SWT;
import org.eclipse.swt.layout.RowLayout;
import org.eclipse.swt.widgets.Button;
import org.eclipse.swt.widgets.Display;
import org.eclipse.swt.widgets.Shell;

/**
 * @author suren
 * @date 2015年9月30日 下午3:53:59
 */
public class RowLayoutTest
{

	/**
	 * @param args
	 */
	public static void main(String[] args)
	{
		Display display = new Display();
		Shell shell = new Shell(display);

		RowLayout rowLayout = new RowLayout();
		rowLayout.wrap = false;
		rowLayout.type = SWT.VERTICAL;

		shell.setSize(150, 100);
		shell.setLayout(rowLayout);

		new Button(shell, SWT.PUSH).setText("one");
		new Button(shell, SWT.PUSH).setText("two");
		new Button(shell, SWT.PUSH).setText("three");
		new Button(shell, SWT.PUSH).setText("four");
		new Button(shell, SWT.PUSH).setText("five");
		new Button(shell, SWT.PUSH).setText("six");

		shell.open();
		while(!shell.isDisposed()){
			if(!display.readAndDispatch()){
				display.sleep();
			}
		}
		display.dispose();
	}

}
[/codesyntax] 从上面例子中,我们可以看到RowLayout按照行或者列来排列元素,满了的话会自动换行——除非设置了wrap为false。
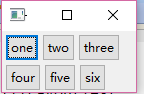
[caption id="attachment_2685" align="aligncenter" width="143"]
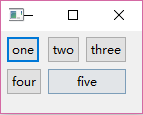
swt.GridLayout.simple[/caption] [codesyntax lang="java"]
/**
 * Copyright By suren.
 * You can get more information from my website:
 * http://surenpi.com
 */
package org.suren.swt.test;

import org.eclipse.swt.SWT;
import org.eclipse.swt.layout.GridData;
import org.eclipse.swt.layout.GridLayout;
import org.eclipse.swt.widgets.Button;
import org.eclipse.swt.widgets.Display;
import org.eclipse.swt.widgets.Label;
import org.eclipse.swt.widgets.Shell;

/**
 * @author suren
 * @date 2015年9月30日 下午4:21:32
 */
public class GridLayoutTest
{

	/**
	 * @param args
	 */
	public static void main(String[] args)
	{
		Display display = new Display();
		Shell shell = new Shell(display);

		GridLayout gridLayout = new GridLayout();
		gridLayout.numColumns = 3;

		shell.setSize(200, 200);
		shell.setLayout(gridLayout);

		new Button(shell, SWT.NULL).setText("one");
		new Button(shell, SWT.NULL).setText("two");
		new Button(shell, SWT.NULL).setText("three");
		new Button(shell, SWT.NULL).setText("four");

		Button label = new Button(shell, SWT.NULL);
		label.setText("five");
		label.setLayoutData(new GridData(SWT.FILL, SWT.FILL, false, false, 2, 1));

		shell.open();
		while(!shell.isDisposed()){
			if(!display.readAndDispatch()){
				display.sleep();
			}
		}
		display.dispose();
	}

}
[/codesyntax]
想要在SWT中添加滚动条的话,需要用到org.eclipse.swt.custom.ScrolledComposite。个人感觉这个组件封装的不够好,查了很多资料才搞定,尤其要向容器中动态添加组件。下面给出代码片段: [codesyntax lang="java"]
Composite parent = new Composite(container, SWT.NULL);
parent.setLayout(new FillLayout()); //父必须是FillLayout的布局

ScrolledComposite scrolledComposite = new ScrolledComposite(parent,
		SWT.H_SCROLL | SWT.V_SCROLL | SWT.BORDER);
scrolledComposite.setExpandHorizontal(true);
scrolledComposite.setExpandVertical(true);

Composite composite = new Composite(scrolledComposite, SWT.NULL);
scrolledComposite.setContent(composite); //这样就让Scroll来管理该组件

Point size = composite.computeSize(SWT.DEFAULT, SWT.DEFAULT); //通过计算出来的大小是最适合组件大小的
scrolledComposite.setMinSize(size);

//如果是动态向composite中添加组件的话,还需要调用下面的代码
composite.layout(true);
scrolledComposite.setMinSize(composite.computeSize(SWT.DEFAULT, SWT.DEFAULT));
[/codesyntax]


 swt.FillLayout.simple[/caption] [codesyntax lang="java"]
 swt.FillLayout.vertical.simple[/caption] [codesyntax lang="java"]
 swt.FillLayout.vertical.pack[/caption] [codesyntax lang="java"]
 swt.RowLayout.simple[/caption] [codesyntax lang="java"]
 swt.RowLayout.wrap[/caption] [codesyntax lang="java"]
 swt.RowLayout.vertical[/caption] [codesyntax lang="java"]
 swt.GridLayout.simple[/caption] [codesyntax lang="java"]


 873
873

 被折叠的 条评论
为什么被折叠?
被折叠的 条评论
为什么被折叠?
 到【灌水乐园】发言


