


问题提出:
随着项目的越来越大,可能会出现好几个团队共同维护一个项目的情况,例如:项目组A负责其中的A块,项目组B负责其中的B块.....这几块彼此之间既独立,也相互联系。对于这种情况,可以采用约定的方式,比如,你只修改你那块,不要修改公共的。如果要修改公共的,那么必须要通知一下其它组,大家共同决定怎么修改,这种方式有一个很大的问题,很有可能不经意间就改了别的团队的代码。还有维护的越来越复杂等。诸如此类的问题,很自然的我们会考虑每个团队建立一个静态库.
iOS的静态库有两种,.a和.framework,动态库.framework居多。静态库建议也生成.framework模式的,好处是.framework包含了相关的.h文件等。.a文件还要自己添加相关的.h文件。
静态库:链接时,静态库会被完整地复制到可执行文件中,被多次使用就有多份冗余拷贝.例如我们在我们的程序中使用了百度地图的.a文件,另外一个应用也使用了百度地图.a。这样整个系统中,会出现两个百度地图.a文件。
动态库:链接时不复制,程序运行时由系统动态加载到内存,供程序调用,系统只加载一次,多个程序共用,节省内存。系统提供的库基本上都属于此类,例如UIKit等,A应用和B应用中都用到了UIKit,系统只加载了一份在内存中.iOS中对于第三方的动态库在iOS8之前不支持,但iOS8及以后支持第三方动态库。
一、制作framework工程:
从Xcode6开始,已经提供了制作.framework的选项,如下图红框内容所示:

此时编译,会遇到如下错误:

(null): Embedded dylibs/frameworks only run on iOS 8 or later
原因:动态库只能再iOS8及以后才支持,而这里需要支持到iOS7及以上,因此需修改编译参数配置,将其设置为静态库。
1)修改 Mach-O Type.从默认的Dynamic Library 改为 Static Library,再编译,警告消失;

注意:如果framework为iOS8及以上,则可直接使用动态库,即:Mach-O Type的类型为默认的:Dynamic Library。
二、项目引用framework
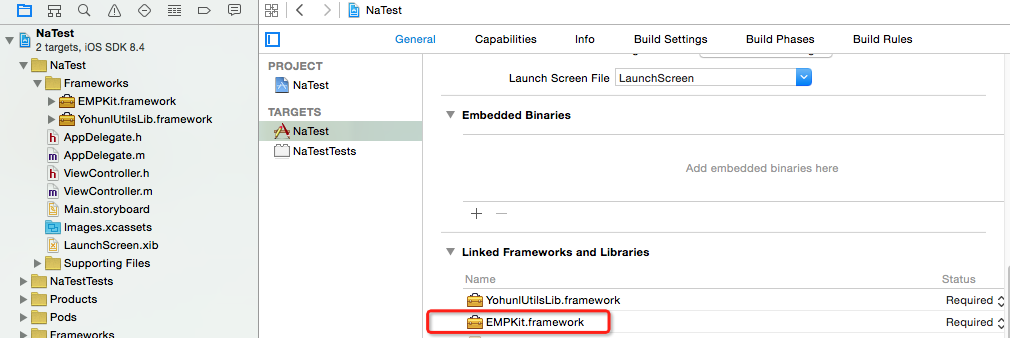
1)当我们使用Static Library时候,生成的framework直接如同添加普通文件的形式添加进来即可,它会在[Linked Frameworks and Libraries]中显示。如下图所示:
1)当使用Dynamic Library模式(只有iOS8.0及以上才支持)的时候。如同普通文件一样添加到示例工程中去的话,运行,会出现提示:
dyld: Library not loaded: @rpath/NetTestLib.framework/NetTestLib

Referenced from: /Users/yohunl/Library/Developer/CoreSimulator/Devices/B1DBCA26-C113-4C74-BB81-297D4AF1E0C8/data/Containers/Bundle/Application/C1B4F6D5-96FD-4245-8E6D-4F1C569EEF6F/TestFramework.app/TestFramework

Reason: image not found
解决方案:在工程的配置 Embedded Binaries下面添加,如下图所示:

三、使用Pod管理依赖开源类库:
1) 命令行,进入目录下 pod init 建立一个podfile文件,因为我们制作的.framework需要用到AFNetworking网络库:

2) 命令行输入vim Podfile,确保内容如下:
# Uncomment this line to define a global platform for your project

platform :ios, '7.0'


inhibit_all_warnings!


target 'EMPKit' do


pod 'AFNetworking'


end


target 'EMPKitTests' do


end
3) 命令行输入pod install,建立依赖。
控制台打印如下信息,依赖建立完成。
Updating local specs repositories


CocoaPods 0.39.0.beta.4 is available.

To update use: `gem install cocoapods --pre`

[!] This is a test version we'd love you to try.


For more information see http://blog.cocoapods.org

and the CHANGELOG for this version http://git.io/BaH8pQ.


Analyzing dependencies

Downloading dependencies

Installing AFNetworking (2.6.0)

Generating Pods project

Integrating client project


[!] Please close any current Xcode sessions and use `EMPKit.xcworkspace` for this project from now on.

Sending stats

Sending stats
4) 关闭工程,在工程根目录打开工作空间(依赖建立完成,同时生成工作空间),如下图所示:


四、framework中创建EMPNetwork类用来引用AFNetwork。
1)新建EMPNetwork,代码如下:
@interface EMPNetwork : NSObject


/**

 *  获取github上用户的repo

 *

 *  @paramuser   用户名

 *  @paramsuccess成功的回调

 *  @paramfailure失败的回调

 */

- (void)getGithubReposForUser:(NSString*)user

                  withSuccess:(void(^)(id responseObject))success

                      failure:(void(^)(NSError*error))failure;

/**

 *  测试 getGithubReposForUser:withSuccess:failure的

 */

- (void)test;


@end

#import "EMPNetwork.h"

#import "AFNetworking.h"


@implementation EMPNetwork

- (void)getGithubReposForUser:(NSString*)user

                  withSuccess:(void(^)(id responseObject))success

                      failure:(void(^)(NSError*error))failure {

    AFHTTPRequestOperationManager *manager = [AFHTTPRequestOperationManager manager];

    [manager GET:[NSString stringWithFormat:@"https://api.github.com/users/%@/repos", user]

      parameters:nil

         success:^(AFHTTPRequestOperation *operation,id responseObject) {

             success(responseObject);

         }

         failure:^(AFHTTPRequestOperation *operation, NSError *error) {

             failure(error);

         }

     ];

}

- (void) test {

    [self getGithubReposForUser:@"yohunl"withSuccess:^(id responseObject) {

        NSLog(@"getGithubReposForUser response = %@",responseObject);

    } failure:^(NSError*error) {

        NSLog(@"getGithubReposForUser error = %@",error);

    }];

}

@end
2)暴露接口,在TARGETS->Build Phases->Headers将EMPNetwork放置在public区域:

3)在EMPKit.h文件中添加EMPNetwork引用:
#import <EMPKit/EMPNetwork.h>
4)运行编译工程,生成相应的framework:
a) 查看:文件夹Products->EMPKit.framework,右键选择[Show in Finder]

b) 文件结构如下:
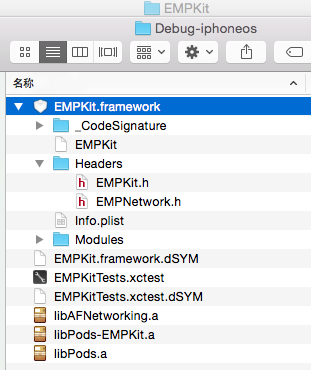
注意:EMPKit.framework中并不包括AFNetwork类库,此部分后面将会验证。
1)查看EMPKit.framework支持的架构:
命令行进入步骤4)->b)的目录,
输入$ lipo -info EMPKit.framework/EMPKit
命令行显示:Architectures in the fat file: EMPKit.framework/EMPKit are: armv7 arm64
说明支持:armv7、arm64两种架构。
五、分离不同架构,制作同时支持模拟器和真机的framework
1)分离.o文件(在步骤四->5)同一目录)
$ mkdir armV7
$ lipo EMPKit.framework/EMPKit -thin armv7 -output ./armv7/EMPKit_armv7
$ cd armV7
$ ar -x EMPKit_armv7
分离后如下图所示:
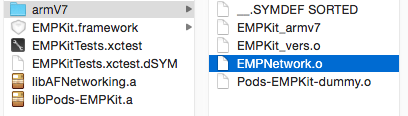
可以看到,最后的.framework中,并没有包含我们pod添加的 AFNetworking。所以当我们把生成的EMPKit.framework给他人使用的时候,使用者要在项目中添加 AFNetworking,否则会提示找不到的错误。
1)使用命令来合并生成的真机和模拟器的framework
a) 建立一个target将其命名为EMPKitAggregate;
 b) 新建运行脚本;
 c) 添加运行脚本
# Sets the target folders and the final framework product.
# 如果工程名称和Framework的Target名称不一样的话,要自定义FMKNAME
# 例如: FMK_NAME = "MyFramework"
FMK_NAME=${PROJECT_NAME}
# Install dir will be the final output to the framework.
# The following line create it in the root folder of the current project.
INSTALL_DIR=${SRCROOT}/Products/${FMK_NAME}.framework
# Working dir will be deleted after the framework creation.
WRK_DIR=build
DEVICE_DIR=${WRK_DIR}/Release-iphoneos/${FMK_NAME}.framework
SIMULATOR_DIR=${WRK_DIR}/Release-iphonesimulator/${FMK_NAME}.framework
# -configuration ${CONFIGURATION}
# Clean and Building both architectures.
Xcodebuild -configuration "Release" -target "${FMK_NAME}" -sdk iphoneos clean build
Xcodebuild -configuration "Release" -target "${FMK_NAME}" -sdk iphonesimulator clean build
# Cleaning the oldest.
if [ -d "${INSTALL_DIR}" ]
then
rm -rf "${INSTALL_DIR}"
fi
mkdir -p "${INSTALL_DIR}"
cp -R "${DEVICE_DIR}/" "${INSTALL_DIR}/"
# Uses the Lipo Tool to merge both binary files (i386 + armv6/armv7) into one Universal final product.
lipo -create "${DEVICE_DIR}/${FMK_NAME}" "${SIMULATOR_DIR}/${FMK_NAME}" -output "${INSTALL_DIR}/${FMK_NAME}"
rm -r "${WRK_DIR}"
open "${INSTALL_DIR}"
最终效果如下图所示:

注意:如何输出运行脚本的变量,进入工程目录输入如下命令即可:
Xcodebuild -workspace EMPKit.xcworkspace -scheme EMPKit -sdk iphonesimulator -configuration Debug -showBuildSettings > Xcodebuild_showBuildSettings.txtd) 当然了,我们一般都应该合并release模式的,而不是debug模式的framework,相关操作如下:

 e) 最后Commod +B运行生成framework,运行成功弹出:

六、工程测试:
1)新建一个single View Application的测试上述framework的工程 TestFrameworkDemo;
2)将上一步生成的 Release-universal/EMPKit.framework 加入到工程 TestFrameworkDemo;
3)在AppDelegate中添加如下代码:
#import <EMPKit/EMPKit.h>

@interface AppDelegate ()

@end

@implementation AppDelegate


- (BOOL)application:(UIApplication *)application
didFinishLaunchingWithOptions:(NSDictionary *)launchOptions {
    EMPNetwork *network = [[EMPNetwork alloc] init];
    [network test];
    return YES;
}

@end
4)运行编译报错,错误信息如下:
Undefined symbols for architecture x86_64:
  "_OBJC_CLASS_$_AFHTTPRequestOperationManager", referenced from:
      objc-class-ref in EMPKit(EMPNetwork.o)
ld: symbol(s) not found for architecture x86_64
clang: error: linker command failed with exit code 1 (use -v to see invocation)
原因:未导入EMPKit.framework所依赖的AFNetworking
此时,我们有两种方式解决这个问题:
1. 将我们生成 EMPkit.framework 过程中生成的libAFNetworking.a 拷贝过来,添加到工程中(当然了,你要自己合并 libAFNetworking的真机和模拟器的.a文件) [这种方式的好处是可以保证我们的EMPkit.framework使用到的libAFNetworking和我们一样的版本,保证了兼容性,,但同时也增加了集成的复杂性,我们要申明我们的framework用到了哪些第三方和第三方的版本信息]
2.在TestFrameworkDemo 工程中,增加 podFile文件,在其中加入依赖pod 'AFNetworking'重新pod install一下 [推荐这种方式,因为,我们用到的第三方都可以使用pod管理,方便],下面就以这种方法来说明:
具体参见步骤三,这里只说明相关脚本:
1):进入TestFrameworkDemo;
2):命令行输入:pod init
3):命令行输入:vim Podfile
4):确保Podfile的内容为:
# Uncomment this line to define a global platform for your project
platform :ios, '7.0'

inhibit_all_warnings!

target 'TestFrameworkDemo' do

pod 'AFNetworking'

end

target 'TestFrameworkDemoTests' do

end
5):命令行输入:pod install
5)至此编译运行成功。
七、参考:


 1625
1625


 被折叠的 条评论
为什么被折叠?
被折叠的 条评论
为什么被折叠?
 到【灌水乐园】发言


