


1、 详解Java中的BIO、NIO、AIO
1.1、引言
IO流是Java中比较难理解的一个知识点,但是IO流在实际的开发场景中经常会使用到,比如Dubbo底层就是NIO进行通讯。本文将介绍Java发展过程中出现的三种IO:BIO、NIO以及AIO,重点介绍NIO。
1.2、什么是BIO
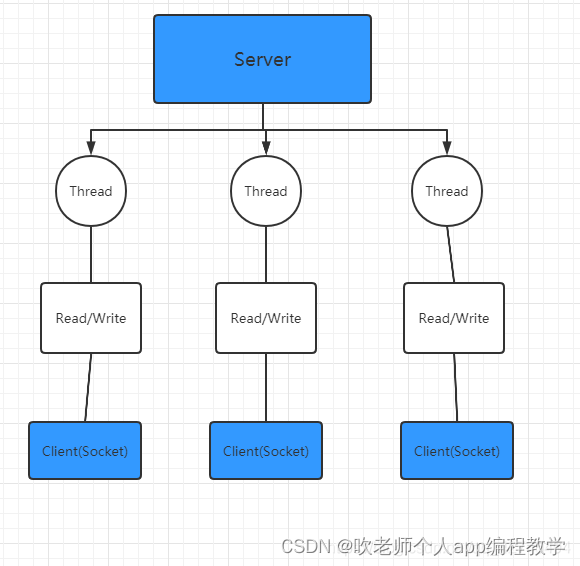
BIO即同步阻塞IO,实现模型为一个连接就需要一个线程去处理。这种方式简单来说就是当有客户端来请求服务器时,服务器就会开启一个线程去处理这个请求,即使这个请求不干任何事情,这个线程都一直处于阻塞状态。
BIO模型有很多缺点,最大的缺点就是资源的浪费。想象一下如果QQ使用BIO模型,当有一个人上线时就需要一个线程,即使这个人不聊天,这个线程也一直被占用,那再多的服务器资源都不管用。
1.3、BIO代码实践
使用 BIO 模型编写一个服务器端,监听 6666 端口,当有客户端连接时,就启动一个线程与之通讯。
要求使用线程池机制改善,可以连接多个客户端.
服务器端可以接收客户端发送的数据(telnet 方式即可)。
代码演示:

package com.atguigu.bio;

import java.io.InputStream;
import java.net.ServerSocket;
import java.net.Socket;
import java.util.concurrent.ExecutorService;
import java.util.concurrent.Executors;

public class BIOServer {
    public static void main(String[] args) throws Exception {
        //线程池机制
        //思路
        //1. 创建一个线程池
        //2. 如果有客户端连接,就创建一个线程,与之通讯(单独写一个方法)
        ExecutorService newCachedThreadPool = Executors.newCachedThreadPool();
        //创建ServerSocket
        ServerSocket serverSocket = new ServerSocket(6666);
        System.out.println("服务器启动了");
        while (true) {
            System.out.println("线程信息 id =" + Thread.currentThread().getId() + " 名字=" +
            Thread.currentThread().getName());
            //监听,等待客户端连接
            System.out.println("等待连接....");
            final Socket socket = serverSocket.accept();
            System.out.println("连接到一个客户端");

            //就创建一个线程,与之通讯(单独写一个方法)
            newCachedThreadPool.execute(new Runnable() {
                public void run() { //我们重写
                    //可以和客户端通讯
                    handler(socket);
                }
            });
        }
    }

    //编写一个handler方法,和客户端通讯
    public static void handler(Socket socket) {
        try {
            System.out.println("线程信息 id =" + Thread.currentThread().getId() + " 名字=" +
            Thread.currentThread().getName());
            byte[] bytes = new byte[1024];
            //通过socket 获取输入流
            InputStream inputStream = socket.getInputStream();
            //循环的读取客户端发送的数据
            while (true) {
                System.out.println("线程信息 id =" + Thread.currentThread().getId() + " 名字=" +
                Thread.currentThread().getName());
                System.out.println("read....");
               int read =  inputStream.read(bytes);
               if(read != -1) {
                   System.out.println(new String(bytes, 0, read
                   )); //输出客户端发送的数据
               } else {
                   break;
               }
            }
        }catch (Exception e) {
            e.printStackTrace();
        }finally {
            System.out.println("关闭和client的连接");
            try {
                socket.close();
            }catch (Exception e) {
                e.printStackTrace();
            }
        }
    }
}
演示
快捷键win+R打开cmd窗口,根据上面代码拼写6666端口
输入 telnet 127.0.0.1 6666
进入黑窗口
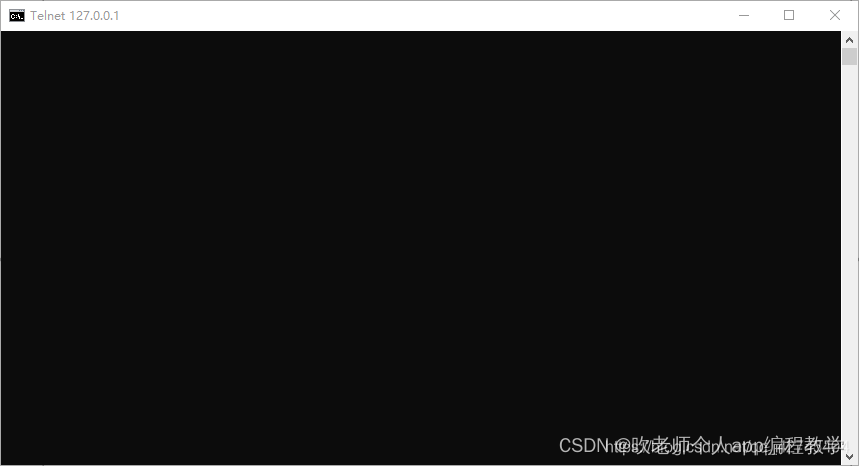
输入ctrl+]
向服务端发送文本
send hello world

服务端接收的
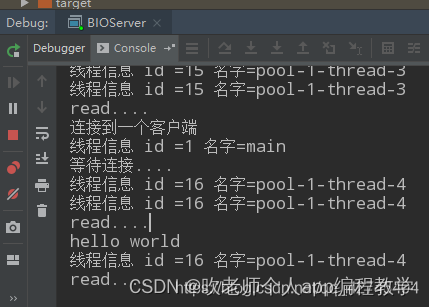
当有
多个cmd窗口时,则创建多一个线程与之对应
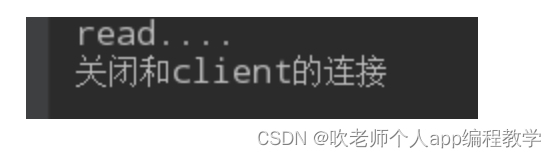
退出时,cmd输入
quit
服务端显示
2、什么是NIO
BIO是阻塞的,如果没有多线程,BIO就需要一直占用CPU,而NIO则是非阻塞IO,NIO在获取连接或者请求时,即使没有取得连接和数据,也不会阻塞程序。NIO的服务器实现模式为一个线程可以处理多个请求(连接)。
NIO有几个知识点需要掌握,Channel(通道),Buffer(缓冲区), Selector(多路复用选择器)。
Channel既可以用来进行读操作,又可以用来进行写操作。NIO中常用的Channel有FileChannel
、SocketChannel、ServerSocketChannel、DatagramChannel。
Buffer缓冲区用来发送和接受数据。
Selector 一般称为选择器或者多路复用器 。它是Java NIO核心组件中的一个,用于检查一个或多个NIO Channel(通道)的状态是否处于可读、可写。在javaNIO中使用Selector往往是将Channel注册到Selector中。
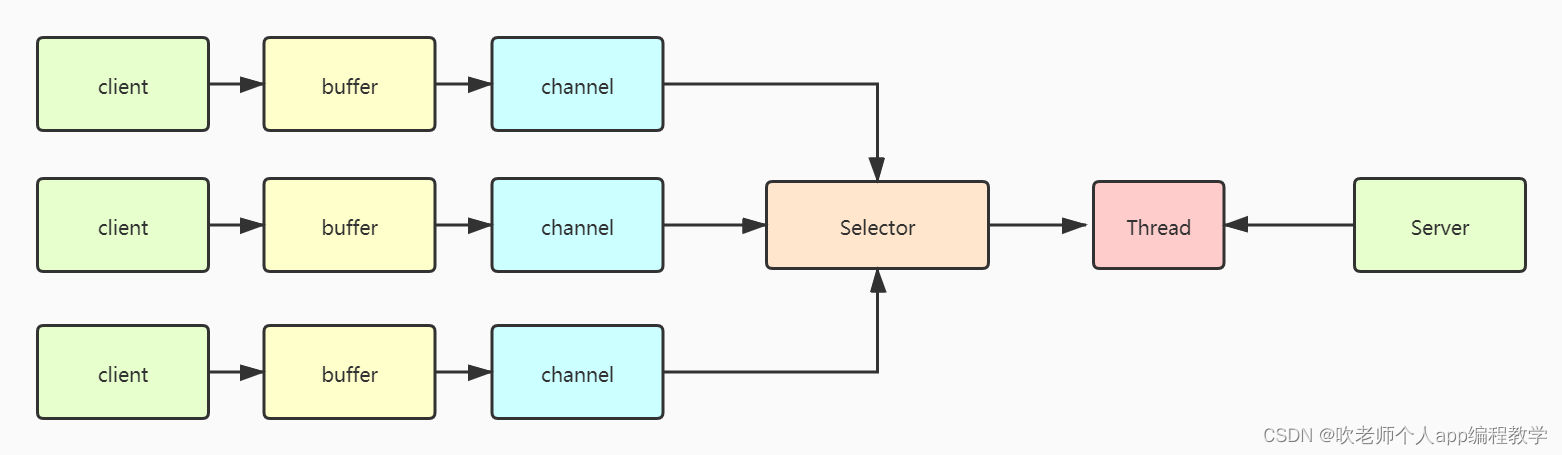
下面我通过代码的方式模拟javaNIO的运行流程。
2.1、NIO代码实践
首先贴上NIO的实践代码:
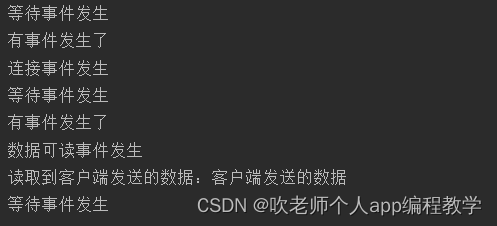
NIO服务端详细的执行过程是这样的:
创建一个ServerSocketChannel和Selector,然后将ServerSocketChannel注册到Selector上
Selector通过select方法去轮询监听channel事件,如果有客户端要连接时,监听到连接事件。
通过channel方法将socketchannel绑定到ServerSocketChannel上,绑定通过SelectorKey实现。
socketchannel注册到Selector上,关心读事件。
Selector通过select方法去轮询监听channel事件,当监听到有读事件时,ServerSocketChannel通过绑定的SelectorKey定位到具体的channel,读取里面的数据。
public class NioServer {
    public static void main(String[] args) throws IOException {
        //创建一个socket通道,并且设置为非阻塞的方式
        ServerSocketChannel serverSocketChannel=ServerSocketChannel.open();
        serverSocketChannel.configureBlocking(false);
        serverSocketChannel.socket().bind(new InetSocketAddress(9000));
        //创建一个selector选择器,把channel注册到selector选择器上
        Selector selector=Selector.open();
        serverSocketChannel.register(selector, SelectionKey.OP_ACCEPT);

        while (true){
            System.out.println("等待事件发生");
            selector.select();
            System.out.println("有事件发生了");
            Iterator<SelectionKey> iterator = selector.selectedKeys().iterator();
            while (iterator.hasNext()){
                SelectionKey key = iterator.next();
                iterator.remove();
                handle(key);
            }
        }

    }

    private static void handle(SelectionKey key) throws IOException {
        if (key.isAcceptable()){
            System.out.println("连接事件发生");
            ServerSocketChannel serverSocketChannel= (ServerSocketChannel) key.channel();
            //创建客户端一侧的channel,并注册到selector上
            SocketChannel socketChannel = serverSocketChannel.accept();
            socketChannel.configureBlocking(false);
            socketChannel.register(key.selector(),SelectionKey.OP_READ);
        }else if (key.isReadable()){
            System.out.println("数据可读事件发生");
            SocketChannel socketChannel= (SocketChannel) key.channel();
            ByteBuffer buffer = ByteBuffer.allocate(1024);
            int len = socketChannel.read(buffer);
            if (len!=-1){
                System.out.println("读取到客户端发送的数据:"+new String(buffer.array(),0,len));
            }
            //给客户端发送信息
            ByteBuffer wrap = ByteBuffer.wrap("hello world".getBytes());
            socketChannel.write(wrap);
            key.interestOps(SelectionKey.OP_READ|SelectionKey.OP_WRITE);
            socketChannel.close();
        }
    }
}
客户端代码:NIO客户端代码的实现比BIO复杂很多,主要的区别在于,NIO的客户端也需要去轮询自己和服务端的连接情况。
public class NioClient {
    public static void main(String[] args) throws IOException {
        //配置基本的连接参数
        SocketChannel channel=SocketChannel.open();
        channel.configureBlocking(false);
        Selector selector = Selector.open();
        channel.connect(new InetSocketAddress("127.0.0.1",9000));
        channel.register(selector, SelectionKey.OP_CONNECT);

        //轮询访问selector
        while(true){
            selector.select();
            Iterator<SelectionKey> iterator = selector.selectedKeys().iterator();
            while (iterator.hasNext()){
                SelectionKey key = iterator.next();
                iterator.remove();
                //连接事件发生
                if (key.isConnectable()){
                    SocketChannel socketChannel= (SocketChannel) key.channel();
                    //如果正在连接,则完成连接
                    if (socketChannel.isConnectionPending()){
                        socketChannel.finishConnect();
                    }
                    socketChannel.configureBlocking(false);
                    ByteBuffer buffer = ByteBuffer.wrap("客户端发送的数据".getBytes());
                    socketChannel.write(buffer);
                    socketChannel.register(selector,SelectionKey.OP_READ);
                }else if (key.isReadable()){
                    //读取服务端发送过来的消息
                    read(key);
                }
            }
        }
    }

    private static void read(SelectionKey key) throws IOException {
        SocketChannel socketChannel= (SocketChannel) key.channel();
        ByteBuffer buffer = ByteBuffer.allocate(512);
        int len=socketChannel.read(buffer);
        if (len!=-1){
            System.out.println("客户端收到信息:"+new String(buffer.array(),0,len));
        }
    }
}
效果大概是这样的:首先服务端等待事件发生,当客户端启动时,服务器端先接受到连接的请求,接着接受到数据读取的请求,读完数据后继续等待。
客户端发送数据后,获取到了来自服务端的回复。

2.2、NIO总结
NIO通过一个Selector,负责监听各种IO事件的发生,然后交给后端的线程去处理。NIO相比与BIO而言,非阻塞体现在轮询处理上。BIO后端线程需要阻塞等待客户端写数据,如果客户端不写数据就一直处于阻塞状态。而NIO通过Selector进行轮询已注册的客户端,当有事件发生时才会交给后端去处理,后端线程不需要等待。
3、什么是AIO
AIO是在JDK1.7中推出的新的IO方式–异步非阻塞IO,也被称为NIO2.0,AIO在进行读写操作时,直接调用API的read和write方法即可,这两种均是异步的方法,且完成后会主动调用回调函数。简单来讲,当有流可读取时,操作系统会将可读的流传入read方法的缓冲区,并通知应用程序;对于写操作而言,当操作系统将write方法传递的流写入完毕时,操作系统主动通知应用程序。
Java提供了四个异步通道:AsynchronousSocketChannel、AsynchronousServerSocketChannel、AsynchronousFileChannel、AsynchronousDatagramChannel。
3.1、AIO代码实践
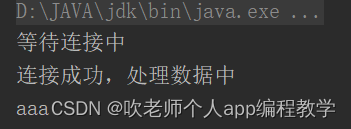
服务器端代码:AIO的创建方式和NIO类似,先创建通道,再绑定,再监听。只不过AIO中使用了异步的通道。
public class AIOServer {
    public static void main(String[] args) {
        try {
            //创建异步通道
            AsynchronousServerSocketChannel serverSocketChannel=AsynchronousServerSocketChannel.open();
            serverSocketChannel.bind(new InetSocketAddress(8080));
            System.out.println("等待连接中");
            //在AIO中,accept有两个参数,
            // 第一个参数是一个泛型,可以用来控制想传递的对象
            // 第二个参数CompletionHandler,用来处理监听成功和失败的逻辑
            //  如此设置监听的原因是因为这里的监听是一个类似于递归的操作,每次监听成功后要开启下一个监听
            serverSocketChannel.accept(null, new CompletionHandler<AsynchronousSocketChannel, Object>() {
                //请求成功处理逻辑
                @Override
                public void completed(AsynchronousSocketChannel result, Object attachment) {
                    System.out.println("连接成功,处理数据中");
                    //开启新的监听
                    serverSocketChannel.accept(null,this);
                    handledata(result);
                }
                @Override
                public void failed(Throwable exc, Object attachment) {
                    System.out.println("失败");
                }
            });
            try {
                TimeUnit.SECONDS.sleep(Integer.MAX_VALUE);
            } catch (InterruptedException e) {
                e.printStackTrace();
            }
        } catch (IOException e) {
            e.printStackTrace();
        }
    }

    private static void handledata(AsynchronousSocketChannel result) {
        ByteBuffer byteBuffer=ByteBuffer.allocate(1024);
        //通道的read方法也带有三个参数
        //1.目的地:处理客户端传递数据的中转缓存,可以不使用
        //2.处理客户端传递数据的对象
        //3.处理逻辑,也有成功和不成功的两个写法
        result.read(byteBuffer, byteBuffer, new CompletionHandler<Integer, ByteBuffer>() {
            @Override
            public void completed(Integer result, ByteBuffer attachment) {
                if (result>0){
                    attachment.flip();
                    byte[] array = attachment.array();
                    System.out.println(new String(array));
                }
            }
            @Override
            public void failed(Throwable exc, ByteBuffer attachment) {
                System.out.println("失败");
            }
        });
    }
}
客户端代码基本上没有太多差别,主要还是实现数据的发送功能
public class AIOClient {
    public static void main(String[] args) {
        try {
            AsynchronousSocketChannel socketChannel=AsynchronousSocketChannel.open();
            socketChannel.connect(new InetSocketAddress("127.0.0.1",8080));
            Scanner scanner=new Scanner(System.in);
            String next = scanner.next();
            ByteBuffer byteBuffer=ByteBuffer.allocate(1024);
            byteBuffer.put(next.getBytes());
            byteBuffer.flip();
            socketChannel.write(byteBuffer);
        } catch (IOException e) {
            e.printStackTrace();
        }
    }
}
观察结果:


 659
659


 被折叠的 条评论
为什么被折叠?
被折叠的 条评论
为什么被折叠?
 到【灌水乐园】发言


