


SpringBoot学习笔记:Spring Boot 运行原理,自动配置
启动流程
我们可以先看看这段代码发生了什么事情
SpringApplication.run(App.class, args);


在创建SpringApplication的时候初始化了一些ApplicationContext和ApplicationListener
主要通过getSpringFactoriesInstances方法来实现

上面的SpringFactoriesLoader.loadFactoryNames方法看这里
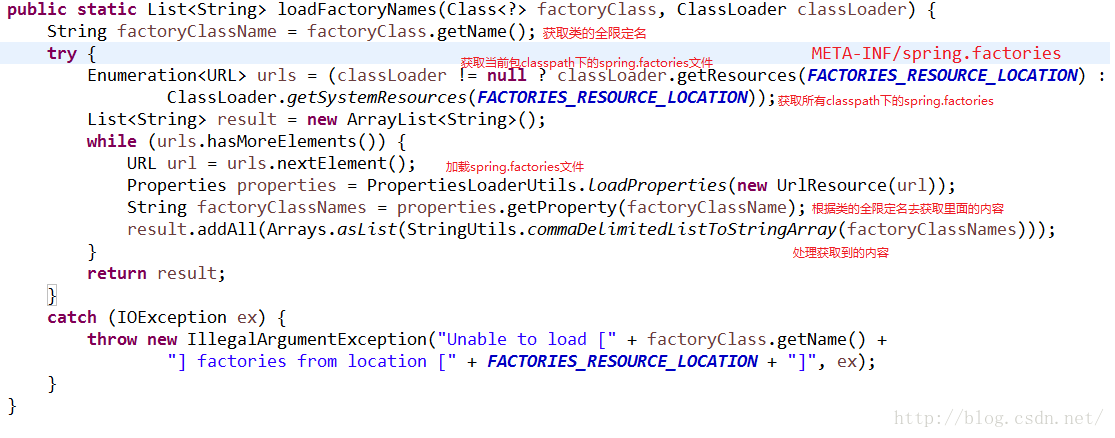
下面我们可以查看下spring.factories文件,spring-boot-autoconfigure和 spring-boot的jar包中都有

我们可以先看看Spring-boot里面的文件

当SpringApplication创建,初始化了上述的 Application Context和Application Listeners

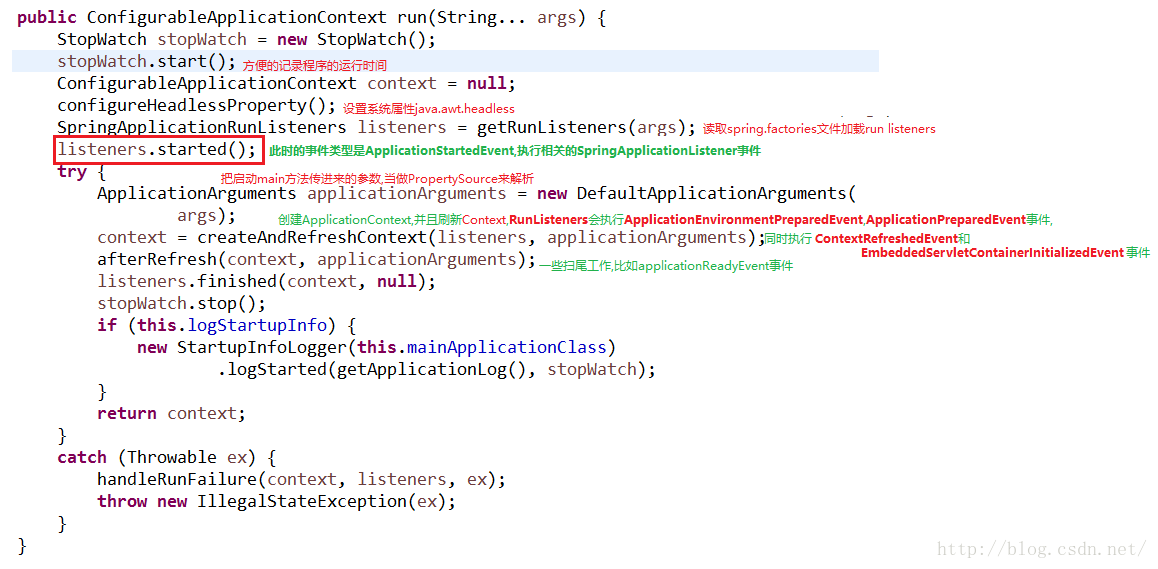
通过spring.factories文件拿到一系列的Context和Listener之后 执行run方法
run方法会从spring.factories文件中获取到run listener,然后在spirng boot 执行到各个阶段时执行Listener事件和Context事件
所以,所谓的SpringApplicationRunListeners实际上就是在SpringApplication对象的run方法执行的不同阶段,去执行一些操作,并且这些操作是可配置的。
Spring boot总共有这些事件类型


Spring 事件体系
http://blog.csdn.net/caihaijiang/article/details/7460888
看下createAndRefreshContext方法

applyInitializers方法其中
DelegatingApplicationContextInitializer读取context.initializer.classes配置,这些类都是实现了ApplicationContextInitializer接口的类,读取之后执行initialize方法,所以我们在这里可以自己扩展一些东西
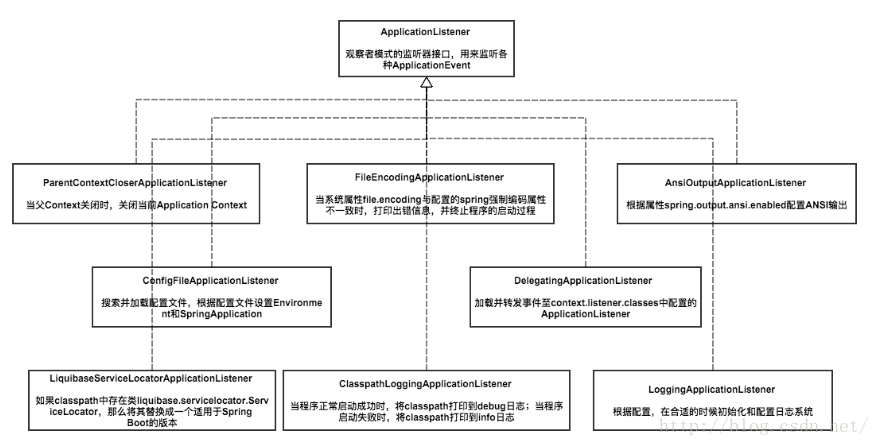
这里有一些listener和context的功能图

这里面代码看的晕乎乎的,都不知道理解的对不对,希望不会对你们产生误导
参考资料
http://blog.csdn.net/liaokailin/article/category/5765237
http://zhaox.github.io/java/2016/03/22/spring-boot-start-flow
http://blog.csdn.net/u011179993/article/details/51475732
自动配置
Spring Boot关于自动配置的源码在spring-boot-autoconfigure中.

上面的这些东西主要是靠condition包下面的注解来根据不同的条件自动创建Bean的
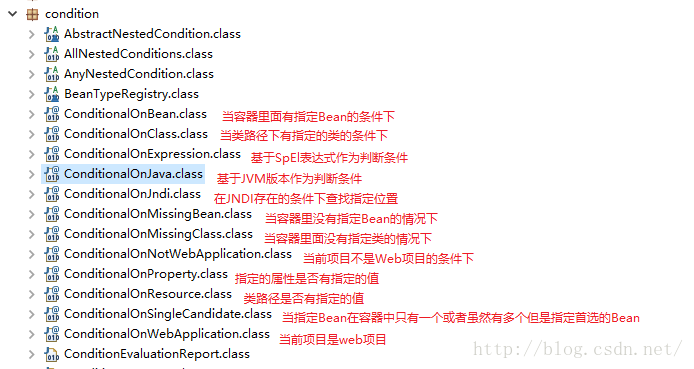
这些注解都是组合了@Conditional元注解,只是使用了不同的条件
我们可以查看下@ConditionalOnWebApplication这个注解

这个注解使用的条件是OnWebApplicationCondition这个类
package org.springframework.boot.autoconfigure.condition;

import org.springframework.context.annotation.Condition;
import org.springframework.context.annotation.ConditionContext;
import org.springframework.core.Ordered;
import org.springframework.core.annotation.Order;
import org.springframework.core.type.AnnotatedTypeMetadata;
import org.springframework.util.ClassUtils;
import org.springframework.util.ObjectUtils;
import org.springframework.web.context.WebApplicationContext;
import org.springframework.web.context.support.StandardServletEnvironment;

/**
 * {@link Condition} that checks for the presence or absence of
 * {@link WebApplicationContext}.
 *
 * @author Dave Syer
 * @see ConditionalOnWebApplication
 * @see ConditionalOnNotWebApplication
 */
@Order(Ordered.HIGHEST_PRECEDENCE + 20)
class OnWebApplicationCondition extends SpringBootCondition {

	private static final String WEB_CONTEXT_CLASS = "org.springframework.web.context."
			+ "support.GenericWebApplicationContext";

	@Override
	public ConditionOutcome getMatchOutcome(ConditionContext context,
			AnnotatedTypeMetadata metadata) {
		boolean webApplicationRequired = metadata
				.isAnnotated(ConditionalOnWebApplication.class.getName());
           //判断是否是web环境,并获取结果
		ConditionOutcome webApplication = isWebApplication(context, metadata);

		if (webApplicationRequired && !webApplication.isMatch()) {
			return ConditionOutcome.noMatch(webApplication.getMessage());
		}

		if (!webApplicationRequired && webApplication.isMatch()) {
			return ConditionOutcome.noMatch(webApplication.getMessage());
		}

		return ConditionOutcome.match(webApplication.getMessage());
	}

	private ConditionOutcome isWebApplication(ConditionContext context,
			AnnotatedTypeMetadata metadata) {
           //判断GenericWebApplicationContext是否在类路径中
		if (!ClassUtils.isPresent(WEB_CONTEXT_CLASS, context.getClassLoader())) {
			return ConditionOutcome.noMatch("web application classes not found");
		}
          //容器中是否有名为session的scope
		if (context.getBeanFactory() != null) {
			String[] scopes = context.getBeanFactory().getRegisteredScopeNames();
			if (ObjectUtils.containsElement(scopes, "session")) {
				return ConditionOutcome.match("found web application 'session' scope");
			}
		}
          //当前容器的enviroment是否为StandardServletEnviroment
		if (context.getEnvironment() instanceof StandardServletEnvironment) {
			return ConditionOutcome
					.match("found web application StandardServletEnvironment");
		}
          //当前容器的resourceLoader是否是WebApplicationContext
		if (context.getResourceLoader() instanceof WebApplicationContext) {
			return ConditionOutcome.match("found web application WebApplicationContext");
		}

		return ConditionOutcome.noMatch("not a web application");
	}

}
最终通过ConditionOutcome返回是否web项目,还有判断结果
自定义starter pom
自己实现一个简单的例子,当某个类存在的时候,自动配置这个Bean,并且可以讲这个属性在application.properties中配置
新建一个maven项目
Pom.xml
<project xmlns="http://maven.apache.org/POM/4.0.0" xmlns:xsi="http://www.w3.org/2001/XMLSchema-instance"
  xsi:schemaLocation="http://maven.apache.org/POM/4.0.0 http://maven.apache.org/xsd/maven-4.0.0.xsd">
  <modelVersion>4.0.0</modelVersion>

  <groupId>com.ibigsea</groupId>
  <artifactId>spring-boot-starter-hello</artifactId>
  <version>0.0.1-SNAPSHOT</version>
  <packaging>jar</packaging>

  <name>spring-boot-starter-hello</name>
  <url>http://maven.apache.org</url>

  <properties>
    <project.build.sourceEncoding>UTF-8</project.build.sourceEncoding>
  </properties>

  <dependencies>
    <dependency>
      <groupId>org.springframework.boot</groupId>
      <artifactId>spring-boot-autoconfigure</artifactId>
      <version>1.3.3.RELEASE</version>
    </dependency>
  </dependencies>
</project>
Hello.java
package com.ibigsea.spring_boot_starter_hello;

/**
 * 通过application.properties的hello.msg来配置,默认为world
 * @author bigsea
 *
 */
public class Hello {

	private String msg;

	public String sayHello() {
		return "hello " + msg;
	}

	public String getMsg() {
		return msg;
	}

	public void setMsg(String msg) {
		this.msg = msg;
	}

}
HelloProperties.java
package com.ibigsea.spring_boot_starter_hello;

import org.springframework.boot.context.properties.ConfigurationProperties;

/**
 * 属性配置,Spring boot 自身的自动配置
 * @author bigsea
 *
 */
@ConfigurationProperties(prefix="hello")
public class HelloProperties {

	private static final String MSG = "world";

	private String msg = MSG ;

	public String getMsg() {
		return msg;
	}

	public void setMsg(String msg) {
		this.msg = msg;
	}


}
HelloAutoConfiguration.java
package com.ibigsea.spring_boot_starter_hello;

import org.springframework.beans.factory.annotation.Autowired;
import org.springframework.boot.autoconfigure.condition.ConditionalOnClass;
import org.springframework.boot.autoconfigure.condition.ConditionalOnMissingBean;
import org.springframework.boot.autoconfigure.condition.ConditionalOnProperty;
import org.springframework.boot.context.properties.EnableConfigurationProperties;
import org.springframework.context.annotation.Bean;
import org.springframework.context.annotation.Configuration;

@Configuration
@EnableConfigurationProperties(HelloProperties.class)//开启属性注入,通过@autowired注入
@ConditionalOnClass(Hello.class)//判断这个类是否在classpath中存在
//当设置hello=enabled的情况下,如果没有设置则默认为true,即条件符合
@ConditionalOnProperty(prefix="hello", value="enabled", matchIfMissing = true)
public class HelloAutoConfiguration {

	@Autowired
	private HelloProperties helloProperties;

	@Bean//使用java配置方式配置这个类
	@ConditionalOnMissingBean(Hello.class)//容器中如果没有Hello这个类,那么自动配置这个Hello
	public Hello hello() {
		Hello hello = new Hello();
		hello.setMsg(helloProperties.getMsg());
		return hello;
	}

}
并且要添加spring.factories
# Auto Configure
org.springframework.boot.autoconfigure.EnableAutoConfiguration=\
com.ibigsea.spring_boot_starter_hello.HelloAutoConfiguration
整个项目结构
好了,到这里我们就完成了一个starter项目了,下面自己测试下
Pom.xml
<project xmlns="http://maven.apache.org/POM/4.0.0" xmlns:xsi="http://www.w3.org/2001/XMLSchema-instance"
  xsi:schemaLocation="http://maven.apache.org/POM/4.0.0 http://maven.apache.org/xsd/maven-4.0.0.xsd">
  <modelVersion>4.0.0</modelVersion>

  <groupId>com.ibigsea</groupId>
  <artifactId>test-starter</artifactId>
  <version>0.0.1-SNAPSHOT</version>
  <packaging>jar</packaging>

  <name>test-starter</name>
  <url>http://maven.apache.org</url>

	<properties>
		<project.build.sourceEncoding>UTF-8</project.build.sourceEncoding>
		<boot.version>1.3.3.RELEASE</boot.version>
	</properties>

	<dependencies>
		<dependency>
			<groupId>com.ibigsea</groupId>
			<artifactId>spring-boot-starter-hello</artifactId>
			<version>0.0.1-SNAPSHOT</version>
		</dependency>
		<dependency>
			<groupId>org.springframework.boot</groupId>
			<artifactId>spring-boot-starter-web</artifactId>
			<version>${boot.version}</version>
		</dependency>
		<dependency>
			<groupId>org.springframework.boot</groupId>
			<artifactId>spring-boot-starter-test</artifactId>
			<version>${boot.version}</version>
			<scope>test</scope>
		</dependency>
	</dependencies>
</project>
App.java
package com.ibigsea.test_starter;

import org.springframework.beans.factory.annotation.Autowired;
import org.springframework.boot.SpringApplication;
import org.springframework.boot.autoconfigure.SpringBootApplication;
import org.springframework.web.bind.annotation.RequestMapping;
import org.springframework.web.bind.annotation.RestController;

import com.ibigsea.spring_boot_starter_hello.Hello;


@SpringBootApplication
@RestController
public class App {

	@Autowired
	private Hello hello;

	@RequestMapping("/")
	public String index() {
		return hello.sayHello();
	}

	public static void main(String[] args) {
		SpringApplication.run(App.class, args);
	}
}
application.properties
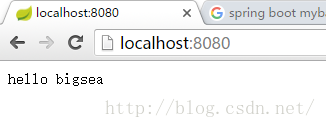
hello.msg=bigsea
运行结果
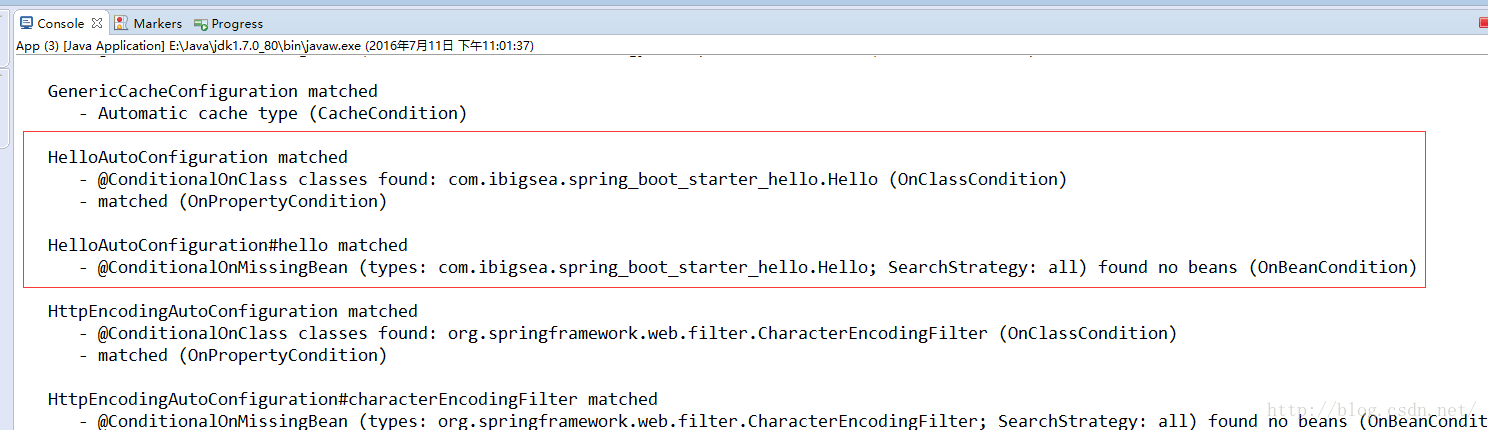
开启dubug模式 可以看到自动配置信息


 514
514

 被折叠的 条评论
为什么被折叠?
被折叠的 条评论
为什么被折叠?
 到【灌水乐园】发言


