


先看到 一篇 部署到 app 上面的文章.
http://www.iteye.com/topic/428326
感谢这个兄弟的研究.
先说昨天写的一篇 文章.
http://toeo.iteye.com/admin/blogs/641211
讲到 如果 创建 一个 java 和 BlazeDS的工程. 并且工程文件是放到一起的.
flex 和 J2EE 一起开发.
现在将工程 可以运行 app 上面. 开发 的东西直接部署到 google的服务器上面.
工程代码很简单.
一个pojo.
@PersistenceCapable(identityType = IdentityType.APPLICATION)
public class SystemUser implements Serializable {

	private static final long serialVersionUID = 5679860749390605118L;

	@PrimaryKey
	@Persistent(valueStrategy = IdGeneratorStrategy.IDENTITY)
	private Long id;

	@Persistent
	public String loginName;

	@Persistent
	public String passwd;
......
一个dao.
public class SystemUserDAO extends JdoDaoSupport {

......

/**
	 * 保存数据.
	 */
	public String saveSystemUser(SystemUser systemUser) {
		String countNo = "";
		PersistenceManager pm = getPersistenceManager();
		try {
			if (systemUser.getId() == null) {
				systemUser.setCreateDate(new Date());
				pm.makePersistent(systemUser);
			} else {
				SystemUser tempSystemUser = pm.getObjectById(SystemUser.class,
						systemUser.getId());
				tempSystemUser.setLoginName(systemUser.getLoginName());
				tempSystemUser.setPasswd(systemUser.getPasswd());
				tempSystemUser.setName(systemUser.getName());
				tempSystemUser.setPhone(systemUser.getPhone());
				tempSystemUser.setEmail(systemUser.getEmail());
				tempSystemUser.setIslock(systemUser.getIslock());
				tempSystemUser.setLoginTimes(systemUser.getLoginTimes());
				tempSystemUser.setLastLogin(systemUser.getLastLogin());
				pm.makePersistent(tempSystemUser);
			}
			Query query = pm.newQuery("select count(id) from "
					+ SystemUser.class.getName());
			/** 强制转换成int */
			countNo = "" + Integer.parseInt(query.execute("Smith").toString());
		} catch (Exception e) {
			e.printStackTrace();
		} finally {
			pm.close();
		}
		return countNo;
	}

......
一个远程调用的方法.
public class ROService {

	public ROService() {
		System.out.println("初始化类.");
	}

	private SystemUserDAO systemUserDAO;

	public String helloWorld() {
		SystemUser systemUser = new SystemUser();
		systemUser.setCreateDate(new Date());
		systemUser.setLoginName("123456");
		systemUser.setPasswd("1223");
		System.out.println("函数被调用.");
		return "保存一个新类.总共有:\t" + systemUserDAO.saveSystemUser(systemUser)
				+ "条记录.";
	}
flex 远程调用.
<mx:Script>
    <![CDATA[
      import mx.rpc.remoting.mxml.Operation;
      private function callIt():void
      {
        var op:Operation = roHello.getOperation("helloWorld") as Operation;
        op.send();
      }
    ]]>
  </mx:Script>

  <mx:RemoteObject id="roHello" destination="helloClass"/>

  <mx:Label text="Hello from BlazeDS!" fontSize="14" fontWeight="bold"/>

  <mx:Button label="Click to say hello" click="callIt()"/>

  <mx:Label text="{roHello.helloWorld.lastResult}"
    fontSize="14" fontWeight="bold"/>
更新插件.
将eclipse的 插件更新到 最新的 4 月 11 日的版本.(3 月的版本是不可以的.报错误.启动不了.)
然后选择工程的 属性.
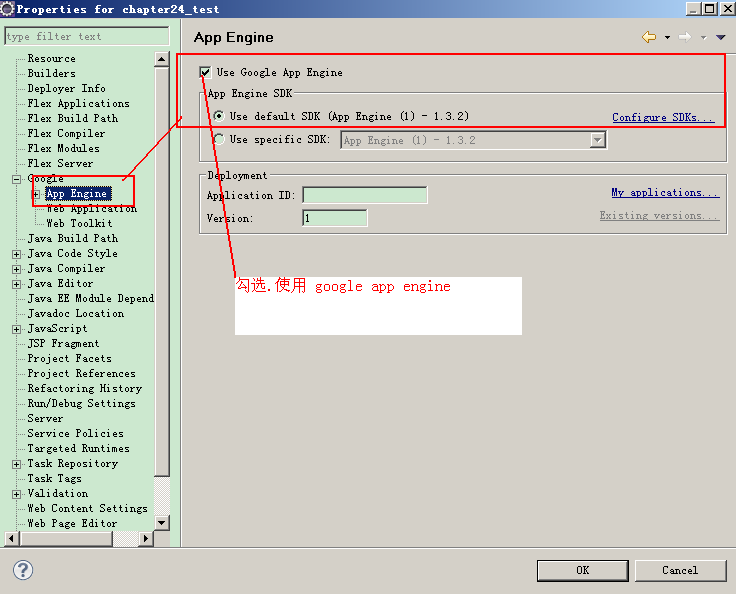
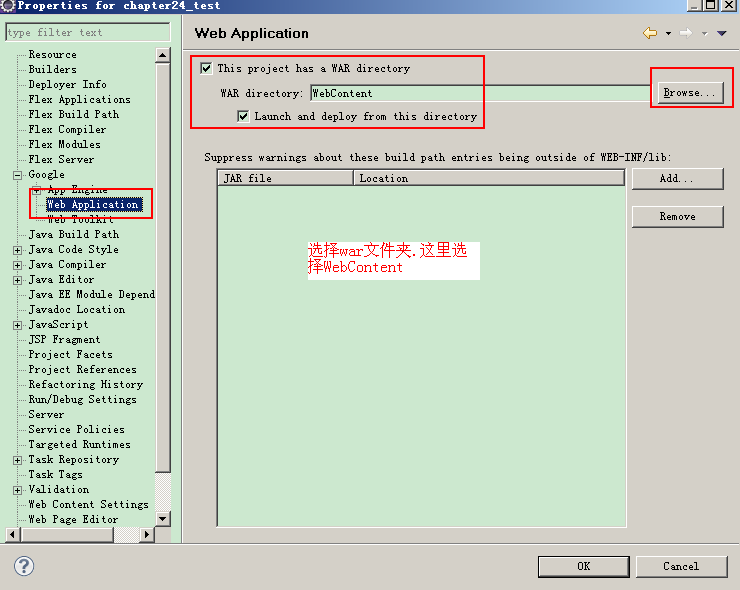

添加 SDK.
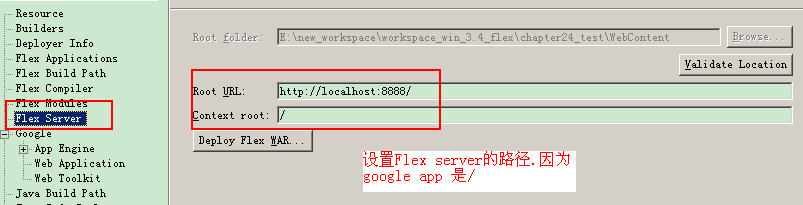
修改 flex 的服务器路径 然后重新编译.flex.
然后按照 那个兄弟的方法.
1 .修改WEB-INF/appengine-web.xml,在<appengine-web-app> 下加入这句:
<sessions-enabled>true</sessions-enabled>
2. 修改WEB-INF/flex/services-config.xml,在<system>下加入下句:
<manageable>false</manageable>
3.
替换WEB-INF/lib/flex-messaging-core.jar(基于blazeds-src- 3.2.0.3978)
文件下载地址.
http://dl.iteye.com/topics/download/25a933ff-c336-3387-9c9b-a5b00ae4cf68
2010-4-11 23:32:29 com.google.apphosting.utils.jetty.JettyLogger info
信息: Logging to JettyLogger(null) via com.google.apphosting.utils.jetty.JettyLogger
2010-4-11 23:32:29 com.google.apphosting.utils.config.AppEngineWebXmlReader readAppEngineWebXml
信息: Successfully processed E:\new_workspace\workspace_win_3.4_flex\chapter24_test\WebContent\WEB-INF/appengine-web.xml
2010-4-11 23:32:29 com.google.apphosting.utils.config.AbstractConfigXmlReader readConfigXml
信息: Successfully processed E:\new_workspace\workspace_win_3.4_flex\chapter24_test\WebContent\WEB-INF/web.xml
初始化类.
The server is running at http://localhost:8888/
启动的时候 比以前的版本多了些日志.
测试. 调用jdo.成功.调用 flex 成功.
然后配置 spring 2.0.7整合
spring 不用太高的版本.用 spring 2.0.7 就行.
发现 其实在 BlazeDS 里面就支持spring呢.
1.要有一个 SpringFactory
相信见附件.
2. 在services-config.xml中
<factories>
<factory id="spring" class="com.spring.factories.SpringFactory" />
</factories>
3.在remoting-config.xml中
<destination id="helloClass" channels="my-amf">
<properties>
<factory>spring</factory>
<scope>application</scope>
<source>helloClass</source>
</properties>
</destination>
4.在spring配置中加入
<bean id="systemUserDAO" class="com.freewebsys.dao.SystemUserDAO">
<property name="persistenceManagerFactory">
<ref bean="pmf" />
</property>
</bean>
<bean id="helloClass" class="flex3Bible.ROService"/>
这样在点击的时候就可以调用 jdo 进行保存.
在使用Google app的服务的时候.jdo如果jdo调用出错是由于 jar 文件引用重复.

将 WebContent 下面的 那个 app的jar 都不要引用..和 sdk的jar 重复.
附件是 源文件 去掉 jar 包.
修改配置文件的服务器路径.修改成你自己申请的名称.


选择工程右键直接可以部署到google app 上面.(怎么申请帐号部署略)
我的应用访问地址.
http://myflexeye.appspot.com/flex_web/CallOperation.html
访问页面显示结果.

服务调用成功.
[下面继续做一个简单的CRUD.部署到app上面.]


 3049
3049

 被折叠的 条评论
为什么被折叠?
被折叠的 条评论
为什么被折叠?
 到【灌水乐园】发言


