


第一章 sshd服务搭建管理和防止暴力破解
本节课所讲内容:
1.1、学习Linux服务前期环境准备、搭建一个RHEL7环境
1.2、sshd服务安装-ssh命令使用方法
1.3、sshd服务配置和管理
1.4、防止SSHD服务暴力破解的几种方式
1.1、学习Linux服务前期环境准备、搭建一个RHEL7环境
注意:本章学习推荐大家用centos 7.4 系列的系统,用RHEL也可以
实验环境搭建:
系统安装 :安装RHEL7或者centos7 系列 64位系统 不要用32位
下载地址:  种子文件,下载下来,用迅雷下载即可
1.1.1)清空关闭防火墙
[root@xuegod63 ~]# iptables -F
[root@xuegod63 ~]# systemctl stop firewalld
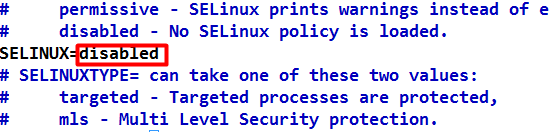
[root@xuegod63 ~]# systemctl disable firewalld1.1.2)关闭selinux
查看selinux状态
[root@xuegod63 ~]# getenforce
Disabled
vim /etc/selinux/config
1.1.3)配置好静态IP
vim /etc/sysconfig/network-scripts/ifcfg-ens32

TYPE="Ethernet"
PROXY_METHOD="none"
BROWSER_ONLY="no"
BOOTPROTO="static"
DEFROUTE="yes"
IPV4_FAILURE_FATAL="no"
IPADDR=192.168.0.63
GATEWAY=192.168.0.1
DNS1=223.5.5.5
NAME="ens32"
UUID="5e02ab66-a084-404a-bb4c-50bf47bd1bd5"
DEVICE="ens32"
ONBOOT="yes"
关闭NetworkManager 服务:
service NetworkManager stop
systemctl disable NetworkManager.service
1.1.4)配置主机和ip映射关系
[root@xuegod63 ~]# vim /etc/hosts
127.0.0.1   localhostlocalhost.localdomain localhost4 localhost4.localdomain4
::1         localhost localhost.localdomain localhost6 localhost6.localdomain6
192.168.1.63    xuegod63.cn     xuegod63
192.168.1.64    xuegod64.cn     xuegod64
[root@xuegod63 ~]# vim /etc/hosts
127.0.0.1 localhostlocalhost.localdomain localhost4 localhost4.localdomain4
::1 localhost localhost.localdomain localhost6 localhost6.localdomain6
192.168.1.63 xuegod63.cn xuegod63
192.168.1.64 xuegod64.cn xuegod64
1.1.5)修改主机名
[root@xuegod63 ~]# vim /etc/hostname
xuegod63
[root@xuegod63 ~]# hostname xuegod63 ##立即生效
xuegod63
1.1.6)配置好yum源
本地yum源
[root@xuegod63 ~]# mount /dev/sr0  /mnt/
[root@xuegod63 ~]# echo "/dev/sr0 /mnt iso9660 defaults 0 0" >> /etc/fstab
[root@xuegod63 ~]# rm -rf /etc/yum.repos.d/*
[root@xuegod63 ~]# cat> /etc/yum.repos.d/rhel6.repo <<EOF
> [rhel6-source]
>name=rhel6-source
>baseurl=file:///mnt
> enabled=1
>gpgcheck=0
> EOF
1.1.7)配置网络yum源
阿里云镜像源站点(http://mirrors.aliyun.com/) centos镜像参考:http://mirrors.aliyun.com/help/centos
CentOS
#备份
mv /etc/yum.repos.d/CentOS-Base.repo /etc/yum.repos.d/CentOS-Base.repo.backup

#下载新的CentOS-Base.repo 到/etc/yum.repos.d/   #CentOS 7
wget -O /etc/yum.repos.d/CentOS-Base.repohttp://mirrors.aliyun.com/repo/Centos-7.repo

#之后运行yum makecache生成缓存
yum makecache

# 安装epel源
yum install epel-release –y
主机网卡类型:桥接
开机配置成: init 3 模式
[root@xuegod63 ~]# ln -svf /lib/systemd/system/runlevel3.target /etc/systemd/system/default.target

#重启机器生效:
[root@xuegod63 ~] reboot
创建一个快照。
每做一个新的服务时,使用一个全新的快照。
克隆虚拟机:

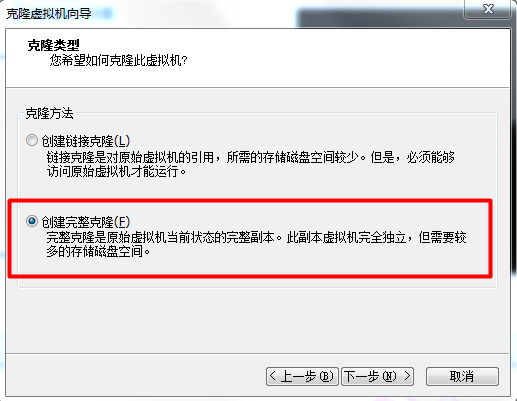
克隆后发现克隆的机器网卡无法启动,需要如下操作:
1、删除克隆机器的网卡MAC地址
2、删除网卡信息文件

[root@xuegod63 network-scripts]# rm -rf /etc/udev/rules.d/70-persistent-net.rules
3、重启:reboot
1.2、sshd服务安装-ssh命令使用方法
SSHD服务
介绍:SSH 协议:安全外壳协议。为 Secure Shell 的缩写。SSH 为建立在应用层和传输层基础上的安全协议。
作用:sshd服务使用SSH协议可以用来进行远程控制, 或在计算机之间传送文件
相比较之前用telnet方式来传输文件要安全很多,因为telnet使用明文传输,是加密传输。

服务安装:
需要安装OpenSSH 四个安装包:
OpenSSH软件包,提供了服务端后台程序和客户端工具,用来加密远程控件和文件传输过程中的数据,并由此来代替原来的类似服务。
安装包:
OpenSSH服务需要4 个软件包
openssh-5.3p1-114.el6_7.x86_64:包含OpenSSH服务器及客户端需要的核心文件
openssh-clients-5.3p1-114.el6_7.x86_64:OpenSSH客户端软件包
openssh-server-5.3p1-114.el6_7.x86_64:OpenSSH服务器软件包
openssh-askpass-5.3p1-114.el6_7.x86_64:支持对话框窗口的显示,是一个基于X 系统的密码
诊断工具 这四个软件包在我们的RHEL镜像软件安装包里有。
[root@xuegod63 Packages]# ls /media/cdrom/Packages/openssh*

/media/cdrom/Packages/openssh-5.3p1-104.el6.x86_64.rpm
/media/cdrom/Packages/openssh-askpass-5.3p1-104.el6.x86_64.rpm
/media/cdrom/Packages/openssh-clients-5.3p1-104.el6.x86_64.rpm
/media/cdrom/Packages/openssh-server-5.3p1-104.el6.x86_64.rpm
找到软件包存放位置之后,下面我们来安装软件包:
安装方法有两种:
1.2.1、配置yum源,通过
yum install openssh openssh-clients openssh-server -y #安装

前提:系统以及配置好yum源,(本地源or网络源) 推荐用yum来安装

设置开机自动挂载系统镜像文件
echo“/dev/cdrom /media/cdrom iso9660 defaults 0 0”>>/etc/fstab
你的光驱设备        挂载点        挂载格式   默认         默认
1.2.2、本地直接安装rpm包文件:
rpm –ivh /media/cdrom/Packages/openssh*.rpm

可能需要解决依赖关系 确认软件包是否已经安装:
rpm -qa | grep openssh

openssh-askpass-5.3p1-114.el6_7.x86_64
openssh-clients-5.3p1-114.el6_7.x86_64
openssh-5.3p1-114.el6_7.x86_64
openssh-server-5.3p1-114.el6_7.x86_64
查看软件安装生产的文件:
rpm –ql openssh

/etc/ssh
/etc/ssh/moduli
/usr/bin/ssh-keygen
/usr/libexec/openssh
/usr/libexec/openssh/ssh-keysign
/usr/share/doc/openssh-5.3p1
OpenSSH配置文件
OpenSSH常用配置文件有两个/etc/ssh/ssh_config和/etc/sshd_config
ssh_config 为客户端配置文件
sshd_config 为服务器端配置文件
服务启动关闭脚本:
[root@xuegodssh]# service sshd restart/stop/start/status
开机启动服务:
[root@xuegod63 ~]# chkconfig sshd on
[root@xuegod63 ssh]# systemctl list-unit-files | grep sshd
sshd-keygen.service static
sshd.service enabled
sshd@.service static
sshd.socket disabled
如何使用ssh来远程连接主机:
方法一、
1、ssh [远程主机用户名] @[远程服务器主机名或IP地址] 如果用root进程登录远程主机可以这样: [root@xuegodssh]# ssh 192.168.0.64 普通用户: [root@xuegod63 ~]# useradd cat&&echo 123456 | passwd --stdin cat [root@xuegodssh]# ssh cat@192.168.0.64 第一次登录服务器时系统没有保存远程主机的信息,为了确认该主机身份会提示用户是否继续连接,输入yes 后登录, 这时系统会将远程服务器信息写入用户主目录下的$HOME/.ssh/known_hosts文件中,下次再进行登录时因为保存有该主机信息就不会再提示了 RSA算法基于一个十分简单的数论事实:将两个大素数相乘十分容易,但是想要对其乘积进行因式分解却极其困难,因此可以将乘积公开作为加密密钥。
方法二、
ssh -l [远程主机用户名] [远程服务器主机名或IP 地址]
例:ssh -l cat 192.168.0.64
-l login_name
1.3、sshd服务配置和管理
介绍下配置文件,以及需要安全调优的地方
注:参数前面有#,表示是默认值。 当然#号也表示注示。

/etc/ssh/sshd_config配置文件
Port 22 #设置sshd监听端口号
[root@xuegod63 ~]# iptables -F
[root@xuegod63 ~]# systemctl stop firewalld
[root@xuegod63 ~]# systemctl disable firewalld
例:修改sshd服务默认监听的端口为222
vim/etc/ssh/sshd_config
改:Port 22
为:Port 222
[root@xuegodssh]# service sshd restart
测:
[root@xuegod74 ~]# netstat -tlunp | grep sshd
tcp 0 0 0.0.0.0:222 0.0.0.0:* LISTEN 4139/sshd
tcp 0 0 :::222 :::* LISTEN 4139/sshd
修改完端口默认端口后,登录方法:
[root@xuegod63 ~]# ssh -p 222 192.168.0.63
ListenAddress 0.0.0.0 #设置sshd服务器绑定的IP 地址,0.0.0.0 表示侦听所有地址这个值可以写成本地IP地址也可以写成所有地址
Protocol 2 # 选择的 SSH 协议版本,可以是 1 也可以是 2 ,CentOS 5.x 预设是仅支援 V2。安全考虑,设置为最新的协议版本
#HostKey /etc/ssh/ssh_host_key #设置包含计算机私人密匙的文件
SyslogFacility AUTHPRIV # 当有人使用 SSH 登入系统的时候,SSH 会记录信息,这个信息要记录的类型为AUTHPRIV。
sshd服务日志存放在: /var/log/secure 。
例: 为什么sshd配置文件中没有指定日志,但日志却存放在了: /var/log/secure ?
[root@xuegodssh]# vim /etc/rsyslog.conf 查看:
#LogLevel INFO
# 登录记录的等级!INFO级别以上。
下面是安全调优的重点:
LoginGraceTime 2m #grace 优雅
# 当使用者连上 SSH server 之后,会出现输入密码的画面,在该画面中,
# 在多久时间内没有成功连上 SSH server 就强迫断线!若无单位则默认时间为秒!
可以根据实际情况来修改实际
# PermitRootLogin yes
#是否允许 root 登入!预设是允许的,但是建议设定成 no !
真实的生产环境服务器,是不允许root账号直接登陆的!!!
PasswordAuthentication yes
# 密码验证当然是需要的!所以这里写 yes,也可以设置为no
#在真实的生产服务器上,根据不同安全级别要求,有的是设置不需要密码登陆的,通过认证的秘钥来登陆
# PermitEmptyPasswords no
# 若上面那一项如果设定为 yes 的话,这一项就最好设定为 no ,
# 这个项目在是否允许以空的密码登入!当然不许!
# PrintMotd yes
# 登入后是否显示出一些信息呢?例如上次登入的时间、地点等等,预设是 yes
# 亦即是打印出 /etc/motd这个文档的内容。
例:给sshd服务添加一些警告信息
[root@xuegod ~]# cat /etc/motd
[root@xuegod ~]# echo 'Warning ! From now on, all of your operation has been record!'> /etc/motd

测试:
ssh 192.168.0.64
root@192.168.0.64's password:
Last login: Thu Jun 23 14:02:38 2016 from 192.168.0.1
Warning ! From now on, all of your operation has been record!
警告!从现在开始,你所有的操作已经被记录!

# PrintLastLog yes
# 显示上次登入的信息!预设也是 yes !
例: ssh 192.168.0.63
Last login: Tue Nov 4 19:57:31 2014 from 192.168.1.107 #就是这个信息
# UseDNS yes
#一般来说,为了要判断客户端来源是正常合法的,因此会使用 DNS 去反查客户端的主机名
# 不过如果是在内网互连,这项目设定为 no 会让联机速度比较快。
四、SSHD服务防止暴力破解
防止暴力破解的方法有三种:
方法一、密钥认证实现
配置安全的sshd服务

1、 密码足够的复杂,密码的长度要大于8位最好大于20位。密码的复杂度是密码要尽可能有数字、大小写字母和特殊符号混合组成,
2、修改默认端口号
3 、不允许root账号直接登陆,添加普通账号,授予root的权限

互动:是否可以禁止root身份登录? 不行,因为有些程序需要使用root身份登录并运行。另外判断一个用户是不是超级管理员,看的是用户的ID是否为0。

4、不允许密码登陆,只能通过认证的秘钥来登陆系统
通过密钥认证实现sshd认证
实验环境:
服务端:xuegod63 IP:192.168.0.63
客户端:xuegod64 IP:192.168.0.64
客户端生成密钥对,然后把公钥传输到服务端
[root@xuegod64 ~]# ssh-keygen

Generating public/private rsa key pair.
Enter file in which to save the key (/root/.ssh/id_rsa):
#提示输入密匙文件的保存路径,选择默认继续哈~
Enter passphrase (empty for no passphrase):
下面要求输入密码,这里的passphrase 密码是对生成的私匙文件(/root/.ssh/id_dsa)
的保护口令,如果不设置可以回车。
Enter same passphrase again:

Your identification has been saved in /root/.ssh/id_rsa.
Your public key has been saved in /root/.ssh/id_rsa.pub.
The key fingerprint is:
da:2c:d8:53:92:6e:ff:4a:54:14:cd:23:28:b3:bb:3b root@xuegod64
The key's randomart image is:
+--[ RSA 2048]----+

| .o+ |
| o ... + |
| + .. . |
| .. . |
| o.S |
| +.B |
| . B.+ |
| .E= |
| .ooo. |
+-----------------+
root@xuegod64 ~]# cd /root/.ssh/
[root@xuegod64 .ssh]# ls
id_rsa id_rsa.pub known_hosts
发布公钥到服务端:
使用ssh-copy-id 命令将客户端生成的公钥发布到远程服务器192.168.0.63 xuegod63
[root@xuegod64 .ssh]# ssh-copy-id -i 192.168.0.63

The authenticity of host '192.168.0.63(192.168.0.63)' can't be established.
RSA key fingerprint is d9:17:d7:db:38:7c:e8:56:9c:4b:7e:00:7f:9e:1c:74.
Are you sure you want to continue connecting (yes/no)? yes
Warning: Permanently added '192.168.0.64' (RSA) to the list of known hosts.
root@192.168.0.64's password:
Now try logging into the machine, with "ssh '192.168.0.63'", and check in:

.ssh/authorized_keys
to make sure we haven't added extra keys that you weren't expecting
#这个时候可以通过ssh 无密钥直接登陆主机
注意:如果服务器不是监听22端口,则需要这样传输密钥:
ssh-copy-id -i ~/.ssh/id_rsa.pub "-p 222 root@192.168.0.63"
方法二:通过开源的防护软件来防护安全
简单、灵活、功能强大 实战背景: 最近公网网站一直被别人暴力破解sshd服务密码。虽然没有成功,但会导致系统负载很高,原因是在暴力破解的时候,系统会不断地认证用户,从而增加了系统资源额外开销,导致访问公司网站速度很慢。 fail2ban可以监视你的系统日志,然后匹配日志的错误信息(正则式匹配)执行相应的屏蔽动作(一般情况下是防火墙),而且可以发送e-mail通知系统管理员,很好、很实用、很强大!#ban (bæn)禁令 简单来说其功能就是防止暴力破解。工作的原理是通过分析一定时间内的相关服务日志,将满足动作的相关IP利用iptables加入到dorp列表一定时间。 注:重启iptables服务的话,所有DORP将重置。 下载软件包:官方地址:http://www.fail2ban.org http://www.fail2ban.org/wiki/index.php/Downloads # HostKey /etc/ssh/ssh_host_rsa_key # SSH version 2 使用的 RSA 私钥 # HostKey /etc/ssh/ssh_host_dsa_key # SSH version 2 使用的 DSA 私钥 注: RSA 是一种非对称加解密算法。 RSA 与 DSA 都是非对称加密算法。其中RSA的安全性是基于极其困难的大整数的分解(两个素数的乘积); DSA 的安全性是基于整数有限域离散对数难题。基本上可以认为相同密钥长度的 RSA 算法与 DSA 算法安全性相当。 公钥用于加密,它是向所有人公开的;私钥用于解密,只有密文的接收者持有。 #ServerKeyBits 1024定义服务器密匙长度
安装:互动这个陌生的软件包如何安装?
解压查看readme文件
[root@xuegod63 ~]# tar -zxvf fail2ban-0.8.14.tar.gz
[root@xuegod63 fail2ban-0.8.14]# vim README.md #查看以下内容
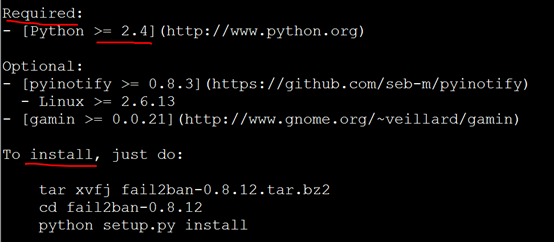
需要安装python开发环境,并且版本要大于2.4
查看当前系统中python的版本:

[root@xuegod63 fail2ban-0.8.14]# python -V

Python 2.6.6

安装:

[root@xuegod63 ~]# cd fail2ban-0.8.14
[root@xuegod63 fail2ban-0.8.14]#python setup.py install
相关主要文件说明:
/etc/fail2ban/action.d #动作文件夹,内含默认文件。iptables以及mail等动作配置
/etc/fail2ban/fail2ban.conf    #定义了fai2ban日志级别、日志位置及sock文件位置
/etc/fail2ban/filter.d                     #条件文件夹,内含默认文件。过滤日志关键内容设置
/etc/fail2ban/jail.conf     #主要配置文件,模块化。主要设置启用ban动作的服务及动作阀值
# jail [dʒeɪl]监狱
生成服务启动脚本:
[root@xuegod63 fail2ban-0.8.14]# pwd
/root/fail2ban-0.8.14

[root@xuegod63 fail2ban-0.8.14]# cp files/redhat-initd /etc/rc.d/init.d/fail2ban

[root@xuegod63 fail2ban-0.8.14]#chkconfig --add fail2ban #开机自动启动
互动: 你怎么知道要复制这个文件? 一个新的软件包,后期怎么可以知道哪个文件是启动脚本文件?
这就要找服务器启动脚本文件中有什么特点,然后过滤出来对应的文件名。
[root@xuegod63 fail2ban-0.8.14]# grep chkconfig ./* -R --color

./files/redhat-initd:# chkconfig: - 92 08

启动脚本里都包含chkconfig 字段
应用实例
设置条件:ssh远程登录5分钟内3次密码验证失败,禁止用户IP访问主机1小时,1小时该限制自动解除,用户可重新登录。
因为动作文件(action.d/iptables.conf)以及日志匹配条件文件(filter.d/sshd.conf )安装后是默认存在的。基本不用做任何修改。所有主要需要设置的就只有jail.conf文件。启用sshd服务的日志分析,指定动作阀值即可。

实例文件/etc/fail2ban/jail.conf及说明如下:

[DEFAULT]                 #全局设置
ignoreip = 127.0.0.1/8    #忽略的IP列表,不受设置限制
bantime = 600             #屏蔽时间,单位:秒
findtime = 600             #这个时间段内超过规定次数会被ban掉
maxretry = 3                #最大尝试次数
backend = auto            #日志修改检测机制(gamin、polling和auto这三种)
[ssh-iptables]               #单个服务检查设置,如设置bantime、findtime、maxretry和全局冲突,服务优先级大于全局设置。
enabled = true             #是否激活此项(true/false)修改成 true
filter = sshd              #过滤规则filter的名字,对应filter.d目录下的sshd.conf
action = iptables[name=SSH, port=ssh, protocol=tcp]             #动作的相关参数,对应action.d/iptables.conf文件
sendmail-whois[name=SSH, dest=you@example.com, sender=fail2ban@example.c
om, sendername="Fail2Ban"]#触发报警的收件人
logpath = /var/log/secure   #检测的系统的登陆日志文件。这里要写sshd服务日志文件。 默认为logpath = /var/log/sshd.log
#5分钟内3次密码验证失败,禁止用户IP访问主机1小时。 配置如下
bantime = 3600 #禁止用户IP访问主机1小时
findtime = 300 #在5分钟内内出现规定次数就开始工作
maxretry = 3 #3次密码验证失败
启动服务:
[root@xuegod63 fail2ban-0.8.14]# systemctl start fail2ban
[root@xuegod63 fail2ban-0.8.14]# systemctl enable fail2ban
测试:
[root@xuegod63 fail2ban]# > /var/log/secure #清日志。 从现在开始
[root@xuegod63 fail2ban]# systemctl restart fail2ban
Stopping fail2ban: [ OK ]
Starting fail2ban: [ OK ]
[root@xuegod63 fail2ban]# iptables -L -n
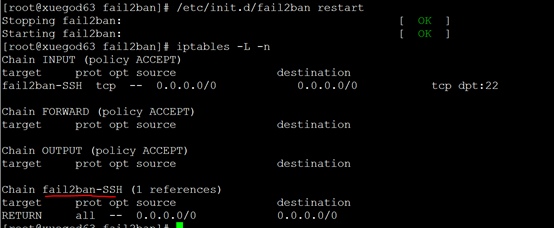
会多生成一个规则链。
测试:故意输入错误密码3次,再进行登录时,会拒绝登录
[root@xuegod64 ~]# ssh 192.168.1.63
root@192.168.1.63's password:
Permission denied, please try again.
root@192.168.1.63's password:
Permission denied, please try again.
root@192.168.1.63's password:
Permission denied (publickey,password).

[root@xuegod64 ~]# ssh 192.168.1.63
ssh: connect to host 192.168.1.63 port 22: Connection refused

[root@www.linuxidc.com ~]# iptables -L |tail -4
Chain fail2ban-SSH (1 references)
target prot opt source destination
DROP all -- 192.168.7.142 anywhere
RETURN all -- anywhere anywhere


[root@xuegod63 fail2ban]# fail2ban-client status#配置好之后我们检测下fail2ban是否工作。

Status
|- Number of jail: 1
`- Jail list: ssh-iptables
#具体看某一项的状态也可以看,如果显示被ban的ip和数目就表示成功了,如果都是0,说明没有成功。

[root@xuegod63 fail2ban]# fail2ban-client status ssh-iptables

Status for the jail: ssh-iptables
|- filter
| |- File list: /var/log/secure
| |- Currently failed: 0
| `- Total failed: 3
`- action
|- Currently banned: 1
| `- IP list: 192.168.1.64
`- Total banned: 1

查看fail2ban的日志能够看到相关的信息
[root@xuegod63 fail2ban]# tail /var/log/fail2ban.log
2015-03-03 19:43:59,233 fail2ban.actions[12132]: WARNING [ssh-iptables] Ban 192.168.1.64
需要注意的四点:
1、如果做错了,想清空一下记录,还原: 只需要把 > /var/log/secure 清空就可以了。 service fail2ban restart 2、另外如果后期需要把iptables清空后或iptables重启后,也需要把fail2ban重启一下。 3、如果修改ssh默认端口22为2015后 。 配置fail2ban来监控sshd服务 需要修改配置文件: [root@xuegod63 fail2ban]# vim jail.conf #修改iptables动作中的端口号。 默认为ssh。 改:port=ssh 为 port=2015 [root@xuegod63 fail2ban]# vim /etc/fail2ban/action.d/iptables.conf #修改动作文件中默认端口号。 改: port=ssh 为port=2015 重启服务即可 4、如果想要使用fail2ban发送告警邮件,请确保系统的邮件服务能够正常发送邮件! 可以发一封测试邮件到指定邮箱来测试下: echo “test mail”|mail -s test cat@xuegod.cn
补充:
1、通过shell脚本来防止暴力破解ssh
通过自定义的shell脚本来防护安全
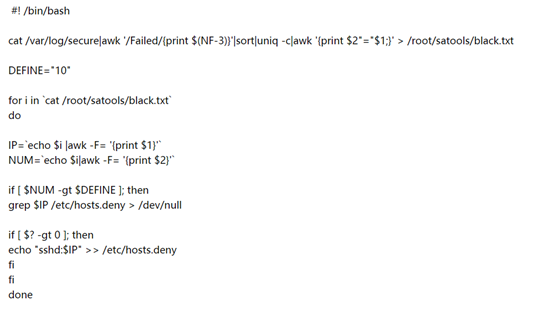
#! /bin/bash
echo "set from=发送者邮箱(可为公网) smtp=邮箱发件服务器  >>/etc/mail.rc
echo "set smtp-auth-user=公网邮箱  smtp-auth-password=邮箱密码 smtp-auth=login"  >>/etc/mail.rc
cat /var/log/secure|awk '/Failed/{print $(NF-3)}'|sort|uniq -c|awk '{print $2"="$1;}' > /root/satools/black.txt
DEFINE="10"
for i in `cat /root/satools/black.txt`
do
IP=`echo $i |awk -F= '{print $1}'`
NUM=`echo $i|awk -F= '{print $2}'`
if [ $NUM -gt $DEFINE ]; then
mail_ip="$IP the num $NUM"
echo $mail_ip|mail  -s "the ip is bad"  接收者邮箱
fi
done
https://www.moewah.com/archives/223.html
2、通过pam 模块来防止暴力破解ssh
[root@xuegod63 ~]# vim /etc/pam.d/sshd
# 在第一行下面添加一行:
auth required pam_tally2.so deny=3 unlock_time=600 even_deny_root root_unlock_time=1200
说明:尝试登陆失败超过3次,普通用户600秒解锁,root用户1200秒解锁

手动解除锁定:
查看某一用户错误登陆次数:pam_tally –-user
例如,查看work用户的错误登陆次数:pam_tally –-user work
清空某一用户错误登陆次数:pam_tally –-user –-reset
例如,清空 work 用户的错误登陆次数,pam_tally –-user work –-reset
3、denyhosts 软件防护
当我们的服务器对外提供服务的时候,难免的会受到其他用户的扫描和试图登录的操作,以侵入服务器,这样不仅会浪费系统的资源,有可能还会被其他用户进行N多次尝试后登录系统,对系统造成破坏影响业务系统的正常运行。DenyHosts是一个使用python编写的脚本文件,通过运行这个脚本(可以通过命令行运行、计划任务或者是作为服务运行)可以有效的阻止对SSH服务器的攻击。DenyHosts具有如下特性:
1. 对/var/log/secure日志文件进行分析,查找所有的登录尝试,并且过滤出失败和成功的尝试。
2.记录下所有失败的登录尝试的用户名和主机,如果超过阀值,则记录主机。
3.保持对每一个登录失败的用户(存在系统中或不存在系统中的用户)的跟踪
4.对每一个可疑的登录进行跟踪。(虽然登录成功,但是有很多次登录失败的记录)
5.将可疑地址的主机加入到/etc/hosts.deny文件中。
总结:
1.1、学习Linux服务前期环境准备、搭建一个RHEL7环境
1.2、sshd服务安装-ssh命令使用方法
1.3、sshd服务配置和管理
1.4、防止SSHD服务暴力破解的几种方式
作业:
下去查资料,安装配置denyhosts ,来防护sshd服务


 184
184

 被折叠的 条评论
为什么被折叠?
被折叠的 条评论
为什么被折叠?
 到【灌水乐园】发言


