


之前的文章或多或少都提到了一些窗口的概念。本篇先从基础入手,跟大家一起看看窗口的重要特性和流程。本文所涉源码均基于Android 13。
1 基本概念
Android中窗口负责管理应用的可视化区域以及响应用户操作事件,是显示系统中基础且十分重要的一环。首先我们来看看几个常见的类和关系。
Activity与Window
初学Android的同学接触到的第一个组件大概率是Activity,那时候觉得Activity就是我们理解的界面。其实这样的理解放到如今来看也不能说错,只是需要一个更准确的说法:Activity包含我们可见的界面,但是可见的界面不一定是Activity。我们之所以能在Activity中看到我们布局文件中定义的那些View控件,并不是因为Activity本身,而是Activity启动过程中创建了window窗口以及绘制了我们定义的那些View树。
如果把Activity比作窗户的设计师,则Window相当于窗户本身,View则是窗户上贴的各种各样的贴纸。设计师不会往自己身上贴贴纸,贴纸只会贴在窗户上,设计师要做的就是处理各种业务逻辑,是一个控制者的角色。来一张简单的图:
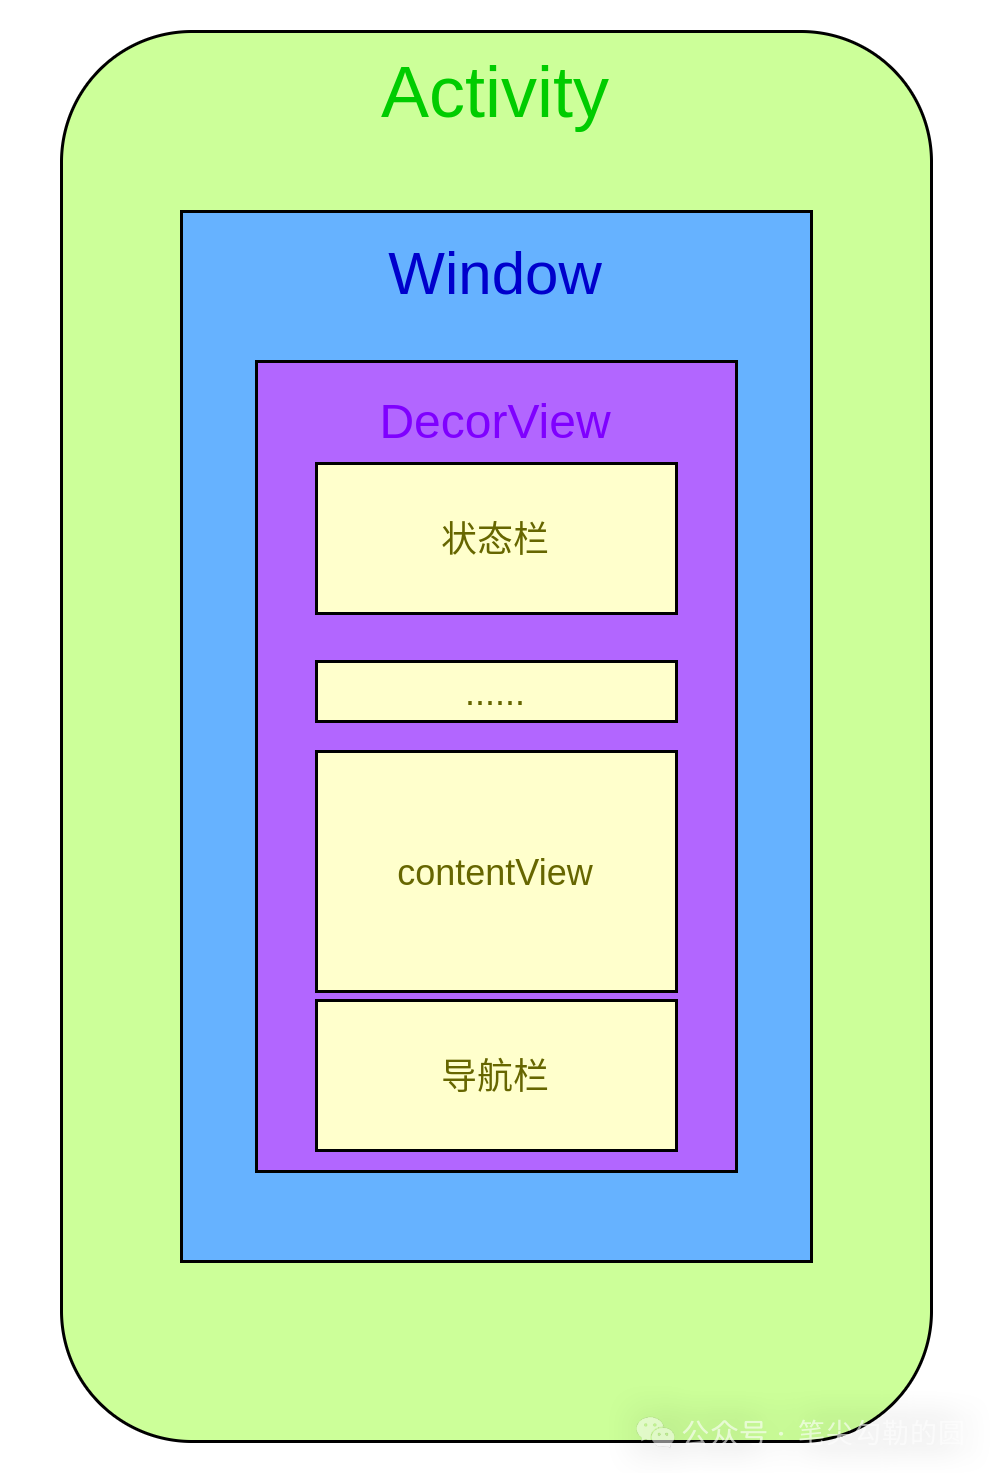
PhoneWindow
Window可以用来处理显示背景,但它是个抽象类,抽象类无法被实例化:
public abstract class Window {......}PhoneWindow作为Window的唯一实现类,承载了window的主要功能:
/*** Android-specific Window.*/public class PhoneWindow extends Window implements MenuBuilder.Callback {// DecorView对象private DecorView mDecor;...}
源码中的注释说PhoneWindow是Android中specific(具体明确)的窗口,大意也是如此,它才是真正干活的Window。此外,里面还定义了DecorView对象。
DecorView
View是用户与界面交互的直接载体,比如点击按钮、上下滑动列表等等。Activity界面中的根View叫做DecorView,它是View的根布局,里面包含了我们定义的View树,当然也有状态栏和导航栏。我们从Android Studio的Layout Inspector工具中可以一目了然:
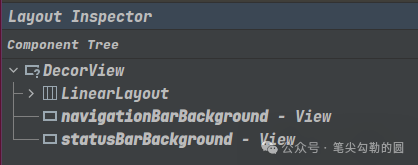
(图示:DecorView的构成)
从上图中可以看出,DecorView包括一个LinearLayout、导航栏和状态栏。其中,我们通过setContentView设置的布局就包含在LinearLayout里面。
WindowManager
WindowManager,窗口管理者,用来管理窗口的显示,例如位置、大小、类型等等。在《Android子线程可以更新UI吗?》一文中我们已经使用过WindowManager,我们再来回顾一下:
void subThreadAddView() {
    Button button = new Button(MainActivity.this);
    button.setText("子线程的UI");
    button.setBackgroundColor(Color.YELLOW);
    button.setTextColor(Color.RED);
    button.setOnClickListener(new View.OnClickListener() {
        @Override
        public void onClick(View view) {
            button.setText("子线程的UI更新了");
        }
    });
    WindowManager.LayoutParams lp = new WindowManager.LayoutParams(WindowManager.LayoutParams.TYPE_APPLICATION);
    lp.width = 400;
    lp.height = 200;
    MainActivity.this.getWindowManager().addView(button, lp);
}
代码中我们创建了Button,设置了布局属性,宽高分别设置为400和200,窗口类型为Application窗口,最终使用WindowManager添加进去。因此,WindowManager是窗口的管理器。
ViewRootImpl
ViewRootImpl不能看名字进行理解,它不是View,更不是根View,而是View树和WindowManager之间的连接者,负责View的测量、布局和绘制工作,是整个View系统里面非常重要的类。
public final class ViewRootImpl implements ViewParent,View.AttachInfo.Callbacks, ThreadedRenderer.DrawCallbacks,AttachedSurfaceControl {}
2 核心流程
看完诸多概念和关系后,大家可能觉得有点理解但不多。没关系,我们再来看看一些核心的窗口显示过程,将那些概念串起来,自然就能加深理解和掌握。
PhoneWindow的创建
前面我们说到,Activity启动过程中会创建Window,而PhoneWindow是Window的实现类,那么PhoneWindow是何时创建的呢?
Activity启动过程中会执行到ActivityThread的performLaunchActivity,里面会执行Activity的attach方法:
private Activity performLaunchActivity(ActivityClientRecord r, Intent customIntent) {......activity.attach(appContext, this, getInstrumentation(), r.token,r.ident, app, r.intent, r.activityInfo, title, r.parent,r.embeddedID, r.lastNonConfigurationInstances, config,r.referrer, r.voiceInteractor, window, r.activityConfigCallback,r.assistToken, r.shareableActivityToken);......}
我们继续看看attach方法:
final void attach(Context context, ActivityThread aThread,Instrumentation instr, IBinder token, int ident,Application application, Intent intent, ActivityInfo info,CharSequence title, Activity parent, String id,NonConfigurationInstances lastNonConfigurationInstances,Configuration config, String referrer, IVoiceInteractor voiceInteractor,Window window, ActivityConfigCallback activityConfigCallback, IBinder assistToken,IBinder shareableActivityToken) {......// 创建PhoneWindow对象mWindow = new PhoneWindow(this, window, activityConfigCallback);
有了有了,这里new了PhoneWindow赋值给Activity的成员变量mWindow,这样Activity就拥有了Window对象。
DecorView的初始化
Activity有了,PhoneWindow也有了,还差个View就能组成我们前面所说的窗户了。作为根View,DecorView的初始化自然是我们首要关心的。
大家肯定清楚Activity的onCreate方法,里面会调用setContentView方法,就像这样:
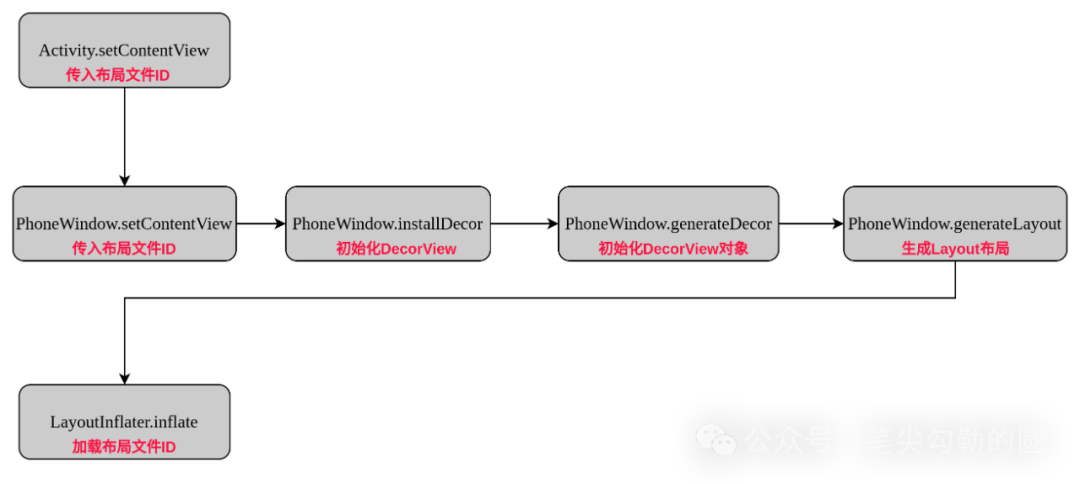
@Overrideprotected void onCreate(Bundle savedInstanceState) {super.onCreate(savedInstanceState);setContentView(R.layout.activity_main);
方法内部实现我们一起来看看:
public void setContentView(@LayoutRes int layoutResID) {// 这里直接调用PhoneWindow的方法getWindow().setContentView(layoutResID);initWindowDecorActionBar();}
这里Activity直接调用了Window的setContentView方法,也就是PhoneWindow的方法:
public void setContentView(int layoutResID) {
    if (mContentParent == null) {
        // 这里初始化DecorView
        installDecor();
    } else if (!hasFeature(FEATURE_CONTENT_TRANSITIONS)) {
        mContentParent.removeAllViews();
    }

    if (hasFeature(FEATURE_CONTENT_TRANSITIONS)) {
        final Scene newScene = Scene.getSceneForLayout(mContentParent, layoutResID,
                getContext());
        transitionTo(newScene);
    } else {
        // 这里将我们定义的布局文件加载进去
        mLayoutInflater.inflate(layoutResID, mContentParent);
    }
......
}看到了,里面调用了installDecor方法,应该是初始化DecorView的,我们继续看:
private void installDecor() {mForceDecorInstall = false;if (mDecor == null) {// 此时走到这里创建DecorViewmDecor = generateDecor(-1);mDecor.setDescendantFocusability(ViewGroup.FOCUS_AFTER_DESCENDANTS);mDecor.setIsRootNamespace(true);if (!mInvalidatePanelMenuPosted && mInvalidatePanelMenuFeatures != 0) {mDecor.postOnAnimation(mInvalidatePanelMenuRunnable);}} else {mDecor.setWindow(this);}if (mContentParent == null) {// 这里生成布局mContentParent = generateLayout(mDecor);......}
此时mDecor为null,继续走到generateDecor方法:
protected DecorView generateDecor(int featureId) {......// 这里new DecorView对象return new DecorView(context, featureId, this, getAttributes());}
这里new了DecorView对象返回。
DecorView对象创建完毕,我们回到installDecor方法,后面接着调用了generateLayout方法,赋值给了mContentParent,方法比较长,主要是读取一些主题和加载对应的初始布局文件。
回到setContentView方法,DecorView和mContentParent都有了之后,接着通过LayoutInflater将我们的布局文件加载到mContentParent里面。画个图总结一下这个过程:
(图示:setContentView流程)
WindowManager添加View
有了View,我们需要通过WindowManager进行添加和管理。WindowManager的初始化是在Activity的attach方法的后半段:
final void attach(Context context, ActivityThread aThread,
            Instrumentation instr, IBinder token, int ident,
            Application application, Intent intent, ActivityInfo info,
            CharSequence title, Activity parent, String id,
            NonConfigurationInstances lastNonConfigurationInstances,
            Configuration config, String referrer, IVoiceInteractor voiceInteractor,
            Window window, ActivityConfigCallback activityConfigCallback, IBinder assistToken,
            IBinder shareableActivityToken) {
......
    // 设置WindowManager对象
    mWindow.setWindowManager(
           (WindowManager)context.getSystemService(Context.WINDOW_SERVICE),
            mToken, mComponent.flattenToString(),
            (info.flags & ActivityInfo.FLAG_HARDWARE_ACCELERATED) != 0);
    if (mParent != null) {
        mWindow.setContainer(mParent.getWindow());
    }
    // 赋值给成员变量
    mWindowManager = mWindow.getWindowManager();
......这里给PhoneWindow设置了WindowManager对象,接着又赋值给成员变量mWindowManager,一起看看setWindowManager方法:
public void setWindowManager(WindowManager wm, IBinder appToken, String appName,boolean hardwareAccelerated) {......if (wm == null) {wm = (WindowManager)mContext.getSystemService(Context.WINDOW_SERVICE);}// 对象赋值mWindowManager = ((WindowManagerImpl)wm).createLocalWindowManager(this);}
public WindowManagerImpl createLocalWindowManager(Window parentWindow) {// 直接new WindowManagerImpl对象return new WindowManagerImpl(mContext, parentWindow, mWindowContextToken);}
// WindowManagerImpl是真正的执行者public final class WindowManagerImpl implements WindowManager {......}
这里实际得到的是WindowManagerImpl对象,WindowManager是个interface,WindowManagerImpl实现了此接口。至此,Activity拥有了WindowManager对象。
继续看看WindowManager的用武之地,在ActivityThread的handleResumeActivity方法中:
public void handleResumeActivity(ActivityClientRecord r, boolean finalStateRequest,boolean isForward, String reason) {......if (r.window == null && !a.mFinished && willBeVisible) {r.window = r.activity.getWindow();// 获取DecorView对象View decor = r.window.getDecorView();decor.setVisibility(View.INVISIBLE);// 获取WindowManager对象ViewManager wm = a.getWindowManager();WindowManager.LayoutParams l = r.window.getAttributes();a.mDecor = decor;l.type = WindowManager.LayoutParams.TYPE_BASE_APPLICATION;l.softInputMode |= forwardBit;if (r.mPreserveWindow) {a.mWindowAdded = true;r.mPreserveWindow = false;ViewRootImpl impl = decor.getViewRootImpl();if (impl != null) {impl.notifyChildRebuilt();}}if (a.mVisibleFromClient) {if (!a.mWindowAdded) {a.mWindowAdded = true;// 这里会调用addView方法wm.addView(decor, l);......
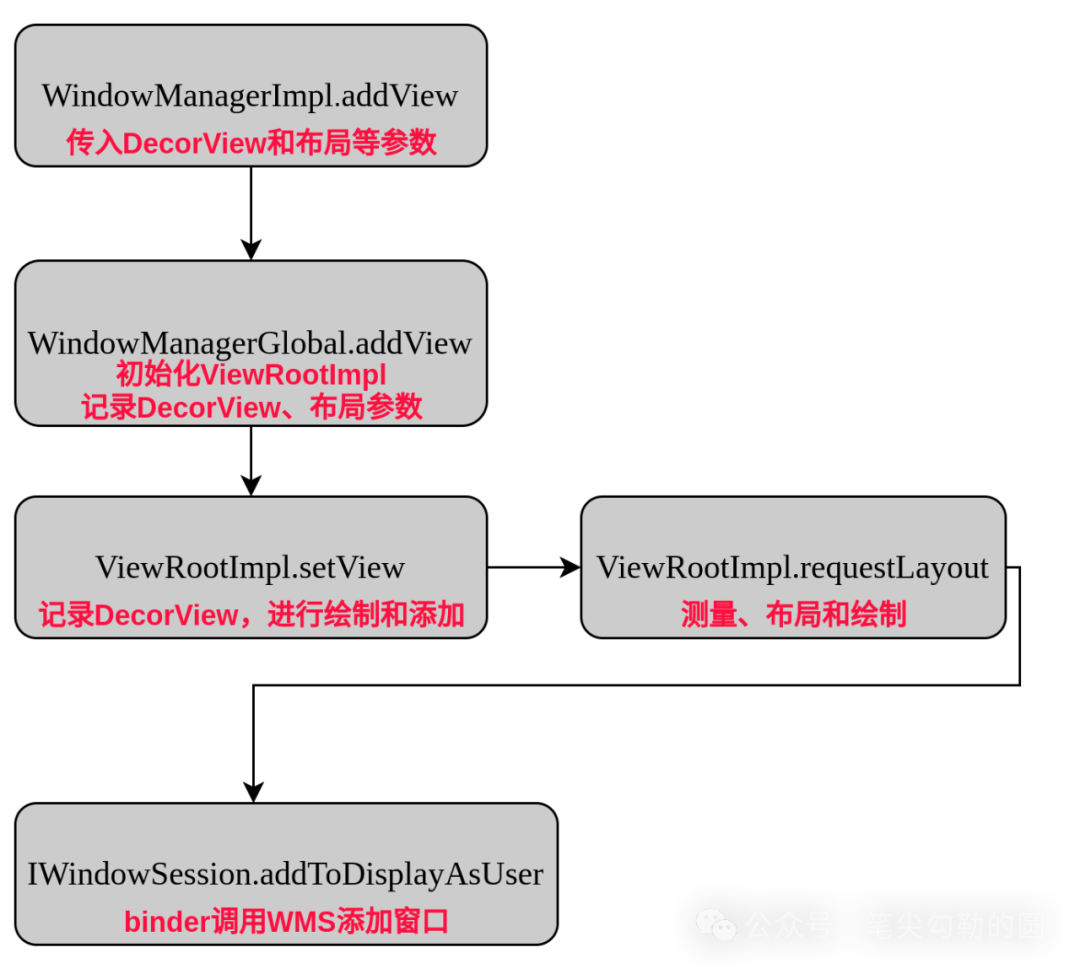
这里获取了之前的创建的DecorView和WindowManager对象,并设置了窗口类型为BASE_APPLICATION,最后通过WindowManager.addView方法添加进去。
ViewRootImpl的作用
前面说过,ViewRootImpl是连接WindowManager和View的,怎么连接的呢?肯定是在上面WindowManager.addView之后了,我们继续看源码:
public void addView(@NonNull View view, @NonNull ViewGroup.LayoutParams params) {......// 调用WindowManagerGlobal的addView方法mGlobal.addView(view, params, mContext.getDisplayNoVerify(), mParentWindow,mContext.getUserId());}
这里继续调用WindowManagerGlobal的addView方法:
public void addView(View view, ViewGroup.LayoutParams params,
            Display display, Window parentWindow, int userId) {
......
    // 定义ViewRootImpl
    ViewRootImpl root;
    View panelParentView = null;

....

    if (windowlessSession == null) {
        // new ViewRootImpl对象
        root = new ViewRootImpl(view.getContext(), display);
    } else {
        root = new ViewRootImpl(view.getContext(), display,
                  windowlessSession);
    }

    view.setLayoutParams(wparams);
    // 将DecorView加入到view列表
    mViews.add(view);
    // 将ViewRootImpl加入到root列表
    mRoots.add(root);
    // 将param加入到params列表
    mParams.add(wparams);


    try {
        // 调用ViewRootImpl的setView方法
        root.setView(view, wparams, panelParentView, userId);
......
这里的核心逻辑是new了ViewRootImpl对象并加入mRoots列表中,同时将DecorView和布局参数也分别加入mViews和mParams列表中。到这里大家应该明白WindowManagerGlobal的作用,顾名思义,窗口全局管理器,管理每个窗口的view、viewRootImpl和布局参数。好的,后面就交给ViewRootImpl去setView:
public void setView(View view, WindowManager.LayoutParams attrs, View panelParentView,
            int userId) {
    synchronized (this) {
        if (mView == null) {
            mView = view;

......
            // 请求layout
            requestLayout();
            ......
            // 请求WMS添加窗口
            res = mWindowSession.addToDisplayAsUser(mWindow, mWindowAttributes,
                        getHostVisibility(), mDisplay.getDisplayId(), userId,
                        mInsetsController.getRequestedVisibilities(), inputChannel, mTempInsets,
                        mTempControls);
......
这个方法比较长,我们重点看下requestLayout方法和addToDisplayAsUser方法。
requestLayout方法:
public void requestLayout() {if (!mHandlingLayoutInLayoutRequest) {// 检查线程checkThread();mLayoutRequested = true;// 测量、布局、绘制scheduleTraversals();}}
这里会先检查线程,判断是否是创建线程来更新UI,检查完线程后会调用scheduleTraversals来进行view的测量、布局和绘制三大流程,本文先不展开了。
接着看addToDisplayAsUser方法:
public int addToDisplayAsUser(IWindow window, WindowManager.LayoutParams attrs,
            int viewVisibility, int displayId, int userId, InsetsVisibilities requestedVisibilities,
            InputChannel outInputChannel, InsetsState outInsetsState,
            InsetsSourceControl[] outActiveControls) {
    // 这里的mService就是WMS对象
    return mService.addWindow(this, window, attrs, viewVisibility, displayId, userId,
            requestedVisibilities, outInputChannel, outInsetsState, outActiveControls);
}
这个方法是在Session里面,也就是上面mWindowSession的binder服务端,此时已经进行binder跨进程通信了。代码中的mService就是WindowManagerService对象(WMS),后面就会通过WMS进行窗口的server端添加逻辑啦。本文暂且不展开了。
好的,我们同样来画张图描述一下ViewRootImpl的过程:
3 总结
本篇主要针对Activity启动中涉及的窗口知识进行了基础的概念和流程介绍,想必大家对于窗口有了基础且清晰的认识。文中对于一些源码细节并未过多展开,主要是想先让大家对于窗口有一个框架和流程上的整体认识,后续窗口的知识体系大幕将会徐徐拉开,你会了解更多的窗口流程以及一些你可能没在意过的源码细节。
好了,先总结一下本篇的知识点吧。
1. Activity是逻辑控制单元,本身并不直接显示界面,界面的显示是通过PhoneWindow、DecorView和ViewRootImpl等来实现的。
2. DecorView是Activity中的根View,我们通过setContentView可以将布局文件加载到DecorView里面。
3. 首次启动Activity的情况下,窗口的添加显示是在Activity的onResume方法之后。
4. WindowManager是窗口管理器,用来管理窗口显示的大小、位置和类型等,具体实现类是WindowManagerImpl。
5. WindowManagerGlobal是全局管理器,内部保存着viewRootImpl、params参数、根View列表。
6. ViewRootImpl是View体系中十分重要的类,连接View树和WindowManager,它本身不是View。
7. ViewRootImpl负责执行View的测量、布局和绘制,还负责与SystemServer进程的WMS进行通信。


 1万+
1万+


 被折叠的 条评论
为什么被折叠?
被折叠的 条评论
为什么被折叠?
 到【灌水乐园】发言


