


AsyncLayoutInflater使用
当我们的UI布局因为过于复杂,影响冷启动或者用户体验的时候,可以用AsyncLayoutInflater优化因xml-layout反射变成View,会占用主线程的卡顿问题。首先我们需要查看下AsyncLayoutInflater的使用并且剖析源码了解它的优缺点:
class MainActivity : AppCompatActivity() {

    override fun onCreate(savedInstanceState: Bundle?) {
        super.onCreate(savedInstanceState)
        AsyncLayoutInflater(this).inflate(
            R.layout.activity_splash, null
        ) { view, _, _ ->
            setContentView(view)
        }
        //setContentView(R.layout.activity_splash)
    }
使用很简单构造函数接受一个 Context,inflate 函数最后一个参数是接口,在回调方法中可以获取到View。
public interface OnInflateFinishedListener {
    void onInflateFinished(@NonNull View view, @LayoutRes int resid,@Nul
AsyncLayoutInflater源码剖析
- 构造函数中创建3个对象,分别是布局解析器
BasicInflater,解析单利子线程InflateThread,用于切换到主线程callback的Handler。inflate方法最终把任务封装对象交给InflateThread的队列。
 public AsyncLayoutInflater(@NonNull Context context) {
     mInflater = new BasicInflater(context);
     mHandler = new Handler(mHandlerCallback);
     mInflateThread = InflateThread.getInstance();
 }

 public void inflate(...
     mInflateThread.enqueue(request);
对于 BasicInflater 主要优化了 LayoutInflater 加载布局对象时候优先查找 "android.widget.","android.webkit.","android.app." 前缀的。
private static final String[] sClassPrefixList = {
    "android.widget.", "android.webkit.", "android.app."
};

@Override
protected View onCreateView(String name, AttributeSet attrs) throws ClassNotFoundException {
    for (String prefix : sClassPrefixList) {
        try {
            View view = createView(name, prefix, attrs);
            if (view != null) {
                return view;
            }
        } catch (ClassNotFoundException e) {
            // In this case we want to let the base class take a crack
            // at it.
        }
    }
    return super.onCreateView(name, attrs);
}
InflateThread 继承于 Thread,所以重点看 start 和 run 方法
private static class InflateThread extends Thread {
    private static final InflateThread sInstance;
    static {
        //单利对象并且创建之后就启动并且进入run中的死循环
        sInstance = new InflateThread();
        sInstance.start();
    }

    public static InflateThread getInstance() {
        return sInstance;
    }
    //解析队列最大支持10个
    private ArrayBlockingQueue<InflateRequest> mQueue = new ArrayBlockingQueue<>(10);
    //解析请求的对象池
    private SynchronizedPool<InflateRequest> mRequestPool = new SynchronizedPool<>(10);

    @Override
    public void run() {
        while (true) {
            runInner();
        }
    }
    //把任务添加到解析队列
    public void enqueue(InflateRequest request) {
        try {
            mQueue.put(request);
        } catch (InterruptedException e) {
            throw new RuntimeException("Failed to enqueue async inflate request", e);
        }
    }
run 内部是个死循环,在 runInner 中不断从队列中获取布局的解析任务放在子线程中执行,解析完成变成 View 之后通过 Handler 回调到主线程再使用。
 public void runInner() {
     InflateRequest request;
     try {
         //轮训获取任务,没有任务会阻塞
         request = mQueue.take();
     } catch (InterruptedException ex) {
         // Odd, just continue
         Log.w(TAG, ex);
         return;
     }
     try {
     //在子线程中attachToRoot只能给false
         request.view = request.inflater.mInflater.inflate(
                 request.resid, request.parent, false);
     } catch (RuntimeException ex) {
        ...
     }
     //sendToTarget 发送到Handler
     Message.obtain(request.inflater.mHandler, 0, request).sendToTarget();
 }
Handler 的 callback 主要是为了把回调结果返回主线程,并且当子线程中解析失败会在这里重新尝试 inflate。
 private Callback mHandlerCallback = new Callback() {
     @Override
     public boolean handleMessage(Message msg) {
         //获取子线程结果的封装
         InflateRequest request = (InflateRequest) msg.obj;
         //如果view在子线程解析失败没有赋值,在main线程中重新解析一次
         if (request.view == null) {
             request.view = mInflater.inflate(
                     request.resid, request.parent, false);
         }
         //回调 onInflateFinished
         request.callback.onInflateFinished(
                 request.view, request.resid, request.parent);
         //线程回收资源
         mInflateThread.releaseRequest(request);
         return true;
     }
 };
优点整理
- 在子线程中解析来优化主线程占用
- 在子线程解析失败,会再次回到主线程inflate一次
- 可以优化启动Activity时候主线程还有其他任务同步进行的卡白屏问题。
缺陷整理
- 所有的解析工作在一个线程中,同时有多个inflate任务只能串行
- 在子线程中初始化View时候不能创建
Handler或者调用Looper.myLooper() - 队列添加任务超过10个时候会阻塞主线程,非常小概率了
- 不支持
LayoutInflater.FactoryorLayoutInflater.Factory2,全局换字体或者替换控件功能会有影响 - 没有提供取消解析的api,可能出现内存泄漏
- 由于是callback方式在fragment中使用很困难
- 不是主线程
attachToRoot必须是false,如果需要add到rootView需要手动
用kotlin协程优化
Coroutine可以提供解析的子线程和切换到主线程,使用挂起函数就不需要接口回调了,并且可以自由的取消任务。这可以解决上面的部分缺陷了,看起来直接替换掉InflateThread和Handler所有工作就可以了,复制一份AsyncLayoutInflater代码改造,代码一下子少了很多。
class CoroutineLayoutInflater(
    private val context: Context,
    private val dispatcher: CoroutineDispatcher = Dispatchers.Default
) {
    private val inflater: BasicInflater = BasicInflater(context)

    suspend fun inflate(
        @LayoutRes resId: Int,
        parent: ViewGroup? = null,
    ): View {
        val view = withContext(dispatcher) {
            try {
                inflater.inflate(resId, parent, false)
            } catch (ex: RuntimeException) {
                Log.e("CoroutineLayoutInflater", "The background thread failed to inflate. Error message=${ex.message}")
                null
            }
        }
        //如果在main线程了直接调度
        return withContext(Dispatchers.Main.immediate) {
            view ?: inflater.inflate(resId, parent, false)
        }
    }
    ... BasicInflater
lifecycleScope 可以自动取消任务
class MainActivity : AppCompatActivity() {

    override fun onCreate(savedInstanceState: Bundle?) {
        super.onCreate(savedInstanceState)
        lifecycleScope.launch {
            val view = CoroutineLayoutInflater(this@MainActivity).inflate(R.layout.activity_splash)
            setContentView(view)
            //ActivitySplashBinding.bind(view)
        }
    }
}
解析线程优化
上面代码的CoroutineDispatcher我们使用了Dispatchers.Default,创建的线程名称默认为DefaultDispatcher-worker-#,如果大家需要单独定义一个线程池或者添加线程名称等,可以这样操作。
val threadFactory = ... //自定义名称或线程虚拟内存优化 512kb等
val nThreads = ... // 线程数,为1就是单线程
//最好是全局变量去保持这个layout专用的dispatcher
val dispatcher = ThreadPoolExecutor(
    nThreads, nThreads,
    0L, TimeUnit.MILLISECONDS,
    LinkedBlockingQueue<Runnable>()
).apply {
    //允许核心线程回收
    allowCoreThreadTimeOut(true)
    //转换为 CoroutineDispatcher
    asCoroutineDispatcher()
}
//go
CoroutineLayoutInflater(context, dispatcher)
支持LayoutInflater.Factory2
在androidx中提供了api LayoutInflaterCompat.setFactory2(inflater, factory2) 来给 LayoutInflater 设置 factory,inflater 对象我们有了,还需要获取到 factory2 对象。
查看源码, LayoutInflater.Factory2 是个接口 androidx 的实现类在 AppCompatDelegateImpl,因为类是 @hide 需要通过 AppCompatActivity#getDelegate() 来获取,那么在 Activity 中必须是继承 AppCompatActivity 的。那么再改造下我们的 CoroutineLayoutInflater
class CoroutineLayoutInflater(...) {

    private val inflater: BasicInflater = BasicInflater(context)

    init {
        ((context as? AppCompatActivity)?.delegate as? LayoutInflater.Factory2)?.let { factory2 ->
            LayoutInflaterCompat.setFactory2(inflater, factory2)
        }
    }
Fragment的支持问题
虽然用了 suspend 函数,但是如果 runBlocking { } 会阻塞当前的线程,那么和不使用 AsyncLayoutInflater 就一样了。看起来只能曲线救国了,还是建议直接改造成 Compose 吧。
class HostFragment : Fragment() {
override fun onCreateView(
inflater: LayoutInflater,
container: ViewGroup?,
savedInstanceState: Bundle?
): View {
return FrameLayout(requireActivity()).also { rootView ->
viewLifecycleOwner.lifecycleScope.launch {
CoroutineLayoutInflater(requireActivity()).inflate(
R.layout.fragment_host, container
).let {
rootView.addView(it)
}
}
}
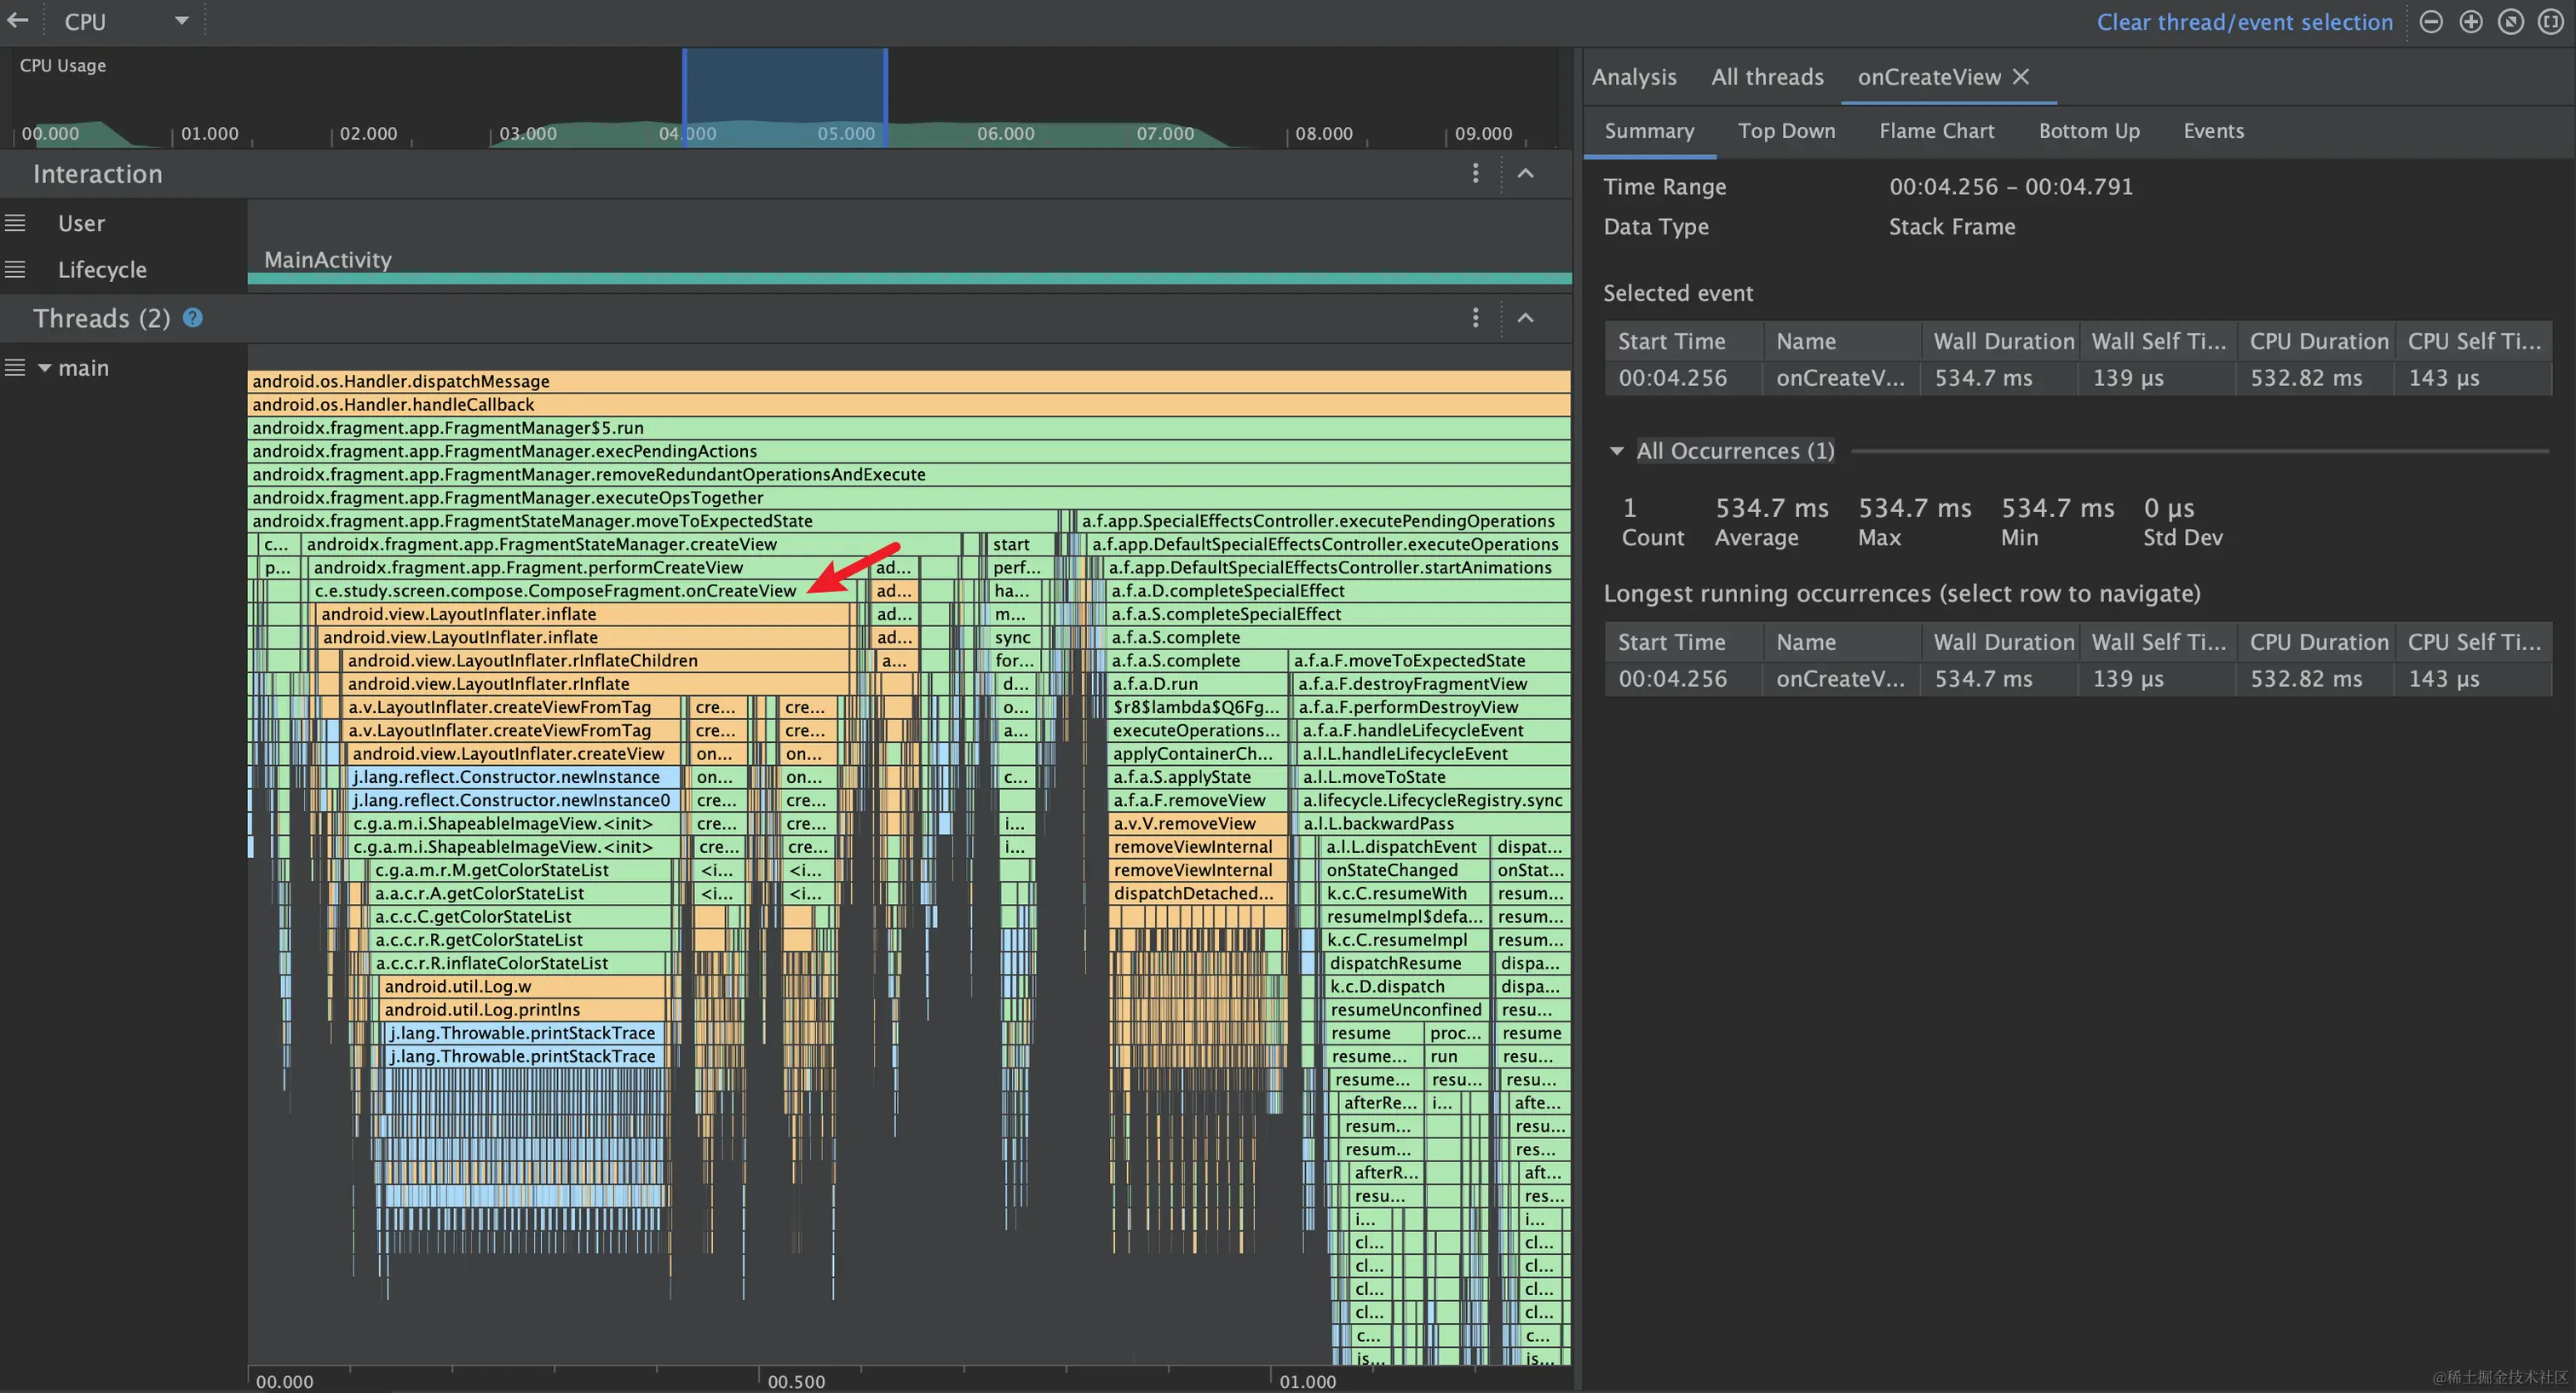
}Profiler分析trace
先用普通的View创建方式查看先main的耗时占用
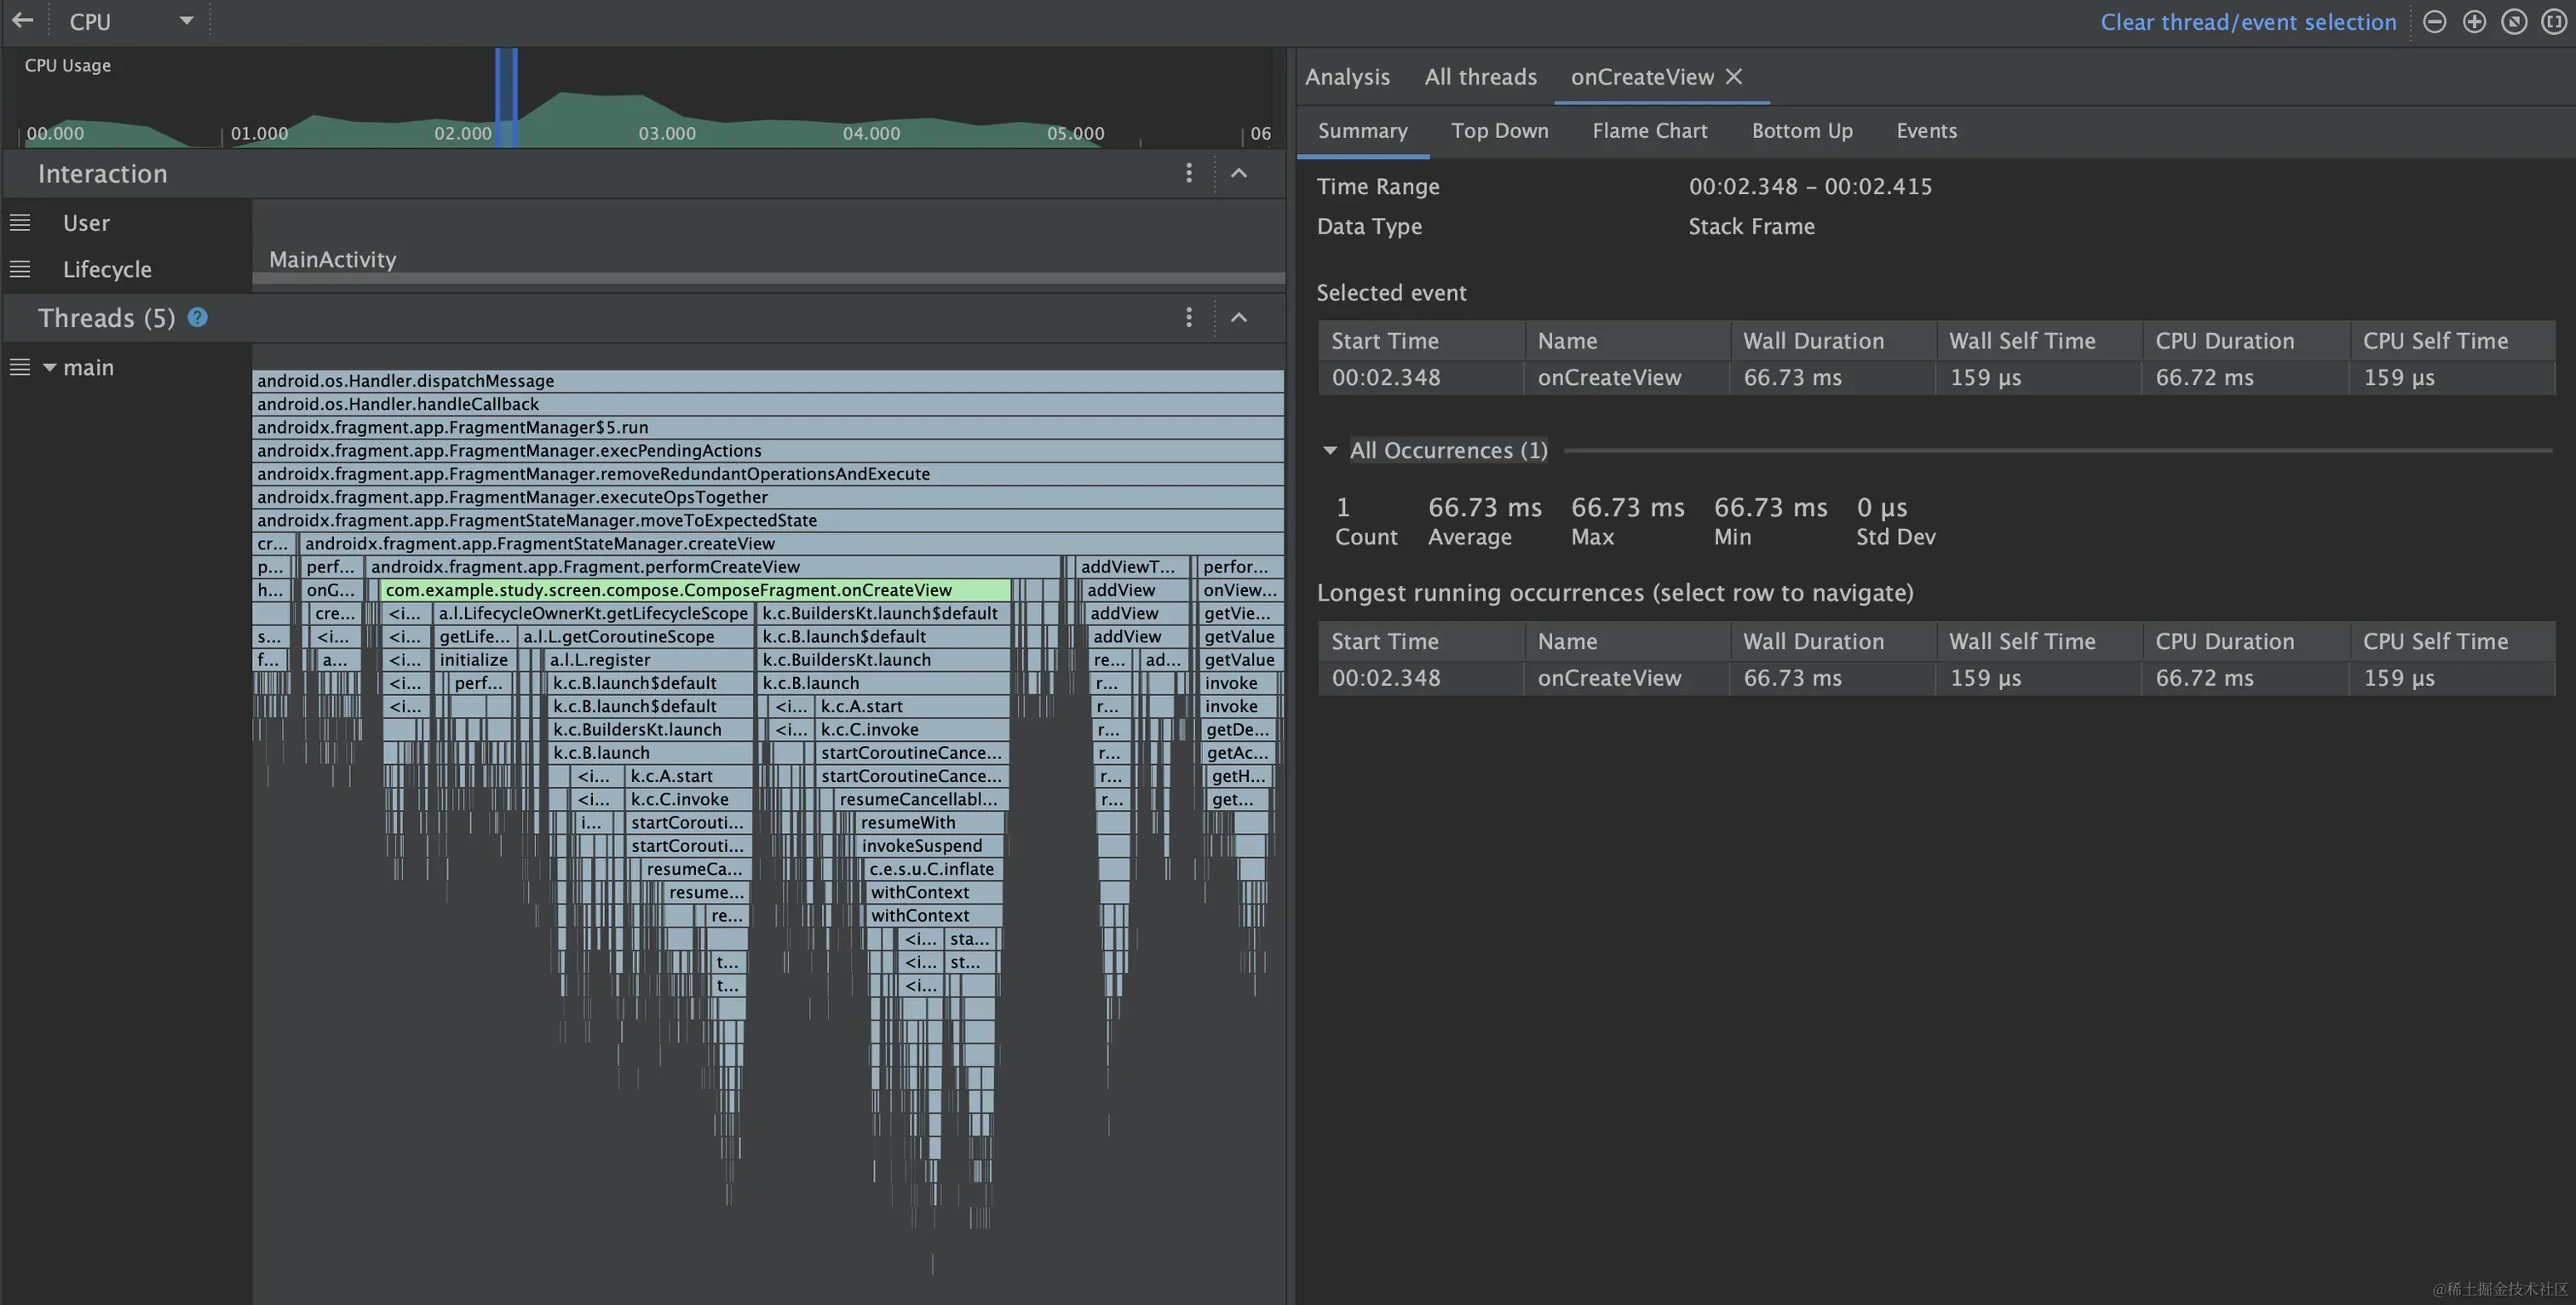
使用优化后的CoroutineLayoutInflater
主线程的占用都移动到了DefaultDispatcher-worker-#
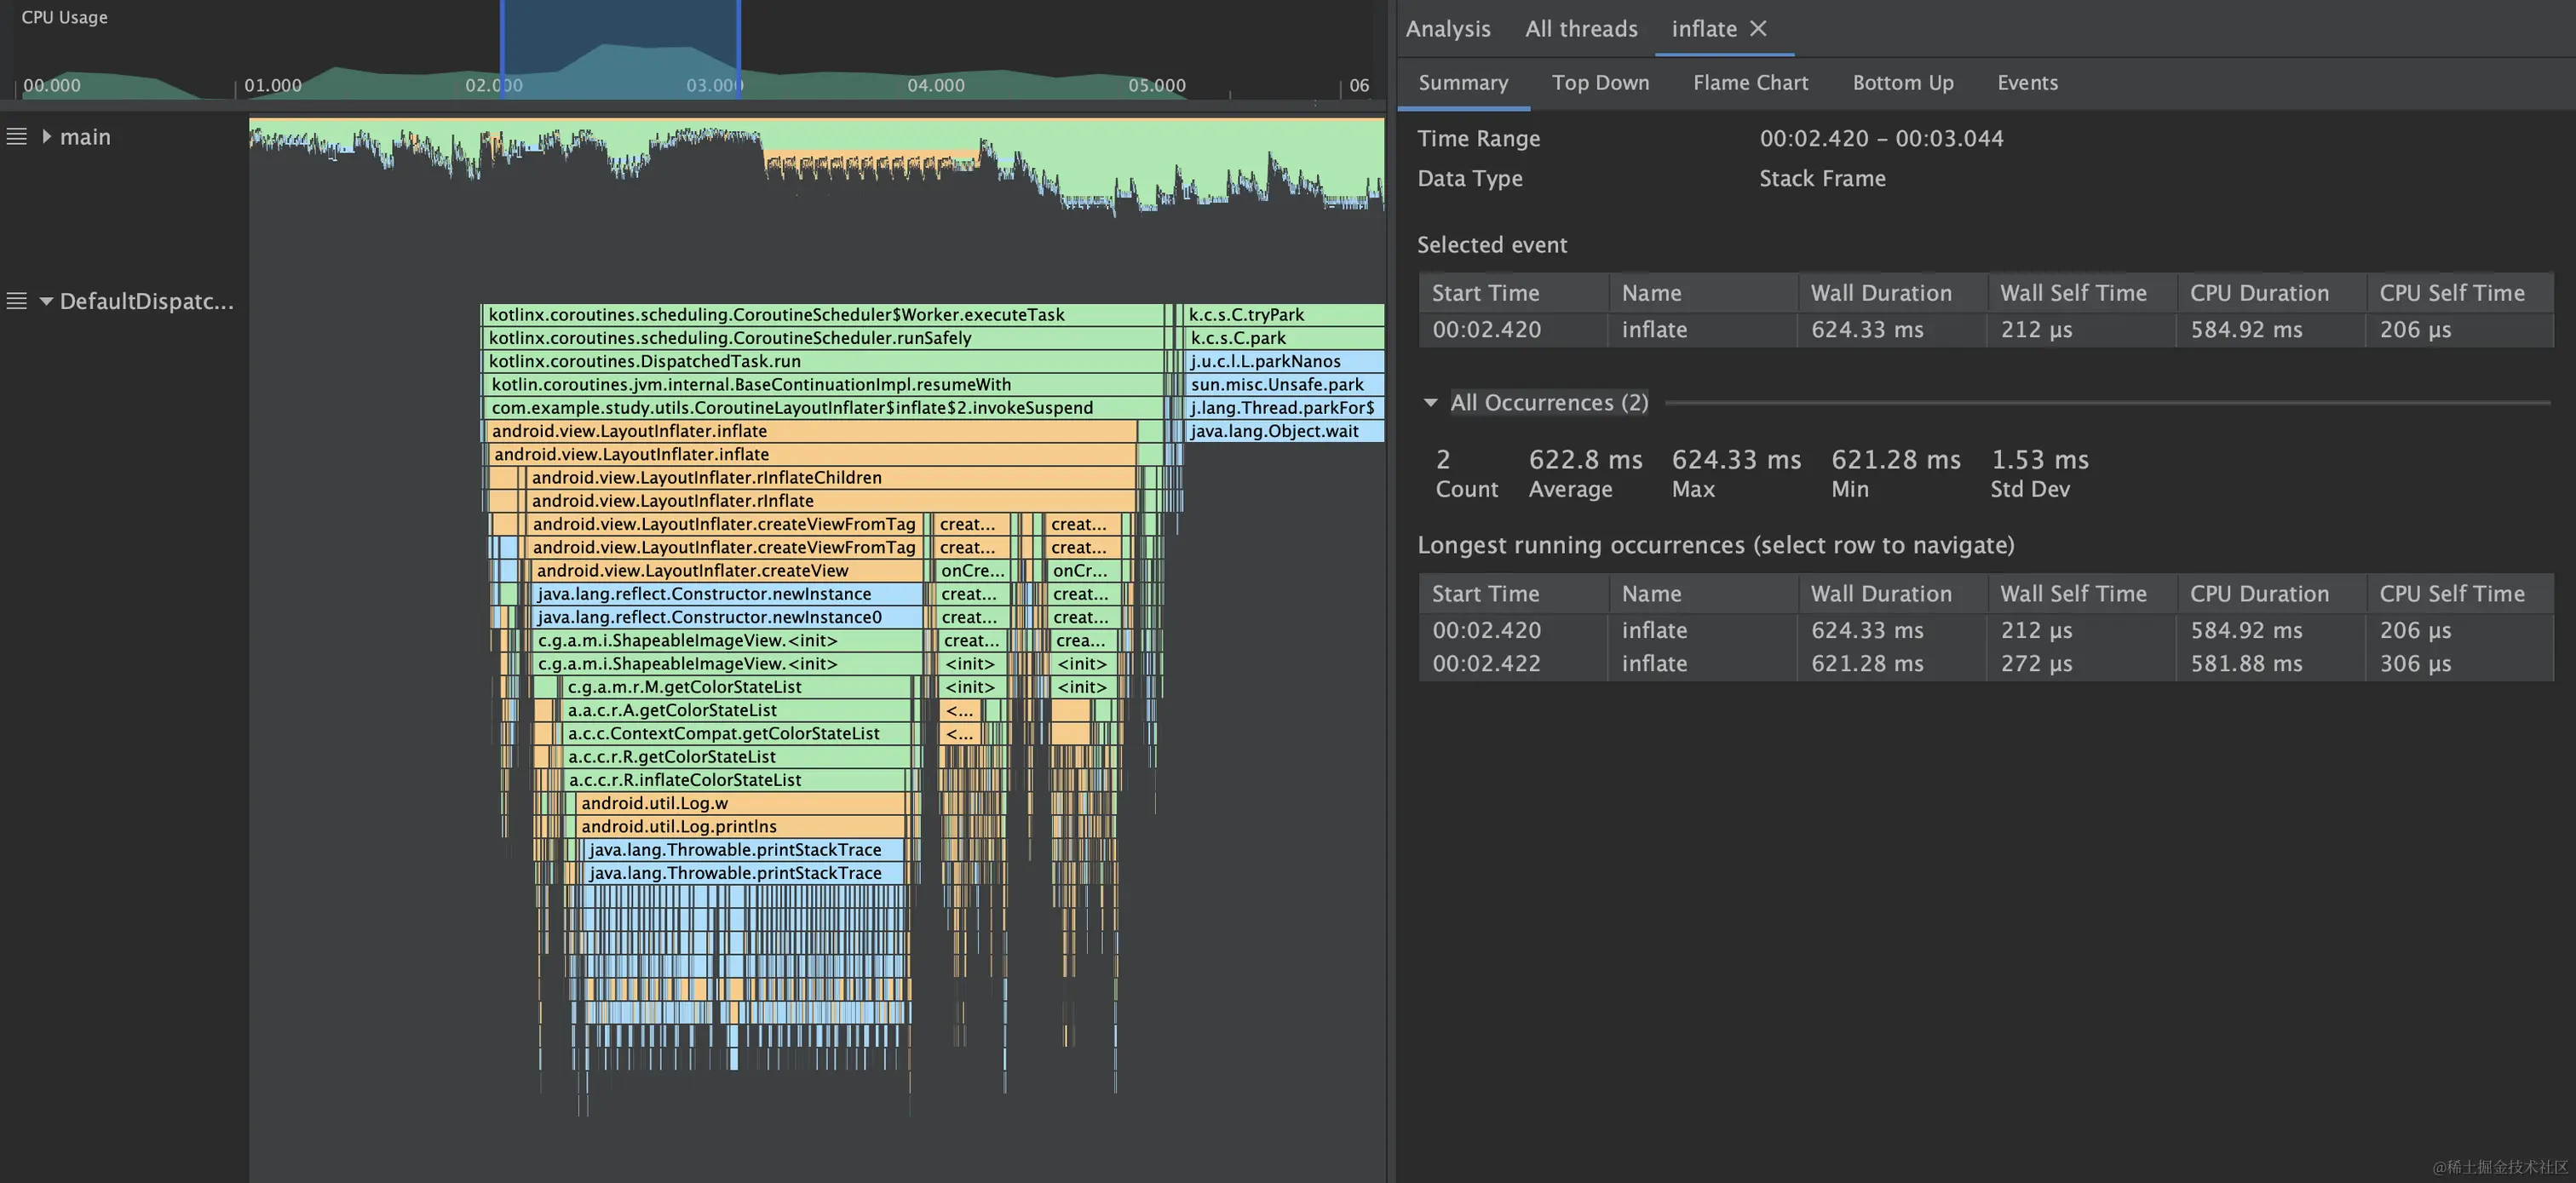
通过分析也可以看出在冷启动中使用会有比较好的效果,而且不太建议同时间内大量使用,会频繁的切换线程导致CPU碎片时间过多反而会卡顿。
作者:forJrking
链接:https://juejin.cn/post/7296442264447320116
来源:稀土掘金
著作权归作者所有。商业转载请联系作者获得授权,非商业转载请注明出处。


 被折叠的 条评论
为什么被折叠?
被折叠的 条评论
为什么被折叠?
 到【灌水乐园】发言


