


示例:线程不安全的计数器
以下代码模拟多个线程同时对共享计数器进行自增操作:
public class ThreadUnsafeExample {
    private static int counter = 0; // 共享计数器

    public static void main(String[] args) throws InterruptedException {
        int threadCount = 100;
        Thread[] threads = new Thread[threadCount];

        // 创建并启动 100 个线程
        for (int i = 0; i < threadCount; i++) {
            threads[i] = new Thread(() -> {
                for (int j = 0; j < 1000; j++) {
                    counter++; // 非线程安全操作
                }
            });
            threads[i].start();
        }

        // 等待所有线程完成
        for (Thread t : threads) {
            t.join();
        }

        // 预期结果应为 100,000,但实际输出通常小于该值
        System.out.println("Counter: " + counter); // 可能输出 99873、99952 等
    }
}
问题分析
1. 线程不安全的根本原因
counter++ 看似是原子操作,实际上包含三个步骤:
- 读取:从主内存读取
counter的当前值到线程工作内存。 - 修改:在工作内存中对值加 1。
- 写入:将修改后的值刷新回主内存。
2. 可能的竞态条件
假设两个线程同时执行 counter++:
- 时间点 1:线程 A 读取
counter值为 100。 - 时间点 2:线程 B 读取
counter值为 100(此时 A 尚未写入)。 - 时间点 3:线程 A 加 1 后写入 101。
- 时间点 4:线程 B 加 1 后写入 101(覆盖 A 的更新)。
最终结果:两次自增仅使 counter 增加 1,导致计数丢失。
3. 线程同步与安全
3.1 线程安全问题
当多个线程同时访问和修改共享资源时,可能会导致数据不一致或错误的结果,这就是线程安全问题。例如,多个线程同时对一个共享的计数器进行自增操作,可能会出现计数不准确的情况。
3.2 同步机制
synchronized关键字- 同步方法:在方法声明中使用
synchronized关键字,保证同一时刻只有一个线程能够访问该方法。
- 同步方法:在方法声明中使用
class Counter {
    private int count = 0;

    public synchronized void increment() {
        count++;
    }

    public int getCount() {
        return count;
    }
}
- 同步代码块:使用
synchronized关键字修饰代码块,指定要同步的对象。
class Counter {
    private int count = 0;
    private final Object lock = new Object();

    public void increment() {
        synchronized (lock) {
            count++;
        }
    }

    public int getCount() {
        return count;
    }
}
Lock接口:java.util.concurrent.locks包中的Lock接口提供了更灵活的锁机制,如可重入锁ReentrantLock。
import java.util.concurrent.locks.Lock;
import java.util.concurrent.locks.ReentrantLock;

class Counter {
    private int count = 0;
    private Lock lock = new ReentrantLock();

    public void increment() {
        lock.lock();
        try {
            count++;
        } finally {
            lock.unlock();
        }
    }

    public int getCount() {
        return count;
    }
}
4. 线程间通信
4.1 wait()、notify() 和 notifyAll() 方法
这三个方法是 Object 类的方法,用于实现线程间的通信。wait() 方法使当前线程进入等待状态,notify() 方法唤醒在此对象监视器上等待的单个线程,notifyAll() 方法唤醒在此对象监视器上等待的所有线程。
class SharedResource {
    private boolean flag = false;

    public synchronized void producer() throws InterruptedException {
        while (flag) {
            wait();
        }
        System.out.println("生产者生产数据");
        flag = true;
        notifyAll();
    }

    public synchronized void consumer() throws InterruptedException {
        while (!flag) {
            wait();
        }
        System.out.println("消费者消费数据");
        flag = false;
        notifyAll();
    }
}

public class ThreadCommunicationExample {
    public static void main(String[] args) {
        SharedResource sharedResource = new SharedResource();

        Thread producerThread = new Thread(() -> {
            try {
                for (int i = 0; i < 5; i++) {
                    sharedResource.producer();
                }
            } catch (InterruptedException e) {
                e.printStackTrace();
            }
        });

        Thread consumerThread = new Thread(() -> {
            try {
                for (int i = 0; i < 5; i++) {
                    sharedResource.consumer();
                }
            } catch (InterruptedException e) {
                e.printStackTrace();
            }
        });

        producerThread.start();
        consumerThread.start();
    }
}
4.2 await()、signal() 和 signalAll() 方法
Lock 接口的 Condition 对象提供了 await()、signal() 和 signalAll() 方法,功能类似于 wait()、notify() 和 notifyAll() 方法,但使用起来更加灵活。
import java.util.concurrent.locks.Condition;
import java.util.concurrent.locks.Lock;
import java.util.concurrent.locks.ReentrantLock;

class SharedResourceWithLock {
    private boolean flag = false;
    private Lock lock = new ReentrantLock();
    private Condition condition = lock.newCondition();

    public void producer() throws InterruptedException {
        lock.lock();
        try {
            while (flag) {
                condition.await();
            }
            System.out.println("生产者生产数据");
            flag = true;
            condition.signalAll();
        } finally {
            lock.unlock();
        }
    }

    public void consumer() throws InterruptedException {
        lock.lock();
        try {
            while (!flag) {
                condition.await();
            }
            System.out.println("消费者消费数据");
            flag = false;
            condition.signalAll();
        } finally {
            lock.unlock();
        }
    }
}
5. 线程池
5.1 线程池的概念和优势
线程池是一种管理线程的机制,它预先创建一定数量的线程,当有任务提交时,从线程池中获取线程来执行任务,任务执行完毕后线程不会销毁,而是返回线程池等待下一个任务。使用线程池的优势包括:
- 减少线程创建和销毁的开销:避免了频繁创建和销毁线程带来的性能损耗。
- 提高响应速度:任务提交后可以立即从线程池中获取线程执行,无需等待线程创建。
- 便于线程管理:可以控制线程的数量、线程的生命周期等。
5.2 创建线程池
Java 提供了 ExecutorService 接口和 Executors 工具类来创建线程池。常见的线程池类型有:
- 固定大小线程池:
Executors.newFixedThreadPool(int nThreads)
import java.util.concurrent.ExecutorService;
import java.util.concurrent.Executors;

public class FixedThreadPoolExample {
    public static void main(String[] args) {
        ExecutorService executorService = Executors.newFixedThreadPool(3);
        for (int i = 0; i < 5; i++) {
            final int taskId = i;
            executorService.submit(() -> {
                System.out.println("任务 " + taskId + " 正在执行,线程名: " + Thread.currentThread().getName());
                try {
                    Thread.sleep(1000);
                } catch (InterruptedException e) {
                    e.printStackTrace();
                }
            });
        }
        executorService.shutdown();
    }
}
- 单线程线程池:
Executors.newSingleThreadExecutor() - 缓存线程池:
Executors.newCachedThreadPool() - 定时任务线程池:
Executors.newScheduledThreadPool(int corePoolSize)
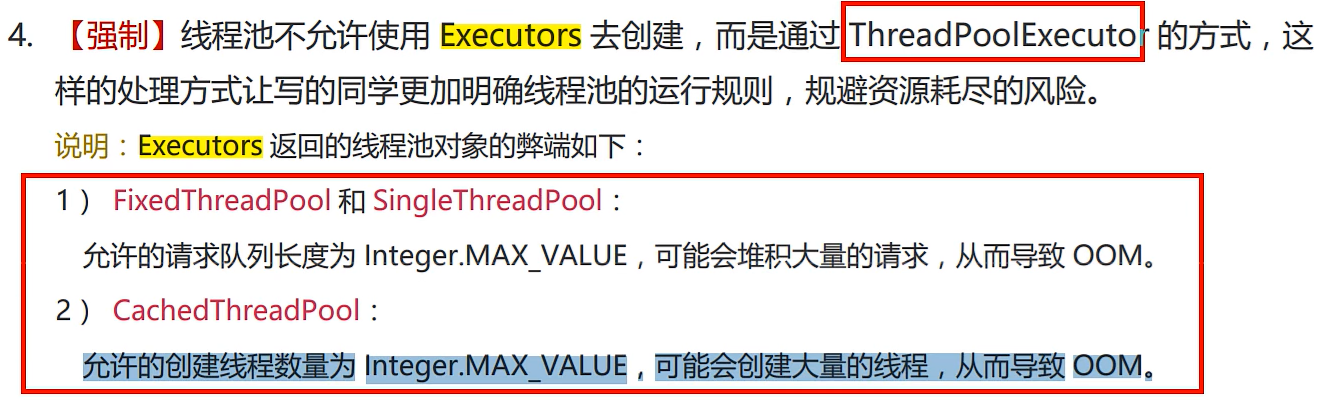
不过,从 Java 7 开始,更推荐使用 ThreadPoolExecutor 类来手动创建线程池,以避免使用 Executors 工具类可能带来的一些问题,如内存溢出等。
import java.util.concurrent.*;

public class ThreadPoolExecutorExample {
    public static void main(String[] args) {
        ThreadPoolExecutor executor = new ThreadPoolExecutor(
                2, // 核心线程数
                5, // 最大线程数
                60, // 线程空闲时间
                TimeUnit.SECONDS,
                new LinkedBlockingQueue<>(10) // 任务队列
        );

        for (int i = 0; i < 5; i++) {
            final int taskId = i;
            executor.submit(() -> {
                System.out.println("任务 " + taskId + " 正在执行,线程名: " + Thread.currentThread().getName());
                try {
                    Thread.sleep(1000);
                } catch (InterruptedException e) {
                    e.printStackTrace();
                }
            });
        }
        executor.shutdown();
    }
}


 被折叠的 条评论
为什么被折叠?
被折叠的 条评论
为什么被折叠?
 到【灌水乐园】发言


