12.7 默认虚拟主机
跟httpd类似,第一个被Nginx加载的虚拟主要就是默认主机。但和httpd不同的地方是,它还有一个配置用来标记默认虚拟主机。也就是说,如果没有这个标记,第一个虚拟主机为默认虚拟主机。
修改主配置文件nginx.onf,在结束符号}上面加入一行配置,改写如下:

意思是,/usr/local/nginx/conf/vhost/下面的所有以.conf结尾的文件都会加载,这样我们就可以把所有虚拟主机配置文件放到vhost目录下面了。
[root@zhangjin-120:~]#mkdir /usr/local/nginx/conf/vhost
[root@zhangjin-120:~]#cd /usr/local/nginx/conf/vhost
[root@zhangjin-120:/usr/local/nginx/conf/vhost]#vim default.conf
写入如下内容:
server
{
    listen 80 default_server;  #有这个标记的就是默认虚拟主机
    server_name aaa.com;
    index index.html index.htm index.php;
    root /data/nginx/default;
}
保存退出。
[root@zhangjin-120:/usr/local/nginx/conf/vhost]#/usr/local/nginx/sbin/nginx -t
nginx: the configuration file /usr/local/nginx/conf/nginx.conf syntax is ok
nginx: configuration file /usr/local/nginx/conf/nginx.conf test is successful
[root@zhangjin-120:/usr/local/nginx/conf/vhost]#/usr/local/nginx/sbin/nginx -s reload
[root@zhangjin-120:/usr/local/nginx/conf/vhost]#echo "default_server" > /data/nginx/default/index.html #创建索引页
[root@zhangjin-120:/usr/local/nginx/conf/vhost]#curl -x127.0.0.1:80 aaa.com
default_server
[root@zhangjin-120:/usr/local/nginx/conf/vhost]#curl -x127.0.0.1:80 1234.com #访问一个没有定义过的域名,也会访问到aaa.comdefault_server
12.8 Nginx用户认证
再来创建一个新的虚拟主机:
vim test.com.conf,写入如下内容:
1 server
  2 {
  3     listen 80;
  4     server_name test.com;
  5     index index.html index.htm index.php;
  6     root /data/nginx/test.com;
  7
  8     location /
  9     {
 10         auth_basic            "Auth";
 11         auth_basic_user_file  /usr/local/nginx/conf/htpasswd;
 12     }
 13 }
上面内容,auth_basic表示打开认证,auth_basic_user_file指定用户密码文件(前提是这个用户密码文件存在)。生成用户密码文件的工具需要借助httpd的htpasswd。
然后安装httpd#yum install -y httpd,也可以使用之前编译安装的apache2.4

用curl命令来验证:

状态码401说明,该网站需要验证。
我们打开windows的hosts文件,并加入一行:
IP test.com
然后在浏览器中访问test.com,出现如图所示的验证对话框:

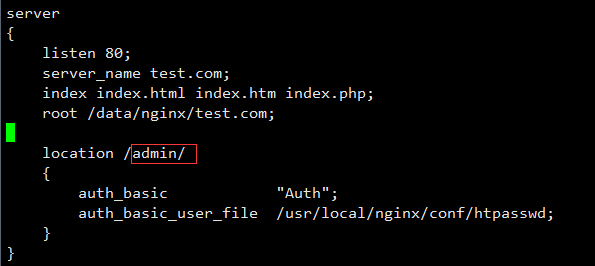
输入用户名和密码就可以访问了。如果是针对某个目录做用户认证,需要修改locaton后面的路径:
12.9 Nginx域名重定向
Nginx的域名重定向和httpd的类似:
更改test.com.conf文件:
server
{
    listen 80;
    server_name test.com test1.com test2.com;
    index index.html index.htm index.php;
    root /data/nginx/test.com;
    if ($host != 'test.com') {
        rewrite ^/(.*)$ http://test.com/$1 permanent;
    }

}
在Nginx配置中,server_name后面可以跟多个域名,permanent为永久重定向,相当于httpd的R=301。另外还有一个常用的redirect,相当于httpd的R=302。
我们来测试下:

12.10 Nginx访问日志
查看Nginx的日志格式:

上图中,combined_realip为日志格式的名字,后面可以调用它;$remote_addr为访问网站的用户的出口IP;$http_x_forwarded_for为代理服务器的IP,如果使用了代理,则会记录代理的IP;$time_local为当前的时间;$host为访问的主机名;$request_uri为访问的URL地址;$status为状态码;$http_referer为referer地址;$http_user_agent为user_agent。
编辑虚拟主机配置文件,指定访问日志的路径:
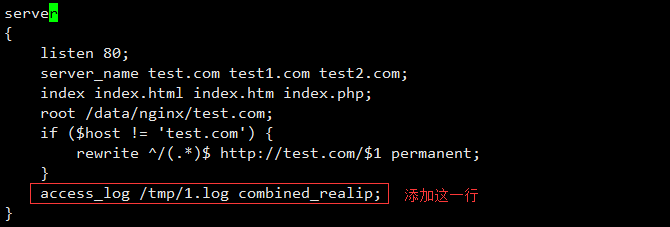
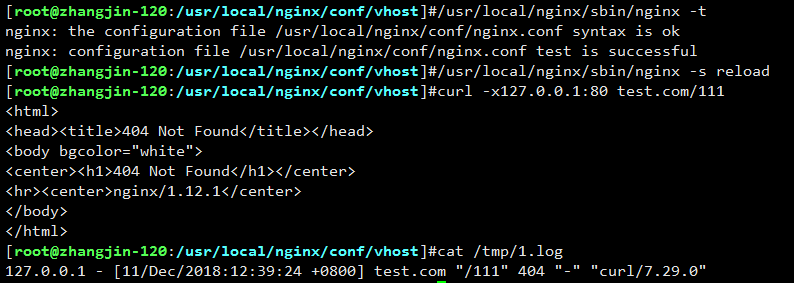
使用access_log来指定日志的存储路径,最后面指定日志的格式名字,测试如下:
12.11 Nginx日志切割
Nginx的日志很简单,不像httpd还有自带的切割工具,要想切割Nginx日志需要借助系统的切割工具或自定义脚本。
以下脚本为Nginx日志的切割脚本:
#vim /usr/local/sbin/nginx_log_rotate.sh,并写入以下内容:
#! /bin/bash
## 假设nginx的日志存放路径为/data/logs/
d=`date -d "-1 day" +%Y%m%d`
logdir="/data/logs"
nginx_pid="/usr/local/nginx/logs/nginx.pid"
cd $logdir
for log in `ls *.log`
do
    mv $log $log-$d
done
/bin/kill -HUP `cat $nginx_pid`


##add cron
#0 0 * * * /bin/bash /usr/local/sbin/nginx_log_rotate.sh
保存后,还需要增加任务计划:
[root@zhangjin-120:/usr/local/nginx/conf/vhost]#crontab -e
no crontab for root - using an empty one
0 0 * * * /bin/bash /usr/local/sbin/nginx_log_rotate.sh
12.12 静态文件不记录日志和过期时间
编辑配置文件:
#vim test.com.conf
并写入以下内容:
server
{
    listen 80;
    server_name test.com test1.com test2.com;
    index index.html index.htm index.php;
    root /data/nginx/test.com;

    if ($host != 'test.com' ) {
        rewrite  ^/(.*)$  http://test.com/$1  permanent;
    }
    location ~ .*\.(gif|jpg|jpeg|png|bmp|swf)$
    {
          expires      7d;
          access_log off;
    }
location ~ .*\.(js|css)$
    {
          expires      12h;
          access_log off;
    }
    access_log /tmp/1.log combined_realip;
}
使用location~可以指定对应的静态文件,expires配置过期时间,而access_log配置为off就可以不记录访问日志了。下面来测试下:
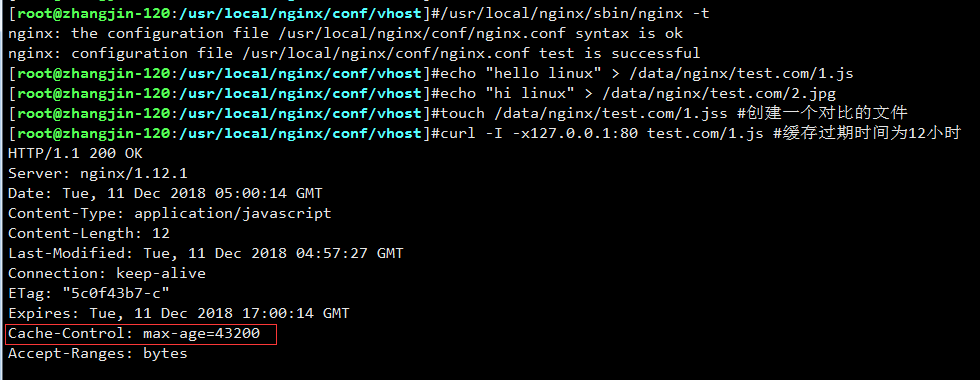


可以看到Cache-control对应的时间大小,另外也可以看一下访问日志:

可以看到,刚才访问的js和jpg,都没有记录到访问日志中。
12.13 Nginx防盗链
编辑配置文件:#vim test.com.conf,写入如下内容:
server
{
    listen 80;
server
{
    listen 80;
    index index.html index.htm index.php;
    root /data/nginx/test.com;

    if ($host != 'test.com' ) {
        rewrite  ^/(.*)$  http://test.com/$1  permanent;
    }
#    {
    index index.html index.htm index.php;
    root /data/nginx/test.com;

    if ($host != 'test.com' ) {
        rewrite  ^/(.*)$  http://test.com/$1  permanent;
    }
#    location ~ .*\.(gif|jpg|jpeg|png|bmp|swf)$
#    {
#          expires      7d;
#          access_log off;
#   }
location ~* ^.+\.(gif|jpg|png|swf|flv|rar|zip|doc|pdf|gz|bz2|jpeg|bmp|xls)$
{
    expires 7d;
    valid_referers none blocked server_names  *.test.com ;
    if ($invalid_referer) {
        return 403;
    }
    access_log off;
}
location ~ .*\.(js|css)$
    {
          expires      12h;
          access_log off;
    }
    access_log /tmp/1.log combined_realip;
}
测试:
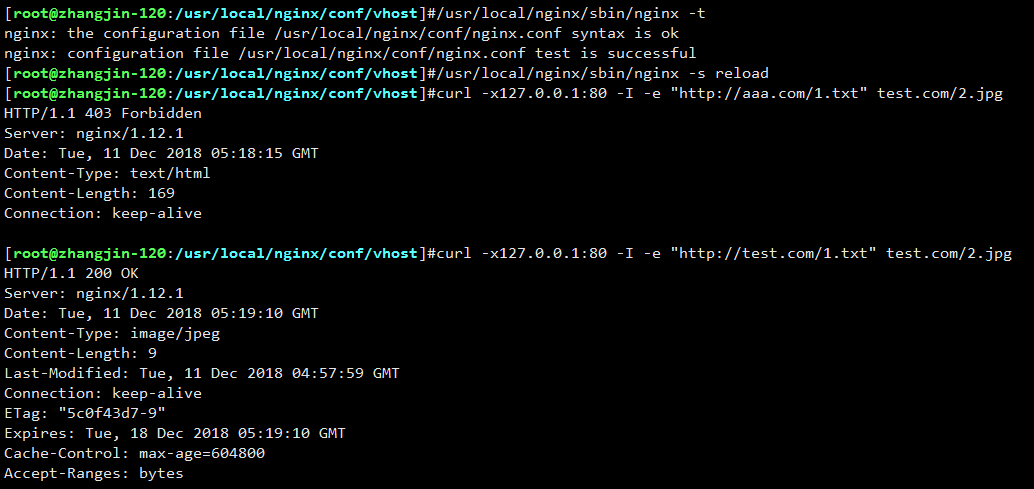
可以看到,不仅仅有过期时间,还有防盗链的功能。
12.14 Nginx访问控制
和httpd一样,Nginx也需要限制某些IP不能访问或者只允许某些IP访问,比如,我们有个需求“使访问admin目录的请求中允许192.168.6.1和127.0.0.1访问”,配置文件加入如下内容:
location /admin/
{
allow 192.168.6.1;
allow 127.0.0.1;
deny all;
}
然后测试一下:

配置文件中的IP也可以为IP段,比如可以写成allow 192.168.6.0/24。如果只拒绝某几个IP,就可以写成这样:
location /admin/
{
deny 192.168.6.1;
deny 127.0.0.1;
}
如果是黑名单的形式,就不需要写allow all了,因为默认就是允许所有。除了这种简单地限制目录外,也可以根据正则匹配来限制:
location ~ .*(abc|image)/.*\.php$
{
deny all;
}
还可以针对user_agent做一些限制:
if ($http_user_agent ~ 'Spider/3.0|YoudaoBot|Tomato')
{
return 403;
}
其中,~为匹配符号,只要user_agent中含有Spider/3.0或者YoudaoBot字符串的,都会被拒绝,return为直接返回403状态码,也可以把它替换为deny all。
12.15 Nginx解析php相关配置
在LAMP中,PHP是作为httpd的一个模块出现的,只在PHP模块被加载,那么就能解析PHP脚本了。而在LNMP中,PHP是以一个服务(php-fpm)的形式存在的,首先要启动php-fpm服务,然后Nginx再和php-fpm通信。也就是说,处理PHP脚本解析的工作是由php-fpm来完成的,Nginx仅仅是一个“搬运工”,它把用户的请求传递给php-fpm,php-fpm处理完成后把结果传递给Nginx,Nginx再把结果返回给用户。那么Nginx是如何和PHP联系起来的呢?
其实test.com.conf配置文件的内容就包含了PHP相关的配置:
server
{
listen 80;
server_name test.com test1.com test2.com;
index index.html index.htm index.php;
root /data/nginx/test.com;
if ($host != 'test.com' ) {
rewrite ^/(.*)$ http://test.com/$1 permanent;
}
location ~ \.php$
{
include fastcgi_params;
fastcgi_pass unix:/tmp/php-fcgi.sock;
fastcgi_index index.php;
fastcgi_param SCRIIPT_FILENAME /data/nginx/test.com$fastcgi_script_name;
}
access_log /tmp/1.log combined_realip;
}
其中,fastcgi_pass用来指定php-fpm的地址,如果php-fpm监听的是一个tcp:port的地址(比如127.0.0.0:9000),那么也需要在这里改成fastcgi_pass 127.0.0.1:9000。这个地址一定要和php-fpm服务监听的地址匹配,否则会报502错误。
factcgi_param SCRIPT_FILENAME后面跟的路径为该站点的根目录,和前面定义的root那个路径保持一致。如果这里配置不对,访问PHP页面会出现404错误。
12.16 Nginx代理
一家公司有很多台服务器,为了节省成本,不能为所有服务器都分配公网IP,而如果一个没有公网IP的服务器要提供Web服务,就可以通过代理来实现。

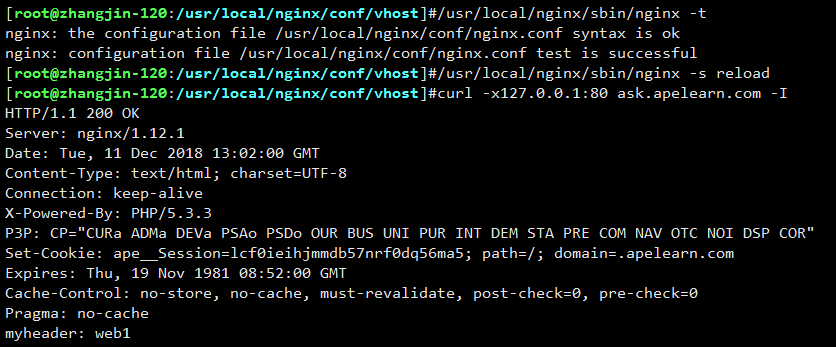
下面来看一下Nginx的代理如何配置:
[root@zhangjin-120:~]#cd /usr/local/nginx/conf/vhost/
[root@zhangjin-120:/usr/local/nginx/conf/vhost]#vim proxy.conf
添加如下内容:
server
{
    listen 80;
    server_name ask.apelearn.com;

    location /
    {
        proxy_pass      http://47.104.7.242/;
        proxy_set_header Host   $host;
        proxy_set_header X-Real-IP      $remote_addr;
        proxy_set_header X-Forwarded-For $proxy_add_x_forwarded_for;
    }
}
proxy_pass指定要代理的域名所在的服务器IP,后面的3行为定义发往后端Web服务器的请求头,第二行必须要有,否则代理不成功,它表示后端Web服务器的域名和当前配置文件中的server_name保持一致,第三行和第四行可以省略。配置文件保存后,重新加载Nginx服务并验证。


 被折叠的 条评论
为什么被折叠?


